

How to connect to wifi via Ethernet

How to connect Ethernet to wifi: first right-click the network icon in the lower right corner, click to open Network and Sharing Center; then click Change Adapter Settings; then right-click Ethernet, click Enable; finally find the one you want to connect to Click to connect to WiFi.

How to connect to wifi via Ethernet:
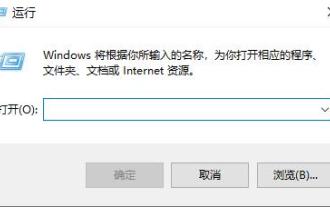
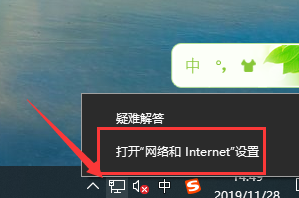
1. First, right-click the network icon in the lower right corner.

#2. Then click to open the Network and Sharing Center.

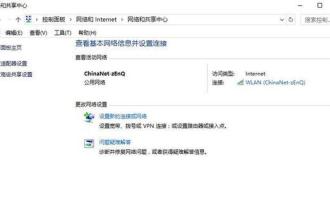
#3. You can see some commonly used function settings in its new page.

#4. Click to change adapter settings.

5. Then right-click Ethernet and select Disable.

#6. Right-click the following icon with the same mouse and click Enable.

#7. This completes the setup.

8. Finally, find the WiFi you want to connect to and click Connect.

The above is the detailed content of How to connect to wifi via Ethernet. For more information, please follow other related articles on the PHP Chinese website!

Hot AI Tools

Undresser.AI Undress
AI-powered app for creating realistic nude photos

AI Clothes Remover
Online AI tool for removing clothes from photos.

Undress AI Tool
Undress images for free

Clothoff.io
AI clothes remover

Video Face Swap
Swap faces in any video effortlessly with our completely free AI face swap tool!

Hot Article
Hot Tools

Notepad++7.3.1
Easy-to-use and free code editor

SublimeText3 Chinese version
Chinese version, very easy to use

Zend Studio 13.0.1
Powerful PHP integrated development environment

Dreamweaver CS6
Visual web development tools

SublimeText3 Mac version
God-level code editing software (SublimeText3)
Hot Topics
 1664
1664
 14
1423
52
1317
25
1268
29
1244
24
14
1423
52
1317
25
1268
29
1244
24

 Win10 Ethernet Enable DHCP Repair Method Guide
Dec 30, 2023 pm 02:23 PM
Win10 Ethernet Enable DHCP Repair Method Guide
Dec 30, 2023 pm 02:23 PM
What happens when Windows 10 Ethernet prompts that dhcp is not enabled? Recently, some users have encountered such a problem when using computers. In order to help everyone use the network better, the editor will share the solution to the problem that Windows 10 Ethernet prompts that dhcp is not enabled. How to fix dhcp not enabled on win10 Ethernet: 1. First press the shortcut key "win+r", and then click run. 2. Then enter services.msc and press Enter. 3. Then you can find the "DHCPClient" service and double-click it to open it. 4. Finally, change the activation type to automatic and the service status to started, then press OK to save the settings and restart the local connection.
 How to connect Xiaoai speakers to wifi? Detailed steps for connecting Xiaoai speakers to wifi network!
Mar 15, 2024 pm 07:28 PM
How to connect Xiaoai speakers to wifi? Detailed steps for connecting Xiaoai speakers to wifi network!
Mar 15, 2024 pm 07:28 PM
Are you curious about how to connect Xiaoai speakers to wifi? Xiaoai Speaker is a very comprehensive smart speaker software. Users can control and configure your AI speaker on their mobile phones, such as adjusting volume, playing music, voice wake-up, etc. Are there any friends who are using it for the first time and don’t know how to set up the wifi connection of Xiaoai speakers? The editor has now compiled the detailed steps for connecting Xiaoai speakers to the wifi network to share with you! If it is helpful to you, please download the software and experience it! 1. How to connect Xiaoai speakers to wifi? Detailed steps for connecting Xiaoai speakers to wifi network! 1. Open the latest version of Xiaoai Speaker app downloaded from this site. The latest version of Xiaoai Speaker app Category: Convenient life Download the latest version of Xiaoai Speaker app is a very convenient smart home service software that can
 What is the difference between Ethernet and Broadband?
Dec 08, 2020 pm 02:28 PM
What is the difference between Ethernet and Broadband?
Dec 08, 2020 pm 02:28 PM
Difference: Ethernet is the most common communication protocol standard used in existing local area networks today. Ethernet transmits information packets at a rate of 10-100Mbps between interconnected devices; broadband is not strictly defined, and is generally demarcated by 56Kbps. Access methods of 56Kbps and below are called "narrowband", and access methods above are classified as "broadband".
 How to enable Ethernet disabling in win10: Detailed steps
Jan 03, 2024 pm 09:51 PM
How to enable Ethernet disabling in win10: Detailed steps
Jan 03, 2024 pm 09:51 PM
Friends who use win10 system often ask how to enable Ethernet disabling. In fact, this operation is very simple. You need to enter the network settings to perform it. Next, I will take you to take a look. How to disable Ethernet in win10: 1. First, click the network connection icon in the lower right corner to open the network and Internet settings. 2. Then click on Ethernet. 3. Then click "Change Adapter Options". 4. At this point, you can right-click "Ethernet" and select Disable.
 How to fix LAN Ethernet driver issues in Windows 11/10
Feb 19, 2024 pm 08:51 PM
How to fix LAN Ethernet driver issues in Windows 11/10
Feb 19, 2024 pm 08:51 PM
If you encounter problems with the LAN Ethernet driver on Windows PC, this article will guide you to solve these problems. Many Windows users have reported that their Ethernet drivers stopped working. This could be due to various reasons such as outdated/faulty drivers, incorrect network configuration, defective network adapters, etc. How to Fix LAN Ethernet Driver Issues in Windows 11/10 If your LAN or Ethernet driver is not working properly on Windows 11/10, you can follow some standard troubleshooting practices to resolve the issue. Update your Ethernet driver. Automatically or manually reinstall the Ethernet driver. Enable your Ethernet adapter. reset your
 How to solve the problem of missing network card in win10?
Dec 22, 2023 pm 02:15 PM
How to solve the problem of missing network card in win10?
Dec 22, 2023 pm 02:15 PM
We often find that when we turn on the computer, the Ethernet of win10 is missing. This is a common computer problem. So how do we solve it? Next, the editor will teach you how to solve this small problem. What to do if the Ethernet is missing in win10? Step 1: Open the Device Manager, first select "Network Adapters", then select "Action, Add Obsolete Hardware (L)". Step 2: Select the option in the red box and click Next. Step 3: Select the network adapter and click Next. Step 4: Select Microsoft on the left, select "Loopback Adapter" on the right, and click Next. Step 5: Finally restart the computer and the Ethernet will come out.
 Steps on how to connect HP 136w printer to wifi. Must read: HP printer wireless connection tutorial
Feb 26, 2024 am 11:19 AM
Steps on how to connect HP 136w printer to wifi. Must read: HP printer wireless connection tutorial
Feb 26, 2024 am 11:19 AM
In fact, it is LAN printer sharing. The method is as follows: 1. Set the IP for the printer. First, plug the network from the router or switch to the printer. 2. Then click Printer Settings - Network Configuration - Wireless Menu. It is best to set a fixed IP for the printer there. Next, download and install the printer driver on your computer. When installing the driver, select the network installation option, so that the computer will automatically search for printers connected to the shared network. Once the installation is complete, the driver will show that the printer has been successfully shared wirelessly. How to connect the printer through a wireless network: 1. Right-click the WiFi icon under the desktop and select "Open Network and Sharing Center". 2. Click the name of the WiFi you are connected to, and a pop-up will appear.
 What is the transmission rate of Gigabit Ethernet?
Sep 28, 2023 pm 01:51 PM
What is the transmission rate of Gigabit Ethernet?
Sep 28, 2023 pm 01:51 PM
Gigabit Ethernet transfer rate is 1 gigabits per second. Detailed introduction: The transmission rate of Gigabit Ethernet is very important for modern network applications. It can meet users' needs for high-speed and reliable network connections and improve work efficiency and user experience. However, achieving Gigabit Ethernet transmission rates requires network equipment support, high-quality twisted pairs, and suitable connection conditions.