

How to cancel shared files

Method to cancel shared files: First find the folder you want to turn off sharing; then right-click to select properties, and click the [Sharing] option; then click the [Advanced Sharing] option in the current page; finally, click [Share] Just uncheck the option "This folder".

How to cancel shared files:
1. Find the folder you want to close sharing.

#2. Then select it, right-click the mouse, and click the Properties option in the menu that appears.

#3. Then click the Share option above in the properties window that opens.

#4. Then you will come to the Sharing Options page, click the Advanced Sharing option on the current page.

5. Then in the advanced sharing window that opens, you can see an option to share this folder, and the check in the box in front of it is checked; Uncheck it and click OK.

The above is the detailed content of How to cancel shared files. For more information, please follow other related articles on the PHP Chinese website!

Hot AI Tools

Undresser.AI Undress
AI-powered app for creating realistic nude photos

AI Clothes Remover
Online AI tool for removing clothes from photos.

Undress AI Tool
Undress images for free

Clothoff.io
AI clothes remover

Video Face Swap
Swap faces in any video effortlessly with our completely free AI face swap tool!

Hot Article
Hot Tools

Notepad++7.3.1
Easy-to-use and free code editor

SublimeText3 Chinese version
Chinese version, very easy to use

Zend Studio 13.0.1
Powerful PHP integrated development environment

Dreamweaver CS6
Visual web development tools

SublimeText3 Mac version
God-level code editing software (SublimeText3)
Hot Topics


 How to fix Microsoft Teams file locked error
Jun 02, 2023 pm 09:17 PM
How to fix Microsoft Teams file locked error
Jun 02, 2023 pm 09:17 PM
Microsoft Teams allows group chats and file sharing among team members. This shared file collaboration in MSTeams allows different users to access and modify shared files from their team clients. To protect shared files from simultaneous editing, Microsoft Teams may lock those files for other users while one of the team members is working on them. However, many users have reported that they see the error file is locked in Microsoft Teams even if the file is not used by any member. In this case, users cannot open, view, and edit files that affect real-time collaboration supported by Teams. If you encounter this error where the file is in the file you are trying to access or edit
 How to set up LAN sharing in Win11
Jun 29, 2023 pm 04:43 PM
How to set up LAN sharing in Win11
Jun 29, 2023 pm 04:43 PM
How to set up LAN sharing in Win11? LAN sharing means that all files in the LAN can be shared and transferred to each other. And the transmission speed is above 1MB/s. In this tutorial, the editor will bring you a tutorial on setting up Win11 LAN sharing. Friends in need can learn about it together. Win11 LAN Sharing Settings Tutorial [Picture and Text] 1. Press the Win+S key combination, or click the search icon on the taskbar, open Windows search, enter Control Panel in the top search box, and then click to open the best match given by the system Control Panel application; 2. Control Panel window, under category view mode, click Network and Internet under Adjust Computer Settings; 3. Network and Internet
 How to configure password-protected access to a shared folder on a local area network
Apr 23, 2024 pm 06:13 PM
How to configure password-protected access to a shared folder on a local area network
Apr 23, 2024 pm 06:13 PM
In modern office scenarios, LAN shared folders are an effective way to promote team collaboration and resource sharing. However, to ensure the security of sensitive information, it is particularly critical to add access passwords to shared folders. Below I will give you detailed instructions on how to set up. Let’s take a look. Setting method 1. First select the folder to be shared, right-click and select "Properties" in the option list. 2. In the window interface that opens, switch to the "Share" option at the top. 3. Then click "Network and Sharing Center" below. 4. Then expand the "All Networks" option. 5. Check "Password protected sharing" and click "Save changes". 6. Then right-click "This PC" on the desktop and select "Manage" in the option list. 7. Enter the new window
 What should I do if win10 cannot access shared files on win7 computer?
Jul 21, 2023 pm 08:25 PM
What should I do if win10 cannot access shared files on win7 computer?
Jul 21, 2023 pm 08:25 PM
In the office process, we often need to use computers to connect to workgroups for file sharing and other operations. However, some netizens said that their win10 cannot access shared files on win7 computers. Often, this is the reason for the wrong setup. The group names shared by win10 and win7 must be the same, and the computer needs to open a special network. The following small side will teach you how to solve the problem that win10 cannot access win7 shares. 1. First find this computer on the desktop. 2. Right-click this computer and click Properties. 3. Find Change Settings on the right side, as shown in the picture below. 4. Find the network ID. 5. There are two options here. One is the office network, also called domain network, and the other is private network. We click on domain network. 6. In this step, we need to pay attention to wi
 How to prevent shared files from being deleted in Win7 system
Jan 31, 2024 pm 11:39 PM
How to prevent shared files from being deleted in Win7 system
Jan 31, 2024 pm 11:39 PM
How to prevent shared files from being deleted in Win7 system When using the Windows 7 operating system, we often encounter situations where shared files are accidentally deleted. Not only will this cause us inconvenience, it may also result in data loss. In order to protect the security of shared files, we can take some measures to prevent them from being deleted. Here are some methods and suggestions to help you protect the security of shared files in Win7 system. 1. Set file permissions: In the properties of a shared folder, you can set file permissions to control who can access, modify, or delete files. By setting appropriate permissions, you can limit access to and modification of shared files, thereby reducing the risk of deletion. 2. Create backups: It is very important to create backups of shared files regularly. this
 How to access Windows shared files in Linux system?
Jan 04, 2024 pm 06:22 PM
How to access Windows shared files in Linux system?
Jan 04, 2024 pm 06:22 PM
The Samba service has been installed by default under Linux. It is very convenient to access Windows shares. Let's take a look at the detailed tutorial below. 1. Establish a windows share 1. First run the command prompt as an administrator. 2. Here I directly create a default share. netsharedown$=c:\baiduyun_download creates a default share named down$. 3. You can check that it has been successfully established through the netshare command. 4. At this time, check the IP address of the Windows machine and execute the ipconfig command. 2. Access the share under deepinlinux 1. Click the launcher on the dock bar and find the terminal.
 How to solve the problem of inaccessible win10 shared folder
Jan 14, 2024 pm 11:36 PM
How to solve the problem of inaccessible win10 shared folder
Jan 14, 2024 pm 11:36 PM
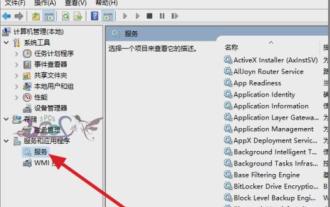
Win10 has been at the top of the operating system rankings since its release. The usage of it by friends is also gradually increasing. However, there are many problems that will occur in win10, so today I will tell you how to solve the problem of inaccessible shared folders in win10. When the problem of inaccessible shared folders occurs on the computer, I believe that friends are confused and don’t know how to solve it. The editor wants to say to this, you don’t have to panic, because you have me, so next the editor will tell you how to solve the problem of inaccessible win10 shared folders. 1. Check whether there are any abnormalities in the shared dependent services. Enter Computer Management, click Service, or enter "service" in the run window.
 How to delete shared files on computer
Dec 15, 2020 pm 05:49 PM
How to delete shared files on computer
Dec 15, 2020 pm 05:49 PM
How to delete shared files on your computer: 1. Open the command prompt; 2. Execute the [net share] command to view the shared directory list; 3. Execute the [net share shared directory /delete] command to delete it.