Understand the Flask project structure

Preface
First, we isolate my project using virtualenv. For example, we want to develop a polling application (a poll app).
mkdir poll_app
cd poll_app
virtualenv .
source bin/activate
Commonly used Python libraries
I am developing an application that requires a database. Therefore, I always use flask_script and flask_migrate libraries. I don't like Flask's CLI tooling.
Flask-Script: https://flask-script.readthedocs.io/en/latest/
Flask-Migrate: https://flask-migrate.readthedocs.io/en/latest/
Similarly to Django, I created a file called manage. py Python file, for example:
from MYAPP.data.models import db
from MYAPP import app
from flask_script import Manager
from flask_migrate import Migrate, MigrateCommand
db.init_app(app)
migrate = Migrate(app, db)
manager = Manager(app)
manager.add_command('db', MigrateCommand)
if __name__ == "__main__":
manager.run()Then, we can perform the following operations on the data:
python manage.py db init # --> init migrations
python manage.py db migrate # --> migrate models
python manage.py db upgrade # --> apply changes
python manage.py db --help # --> :)
Main application file
Create a new project , I create a file app.py in the root folder and then it changes like this.
from MYAPP import app
# To do: This place will change later
config = {
    "development": "config.Development"
}
if __name__ == "__main__":
    app.config.from_object(config["development"])
app.run()Configuration File
I also created a configuration file called config.py in the root folder.
class BaseConfig(object):
    """ Base config class. This fields will use by production and development server """
    ORIGINS = ["*"] # for api calls
    SECRET_KEY = 'YOUR SECRET KEY'
class Development(BaseConfig):
    """ Development config. We use Debug mode """
    PORT = 5000
    DEBUG = True
    TESTING = False
    ENV = 'dev'
# Currently we only have development config.
# If you have production, you will need to pass it to here.
config = {
    'development': 'config.Development'
}
def configure_app(app):
    """
        App configuration will be here.
        Parameters
        ----------
        app : Flask
            app instance
    """
app.config.from_object(config['development'])Folder structure
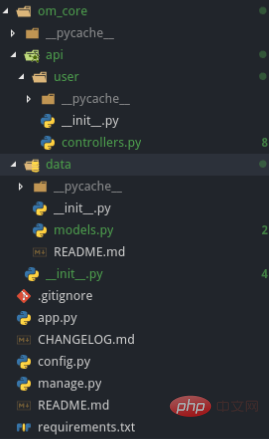
I create a folder in the root directory and name it om_core, and then create two new folders in Qi api and data..
api files store application logic and routing. For example, I created a folder called user in the api.
Generate two files named init.py and controllers.py in the user folder, as will our other API layers. controllers.py (controller file) should look like this:
from flask import Blueprint, jsonify, request
from MYAPP.data.models import db, User
user = Blueprint('user', __name__)
@user.route('/', methods=['GET'])
def get_users():
return jsonify({ "message": "Hi user :)"})
@user.route('/<int:id>', methods=['GET'])
def users(id):
return jsonify({ "id": id })I always use blueprints.
The data folder stores some models. For example, I created a file called models.py:
from flask_sqlalchemy import SQLAlchemy
from MYAPP import app
# We didn't pass app instance here.
db = SQLAlchemy()
class User(db.Model):
    """ Model for user management """
    id = db.Column(db.Integer, primary_key=True)
    email = db.Column(db.String(100), unique=True)
    password = db.Column(db.String(100))
    name = db.Column(db.String(100))
    surname = db.Column(db.String(100))
    active = db.Column(db.Boolean(), default=True)
    created_at = db.Column(db.DateTime, default=db.func.now())
    updated_at = db.Column(db.DateTime, default=db.func.now())
    def __init__(self, email, password, name, surname, active, created_at, updated_at):
        self.email = email
        self.password = password
        self.name = name
        self.surname = surname
        self.active = active
        self.created_at = created_at
self.updated_at = updated_atLet’s go back to the om_core folder. I created a file called init .py to use the Api layer as an endpoint.
from flask import Flask
from flask_cors import CORS
from config import BaseConfig
from config import configure_app
app = Flask(__name__)
from MYAPP.api.user.controllers import user
""" Corst settings will be here. We maybe use this endpoint later. """
cors = CORS(app, resources={
    r'/api/*': {
        'origins': BaseConfig.ORIGINS
    }
})
configure_app(app)
app.url_map.strict_slashes = False
app.register_blueprint(user, url_prefix='/api/users')In the above code, I have used Flask-CORS to allow requests from different origins. This is not required if you do not want to allow requests from different origins.
Screenshots of the overall project structure
The screenshots are as follows:

Recommended tutorial: "Python Tutorial"
The above is the detailed content of Understand the Flask project structure. For more information, please follow other related articles on the PHP Chinese website!

Hot AI Tools

Undresser.AI Undress
AI-powered app for creating realistic nude photos

AI Clothes Remover
Online AI tool for removing clothes from photos.

Undress AI Tool
Undress images for free

Clothoff.io
AI clothes remover

Video Face Swap
Swap faces in any video effortlessly with our completely free AI face swap tool!

Hot Article

Hot Tools

Notepad++7.3.1
Easy-to-use and free code editor

SublimeText3 Chinese version
Chinese version, very easy to use

Zend Studio 13.0.1
Powerful PHP integrated development environment

Dreamweaver CS6
Visual web development tools

SublimeText3 Mac version
God-level code editing software (SublimeText3)

Hot Topics
 1653
1653
 14
14
 1413
1413
 52
52
 1304
1304
 25
25
 1251
1251
 29
29
 1224
1224
 24
24
 PHP and Python: Different Paradigms Explained
Apr 18, 2025 am 12:26 AM
PHP is mainly procedural programming, but also supports object-oriented programming (OOP); Python supports a variety of paradigms, including OOP, functional and procedural programming. PHP is suitable for web development, and Python is suitable for a variety of applications such as data analysis and machine learning.
 Choosing Between PHP and Python: A Guide
Apr 18, 2025 am 12:24 AM
PHP is suitable for web development and rapid prototyping, and Python is suitable for data science and machine learning. 1.PHP is used for dynamic web development, with simple syntax and suitable for rapid development. 2. Python has concise syntax, is suitable for multiple fields, and has a strong library ecosystem.
 PHP and Python: A Deep Dive into Their History
Apr 18, 2025 am 12:25 AM
PHP originated in 1994 and was developed by RasmusLerdorf. It was originally used to track website visitors and gradually evolved into a server-side scripting language and was widely used in web development. Python was developed by Guidovan Rossum in the late 1980s and was first released in 1991. It emphasizes code readability and simplicity, and is suitable for scientific computing, data analysis and other fields.
 Python vs. JavaScript: The Learning Curve and Ease of Use
Apr 16, 2025 am 12:12 AM
Python is more suitable for beginners, with a smooth learning curve and concise syntax; JavaScript is suitable for front-end development, with a steep learning curve and flexible syntax. 1. Python syntax is intuitive and suitable for data science and back-end development. 2. JavaScript is flexible and widely used in front-end and server-side programming.
 How to run sublime code python
Apr 16, 2025 am 08:48 AM
To run Python code in Sublime Text, you need to install the Python plug-in first, then create a .py file and write the code, and finally press Ctrl B to run the code, and the output will be displayed in the console.
 Where to write code in vscode
Apr 15, 2025 pm 09:54 PM
Writing code in Visual Studio Code (VSCode) is simple and easy to use. Just install VSCode, create a project, select a language, create a file, write code, save and run it. The advantages of VSCode include cross-platform, free and open source, powerful features, rich extensions, and lightweight and fast.
 Can vs code run in Windows 8
Apr 15, 2025 pm 07:24 PM
VS Code can run on Windows 8, but the experience may not be great. First make sure the system has been updated to the latest patch, then download the VS Code installation package that matches the system architecture and install it as prompted. After installation, be aware that some extensions may be incompatible with Windows 8 and need to look for alternative extensions or use newer Windows systems in a virtual machine. Install the necessary extensions to check whether they work properly. Although VS Code is feasible on Windows 8, it is recommended to upgrade to a newer Windows system for a better development experience and security.
 How to run python with notepad
Apr 16, 2025 pm 07:33 PM
Running Python code in Notepad requires the Python executable and NppExec plug-in to be installed. After installing Python and adding PATH to it, configure the command "python" and the parameter "{CURRENT_DIRECTORY}{FILE_NAME}" in the NppExec plug-in to run Python code in Notepad through the shortcut key "F6".


