
 Operation and Maintenance
Windows Operation and Maintenance
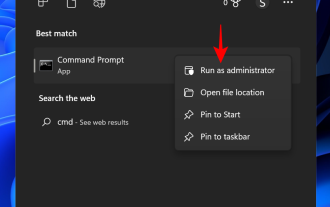
How to enter safe mode from command prompt
Operation and Maintenance
Windows Operation and Maintenance
How to enter safe mode from command prompt
How to enter safe mode from command prompt


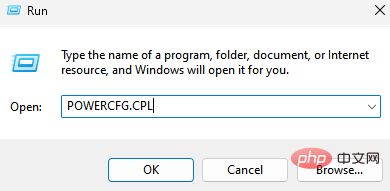
1. Enter the command prompt;
2. Execute the [bcdedit /set {default} safeboot minimal] command;

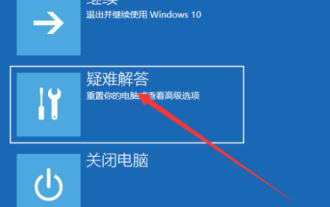
3. Click the [Exit and continue using Windows 10] option, the system will automatically restart and enter safe mode.

Recommended tutorial: windows tutorial
The above is the detailed content of How to enter safe mode from command prompt. For more information, please follow other related articles on the PHP Chinese website!

Hot AI Tools

Undresser.AI Undress
AI-powered app for creating realistic nude photos

AI Clothes Remover
Online AI tool for removing clothes from photos.

Undress AI Tool
Undress images for free

Clothoff.io
AI clothes remover

Video Face Swap
Swap faces in any video effortlessly with our completely free AI face swap tool!

Hot Article
Hot Tools

Notepad++7.3.1
Easy-to-use and free code editor

SublimeText3 Chinese version
Chinese version, very easy to use

Zend Studio 13.0.1
Powerful PHP integrated development environment

Dreamweaver CS6
Visual web development tools

SublimeText3 Mac version
God-level code editing software (SublimeText3)
Hot Topics


 How to remove graphics card driver in safe mode
Feb 20, 2024 am 11:57 AM
How to remove graphics card driver in safe mode
Feb 20, 2024 am 11:57 AM
How to uninstall the graphics card driver in safe mode With the continuous development of technology, computers have become one of the indispensable tools in people's lives and work. In the process of daily use of computers, netizens often encounter various problems, among which graphics card driver problems are a relatively common one. When there is a problem with the graphics card driver, sometimes we need to uninstall the driver in safe mode. This article will introduce the steps on how to uninstall the graphics card driver in safe mode. What is safe mode? Safe mode is a special mode used to repair and resolve computer problems. When electricity
 10 Ways to Fix Corrupted Registry Keys in Windows 11: A Step-by-Step Guide
May 15, 2023 pm 04:10 PM
10 Ways to Fix Corrupted Registry Keys in Windows 11: A Step-by-Step Guide
May 15, 2023 pm 04:10 PM
Click to enter: ChatGPT tool plug-in navigation. Ordinary Windows users may never have to access the Windows registry, but various applications and Windows services do. If the registry keys go bad, you will experience various issues such as higher CPU usage, random system crashes, extended startup and shutdown times, and sub-par global performance. Needless to say, the registry must remain functioning properly. What is the Windows Registry? The Windows Registry is a system-wide repository of files and settings that stores important information about Windows, user preferences, applications, hardware, and many other important parts that make up your personal computer. This data is stored in "
 7 Ways to Access Shared Folders on Windows 11 (And 6 Fixes if You Can't)
May 15, 2023 pm 06:28 PM
7 Ways to Access Shared Folders on Windows 11 (And 6 Fixes if You Can't)
May 15, 2023 pm 06:28 PM
Sharing folders and accessing folders are two parts of the process. If the folder has been shared over a network, the recipient still needs to access it from his/her system. There are many ways to do this, and there are many built-in traps to maintain security. 6 Ways to Access Shared Folders on Windows 11 Here are seven ways to access shared folders on Windows 11, listed in ascending order of difficulty. Method 1: Accessing the shared folder through File Explorer (Network side pane) is the easiest way. All you need to do is: Press Win+E to open File Explorer. Click Network in the side panel. Double-click the computer name of the shared folder. If prompted, use the account that shared the folder
 How to fix 'Windows Resource Protection found corrupt files but was unable to repair some of them' on Windows 11 or 10
Jun 03, 2023 pm 03:29 PM
How to fix 'Windows Resource Protection found corrupt files but was unable to repair some of them' on Windows 11 or 10
Jun 03, 2023 pm 03:29 PM
Click to enter: ChatGPT Tool Plug-in Navigation What is CSRC scanning? System File Checker is a Windows utility that helps repair corrupted system files and registry keys. The scan is launched from the Terminal application and can check the authenticity of files and repair corrupted files by replacing them with functional files from the source. The SFC utility does the job effortlessly. All you have to do is open a command prompt, enter the SFC /scannow command, and let the utility fix the problem on its own. In most cases, this is a quick and easy process. However, there are situations where corrupted system files cannot be repaired. In these cases, you may see the error message "W
 How to install GitHub Desktop on Windows 11 or 10?
May 25, 2023 pm 03:51 PM
How to install GitHub Desktop on Windows 11 or 10?
May 25, 2023 pm 03:51 PM
Step 1: Download GitHubDesktop If you don’t want to use the command line to install GitHubDesktop, you can download it manually from the official website. Visit the link and use the "Download for Windows 64-bit" button to get the executable installation file on your system. When you click on it, a popup will appear to save the GitHubDesktopSetup-x64.exe file. Step 2: Install GitHub Desktop on Windows 11 or 10 After completing the download process, the installation file will be on your system. Double-click it to start the installation process of GitHubDesktop. Wait a few seconds, the system will automatically
 How to change hard drive shutdown after idle time in Windows 11
May 16, 2023 am 08:58 AM
How to change hard drive shutdown after idle time in Windows 11
May 16, 2023 am 08:58 AM
While hard drives are more readily available and faster these days, they still end up consuming a lot of power, especially on laptops. The hard drive consumes more power and ends up draining the laptop's battery faster than it should, so users prefer to turn off the hard drive after idle time. This feature was introduced in Windows 10’s power management options and helps extend your laptop’s battery life. While it may be enabled automatically on systems with a Balanced Power Plan or a Power Saver Plan, you can also turn this feature on manually. This will shut down the hard drive whenever your PC is idle for the selected period of time. This, in turn, will automatically use less power, saving your laptop's battery life. However, when you want to use your PC again,
 A simple tutorial to enter safe mode in dellwin10
Dec 30, 2023 pm 12:49 PM
A simple tutorial to enter safe mode in dellwin10
Dec 30, 2023 pm 12:49 PM
How to enter the safe mode of Dell computer win10 system? When our computer has a driver error or other minor faults, entering safe mode is a good solution. Today I will teach you how to enter safe mode on Dell. How to enter safe mode in dellwin10 1. Click the Start button, select Power, hold down the shift key on the keyboard, and then click "Restart". 2. After restarting, enter the menu and select "Troubleshooting" first. 3. Then select "Advanced Options". 4. Then select "Startup Settings". 5. At this point, click "Restart" to enter the "Safe Mode" selection menu. 6. You can choose the type of entry according to the situation at that time.
 How to correctly use the win10 command prompt for automatic repair operations
Dec 30, 2023 pm 03:17 PM
How to correctly use the win10 command prompt for automatic repair operations
Dec 30, 2023 pm 03:17 PM
The longer the computer is used, the more likely it is to malfunction. At this time, friends need to use their own methods to repair it. So what is the easiest way to do it? Today I will bring you a tutorial on how to repair using the command prompt. How to use win10 automatic repair command prompt: 1. Press "Win+R" and enter cmd to open the "command prompt" 2. Enter chkdsk to view the repair command 3. If you need to view other places, you can also add other partitions such as "d" 4. Enter the execution command chkdskd:/F. 5. If it is occupied during the modification process, you can enter Y to continue.
