

Redis persistence full version

Introduction to persistence
RDB
AOF
The difference between RDB and AOF
Persistence application scenarios
For the persistence function, it is actually very simple and not that complicated
Demo environment
##1. Introduction to persistence
All data in redis is stored in memory. If redis crashes, the data will be lost. Redis persistence is to save data on disk. The working mechanism that uses permanent storage media to save data processes and restore the saved data at a specific time is called persistence.
What is saved in the persistence process?
The first snapshot form stores data results and focuses on the data, which is the RDB that will be discussed below
The second type of operation process, the storage operation process, focuses on the data operation process, which is the AOF that will be discussed below
2. RDB
2-1 RDB startup mode -- save command
The following figure is the configuration information of redis.conf. After execution After saving, a dump.rdb file will be generated
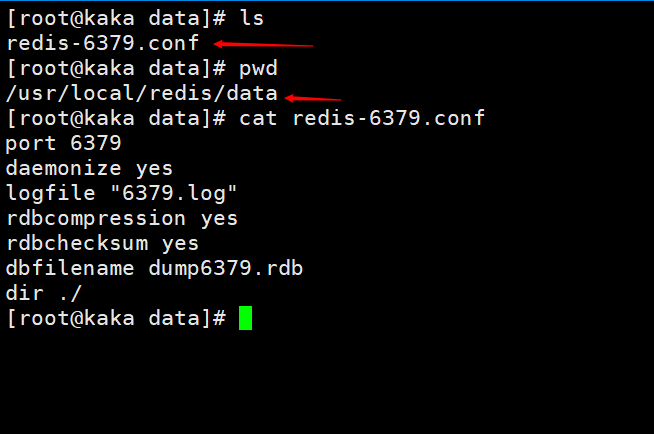
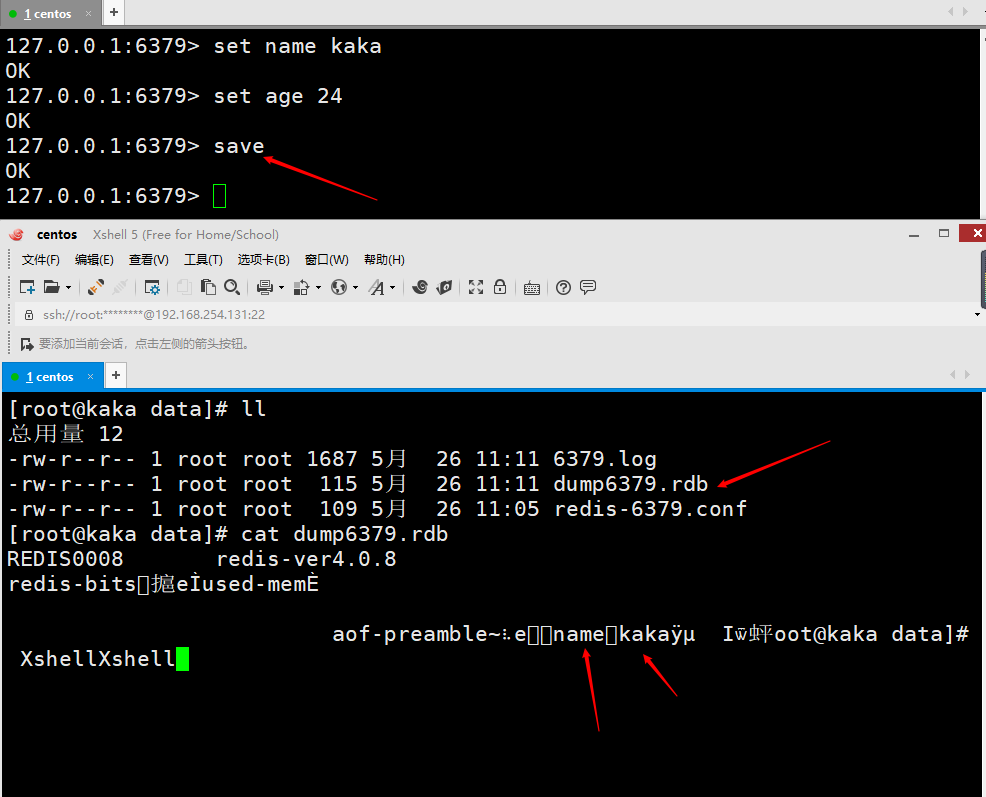
Now we set a value and then save it in /usr/local/redis/data There will be a file dump6379.rdb
2-2 How to use RDB save
- dbfilename dump6379.rdb: Set the RDB file name, the default value is dump.rdb
- dir: The path to store the rdb or aof file
- rdbcompression yes: Set whether to compress the data when storing, The default is yes, using lzf compression
- rdbchecksum yes: Set whether to perform RDB file format verification. This verification process is performed during both writing and reading files
2-3 RDB data recovery
In fact, compared to other relational database recovery, this data recovery basically requires no operation. Just restart it
2-4 RDB -- how the save command works
When you When executing save, instructions from other clients requesting redis will wait until the save instruction is completed. Because the save instruction is executed in a single thread, once the execution time is too long, it will directly cause other users to be unable to store data normally. So this command is abandoned by default. The bgsave introduced below will be used instead
2-5 RDB -- How the bgsave command works
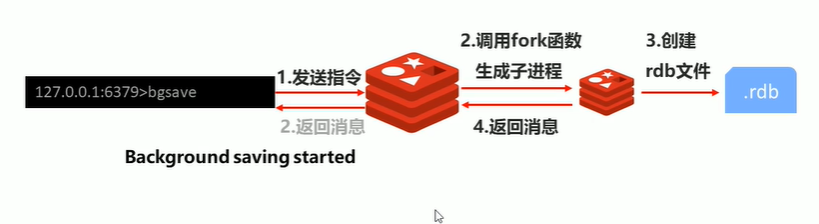
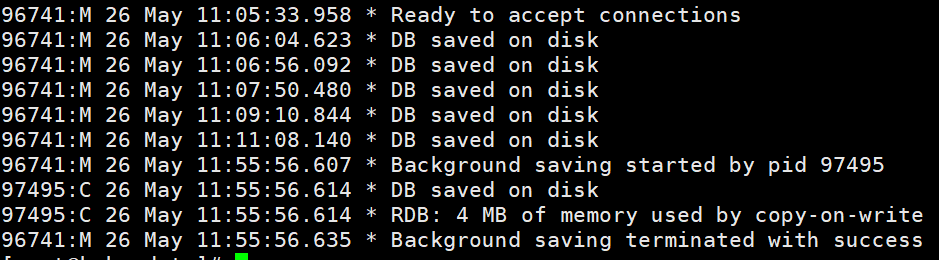
When bgsave is executed in redis Will directly return a Background saving started
At this time we are looking at the log file. The bgsave command is optimized for the save blocking problem
2-5 RDB -- Configuration file auto-start
以下配置是默认配置
save 900 1
save 300 10
save 60 10000
stop-writes-on-bgsave-error yes
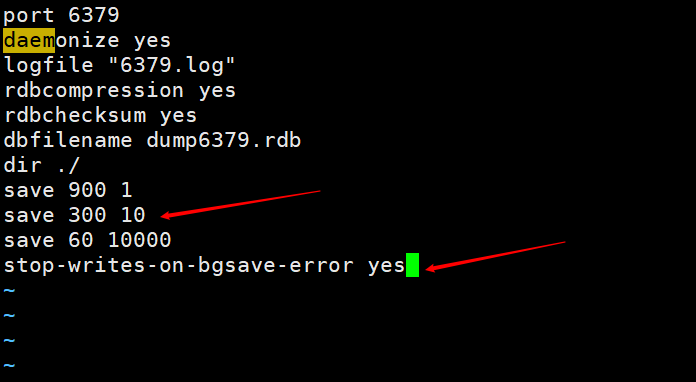
save [Time] [Amount of key changes]
That is to say, if 10 key values change in 300 seconds, bgsave will be executed in the background
3. AOF
3-1 AOF concept
AOF files store the process of executing command operations, and data recovery is also restored using the operation process.
3-2 AOF data writing process
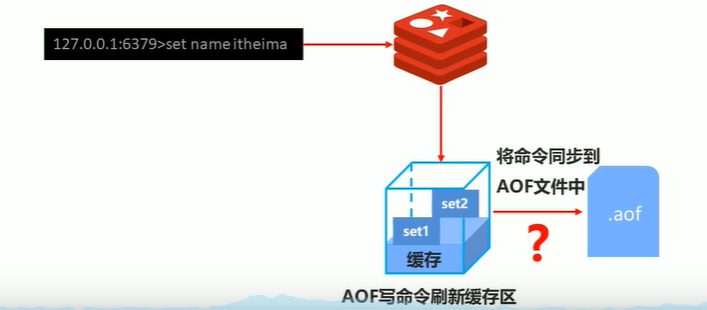
Execute a redis command
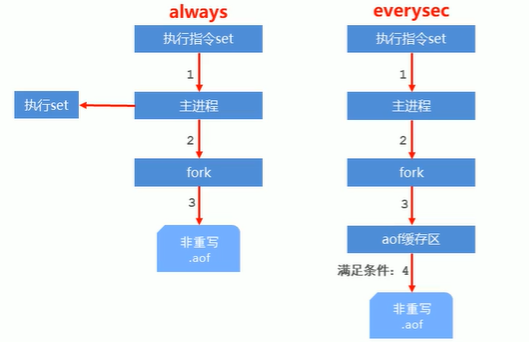
- #always: The executed commands will be stored in the AOF file, with zero data error and low performance. It is not recommended to use
- everysec: Synchronizes the instructions in the buffer to the AOF file every second. It has higher data accuracy and higher performance. It is recommended and is also the default configuration. However, if the system suddenly crashes, the data within 1 second will be lost.
- no: The operating system controls the cycle of each synchronization to the AOF file, and the overall process is uncontrollable
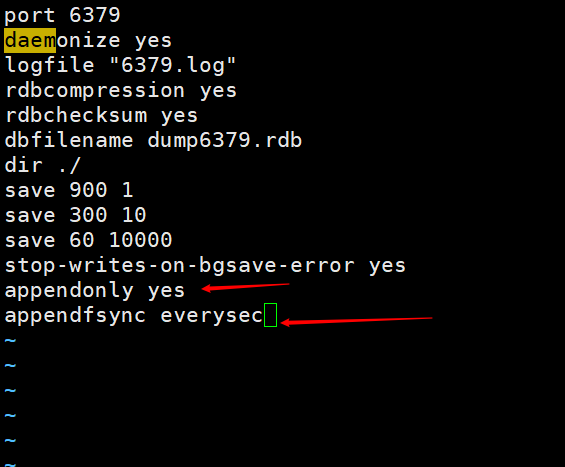
- Configuration:
appendonly yes|no - Function: Whether to enable AOF persistence function, the default is not enabled
- Configuration:
appendfsync always| everysec | no - Function: AOF write data strategy
- Configuration: appendfilename filename
- Function: AOF persistent file name, the default name is appendonly.aof
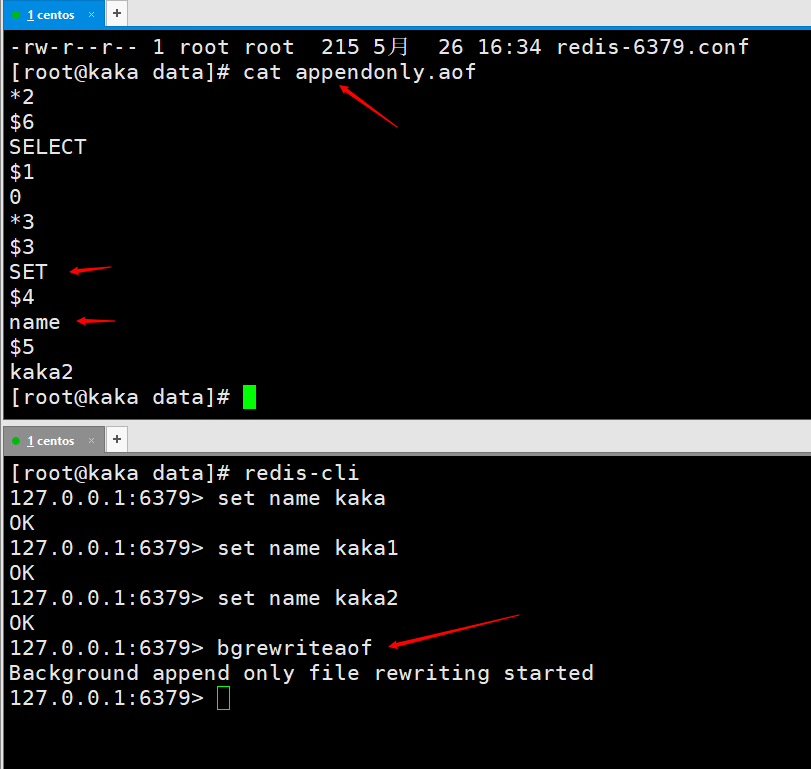
Then use restart the redis service, you can use the usr/local/redis/data directory You can see the appendonly.aof file below
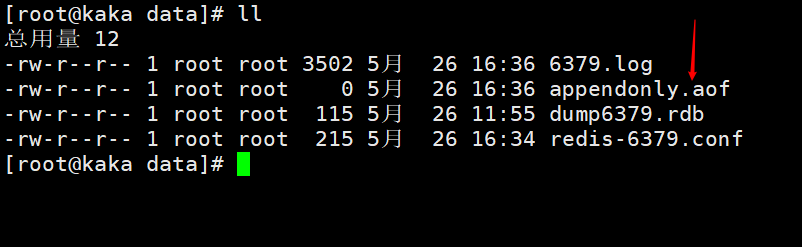
Then we execute a command on the redis client and check it out. You can see that the data will be stored in the file appendonly.aof.

3-5 Problems with AOF writing data
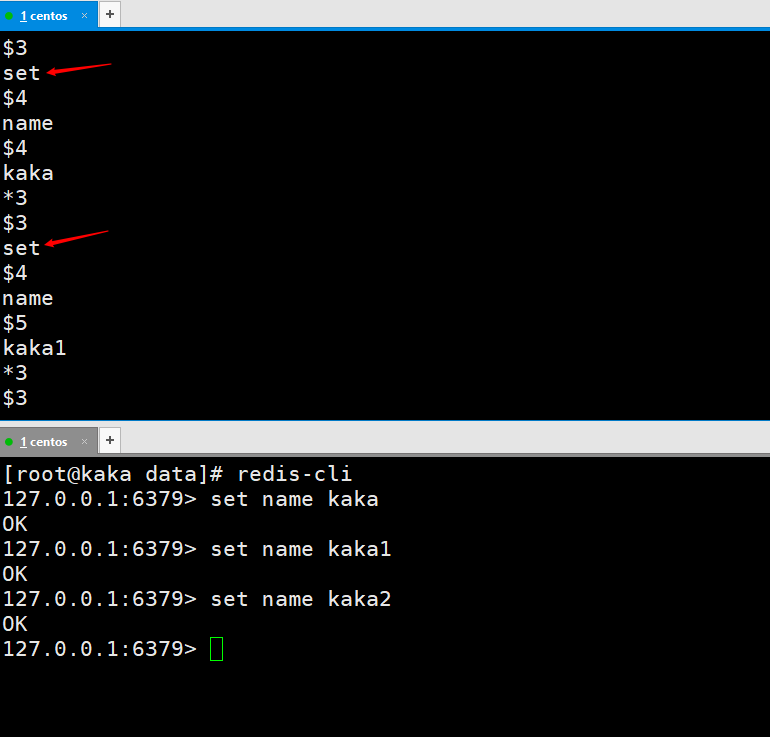
Let's look at a case first. After we repeatedly set the name key, we opened the appendonly.aof file to view it. We can see that there are three operations, but these three operations are all modified by one key! Can't we only save the last key? With this question, we continue to look down
Also, the speed of data recovery will be faster.
It will also improve the efficiency of persistence.
3-7 AOF rewriting Rules
- The timed-out data in the process will no longer be written to the file
- Ignore deletion instructions, such as del,
hdel, srem. There is also the problem mentioned in 3-5. Continuous operations on a key - Multiple write records of the same data are merged into one record: such as
lpush list a lpush lsit b lpush list ccan be converted intolpush list a b c.
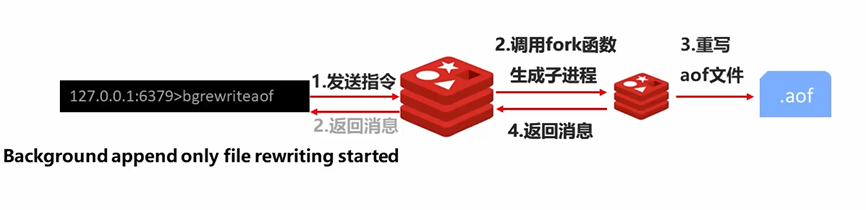
3-8 AOF manual rewrite
Command: bgrewriteaof
Following our questions 3-5, we execute the bgrewriteaof command on the command line and then view the appendonly.aof file
After execution, you will find that the file has become smaller and there is only one instruction in the file
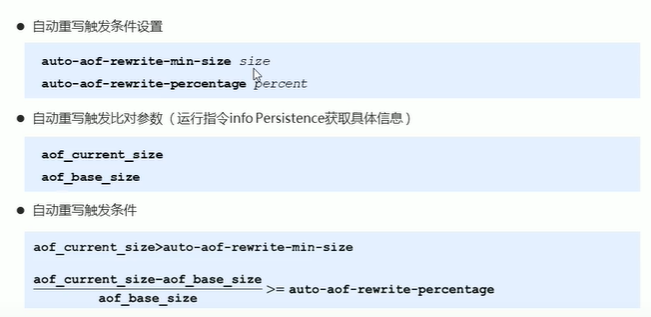
##3-10 AOF automatic rewrite
Configuration:
Trigger comparison parameters:
When aof_current_size > auto-aof-rewrite-min-size 64mb will start rewriting
This picture comes from the Internet
The above is all the content of redis persistence. 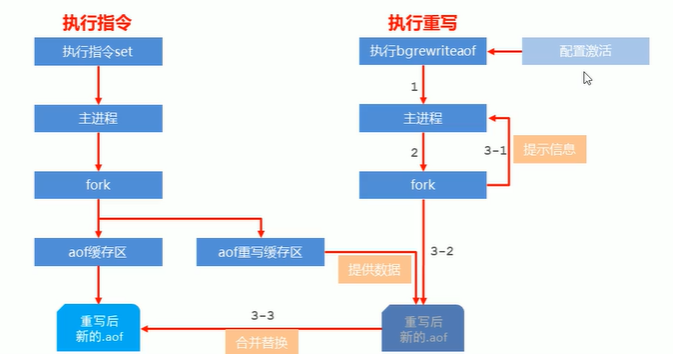 ##
##4. Summary
The above is the detailed content of Redis persistence full version. For more information, please follow other related articles on the PHP Chinese website!

Hot AI Tools

Undresser.AI Undress
AI-powered app for creating realistic nude photos

AI Clothes Remover
Online AI tool for removing clothes from photos.

Undress AI Tool
Undress images for free

Clothoff.io
AI clothes remover

Video Face Swap
Swap faces in any video effortlessly with our completely free AI face swap tool!

Hot Article
Hot Tools

Notepad++7.3.1
Easy-to-use and free code editor

SublimeText3 Chinese version
Chinese version, very easy to use

Zend Studio 13.0.1
Powerful PHP integrated development environment

Dreamweaver CS6
Visual web development tools

SublimeText3 Mac version
God-level code editing software (SublimeText3)
Hot Topics


 How to build the redis cluster mode
Apr 10, 2025 pm 10:15 PM
How to build the redis cluster mode
Apr 10, 2025 pm 10:15 PM
Redis cluster mode deploys Redis instances to multiple servers through sharding, improving scalability and availability. The construction steps are as follows: Create odd Redis instances with different ports; Create 3 sentinel instances, monitor Redis instances and failover; configure sentinel configuration files, add monitoring Redis instance information and failover settings; configure Redis instance configuration files, enable cluster mode and specify the cluster information file path; create nodes.conf file, containing information of each Redis instance; start the cluster, execute the create command to create a cluster and specify the number of replicas; log in to the cluster to execute the CLUSTER INFO command to verify the cluster status; make
 How to clear redis data
Apr 10, 2025 pm 10:06 PM
How to clear redis data
Apr 10, 2025 pm 10:06 PM
How to clear Redis data: Use the FLUSHALL command to clear all key values. Use the FLUSHDB command to clear the key value of the currently selected database. Use SELECT to switch databases, and then use FLUSHDB to clear multiple databases. Use the DEL command to delete a specific key. Use the redis-cli tool to clear the data.
 How to read redis queue
Apr 10, 2025 pm 10:12 PM
How to read redis queue
Apr 10, 2025 pm 10:12 PM
To read a queue from Redis, you need to get the queue name, read the elements using the LPOP command, and process the empty queue. The specific steps are as follows: Get the queue name: name it with the prefix of "queue:" such as "queue:my-queue". Use the LPOP command: Eject the element from the head of the queue and return its value, such as LPOP queue:my-queue. Processing empty queues: If the queue is empty, LPOP returns nil, and you can check whether the queue exists before reading the element.
 How to use the redis command
Apr 10, 2025 pm 08:45 PM
How to use the redis command
Apr 10, 2025 pm 08:45 PM
Using the Redis directive requires the following steps: Open the Redis client. Enter the command (verb key value). Provides the required parameters (varies from instruction to instruction). Press Enter to execute the command. Redis returns a response indicating the result of the operation (usually OK or -ERR).
 How to use redis lock
Apr 10, 2025 pm 08:39 PM
How to use redis lock
Apr 10, 2025 pm 08:39 PM
Using Redis to lock operations requires obtaining the lock through the SETNX command, and then using the EXPIRE command to set the expiration time. The specific steps are: (1) Use the SETNX command to try to set a key-value pair; (2) Use the EXPIRE command to set the expiration time for the lock; (3) Use the DEL command to delete the lock when the lock is no longer needed.
 How to configure Lua script execution time in centos redis
Apr 14, 2025 pm 02:12 PM
How to configure Lua script execution time in centos redis
Apr 14, 2025 pm 02:12 PM
On CentOS systems, you can limit the execution time of Lua scripts by modifying Redis configuration files or using Redis commands to prevent malicious scripts from consuming too much resources. Method 1: Modify the Redis configuration file and locate the Redis configuration file: The Redis configuration file is usually located in /etc/redis/redis.conf. Edit configuration file: Open the configuration file using a text editor (such as vi or nano): sudovi/etc/redis/redis.conf Set the Lua script execution time limit: Add or modify the following lines in the configuration file to set the maximum execution time of the Lua script (unit: milliseconds)
 How to use the redis command line
Apr 10, 2025 pm 10:18 PM
How to use the redis command line
Apr 10, 2025 pm 10:18 PM
Use the Redis command line tool (redis-cli) to manage and operate Redis through the following steps: Connect to the server, specify the address and port. Send commands to the server using the command name and parameters. Use the HELP command to view help information for a specific command. Use the QUIT command to exit the command line tool.
 How to optimize the performance of debian readdir
Apr 13, 2025 am 08:48 AM
How to optimize the performance of debian readdir
Apr 13, 2025 am 08:48 AM
In Debian systems, readdir system calls are used to read directory contents. If its performance is not good, try the following optimization strategy: Simplify the number of directory files: Split large directories into multiple small directories as much as possible, reducing the number of items processed per readdir call. Enable directory content caching: build a cache mechanism, update the cache regularly or when directory content changes, and reduce frequent calls to readdir. Memory caches (such as Memcached or Redis) or local caches (such as files or databases) can be considered. Adopt efficient data structure: If you implement directory traversal by yourself, select more efficient data structures (such as hash tables instead of linear search) to store and access directory information
