

How to initialize yii2 advanced version


To initialize the yii2 environment, you need to execute the script: (under the root directory of yii2)
./init
(recommended related tutorials: yii framework)
The log during the execution process is as follows:
[root@nsyong advanced]# ls
backend  common  composer.json  composer.lock  console  environments  frontend  init  init.bat  LICENSE.md  README.md  requirements.php  tests  vendor  yii.bat
[root@nsyong advanced]# ./init
Yii Application Initialization Tool v1.0

Which environment do you want the application to be initialized in?

  [0] Development
  [1] Production

  Your choice [0-1, or "q" to quit] 0

  Initialize the application under 'Development' environment? [yes|no] yes

  Start initialization ...

   generate backend/config/main-local.php
   generate backend/config/params-local.php
   generate backend/web/index.php
   generate backend/web/index-test.php
   generate frontend/config/main-local.php
   generate frontend/config/params-local.php
   generate frontend/web/index.php
   generate frontend/web/index-test.php
   generate console/config/main-local.php
   generate console/config/params-local.php
   generate yii
   generate common/config/main-local.php
   generate common/config/params-local.php
   generate cookie validation key in backend/config/main-local.php
   generate cookie validation key in frontend/config/main-local.php
      chmod 0777 backend/runtime
      chmod 0777 backend/web/assets
      chmod 0777 frontend/runtime
      chmod 0777 frontend/web/assets
      chmod 0755 yii
      chmod 0755 tests/codeception/bin/yii

  ... initialization completed.

[root@nsyong advanced]# ls
backend common composer.json composer.lock console environments frontend init init.bat LICENSE.md README.md requirements.php tests vendor yii yii.batAfter the initialization is completed, the yii file will appear, as well as some other file initialization configurations, modification of file permissions, etc.
For more programming-related content, please pay attention to the Introduction to Programming column on the php Chinese website.
The above is the detailed content of How to initialize yii2 advanced version. For more information, please follow other related articles on the PHP Chinese website!

Hot AI Tools

Undresser.AI Undress
AI-powered app for creating realistic nude photos

AI Clothes Remover
Online AI tool for removing clothes from photos.

Undress AI Tool
Undress images for free

Clothoff.io
AI clothes remover

Video Face Swap
Swap faces in any video effortlessly with our completely free AI face swap tool!

Hot Article
Hot Tools

Notepad++7.3.1
Easy-to-use and free code editor

SublimeText3 Chinese version
Chinese version, very easy to use

Zend Studio 13.0.1
Powerful PHP integrated development environment

Dreamweaver CS6
Visual web development tools

SublimeText3 Mac version
God-level code editing software (SublimeText3)
Hot Topics


 Windows cannot initialize the device driver for this hardware (code 37) fix
Apr 14, 2023 pm 01:22 PM
Windows cannot initialize the device driver for this hardware (code 37) fix
Apr 14, 2023 pm 01:22 PM
When Windows detects that a device's driver is incompatible or corrupt, it cannot initialize it. The device stops working and when the user investigates, a "Windows cannot initialize the device driver for this hardware (Code 37)" error message appears in the Device Status pane. Solving this problem is easy and you can do it easily. Fix 1 – Scan your computer You can scan your device for any hardware changes. Windows will eventually check and detect any driver changes. 1. You just need to right-click on the "Windows Key" and click on "Device Manager". 2. When Device Manager appears on your system, click Actions on the menu bar. 3. Here,
 FIX: Windows cannot initialize the device driver for this hardware
Apr 13, 2023 pm 01:19 PM
FIX: Windows cannot initialize the device driver for this hardware
Apr 13, 2023 pm 01:19 PM
Error code 37 means that Windows has detected a problem with the device driver and cannot start the hardware device. This means that the software device driver is not installed correctly on your system, or the hardware you are trying to use is not compatible with Windows. You already know that drivers are crucial for the smooth functioning of your device, so if you are going to use a hardware device, you need to resolve this error immediately. In this article, we will show you various ways to bypass this error. What causes Windows error code 37? When you get Windows cannot initialize the device driver for this hardware. (Code 37) message, it can be caused by several issues, including: Compatibility Issues – When you add a hard
 What to do if the dynamic link library initialization routine fails
Dec 29, 2023 am 10:30 AM
What to do if the dynamic link library initialization routine fails
Dec 29, 2023 am 10:30 AM
Solution: 1. Reinstall the application; 2. Repair or reinstall the DLL; 3. System restore or checkpoint recovery; 4. Scan using System File Checker (SFC); 5. Check startup items and services; 6. Use Tools; 7. Check official documentation or forums; 8. Consider security software; 9. Check the event viewer; 10. Seek expert help, etc.
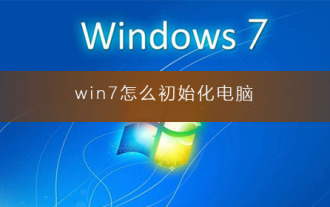 How to initialize the computer in win7
Jan 07, 2024 am 11:53 AM
How to initialize the computer in win7
Jan 07, 2024 am 11:53 AM
The win7 system is a very excellent high-performance system. During the continuous use of win7, many friends are asking how to initialize the computer in win7! Today, the editor will bring you how to restore the factory settings of a win7 computer. Related information on how to initialize the computer in win7: Detailed instructions with pictures and text. Steps: 1. Open the "Start Menu" and enter. 2. Click to enter the settings at the bottom of the left side. 3. In the Win10 update and recovery settings interface, select. 4. Click below "Remove all content and reinstall Windows". 5. You can see the following "Initialization" settings, and then click. 6. Enter the "Your computer has multiple drives" setting option. There are two options here, you can choose according to the situation.
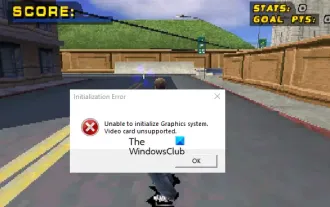 Fix Unable to initialize graphics system error on PC
Mar 08, 2024 am 09:55 AM
Fix Unable to initialize graphics system error on PC
Mar 08, 2024 am 09:55 AM
Many gamers have encountered the frustrating issue of the game failing to initialize the graphics system. This article will delve into the common reasons behind this problem and find simple yet effective solutions that will get you back on the board and beating the level in no time. So, if you are getting Unable to initialize graphics system error message in Rollercoaster Tycoon, Assassin’s Creed, Tony Hawk’s Pro Skater, etc., then follow the solutions mentioned in this article. Initialization error Unable to initialize the graphics system. Graphics cards are not supported. Fix the Unable to initialize the graphics system error message To resolve the Unable to initialize the graphics system error in games like Rollercoaster Tycoon, Assassin's Creed, Tony Hawk's Pro Skater, etc., you can try the following workarounds: Update your graphics card driver in Compatibility Mode
 How to reset win7 network settings
Dec 26, 2023 pm 06:51 PM
How to reset win7 network settings
Dec 26, 2023 pm 06:51 PM
The win7 system is a very excellent high-performance system. Recently, many friends of the win7 system are looking for how to initialize the network settings in win7. Today, the editor will bring you the details of win7 computer network initialization. Let’s take a look at the tutorial. Detailed tutorial on how to initialize network settings in win7: Graphical steps: 1. Click the "Start" menu, find and open the "Control Panel", and then click "Network and Sharing Center". 2. Then find and click "Change Adapter Device". 3. Next, in the window that opens, right-click "Local Area Connection" and then click "Properties". 4. After opening it, find "Internet Protocol Version (TCP/IPv4)" and double
 Fix: New SSD not showing up in Windows 11, 10
Apr 14, 2023 pm 02:52 PM
Fix: New SSD not showing up in Windows 11, 10
Apr 14, 2023 pm 02:52 PM
SSDs have revolutionized the world of technology. These data storage solutions, with their ultra-fast and unparalleled read/write speeds, make every user eager to install their system operating system in them. But what if your new SSD doesn’t show up on your Windows device? This is a typical issue you might face with a brand new SSD plugged into your system. Don't worry. We just got the right solution, all you have to do is follow these steps and your SSD will be back in your File Explorer in no time. Solution - 1. Check the SSD connection. If you are using a USB hub, connect the SSD directly to your system. Check the SSD's connectors for any physical defects.
 C++ program initialization dictionary
Sep 09, 2023 pm 07:01 PM
C++ program initialization dictionary
Sep 09, 2023 pm 07:01 PM
C++ differs from Python in terms of a dictionary with the same name, but it has the same data structure with similar functionality. C++ supports mapping, which can be used in the STL class std::map. The map object contains a pair of values in each entry, one is the key value and the other is the map value. Key values are used to search for and uniquely identify entries in the map. While mapped values are not necessarily unique, key values must always be unique in the map. Let's take a look at how to use mapping. First, let's see how to define a mapped data structure in C++. Syntax #includemap<data_type1,data_type2>myMap; Let’s take an example to see how to do this − Example #incl
