

Introduction to 4 methods of converting HTML to PDF (with code)

This article brings you an introduction to 4 methods of converting HTML to PDF (with code). It has certain reference value. Friends in need can refer to it. I hope it will be helpful to you.
In this article, I will show you how to generate PDF documents from complexly styled React pages using Node.js, Puppeteer, headless Chrome, and Docker.
Background: A few months ago, a client asked us to develop a feature where users could get React page content in PDF format. This page is basically a report and data visualization of a patient case, with lots of SVGs included. There are also special requests to manipulate layout and perform some rearrangements of HTML elements. So there should be different styling and extra content in the PDF compared to the original React page.
Since this task is much more complex than solving it with simple CSS rules, we first explore possible ways to achieve it. We found 3 main solutions. This blog post will guide you through their possibilities and eventual implementation.
Is it generated on the client side or on the server side?
PDF files can be generated on both the client and server sides. But it probably makes more sense to let the backend handle it, since you don't want to use up all the resources the user's browser can provide.
Even so, I will still show the solution for both methods.
Option 1: Make a screenshot from the DOM
At first glance, this solution seems to be the simplest, and it turns out to be the case, but it has its own limitations. This is an easy-to-use method if you don't have special needs, such as selecting text in a PDF or performing a search on text.
This method is simple and straightforward: create a screenshot from the page and put it into a PDF file. Very straightforward. We can use two packages to achieve this:
- Html2canvas, which generates screenshots based on DOM
- jsPdf, a library that generates PDF
Start coding:
npm install html2canvas jspdf
import html2canvas from 'html2canvas'
import jsPdf from 'jspdf'

function printPDF () {
    const domElement = document.getElementById('your-id')
    html2canvas(domElement, { onclone: (document) => {
      document.getElementById('print-button').style.visibility = 'hidden'
}})
    .then((canvas) => {
        const img = canvas.toDataURL('image/png')
        const pdf = new jsPdf()
        pdf.addImage(imgData, 'JPEG', 0, 0, width, height)
        pdf.save('your-filename.pdf')
})That’s it!
Please note the onclone method of html2canvas. It's very handy when you need to manipulate the DOM before taking a screenshot (e.g. hiding the print button). I've seen many projects using this package. But unfortunately, this is not what we want because we need to do the creation of the PDF on the backend.
Option 2: Just use the PDF library
There are several libraries on NPM, such as jsPDF (as mentioned above) or PDFKit. The problem with them is that if I want to use these libraries, I will have to restructure the page. This definitely hurts maintainability as I would need to apply all subsequent changes to both the PDF template and the React page.
Please see the code below. You need to manually create the PDF document yourself. You need to walk through the DOM and find each element and convert it to PDF format, which is a tedious job. An easier way must be found.
doc = new PDFDocument
doc.pipe fs.createWriteStream('output.pdf')
doc.font('fonts/PalatinoBold.ttf')
   .fontSize(25)
   .text('Some text with an embedded font!', 100, 100)

doc.image('path/to/image.png', {
   fit: [250, 300],
   align: 'center',
   valign: 'center'
});

doc.addPage()
   .fontSize(25)
   .text('Here is some vector graphics...', 100, 100)

doc.end()This code snippet comes from the PDFKit documentation. But it can still be useful if your goal is to generate a PDF file directly, rather than converting an existing (and ever-changing) HTML page.
Final Solution 3: Puppeteer and Headless Chrome based on Node.js
What is Puppeteer? Its documentation reads:
Puppeteer is a Node library that provides a high-level API to control Chrome or Chromium on the DevTools protocol. Puppeteer runs Chrome or Chromium in headless mode by default, but it can also be configured to run in full (non-headless) mode.
It is essentially a browser that can be run from Node.js. If you read its documentation, the first thing mentioned is that you can use Puppeteer to generate screenshots and PDF of pages. excellent! This is exactly what we want.
First use npmi i puppeteer to install Puppeteer and implement our functions.
const puppeteer = require('puppeteer')

async function printPDF() {
  const browser = await puppeteer.launch({ headless: true });
  const page = await browser.newPage();
  await page.goto('https://blog.risingstack.com', {waitUntil: 'networkidle0'});
  const pdf = await page.pdf({ format: 'A4' });

  await browser.close();
  return pdf
})This is a simple function that navigates to a URL and generates a PDF file of the site.
First, we launch the browser (PDF generation is only supported in headless mode), then open a new page, set the viewport, and navigate to the provided URL.
Settings waitUntil:'networkidle0' option means that Puppeteer will consider navigation complete when there is no network connection for at least 500 milliseconds. (More information can be obtained from the API docs.)
After that, we save the PDF as a variable, close the browser and return to the PDF.
Note: The page.pdf method accepts an options object, you can use the 'path' option to save the file to disk. If no path is provided, the PDF will not be saved to disk but will be buffered instead. (I'll discuss how to handle this later.)
If you need to log in before you can generate a PDF from a protected page, first you'll want to navigate to the login page, check the form element's ID or name, fill them in, and then Submit form:
await page.type('#email', process.env.PDF_USER)
await page.type('#password', process.env.PDF_PASSWORD)
await page.click('#submit')Always save login credentials in environment variables, don't hardcode them!
样式控制
Puppeteer 也有这种样式操作的解决方案。你可以在生成 PDF 之前插入样式标记,Puppeteer 将生成具有已修改样式的文件。
await page.addStyleTag({ content: '.nav { display: none} .navbar { border: 0px} #print-button {display: none}' })将文件发送到客户端并保存
好的,现在你已经在后端生成了一个 PDF 文件。接下来做什么?
如上所述,如果你不把文件保存到磁盘,将会得到一个缓冲区。你只需要把含有适当内容类型的缓冲区发送到前端即可。
printPDF.then(pdf => {
    res.set({ 'Content-Type': 'application/pdf', 'Content-Length': pdf.length })
res.send(pdf)现在,你只需在浏览器向服务器发送请求即可得到生成的 PDF。
function getPDF() {
 return axios.get(`${API_URL}/your-pdf-endpoint`, {
   responseType: 'arraybuffer',
   headers: {
     'Accept': 'application/pdf'
   }
})一旦发送了请求,缓冲区的内容就应该开始下载了。最后一步是将缓冲区数据转换为 PDF 文件。
savePDF = () => {
    this.openModal(‘Loading…’) // open modal
   return getPDF() // API call
     .then((response) => {
       const blob = new Blob([response.data], {type: 'application/pdf'})
       const link = document.createElement('a')
       link.href = window.URL.createObjectURL(blob)
       link.download = `your-file-name.pdf`
       link.click()
       this.closeModal() // close modal
     })
   .catch(err => /** error handling **/)
 }
<button onClick={this.savePDF}>Save as PDF</button>就这样!如果单击“保存”按钮,那么浏览器将会保存 PDF。
在 Docker 中使用 Puppeteer
我认为这是实施中最棘手的部分 —— 所以让我帮你节省几个小时的百度时间。
官方文档指出“在 Docker 中使用 headless Chrome 并使其运行起来可能会非常棘手”。官方文档有疑难解答部分,你可以找到有关用 Docker 安装 puppeteer 的所有必要信息。
如果你在 Alpine 镜像上安装 Puppeteer,请确保在看到页面的这一部分时再向下滚动一点。否则你可能会忽略一个事实:你无法运行最新的 Puppeteer 版本,并且你还需要用一个标记禁用 shm :
const browser = await puppeteer.launch({
  headless: true,
  args: ['--disable-dev-shm-usage']
});否则,Puppeteer 子进程可能会在正常启动之前耗尽内存。
方案 3 + 1:CSS 打印规则
可能有人认为从开发人员的角度来看,简单地使用 CSS 打印规则很容易。没有 NPM 模块,只有纯 CSS。但是在跨浏览器兼容性方面,它的表现如何呢?
在选择 CSS 打印规则时,你必须在每个浏览器中测试结果,以确保它提供的布局是相同的,并且它不是100%能做到这一点。
例如,在给定元素后面插入一个 break-after 并不是一个多么高深的技术,但是你可能会惊讶的发现要在 Firefox 中使用它需要使用变通方法。
除非你是一位经验丰富的 CSS 大师,在创建可打印页面方面有很多的经验,否则这可能会非常耗时。
如果你可以使打印样式表保持简单,打印规则是很好用的。
让我们来看一个例子吧。
@media print {
    .print-button {
        display: none;
    }

    .content p {
        break-after: always;
    }
}上面的 CSS 隐藏了打印按钮,并在每个 p 之后插入一个分页符,其中包含content 类。有一篇很棒的文章总结了你可以用打印规则做什么,以及它们有什么问题,包括浏览器兼容性。
考虑到所有因素,如果你想从不那么复杂的页面生成 PDF,CSS打印规则非常有效。
总结
让我们快速回顾前面介绍的方案,以便从 HTML 页面生成 PDF 文件:
从 DOM 产生截图:当你需要从页面创建快照时(例如创建缩略图)可能很有用,但是当你需要处理大量数据时就会有些捉襟见肘。
只用 PDF 库:如果你打算从头开始以编程方式创建 PDF 文件,这是一个完美的解决方案。否则,你需要同时维护 HTML 和 PDF 模板,这绝对是一个禁忌。
Puppeteer:尽管在 Docker 上工作相对困难,但它为我们的实现提供了最好的结果,而且编写代码也是最简单的。
CSS打印规则:如果你的用户受过足够的教育,知道如何把页面内容打印到文件,并且你的页面相对简单,那么它可能是最轻松的解决方案。正如你在我们的案例中所看到的,事实并非如此。
本篇文章到这里就已经全部结束了,更多其他精彩内容可以关注PHP中文网的HTML视频教程栏目!
The above is the detailed content of Introduction to 4 methods of converting HTML to PDF (with code). For more information, please follow other related articles on the PHP Chinese website!

Hot AI Tools

Undresser.AI Undress
AI-powered app for creating realistic nude photos

AI Clothes Remover
Online AI tool for removing clothes from photos.

Undress AI Tool
Undress images for free

Clothoff.io
AI clothes remover

Video Face Swap
Swap faces in any video effortlessly with our completely free AI face swap tool!

Hot Article
Hot Tools

Notepad++7.3.1
Easy-to-use and free code editor

SublimeText3 Chinese version
Chinese version, very easy to use

Zend Studio 13.0.1
Powerful PHP integrated development environment

Dreamweaver CS6
Visual web development tools

SublimeText3 Mac version
God-level code editing software (SublimeText3)
Hot Topics


 How to merge PDFs on iPhone
Feb 02, 2024 pm 04:05 PM
How to merge PDFs on iPhone
Feb 02, 2024 pm 04:05 PM
When working with multiple documents or multiple pages of the same document, you may want to combine them into a single file to share with others. For easy sharing, Apple allows you to merge multiple PDF files into one file to avoid sending multiple files. In this post, we will help you know all the ways to merge two or more PDFs into one PDF file on iPhone. How to Merge PDFs on iPhone On iOS, you can merge PDF files into one in two ways – using the Files app and the Shortcuts app. Method 1: Using Files App The easiest way to merge two or more PDFs into one file is to use the Files app. Open on iPhone
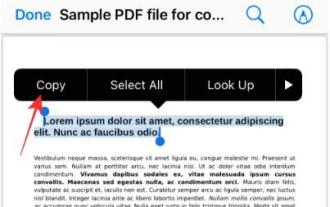 3 Ways to Get Text from PDF on iPhone
Mar 16, 2024 pm 09:20 PM
3 Ways to Get Text from PDF on iPhone
Mar 16, 2024 pm 09:20 PM
Apple's Live Text feature recognizes text, handwritten notes and numbers in photos or through the Camera app and allows you to paste that information onto any other app. But what to do when you're working with a PDF and want to extract text from it? In this post, we will explain all the ways to extract text from PDF files on iPhone. How to Get Text from PDF File on iPhone [3 Methods] Method 1: Drag Text on PDF The easiest way to extract text from PDF is to copy it, just like on any other app with text . 1. Open the PDF file you want to extract text from, then long press anywhere on the PDF and start dragging the part of the text you want to copy. 2
 How to verify signature in PDF
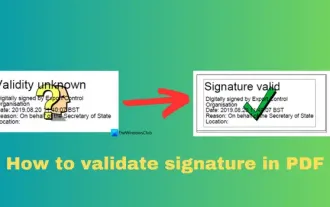
Feb 18, 2024 pm 05:33 PM
How to verify signature in PDF
Feb 18, 2024 pm 05:33 PM
We usually receive PDF files from the government or other agencies, some with digital signatures. After verifying the signature, we see the SignatureValid message and a green check mark. If the signature is not verified, the validity is unknown. Verifying signatures is important, let’s see how to do it in PDF. How to Verify Signatures in PDF Verifying signatures in PDF format makes it more trustworthy and the document more likely to be accepted. You can verify signatures in PDF documents in the following ways. Open the PDF in Adobe Reader Right-click the signature and select Show Signature Properties Click the Show Signer Certificate button Add the signature to the Trusted Certificates list from the Trust tab Click Verify Signature to complete the verification Let
 How to export xmind files to pdf files
Mar 20, 2024 am 10:30 AM
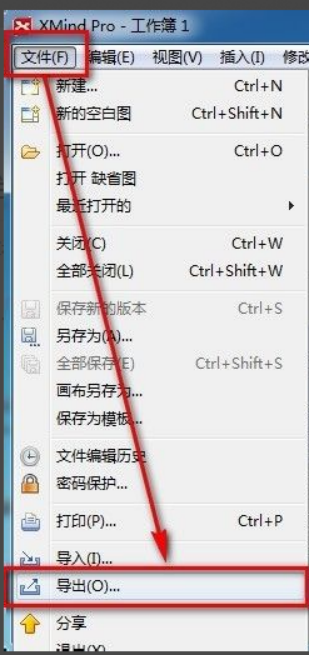
How to export xmind files to pdf files
Mar 20, 2024 am 10:30 AM
xmind is a very practical mind mapping software. It is a map form made using people's thinking and inspiration. After we create the xmind file, we usually convert it into a pdf file format to facilitate everyone's dissemination and use. Then How to export xmind files to pdf files? Below are the specific steps for your reference. 1. First, let’s demonstrate how to export the mind map to a PDF document. Select the [File]-[Export] function button. 2. Select [PDF document] in the newly appeared interface and click the [Next] button. 3. Select settings in the export interface: paper size, orientation, resolution and document storage location. After completing the settings, click the [Finish] button. 4. If you click the [Finish] button
 Solve the problem of downloading PDF files in PHP7
Feb 29, 2024 am 11:12 AM
Solve the problem of downloading PDF files in PHP7
Feb 29, 2024 am 11:12 AM
Solve the problems encountered in downloading PDF files with PHP7 In web development, we often encounter the need to use PHP to download files. Especially downloading PDF files can help users obtain necessary information or files. However, sometimes you will encounter some problems when downloading PDF files in PHP7, such as garbled characters and incomplete downloads. This article will detail how to solve problems you may encounter when downloading PDF files in PHP7 and provide some specific code examples. Problem analysis: In PHP7, due to character encoding and H
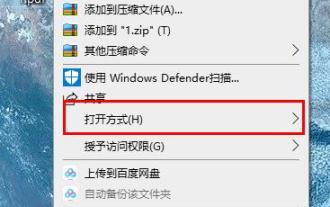 Learn how to rotate PDF files using edge browser shortcut keys
Jan 05, 2024 am 09:17 AM
Learn how to rotate PDF files using edge browser shortcut keys
Jan 05, 2024 am 09:17 AM
Although pdf files are very convenient to use, many friends still like to use word to edit and view them, so how to convert them? Let’s take a look at the detailed operation method below. Edge browser pdf rotation shortcut key: A: The shortcut key for rotation is F9. 1. Right-click the pdf file and select "Open with". 2. Select "Microsoft edge" to open the pdf file. 3. After entering the pdf file, a taskbar will appear below. 4. Click the rotation button next to the "+" sign to rotate right.
 How to set the default opening method of PDF in win11 Tutorial on setting the default opening method of PDF in win11
Feb 29, 2024 pm 09:01 PM
How to set the default opening method of PDF in win11 Tutorial on setting the default opening method of PDF in win11
Feb 29, 2024 pm 09:01 PM
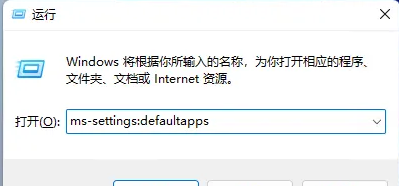
Some users find it troublesome to choose an opening method every time they open a PDF file. They want to set their commonly used opening method as the default method. So how to set the default PDF opening method in win11? The editor below will give you a detailed introduction to the tutorial on setting the default PDF opening method in win11. If you are interested, come and take a look. Tutorial on setting the default opening method of PDF in win11 1. Shortcut key "win+R" to open the run, enter the "ms-settings:defaultapps" command, and press Enter to open. 2. After entering the new interface, enter ".pdf" in the search box above and click the search icon to search. 3. This
 PHP and Vue: a perfect pairing of front-end development tools
Mar 16, 2024 pm 12:09 PM
PHP and Vue: a perfect pairing of front-end development tools
Mar 16, 2024 pm 12:09 PM
PHP and Vue: a perfect pairing of front-end development tools. In today's era of rapid development of the Internet, front-end development has become increasingly important. As users have higher and higher requirements for the experience of websites and applications, front-end developers need to use more efficient and flexible tools to create responsive and interactive interfaces. As two important technologies in the field of front-end development, PHP and Vue.js can be regarded as perfect tools when paired together. This article will explore the combination of PHP and Vue, as well as detailed code examples to help readers better understand and apply these two
