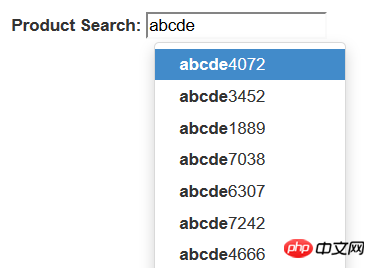
Introduction to the Typeahead component in Bootstrap (code example)
本篇文章给大家带来的内容是关于Bootstrap中Typeahead组件的介绍(代码示例),有一定的参考价值,有需要的朋友可以参考一下,希望对你有所帮助。
Bootstrap 中的 Typeahead 组件就是通常所说的自动完成 AutoComplete,功能很强大,但是,使用上并不太方便。这里我们将介绍一下这个组件的使用。(免费课程推荐:bootstrap教程)

第一,简单使用
首先,最简单的使用方式,就是直接在标记中声明,通过 data-provide="typeahead" 来声明这是一个 typeahead 组件,通过 data-source= 来提供数据。当然了,你还必须提供 bootstrap-typeahead.js 脚本。
<html>
<head>
<link href="bootstrap.min.css" rel="stylesheet" type="text/css" />
</head>
<body>
<div style="margin: 50px 50px">
<label for="product_search">Product Search: </label>
<input id="product_search" type="text" data-provide="typeahead"
data-source='["Deluxe Bicycle", "Super Deluxe Trampoline", "Super Duper Scooter"]'>
</div>
<script src="js/jquery-1.8.3.min.js"></script>
<script src="js/bootstrap-typeahead.js"></script>
</body>
</html>第二,使用脚本填充数据
通常,我们使用脚本来填充数据,那么,页面可以变成如下的形式。
<html>
<head>
<link href="bootstrap.min.css" rel="stylesheet" type="text/css" />
</head>
<body>
<div style="margin: 50px 50px">
<label for="product_search">Product Search: </label>
<input id="product_search" type="text" data-provide="typeahead">
</div>
<script src="js/jquery-1.8.3.min.js"></script>
<script src="js/bootstrap-typeahead.js"></script>
<script>
$(document).ready(function($) {
// Workaround for bug in mouse item selection
$.fn.typeahead.Constructor.prototype.blur = function() {
var that = this;
setTimeout(function () { that.hide() }, 250);
};
$('#product_search').typeahead({
source: function(query, process) {
return ["Deluxe Bicycle", "Super Deluxe Trampoline", "Super Duper Scooter"];
}
});
})
</script>
</body>
</html>注意,我们提供了一个 source 函数来提供数据,这个函数接收两个参数,第一个参数 query 表示用户的输入,第二个参数是 process 函数,这个 process 函数是 typeahead 提供的,用来处理我们的数据。
如果你希望通过 Ajax 调用从服务器端获取匹配的数据,那么,在异步完成的处理函数中,你需要获取一个匹配的字符串数组,然后,将这个数组作为参数,调用 process 函数。
第三,支持 Ajax 获取数据
说了半天,数据都是从本地获取的,到底如何从服务器端获取数据呢?
其实很简单,在 source 函数中,自己调用 Ajax 方法来获取数据,主要注意的是,在获取数据之后,调用 typeahead 的 process 函数处理即可。
$('#product_search').typeahead({
    source: function (query, process) {
        var parameter = {query: query};
        $.post('@Url.Action("AjaxService")', parameter, function (data) {
            process(data);
        });
    }
});当然了,在服务器上,你需要创建一个服务来提供数据,这里,我们演示使用随机数来生成一组随机数据的方法。
public ActionResult AjaxService(string query)
{
    System.Collections.ArrayList list
        = new System.Collections.ArrayList();
    System.Random random = new Random();
    for (int i = 0; i < 20; i++)
    {
        string item  = string.Format("{0}{1}", query, random.Next(10000));
        list.Add(item);
    }
    return this.Json(list);
}第四,使用 highlighter 和 updater
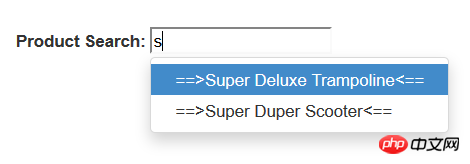
除了使用 source 函数之外,还可以使用 highlighter 函数来特别处理匹配项目的显示,使用 updater 函数,在选择了某个匹配项之后,做出一些后继的处理。

默认的 highlighter 是这样实现的,item 是匹配的项目,找到匹配的部分之后,使用 加粗了。
highlighter: function (item) {
var query = this.query.replace(/[\-\[\]{}()*+?.,\\\^$|#\s]/g, '\\$&')
return item.replace(new RegExp('(' + query + ')', 'ig'), function ($1, match) {
return '<strong>' + match + '</strong>'
})
}而 updater 的默认实现就更加简单了。
updater: function (item) {
    return item
}我们可以重写这两个函数,来实现自定义的处理。
<html>
<head>
<link href="bootstrap.min.css" rel="stylesheet" type="text/css" />
</head>
<body>
<div style="margin: 50px 50px">
<label for="product_search">Product Search: </label>
<input id="product_search" type="text" data-provide="typeahead">
</div>
<script src="js/jquery-1.8.3.min.js"></script>
<script src="js/bootstrap-typeahead.js"></script>
<script>
$(document).ready(function($) {
// Workaround for bug in mouse item selection
$.fn.typeahead.Constructor.prototype.blur = function() {
var that = this;
setTimeout(function () { that.hide() }, 250);
};
$('#product_search').typeahead({
source: function(query, process) {
return ["Deluxe Bicycle", "Super Deluxe Trampoline", "Super Duper Scooter"];
},
highlighter: function(item) {
return "==>" + item + "<==";
},
updater: function(item) {
console.log("'" + item + "' selected.");
return item;
}
});
})
</script>
</body>
</html>第五,使用对象数据
实际上,你的数据可能是一组对象而不是一个字符串数组,下面的例子中,我们使用一个产品对象的数组来说明,每个产品对象有一个 id 编号,还有名称 name 和价格 price .
<html>
<head>
<link href="~/Content/dist/css/bootstrap.min.css" rel="stylesheet" />
</head>
<body>
<div style="margin: 50px 50px">
<label for="product_search">Product Search: </label>
<input id="product_search" type="text" data-provide="typeahead">
</div>
<script src="~/Content/dist/js/jquery.js"></script>
<script src="~/Content/dist/js/bootstrap-typeahead.js"></script>
<script src="~/Content/dist/js/underscore-min.js"></script>
<script>
$(document).ready(function ($) {
// Workaround for bug in mouse item selection
$.fn.typeahead.Constructor.prototype.blur = function () {
var that = this;
setTimeout(function () { that.hide() }, 250);
};
var products = [
{
id: 0,
name: "Deluxe Bicycle",
price: 499.98
},
{
id: 1,
name: "Super Deluxe Trampoline",
price: 134.99
},
{
id: 2,
name: "Super Duper Scooter",
price: 49.95
}
];
$('#product_search').typeahead({
source: function (query, process) {
var results = _.map(products, function (product) {
return product.name;
});
process(results);
},
highlighter: function (item) {
return "==>" + item + "<==";
},
updater: function (item) {
console.log("'" + item + "' selected.");
return item;
}
});
})
</script>
</body>
</html>第六,高级用法
我们希望能够在提示中显示产品的更加详细的信息。
首先,修改我们的 source 函数,原来这个函数返回一个字符串的数组,现在我们返回一个产品 id 的数组,但是,process 函数期望得到一个字符串数组的参数,所以,我们将每个 id 都转换为字符串类型。
然后,typeahead 组件就会调用 matcher 函数来检查用户的输入是否与某个项目匹配,你可以使用产品的 id 在产品列表中获取产品对象,然后检查产品的名称与用户的输入是否匹配。
默认的 matcher 直接使用用户的输入来匹配,我们如果使用 id 的话,显然不能匹配,我们需要重写 matcher 函数。
matcher 接收一个当前项目的字符串,用户当前的输入为 this.query,匹配返回 true, 否则返回 false. 默认的 matcher 如下:
, matcher: function (item) {
return ~item.toLowerCase().indexOf(this.query.toLowerCase())
}将它重写为永远匹配,直接返回 true。而在 highlighter 中将显示结果替换为希望的产品名称和价格组合。在下一步的 highlighter 中,我们使用 Underscore 组件中的 find 方法,通过产品的 id 在产品列表中获取产品对象,然后,显示产品名称和价格的组合。
highlighter: function (id) {
var product = _.find(products, function (p) {
return p.id == id;
    });
    return product.name + " ($" + product.price + ")";
}默认的 updater 直接返回当前匹配的内容,我们这里是一个 id, 需要重写。
updater: function (item) {
return item
}在用户选择之后,typeahead 将会调用 updater 函数,我们通过产品的 id 在产品列表中获取产品对象,然后
最后,updater 函数返回一个产品名称的字符串,为输入框提供内容。setSelectedProduct 是我们的一个自定义函数。
updater: function (id) {
    var product = _.find(products, function (p) {
        return p.id == id;
    });
    that.setSelectedProduct(product);
    return product.name;
}下面是全部的代码。
<html>
<head>
<link href="~/Content/dist/css/bootstrap.min.css" rel="stylesheet" />
</head>
<body>
<div style="margin: 50px 50px">
<label for="product_search">Product Search: </label>
<input id="product_search" type="text" data-provide="typeahead">
<div id="product" style="border-width: 1; padding: 5px; border-style: solid"></div>
</div>
<script src="~/Content/dist/js/jquery.js"></script>
<script src="~/Content/dist/js/bootstrap-typeahead.js"></script>
<script src="~/Content/dist/js/underscore-min.js"></script>
<script>
$(document).ready(function ($) {
// Workaround for bug in mouse item selection
$.fn.typeahead.Constructor.prototype.blur = function () {
var that = this;
setTimeout(function () { that.hide() }, 250);
};
var products = [
{
id: 0,
name: "Deluxe Bicycle",
price: 499.98
},
{
id: 1,
name: "Super Deluxe Trampoline",
price: 134.99
},
{
id: 2,
name: "Super Duper Scooter",
price: 49.95
}
];
var that = this;
$('#product_search').typeahead({
source: function (query, process) {
$('#product').hide();
var results = _.map(products, function (product) {
return product.id + "";
});
process(results);
},
matcher: function (item) {
return true;
},
highlighter: function (id) {
var product = _.find(products, function (p) {
return p.id == id;
});
return product.name + " ($" + product.price + ")";
},
updater: function (id) {
var product = _.find(products, function (p) {
return p.id == id;
});
that.setSelectedProduct(product);
return product.name;
}
});
$('#product').hide();
this.setSelectedProduct = function (product) {
$('#product').html("Purchase: <strong>" + product.name + " ($" + product.price + ")</strong>").show();
}
})
</script>
</body>
</html>The above is the detailed content of Introduction to the Typeahead component in Bootstrap (code example). For more information, please follow other related articles on the PHP Chinese website!

Hot AI Tools

Undresser.AI Undress
AI-powered app for creating realistic nude photos

AI Clothes Remover
Online AI tool for removing clothes from photos.

Undress AI Tool
Undress images for free

Clothoff.io
AI clothes remover

Video Face Swap
Swap faces in any video effortlessly with our completely free AI face swap tool!

Hot Article

Hot Tools

Notepad++7.3.1
Easy-to-use and free code editor

SublimeText3 Chinese version
Chinese version, very easy to use

Zend Studio 13.0.1
Powerful PHP integrated development environment

Dreamweaver CS6
Visual web development tools

SublimeText3 Mac version
God-level code editing software (SublimeText3)

Hot Topics
 How to use bootstrap in vue
Apr 07, 2025 pm 11:33 PM
Using Bootstrap in Vue.js is divided into five steps: Install Bootstrap. Import Bootstrap in main.js. Use the Bootstrap component directly in the template. Optional: Custom style. Optional: Use plug-ins.
 How to get the bootstrap search bar
Apr 07, 2025 pm 03:33 PM
How to use Bootstrap to get the value of the search bar: Determines the ID or name of the search bar. Use JavaScript to get DOM elements. Gets the value of the element. Perform the required actions.
 How to do vertical centering of bootstrap
Apr 07, 2025 pm 03:21 PM
Use Bootstrap to implement vertical centering: flexbox method: Use the d-flex, justify-content-center, and align-items-center classes to place elements in the flexbox container. align-items-center class method: For browsers that do not support flexbox, use the align-items-center class, provided that the parent element has a defined height.
 How to write split lines on bootstrap
Apr 07, 2025 pm 03:12 PM
There are two ways to create a Bootstrap split line: using the tag, which creates a horizontal split line. Use the CSS border property to create custom style split lines.
 How to set up the framework for bootstrap
Apr 07, 2025 pm 03:27 PM
To set up the Bootstrap framework, you need to follow these steps: 1. Reference the Bootstrap file via CDN; 2. Download and host the file on your own server; 3. Include the Bootstrap file in HTML; 4. Compile Sass/Less as needed; 5. Import a custom file (optional). Once setup is complete, you can use Bootstrap's grid systems, components, and styles to create responsive websites and applications.
 How to insert pictures on bootstrap
Apr 07, 2025 pm 03:30 PM
There are several ways to insert images in Bootstrap: insert images directly, using the HTML img tag. With the Bootstrap image component, you can provide responsive images and more styles. Set the image size, use the img-fluid class to make the image adaptable. Set the border, using the img-bordered class. Set the rounded corners and use the img-rounded class. Set the shadow, use the shadow class. Resize and position the image, using CSS style. Using the background image, use the background-image CSS property.
 How to use bootstrap button
Apr 07, 2025 pm 03:09 PM
How to use the Bootstrap button? Introduce Bootstrap CSS to create button elements and add Bootstrap button class to add button text
 How to resize bootstrap
Apr 07, 2025 pm 03:18 PM
To adjust the size of elements in Bootstrap, you can use the dimension class, which includes: adjusting width: .col-, .w-, .mw-adjust height: .h-, .min-h-, .max-h-


