 Development Tools
 webstorm
 The detailed process of building a vue project with webstorm for beginners
The detailed process of building a vue project with webstorm for beginners
The content of this article is about the detailed process of building a Vue project with webstorm for novices. It has certain reference value. Friends in need can refer to it. I hope it will be helpful to you.
This article is only for novices.
First of all, we need to understand a few nouns (concepts).
Node.js:
Node.js is a JavaScript runtime environment based on the Chrome V8 engine.
Node.js uses an event-driven, non-blocking I/O model, making it lightweight and efficient.
Node.js’s package manager npm is the world’s largest open source library ecosystem.
npm:
npm stands for Node Package Manager. It is a package manager based on Node.js. It is also the most popular package manager in the entire Node.js community and supports the most third-party modules. Container (similar to Maven in java).
The original intention of npm: making it easier for JavaScript developers to share and reuse code.
Usage scenarios of npm:
Allow users to obtain third-party packages and use them.
Allows users to publish and share packages or command line programs written by themselves.
npm version query: npm -v
Webpack
WebPack can be regarded as a module packager: what it does is, Analyze your project structure, find JavaScript modules and other extension languages that browsers cannot run directly (Scss, TypeScript, etc.), and convert and package them into a suitable format for browser use.
Let’s get to the point
First of all, now webstorm, node.js
Pay attention to the node version. Only nodes that support harmony mode will support es6. Build the project name based on webpack Only then will no error be reported. The latest version is recommended.
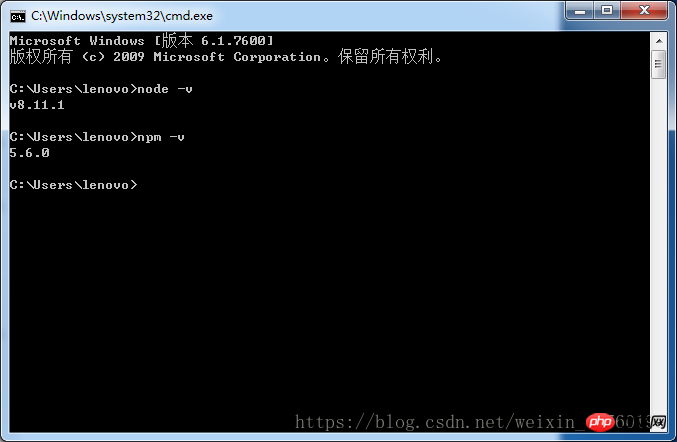
1. After downloading the installation package, just click to install. The interface for successful test installation is as follows:
2. Install Taobao image (similar to Alibaba Cloud's maven central warehouse image)
The installation time is a bit long
Installation command: npm install -g cnpm --registry=https://registry.npm.taobao.org
Verification command: cnpm -v
3. Install webpack
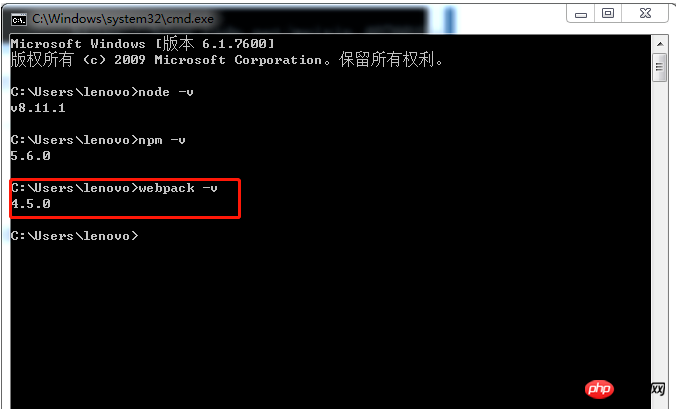
Use npm to install webpack. The command line statement is npm install webpack -g. It takes a little longer. The interface for successful test installation is as follows:

4. The next step is to install vue-cli globally. It takes a little longer
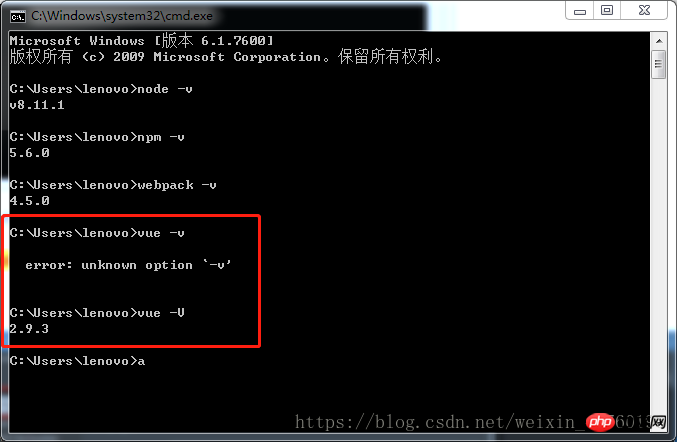
The installation statement is: npm install --global vue-cli
Verification command: vue -V (V must be capitalized)
5. Let’s start using WebStorm
The important point is that if you want to use WebStorm to create a project, you must install git. The installation is very simple. Just download and install it from the official website, otherwise it may not be installed.
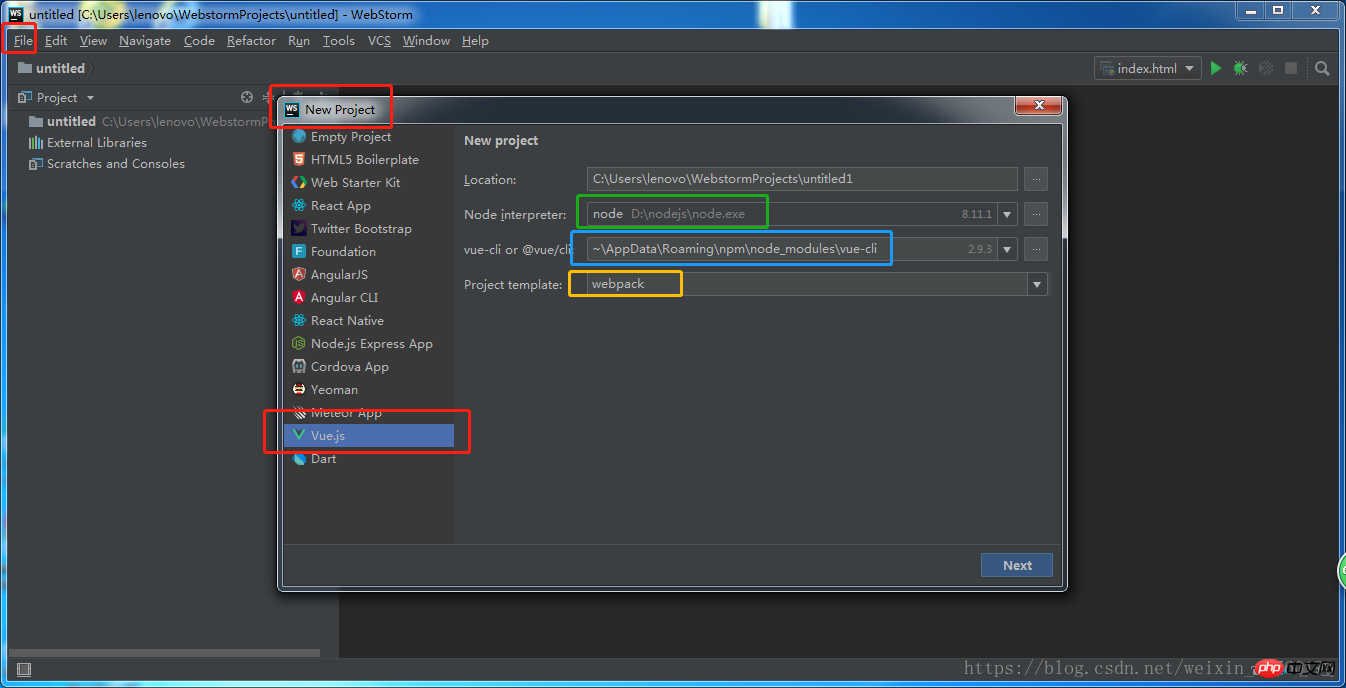
Red is the newly created sequence, green is the node.js address (it will take a while after installation) Automatic search), blue is the address of the vue.js package, yellow is the packaging module used for packaging
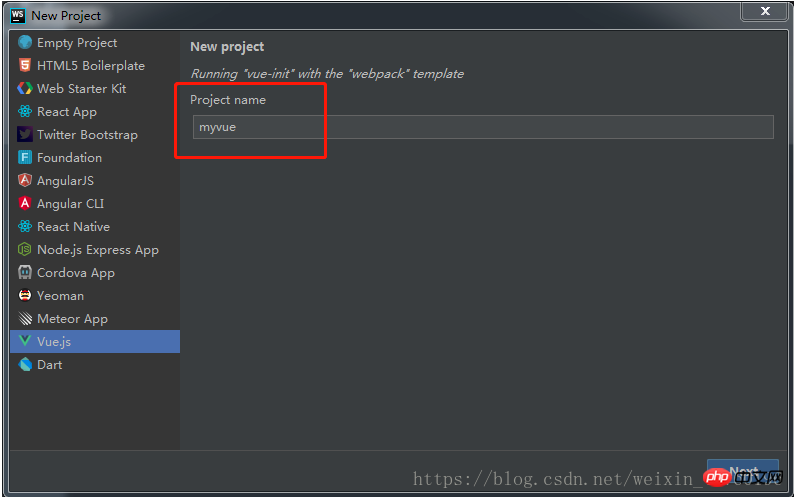
Fill in the project name, note that the project name cannot contain capital letters.
Just keep clicking next step, project structure
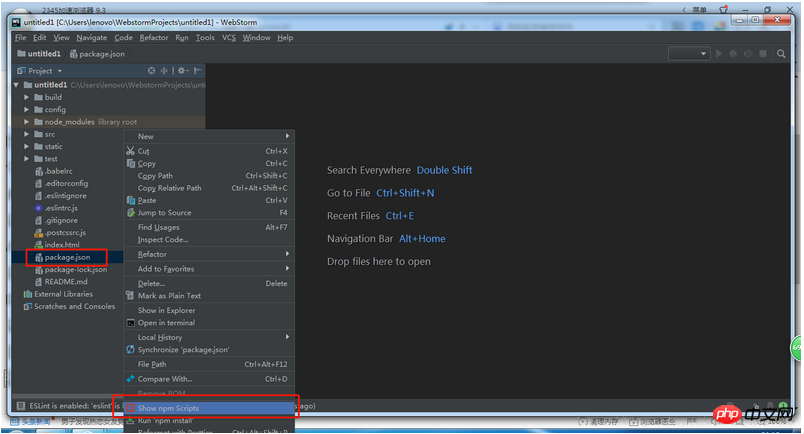
Select package.json, right-click and select show npm scripts
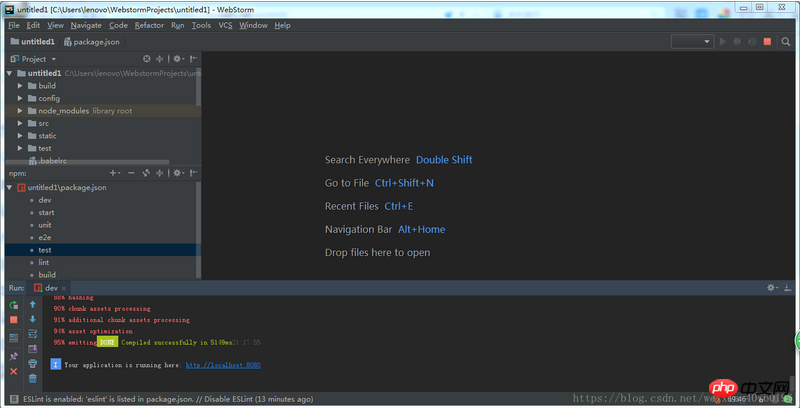
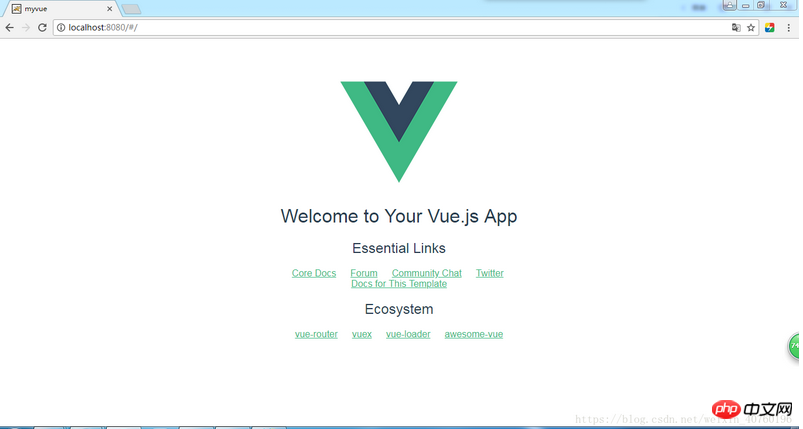
Select dev and double-click to test. After successful opening, the default port will appear. Like the post and open it in the browser. If the following page appears, it is successful. Such a vue project has been created successfully
The above is the detailed content of The detailed process of building a vue project with webstorm for beginners. For more information, please follow other related articles on the PHP Chinese website!

Hot AI Tools

Undresser.AI Undress
AI-powered app for creating realistic nude photos

AI Clothes Remover
Online AI tool for removing clothes from photos.

Undress AI Tool
Undress images for free

Clothoff.io
AI clothes remover

Video Face Swap
Swap faces in any video effortlessly with our completely free AI face swap tool!

Hot Article

Hot Tools

Notepad++7.3.1
Easy-to-use and free code editor

SublimeText3 Chinese version
Chinese version, very easy to use

Zend Studio 13.0.1
Powerful PHP integrated development environment

Dreamweaver CS6
Visual web development tools

SublimeText3 Mac version
God-level code editing software (SublimeText3)

Hot Topics
 How to solve webstorm crash
Apr 08, 2024 pm 02:24 PM
Steps to resolve WebStorm crash issues: Check for updates; Restart your computer; Disable plugins; Reset settings; Clear cache; Check firewall and antivirus software; Reinstall WebStorm; Contact support.
 How to connect to the database in webstorm
Apr 08, 2024 pm 03:42 PM
You can use WebStorm to connect to the database through the following steps: 1. Open the database tool window; 2. Create a data source; 3. Connect to the data source; 4. Query the database; 5. Browse tables and data; 6. Edit database objects; 7. Manage Users and permissions.
 How to run jsp project in webstorm
Apr 08, 2024 pm 03:39 PM
You can run a JSP project in WebStorm by following these steps: Create a Java Web project. Configure the project and add Web and Java EE facets. Create the JSP file in the "src/main/webapp" directory. Write JSP code including HTML, Java and JSP tags. Deploy and run the project. Access the JSP page by entering the application context root in your browser.
 How to automatically wrap lines in webstorm
Apr 08, 2024 pm 03:48 PM
WebStorm provides automatic line wrapping, which breaks code into separate lines to improve readability. Its rules include: 1. Branch long expressions and statements; 2. Branch method calls; 3. Branch functions and class definitions. User-customizable settings such as maximum line length, indentation type, and shortcut keys. However, word wrapping may not work with single-line comments or string literals and will affect code formatting, so careful review is recommended before application.
 How to restart webstorm
Apr 08, 2024 pm 07:15 PM
To restart WebStorm, follow these steps: Use the shortcut keys: Windows/Linux: Ctrl + Shift + A, macOS: Cmd + Shift + A. Enter "restart" in the search field and select "Restart". Using the menu: Click the File menu and select Restart under Reload. Using Task Manager: In Task Manager or Force Quit the application window, select the WebStorm process and click Restart or Restart.
 Which one is easier to use, webstorm or vscode?
Apr 08, 2024 pm 07:33 PM
For developers who focus on web development and pursue deep functionality, WebStorm is a better choice; while users who value customizability, lightweightness, and multi-language support are more suitable for VSCode.
 Where is webstorm's automatic line wrapping?
Apr 08, 2024 pm 08:09 PM
Automatic line wrapping can be set in WebStorm by following these steps: Check the "Wrap lines" checkbox and set the maximum line width. Select automatic line wrapping rules: None, line wrapping at any position, or line wrapping after keywords. Optional settings: retain manual line wrapping and automatic line wrapping after carriage return. Apply the settings and close the settings window. Note: This setting applies to all file types and can be set individually for specific file types.
 How to log in to webstorm
Apr 08, 2024 pm 04:45 PM
Steps to log in to WebStorm: 1. Open WebStorm; 2. Select a GitHub or JetBrains account to log in; 3. Enter credentials; 4. Authorize access to the account; 5. Complete login.


