 Operation and Maintenance
 Linux Operation and Maintenance
 How to view all ECS instances owned through the console
How to view all ECS instances owned through the console
Based on the introduction, this article discusses how to view all ECS instances owned through the console, focusing on viewing instance information on the overview page or viewing instance information on the resource overview page to view all ECS instances owned in each region under the current account. and their operational status.
View instance information
You can view all ECS instances you own through the console. You can view the following:
View instance information on the overview page or View instance information on the resource overview page. View all ECS instances owned by the current account in each region and their running status.
View the information of all ECS instances in a certain region on the instance list page. For details, see View instance information on the instance list page.
View the detailed information of an ECS instance on the instance details page. For details, see View instance information on the instance details page.
View instance information on the overview page
You can view the information of all ECS instances created by your account on the cloud server ECS overview page, including:
Total number of ECS instances , and the number of instances in different states
The number of various resources in each region and the number of ECS instances in different states
Whether the ECS instance is under attack
ECS management The home page of the console defaults to the overview page.
View instance information on the instance list page
Follow the following steps to enter the instance list page:
Log in to the ECS management console.
In the left navigation bar, click Instances.
Select a region.
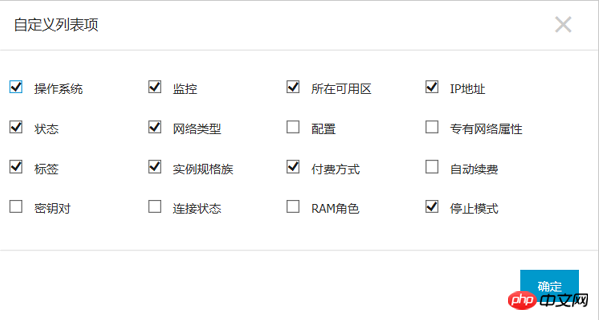
You can see information about existing ECS instances in the selected region, including ECS instance ID/name, availability zone, IP address, status, network type, payment method, operation, etc. You can adjust the instance information displayed in the list through custom list items. The steps are as follows:
In the upper right corner of the instance list, click the icon.
In the Custom List Item dialog box, select the instance information that needs to be displayed, and click OK.

View instance information on the resource overview page
On the instance overview page of the resource overview, you can view all instances in a single region from multiple perspectives Visual statistics. You can filter instances based on network type (including VPC and classic networks) or binding tags, and export all statistics with one click.
Follow the following steps to enter the instance overview page:
Log in to the ECS management console.
In the left navigation bar, click Overview.
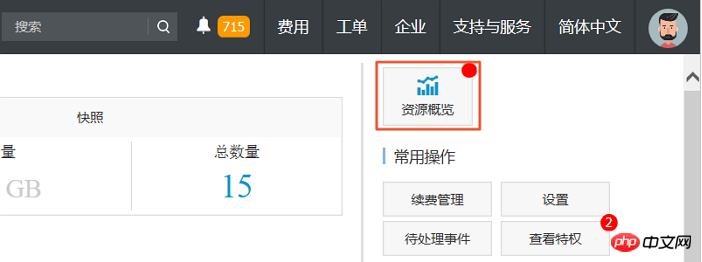
Above Common Operations, click Resource Overview.

In the left navigation bar, click Instance Overview.
Instance overview page information
On the instance overview page, you can view and export instance information by region, network type, and label, including various statuses, payment types, availability zones, and instance specifications. , the number of mirroring instances, and you can also view the number of instances created in the past month. The exported instance information is a CSV file, including all instance information displayed on the current page.

View expired instances in the last 30 days
If you have a prepaid instance, you can also view expired instances in the last 30 days, and even different time periods in the future Expired instances provide you with more basis for renewal and budgeting. As shown in the figure below, one instance will expire in the next 15 to 30 days.

View instance specification distribution
You can use the instance specification distribution chart to view the proportion of instance specifications of different architectures or levels to help you determine the current Whether the instance specification ratio is appropriate. For example, in a large and mature enterprise, if the proportion of entry-level instances is too high, it may not be appropriate; or if the entry-level instances are all burst-performance t5 instances, you may need to re-examine whether the configuration is suitable for the CPU requirements of the current business. , make timely adjustments so that you won’t be in a hurry when your business requires long-term high-load CPU calculations.

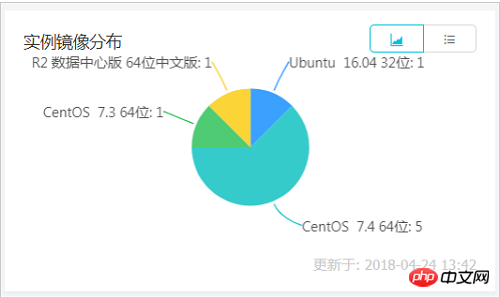
View instance image distribution
You can use the instance image distribution graph to view the distribution of images for easy management. For example, if you deploy the same application on multiple instances, these instances should try to use the same image. In this case, you can confirm the image distribution on the Instance Image Distribution map.

View instance information on the instance details page
You can enter the instance details page to view the detailed information of the ECS instance.
Follow the following steps to enter the instance details page:
Log in to the ECS management console.
In the left navigation bar, click Instances.
Select a region.
Find the ECS instance whose details you want to view and click the instance ID.
On the instance details page, you can view the following ECS instance information:
Basic information: including ECS instance ID, availability zone, name, region, instance specification, instance specification family, and image ID , key pair name (only for Linux instances), RAM role, label.
Configuration information: including CPU, memory, whether the instance is I/O optimized, operating system, IP address, bandwidth billing method, currently used bandwidth value, private network information (only applicable to private network instances) wait.
Paid information: including payment method, stop mode, creation time, automatic release time (only applicable to pay-as-you-go instances), etc.
Monitoring information: including CPU and network usage.
The above is the detailed content of How to view all ECS instances owned through the console. For more information, please follow other related articles on the PHP Chinese website!

Hot AI Tools

Undresser.AI Undress
AI-powered app for creating realistic nude photos

AI Clothes Remover
Online AI tool for removing clothes from photos.

Undress AI Tool
Undress images for free

Clothoff.io
AI clothes remover

Video Face Swap
Swap faces in any video effortlessly with our completely free AI face swap tool!

Hot Article

Hot Tools

Notepad++7.3.1
Easy-to-use and free code editor

SublimeText3 Chinese version
Chinese version, very easy to use

Zend Studio 13.0.1
Powerful PHP integrated development environment

Dreamweaver CS6
Visual web development tools

SublimeText3 Mac version
God-level code editing software (SublimeText3)

Hot Topics
 What computer configuration is required for vscode
Apr 15, 2025 pm 09:48 PM
VS Code system requirements: Operating system: Windows 10 and above, macOS 10.12 and above, Linux distribution processor: minimum 1.6 GHz, recommended 2.0 GHz and above memory: minimum 512 MB, recommended 4 GB and above storage space: minimum 250 MB, recommended 1 GB and above other requirements: stable network connection, Xorg/Wayland (Linux)
 Linux Architecture: Unveiling the 5 Basic Components
Apr 20, 2025 am 12:04 AM
The five basic components of the Linux system are: 1. Kernel, 2. System library, 3. System utilities, 4. Graphical user interface, 5. Applications. The kernel manages hardware resources, the system library provides precompiled functions, system utilities are used for system management, the GUI provides visual interaction, and applications use these components to implement functions.
 How to run java code in notepad
Apr 16, 2025 pm 07:39 PM
Although Notepad cannot run Java code directly, it can be achieved by using other tools: using the command line compiler (javac) to generate a bytecode file (filename.class). Use the Java interpreter (java) to interpret bytecode, execute the code, and output the result.
 vscode cannot install extension
Apr 15, 2025 pm 07:18 PM
The reasons for the installation of VS Code extensions may be: network instability, insufficient permissions, system compatibility issues, VS Code version is too old, antivirus software or firewall interference. By checking network connections, permissions, log files, updating VS Code, disabling security software, and restarting VS Code or computers, you can gradually troubleshoot and resolve issues.
 How to check the warehouse address of git
Apr 17, 2025 pm 01:54 PM
To view the Git repository address, perform the following steps: 1. Open the command line and navigate to the repository directory; 2. Run the "git remote -v" command; 3. View the repository name in the output and its corresponding address.
 Can vscode be used for mac
Apr 15, 2025 pm 07:36 PM
VS Code is available on Mac. It has powerful extensions, Git integration, terminal and debugger, and also offers a wealth of setup options. However, for particularly large projects or highly professional development, VS Code may have performance or functional limitations.
 How to use VSCode
Apr 15, 2025 pm 11:21 PM
Visual Studio Code (VSCode) is a cross-platform, open source and free code editor developed by Microsoft. It is known for its lightweight, scalability and support for a wide range of programming languages. To install VSCode, please visit the official website to download and run the installer. When using VSCode, you can create new projects, edit code, debug code, navigate projects, expand VSCode, and manage settings. VSCode is available for Windows, macOS, and Linux, supports multiple programming languages and provides various extensions through Marketplace. Its advantages include lightweight, scalability, extensive language support, rich features and version
 vscode terminal usage tutorial
Apr 15, 2025 pm 10:09 PM
vscode built-in terminal is a development tool that allows running commands and scripts within the editor to simplify the development process. How to use vscode terminal: Open the terminal with the shortcut key (Ctrl/Cmd). Enter a command or run the script. Use hotkeys (such as Ctrl L to clear the terminal). Change the working directory (such as the cd command). Advanced features include debug mode, automatic code snippet completion, and interactive command history.


