

How to implement multipart form file upload using Node layer
Below I will share with you an example of file upload using Node layer simulation to implement multipart forms. It has a good reference value and I hope it will be helpful to everyone.
Sometimes there is such a demand. Nodejs is used as a webserver to upload files from the browser to the back-end server. The Node layer only does a data transfer. If in this process, the Node webserver needs to properly process the data. Processing, and then Posting to the backend, then you have to simulate file upload at the Node layer.
First, upload the file through the browser. The PostData format looks like this:
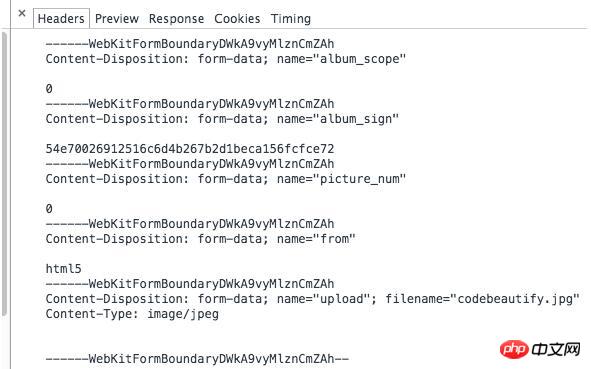
Screenshot 2014 -11-22 PM 9.18.45.png
As shown in the picture, each set of data is actually separated by "-----WebkitFormBoundary....", and finally used This delimiter ends, and this delimiter is completely customizable.
Each piece of submitted data is described by Content-Disposition. If Content-Type is not specified, the default is text/plain. If it is an uploaded binary file, just specify its mime-type.
Simply encapsulate a method to implement file upload at the Node layer:
/**
 * 上传文件
 * @param files  经过formidable处理过的文件
 * @param req  httpRequest对象
 * @param postData 额外提交的数据
 */
function uploadFile(files, req, postData) {
 var boundaryKey = Math.random().toString(16);
 var endData = '\r\n----' + boundaryKey + '--';
 var filesLength = 0, content;

 // 初始数据,把post过来的数据都携带上去
 content = (function (obj) {
  var rslt = [];
  Object.keys(obj).forEach(function (key) {
   arr = ['\r\n----' + boundaryKey + '\r\n'];
   arr.push('Content-Disposition: form-data; name="' + key + '"\r\n\r\n');
   arr.push(obj[key]);
   rslt.push(arr.join(''));
  });
  return rslt.join('');
 })(postData);

 // 组装数据
 Object.keys(files).forEach(function (key) {
  if (!files.hasOwnProperty(key)) {
   delete files.key;
   return;
  }
  content += '\r\n----' + boundaryKey + '\r\n' +
   'Content-Type: application/octet-stream\r\n' +
   'Content-Disposition: form-data; name="' + key + '"; ' +
   'filename="' + files[key].name + '"; \r\n' +
   'Content-Transfer-Encoding: binary\r\n\r\n';
  files[key].contentBinary = new Buffer(content, 'utf-8');
  filesLength += files[key].contentBinary.length + fs.statSync(files[key].path).size;
 });

 req.setHeader('Content-Type', 'multipart/form-data; boundary=--' + boundaryKey);
 req.setHeader('Content-Length', filesLength + Buffer.byteLength(endData));

 // 执行上传
 var allFiles = Object.keys(files);
 var fileNum = allFiles.length;
 var uploadedCount = 0;
 allFiles.forEach(function (key) {
  req.write(files[key].contentBinary);
  var fileStream = fs.createReadStream(files[key].path, {bufferSize: 4 * 1024});
  fileStream.on('end', function () {
   // 上传成功一个文件之后,把临时文件删了
   fs.unlink(files[key].path);
   uploadedCount++;
   if (uploadedCount == fileNum) {
    // 如果已经是最后一个文件,那就正常结束
    req.end(endData);
   }
  });
  fileStream.pipe(req, {end: false});
 });
}The idea is like this, the code is not complicated, and you may need to pay extra attention The thing is, in the response processing of http.request, the response.headers may be gzip. At this time, the buffer cannot be directly toString. It needs to be decoded by zlib and then converted to string. The general idea is:
var result = [];
response.on('data', function (chunk) {
 result.push(chunk);
});

// 处理response
var _dealResponse = function (data) {
 var buffer = data;
 try {
  data = data.toString('utf8');
  data = data ? (JSON.parse(data) || data) : false;
 } catch (err) {
  // 接口返回数据格式异常,解析失败
  console.log(err);
 }

 self.res.writeHead(response.statusCode, 'OK', {
  'content-type': 'text/plain; charset=utf-8',
  'content-length': buffer.length
 });
 self.res.write(buffer);
 self.res.end();
};

response.on('end', function () {
 result = Buffer.concat(result);
 // gzip 的数据,需要zlib解码
 if (response.headers['content-encoding'] == 'gzip') {
  zlib.gunzip(result, function (err, dezipped) {
   var data = err ? new Buffer('{}') : dezipped;
   _dealResponse(data);
  });
 } else {
  _dealResponse(result);
 }
});Mark it, maybe You just need it when you pass by~~~
The above is what I compiled for everyone. I hope it will be helpful to everyone in the future.
Related articles:
Gzip compression issues in HTTP
##How to write a Snake game using JS code (detailed tutorial)
How to convert path to base64 encoding in Javascript
The above is the detailed content of How to implement multipart form file upload using Node layer. For more information, please follow other related articles on the PHP Chinese website!

Hot AI Tools

Undresser.AI Undress
AI-powered app for creating realistic nude photos

AI Clothes Remover
Online AI tool for removing clothes from photos.

Undress AI Tool
Undress images for free

Clothoff.io
AI clothes remover

Video Face Swap
Swap faces in any video effortlessly with our completely free AI face swap tool!

Hot Article
Hot Tools

Notepad++7.3.1
Easy-to-use and free code editor

SublimeText3 Chinese version
Chinese version, very easy to use

Zend Studio 13.0.1
Powerful PHP integrated development environment

Dreamweaver CS6
Visual web development tools

SublimeText3 Mac version
God-level code editing software (SublimeText3)
Hot Topics


 How to implement page jump after PHP form submission
Aug 12, 2023 am 11:30 AM
How to implement page jump after PHP form submission
Aug 12, 2023 am 11:30 AM
How to implement page jump after PHP form submission [Introduction] In web development, form submission is a common functional requirement. After the user fills out the form and clicks the submit button, the form data usually needs to be sent to the server for processing, and the user is redirected to another page after processing. This article will introduce how to use PHP to implement page jump after form submission. [Step 1: HTML Form] First, we need to write a page containing a form in an HTML page so that users can fill in the data that needs to be submitted.
 Implement file upload and download in Workerman documents
Nov 08, 2023 pm 06:02 PM
Implement file upload and download in Workerman documents
Nov 08, 2023 pm 06:02 PM
To implement file upload and download in Workerman documents, specific code examples are required. Introduction: Workerman is a high-performance PHP asynchronous network communication framework that is simple, efficient, and easy to use. In actual development, file uploading and downloading are common functional requirements. This article will introduce how to use the Workerman framework to implement file uploading and downloading, and give specific code examples. 1. File upload: File upload refers to the operation of transferring files on the local computer to the server. The following is used
 How to use Laravel to implement file upload and download functions
Nov 02, 2023 pm 04:36 PM
How to use Laravel to implement file upload and download functions
Nov 02, 2023 pm 04:36 PM
How to use Laravel to implement file upload and download functions Laravel is a popular PHP Web framework that provides a wealth of functions and tools to make developing Web applications easier and more efficient. One of the commonly used functions is file upload and download. This article will introduce how to use Laravel to implement file upload and download functions, and provide specific code examples. File upload File upload refers to uploading local files to the server for storage. In Laravel we can use file upload
 How to solve Java file upload exception (FileUploadException)
Aug 18, 2023 pm 12:11 PM
How to solve Java file upload exception (FileUploadException)
Aug 18, 2023 pm 12:11 PM
How to solve Java file upload exception (FileUploadException). One problem that is often encountered in web development is FileUploadException (file upload exception). It may occur due to various reasons such as file size exceeding limit, file format mismatch, or incorrect server configuration. This article describes some ways to solve these problems and provides corresponding code examples. Limit the size of uploaded files In most scenarios, limit the file size
 How to use JavaScript to realize the automatic prompt function of the input box content of the form?
Oct 20, 2023 pm 04:01 PM
How to use JavaScript to realize the automatic prompt function of the input box content of the form?
Oct 20, 2023 pm 04:01 PM
How to use JavaScript to realize the automatic prompt function of the input box content of the form? Introduction: The automatic prompt function of the form input box content is very common in web applications. It can help users quickly enter the correct content. This article will introduce how to use JavaScript to achieve this function and provide specific code examples. Create the HTML structure First, we need to create an HTML structure that contains the input box and the auto-suggestion list. You can use the following code: <!DOCTYP
 How to use gRPC to implement file upload in Golang?
Jun 03, 2024 pm 04:54 PM
How to use gRPC to implement file upload in Golang?
Jun 03, 2024 pm 04:54 PM
How to implement file upload using gRPC? Create supporting service definitions, including request and response messages. On the client, the file to be uploaded is opened and split into chunks, then streamed to the server via a gRPC stream. On the server side, file chunks are received and stored into a file. The server sends a response after the file upload is completed to indicate whether the upload was successful.
 File Uploading and Processing in Laravel: Managing User Uploaded Files
Aug 13, 2023 pm 06:45 PM
File Uploading and Processing in Laravel: Managing User Uploaded Files
Aug 13, 2023 pm 06:45 PM
File Uploading and Processing in Laravel: Managing User Uploaded Files Introduction: File uploading is a very common functional requirement in modern web applications. In the Laravel framework, file uploading and processing becomes very simple and efficient. This article will introduce how to manage user-uploaded files in Laravel, including verification, storage, processing, and display of file uploads. 1. File upload File upload refers to uploading files from the client to the server. In Laravel, file uploads are very easy to handle. first,
 Pi Node Teaching: What is a Pi Node? How to install and set up Pi Node?
Mar 05, 2025 pm 05:57 PM
Pi Node Teaching: What is a Pi Node? How to install and set up Pi Node?
Mar 05, 2025 pm 05:57 PM
Detailed explanation and installation guide for PiNetwork nodes This article will introduce the PiNetwork ecosystem in detail - Pi nodes, a key role in the PiNetwork ecosystem, and provide complete steps for installation and configuration. After the launch of the PiNetwork blockchain test network, Pi nodes have become an important part of many pioneers actively participating in the testing, preparing for the upcoming main network release. If you don’t know PiNetwork yet, please refer to what is Picoin? What is the price for listing? Pi usage, mining and security analysis. What is PiNetwork? The PiNetwork project started in 2019 and owns its exclusive cryptocurrency Pi Coin. The project aims to create a one that everyone can participate
