

Using Node.js to implement compression and decompression functions
This article mainly introduces the method of compression and decompression based on Node.js. Now I share it with you and give it as a reference.
Compression format
zip and gzip are the two most common compression formats we see. Of course, gzip is rarely touched under Windows.
tar is an archive format that does not compress by default. It needs to be combined with gzip to compress the final tar file into a tar.gz file in gzip format, which is usually abbreviated to tgz.
Why is rar not mentioned? Because it is a patent-protected algorithm, you can get the decompression tool for free, while the compression tool has to be paid. Therefore, in our general application scenarios, rar compressed files are rarely provided.
This article will introduce respectively how to realize the compression and decompression of gzip, tar, tgz and zip under Node.js.
Uncompressed file library
The uncompressed file library used in this article comes from urllib. You need to clone it first and go to the specified directory.
git clone https://github.com/node-modules/urllib.git nodejs-compressing-demo
gzip
on Linux In the world, the responsibilities of each tool will be very pure and very single. For example, gzip will only compress files. As for how the folder is packaged and compressed, it has nothing to do with it. That is what tar is responsible for.
gzip command line compresses a file
For example, if we want to gzip the nodejs-compressing-demo/lib/urllib.js file, we will get a urllib.js .gz file, the source file will be deleted.
$ ls -l nodejs-compressing-demo/lib/urllib.js
-rw-r--r-- 1 a a 31318 Feb 12 11:27 nodejs-compressing-demo/lib/urllib.js

$ gzip nodejs-compressing-demo/lib/urllib.js

$ ls -l nodejs-compressing-demo/lib/urllib.js.gz
-rw-r--r-- 1 a a 8909 Feb 12 11:27 nodejs-compressing-demo/lib/urllib.js.gz

# 还原压缩文件
$ gunzip nodejs-compressing-demo/lib/urllib.js.gz
The file size is reduced from 31318 bytes to 8909 bytes, more than 3.5 times the compression effect.
You can also use the pipe method, combined with the cat command, to compress and save the file as any file:
$ ls -l nodejs-compressing-demo/README.md
-rw-r--r-- 1 a a 13747 Feb 12 11:27 nodejs-compressing-demo/README.md

$ cat nodejs-compressing-demo/README.md | gzip > README.md.gz

$ ls -l README.md.gz
-rw-r--r-- 1 a a 4903 Feb 12 11:50 README.md.gz
Node.js implements gzip
Of course , we will not really implement a gzip algorithm and tool from scratch. In the world of Node.js, these basic libraries have already been prepared for you, we just need to use them out of the box.
This article will use the compressing module to implement all compression and decompression codes.
Why choose compressing? Because it has sufficient code quality and unit testing guarantees, is in an active maintenance state, has a very friendly API, and also supports streaming interfaces.
Promise interface
const compressing = require('compressing');

// 选择 gzip 格式,然后调用 compressFile 方法
compressing.gzip.compressFile('nodejs-compressing-demo/lib/urllib.js', 'nodejs-compressing-demo/lib/urllib.js.gz')
 .then(() => {
  console.log('success');
 })
 .catch(err => {
  console.error(err);
 });

// 解压缩是反响过程,接口都统一为 uncompress
compressing.gzip.uncompress('nodejs-compressing-demo/lib/urllib.js.gz', 'nodejs-compressing-demo/lib/urllib.js2')
 .then(() => {
  console.log('success');
 })
 .catch(err => {
  console.error(err);
});Combined with the async/await programming model, the code is written as a normal asynchronous io operation.
const compressing = require('compressing');

async function main() {
 try {
  await compressing.gzip.compressFile('nodejs-compressing-demo/lib/urllib.js',
   'nodejs-compressing-demo/lib/urllib.js.gz');
  console.log('success');
 } catch (err) {
  console.error(err);
 }

 // 解压缩
 try {
  await compressing.gzip.uncompress('nodejs-compressing-demo/lib/urllib.js.gz',
   'nodejs-compressing-demo/lib/urllib.js2');
  console.log('success');
 } catch (err) {
  console.error(err);
 }
}

main();Stream interface
It is important to note that when programming in Stream mode, you need to handle the error event of each stream and manually destroy all streams.
fs.createReadStream('nodejs-compressing-demo/lib/urllib.js')
 .on('error', handleError)
 .pipe(new compressing.gzip.FileStream()) // It's a transform stream
 .on('error', handleError)
 .pipe(fs.createWriteStream('nodejs-compressing-demo/lib/urllib.js.gz2'))
 .on('error', handleError);

// 解压缩,就是 pipe 的方向倒转过来
fs.createReadStream('nodejs-compressing-demo/lib/urllib.js.gz2')
 .on('error', handleError)
 .pipe(new compressing.gzip.UncompressStream()) // It's a transform stream
 .on('error', handleError)
 .pipe(fs.createWriteStream('nodejs-compressing-demo/lib/urllib.js3'))
 .on('error', handleError);
According to the official Backpressuring in Streams recommendation, we should use the pump module to cooperate with Stream mode programming, and let pump complete the cleaning work of these Streams.
const pump = require('pump');

const source = fs.createReadStream('nodejs-compressing-demo/lib/urllib.js');
const target = fs.createWriteStream('nodejs-compressing-demo/lib/urllib.js.gz2');

pump(source, new compressing.gzip.FileStream(), target, err => {
 if (err) {
  console.error(err);
 } else {
  console.log('success');
 }
});

// 解压缩
pump(fs.createReadStream('nodejs-compressing-demo/lib/urllib.js.gz2'),
  new compressing.gzip.FileStream(),
  fs.createWriteStream('nodejs-compressing-demo/lib/urllib.js3'),
  err => {
 if (err) {
  console.error(err);
 } else {
  console.log('success');
 }
});Advantages of the Stream interface
The Stream interface seems much more complicated than the Promise interface. Why is there such an application scenario?
In fact, in the field of HTTP services, the Stream model will have greater advantages, because the HTTP request itself is a Request Stream. If you want to return an uploaded file with gzip compression, you do not need to save the uploaded file using the Stream interface. to the local disk, but consume this file stream directly.
Using the sample code for egg file upload, we can achieve gzip compression and return with a slight modification.
const pump = require('pump');

class UploadFormController extends Controller {
 // ... other codes

 async upload() {
  const stream = await this.ctx.getFileStream();
  // 直接将压缩流赋值给 ctx.body,实现边压缩边返回的流式响应
  this.ctx.body = pump(stream, new compressing.gzip.FileStream());
 }
}tar | gzip > tgz
gzip Chapter You can know in advance that tar is responsible for packaging the folder.
For example, if you want to package the entire nodejs-compressing-dem o folder into a file and send it to others, you can use the tar command.
$ tar -c -f nodejs-compressing-demo.tar nodejs-compressing-demo/

$ ls -l nodejs-compressing-demo.tar
-rw-r--r-- 1 a a 206336 Feb 12 14:01 nodejs-compressing-demo.tar
As you can see, the files packaged by tar are generally larger because they are uncompressed and the size is close to the actual total size of the folder. So we will all compress at the same time as packaging.
$ tar -c -z -f nodejs-compressing-demo.tgz nodejs-compressing-demo/

$ ls -l nodejs-compressing-demo.tgz
-rw-r--r-- 1 a a 39808 Feb 12 14:07 nodejs-compressing-demo.tgz
The difference in size between tar and tgz is more than 5 times, which can greatly reduce network transmission bandwidth.
Node.js implements tgz
Promise interface
First use compressing.tar.compressDir(sourceDir, targetFile) to Pack a folder into a tar file, and then use the gzip compression method above to compress the tar file into a tgz file.
const compressing = require('compressing');

compressing.tar.compressDir('nodejs-compressing-demo', 'nodejs-compressing-demo.tar')
 .then(() => {
  return compressing.gzip.compressFile('nodejs-compressing-demo.tar',
   'nodejs-compressing-demo.tgz');
 });
 .then(() => {
  console.log('success');
 })
 .catch(err => {
  console.error(err);
 });

// 解压缩
compressing.gzip.uncompress('nodejs-compressing-demo.tgz', 'nodejs-compressing-demo.tar')
 .then(() => {
  return compressing.tar.uncompress('nodejs-compressing-demo.tar',
   'nodejs-compressing-demo2');
 });
 .then(() => {
  console.log('success');
 })
 .catch(err => {
  console.error(err);
});Combined with the async/await programming model, the code will be easier to read:
const compressing = require('compressing');

async function main() {
 try {
  await compressing.tar.compressDir('nodejs-compressing-demo',
   'nodejs-compressing-demo.tar');
  await compressing.gzip.compressFile('nodejs-compressing-demo.tar',
   'nodejs-compressing-demo.tgz');
  console.log('success');
 } catch (err) {
  console.error(err);
 }

 // 解压缩
 try {
  await compressing.gzip.uncompress('nodejs-compressing-demo.tgz',
   'nodejs-compressing-demo.tar');
  await compressing.tar.uncompress('nodejs-compressing-demo.tar',
   'nodejs-compressing-demo2');
  console.log('success');
 } catch (err) {
  console.error(err);
 }
}

main();Stream interface
Through compressing.tar.Stream Class, you can dynamically add any files and folders to a tar stream object, which is very flexible.
const tarStream = new compressing.tar.Stream();
// dir
tarStream.addEntry('dir/path/to/compress');
// file
tarStream.addEntry('file/path/to/compress');
// buffer
tarStream.addEntry(buffer);
// stream
tarStream.addEntry(stream);

const destStream = fs.createWriteStream('path/to/destination.tgz');
pump(tarStream, new compressing.gzip.FileStream(), destStream, err => {
 if (err) {
  console.error(err);
 } else {
  console.log('success');
 }
});zip
zip can actually be regarded as a "commercial" combination of tar gzip. It allows users to not distinguish between compressed files and compressed folders. Anyway, just use my zip.
Example of using the zip command line tool to compress a folder:
$ zip -r nodejs-compressing-demo.zip nodejs-compressing-demo/
 adding: nodejs-compressing-demo/ (stored 0%)
 adding: nodejs-compressing-demo/test/ (stored 0%)
 ...
 adding: nodejs-compressing-demo/.travis.yml (deflated 36%)

$ ls -l nodejs-compressing-demo.*
-rw-r--r-- 1 a a 206336 Feb 12 14:06 nodejs-compressing-demo.tar
-rw-r--r-- 1 a a  39808 Feb 12 14:07 nodejs-compressing-demo.tgz
-rw-r--r-- 1 a a  55484 Feb 12 14:34 nodejs-compressing-demo.zip
By comparing the file sizes of tgz and zip, it can be seen that under the default compression parameters, gzip will perform better than zip.
Node.js implements zip
The implementation code is similar to tar, except that it is compressed by default, and there is no need to add the gzip process.
const compressing = require('compressing');

compressing.zip.compressDir('nodejs-compressing-demo', 'nodejs-compressing-demo.zip')
 .then(() => {
  console.log('success');
 })
 .catch(err => {
  console.error(err);
 });

// 解压缩
compressing.zip.uncompress('nodejs-compressing-demo.zip', 'nodejs-compressing-demo3')
 .then(() => {
  console.log('success');
 })
 .catch(err => {
  console.error(err);
});Summary
Is compression and decompression based on Node.js easier than imagined? Thanks to the giant npm, we can have the simple experience of programming with command line tools.
Whether it is the Promise interface or the Stream interface, it has its most suitable scenario. Will you choose it?
At this point, with the compression and decompression capabilities you have, what kind of services and functions can you do?
The above is what I compiled for everyone. I hope it will be helpful to everyone in the future.
Related articles:
Using tween.js to implement easing tween animation algorithm
Detailed explanation of refs in React (detailed tutorial )
How to achieve intermittent text cycle scrolling effect through JS
The above is the detailed content of Using Node.js to implement compression and decompression functions. For more information, please follow other related articles on the PHP Chinese website!

Hot AI Tools

Undresser.AI Undress
AI-powered app for creating realistic nude photos

AI Clothes Remover
Online AI tool for removing clothes from photos.

Undress AI Tool
Undress images for free

Clothoff.io
AI clothes remover

Video Face Swap
Swap faces in any video effortlessly with our completely free AI face swap tool!

Hot Article
Hot Tools

Notepad++7.3.1
Easy-to-use and free code editor

SublimeText3 Chinese version
Chinese version, very easy to use

Zend Studio 13.0.1
Powerful PHP integrated development environment

Dreamweaver CS6
Visual web development tools

SublimeText3 Mac version
God-level code editing software (SublimeText3)
Hot Topics


 Is nodejs a backend framework?
Apr 21, 2024 am 05:09 AM
Is nodejs a backend framework?
Apr 21, 2024 am 05:09 AM
Node.js can be used as a backend framework as it offers features such as high performance, scalability, cross-platform support, rich ecosystem, and ease of development.
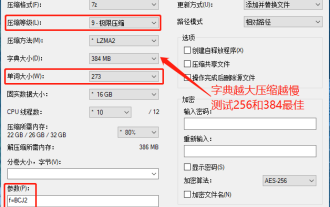 7-zip maximum compression rate setting, how to compress 7zip to the minimum
Jun 18, 2024 pm 06:12 PM
7-zip maximum compression rate setting, how to compress 7zip to the minimum
Jun 18, 2024 pm 06:12 PM
I found that the compressed package downloaded from a download website will be larger than the original compressed package after decompression. The difference is tens of Kb for a small one and several dozen Mb for a large one. If it is uploaded to a cloud disk or paid space, it does not matter if the file is small. , if there are many files, the storage cost will be greatly increased. I studied it specifically and can learn from it if necessary. Compression level: 9-Extreme compression Dictionary size: 256 or 384, the more compressed the dictionary, the slower it is. The compression rate difference is larger before 256MB, and there is no difference in compression rate after 384MB. Word size: maximum 273 Parameters: f=BCJ2, test and add parameter compression rate will be higher
 How to connect nodejs to mysql database
Apr 21, 2024 am 06:13 AM
How to connect nodejs to mysql database
Apr 21, 2024 am 06:13 AM
To connect to a MySQL database, you need to follow these steps: Install the mysql2 driver. Use mysql2.createConnection() to create a connection object that contains the host address, port, username, password, and database name. Use connection.query() to perform queries. Finally use connection.end() to end the connection.
 What are the global variables in nodejs
Apr 21, 2024 am 04:54 AM
What are the global variables in nodejs
Apr 21, 2024 am 04:54 AM
The following global variables exist in Node.js: Global object: global Core module: process, console, require Runtime environment variables: __dirname, __filename, __line, __column Constants: undefined, null, NaN, Infinity, -Infinity
 What is the difference between npm and npm.cmd files in the nodejs installation directory?
Apr 21, 2024 am 05:18 AM
What is the difference between npm and npm.cmd files in the nodejs installation directory?
Apr 21, 2024 am 05:18 AM
There are two npm-related files in the Node.js installation directory: npm and npm.cmd. The differences are as follows: different extensions: npm is an executable file, and npm.cmd is a command window shortcut. Windows users: npm.cmd can be used from the command prompt, npm can only be run from the command line. Compatibility: npm.cmd is specific to Windows systems, npm is available cross-platform. Usage recommendations: Windows users use npm.cmd, other operating systems use npm.
 Pi Node Teaching: What is a Pi Node? How to install and set up Pi Node?
Mar 05, 2025 pm 05:57 PM
Pi Node Teaching: What is a Pi Node? How to install and set up Pi Node?
Mar 05, 2025 pm 05:57 PM
Detailed explanation and installation guide for PiNetwork nodes This article will introduce the PiNetwork ecosystem in detail - Pi nodes, a key role in the PiNetwork ecosystem, and provide complete steps for installation and configuration. After the launch of the PiNetwork blockchain test network, Pi nodes have become an important part of many pioneers actively participating in the testing, preparing for the upcoming main network release. If you don’t know PiNetwork yet, please refer to what is Picoin? What is the price for listing? Pi usage, mining and security analysis. What is PiNetwork? The PiNetwork project started in 2019 and owns its exclusive cryptocurrency Pi Coin. The project aims to create a one that everyone can participate
 Is there a big difference between nodejs and java?
Apr 21, 2024 am 06:12 AM
Is there a big difference between nodejs and java?
Apr 21, 2024 am 06:12 AM
The main differences between Node.js and Java are design and features: Event-driven vs. thread-driven: Node.js is event-driven and Java is thread-driven. Single-threaded vs. multi-threaded: Node.js uses a single-threaded event loop, and Java uses a multi-threaded architecture. Runtime environment: Node.js runs on the V8 JavaScript engine, while Java runs on the JVM. Syntax: Node.js uses JavaScript syntax, while Java uses Java syntax. Purpose: Node.js is suitable for I/O-intensive tasks, while Java is suitable for large enterprise applications.
 Is nodejs a back-end development language?
Apr 21, 2024 am 05:09 AM
Is nodejs a back-end development language?
Apr 21, 2024 am 05:09 AM
Yes, Node.js is a backend development language. It is used for back-end development, including handling server-side business logic, managing database connections, and providing APIs.
