
 Web Front-end
JS Tutorial
Detailed explanation of the steps to build a personal blog using VuePress (with code)
Web Front-end
JS Tutorial
Detailed explanation of the steps to build a personal blog using VuePress (with code)
Detailed explanation of the steps to build a personal blog using VuePress (with code)
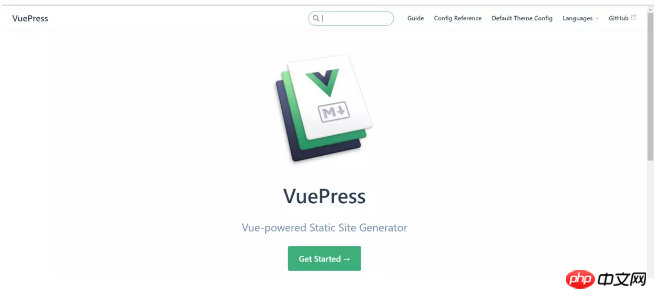
This time I will bring you a detailed explanation of the steps to use VuePress to build a personal blog (with code), and what are the precautions for using VuePress to build a personal blog. The following is a practical case, let's take a look.
VuePress


Get started building
You can follow the examples in the document and play with it yourself. However, since VuePress documentation is also implemented using VuePress, I took a trick and directly used the docs directory in the VuePress warehouse to play with it. 1. First install VuePress globallynpm install -g vuepress
git clone git@github.com:docschina/vuepress.git
cd vuepress
cd docs
vuepress dev
VuePress dev server listening at http://localhost:8080/
directory structure of docs:
├─.vuepress
│ ├─components
│ └─public
│ └─icons
│ └─config.js // 配置文件
├─config // Vuepress文档的配置参考内容
├─default-theme-config // Vuepress文档的默认主题配置内容
├─guide // Vuepress文档的指南内容
└─zh // 中文文档目录
 ├─config
 ├─default-theme-config
 └─guide
└─README.md // 首页配置文件
Home page configuration
The default theme provides a home page layout. To use it, you need to set the YAML front of README.md in your root directory Specify home: true in matter and add some other metadata. Let’s take a look at the README in the root directory first, md:home: true // 是否使用Vuepress默认主题 heroImage: /hero.png // 首页的图片 actionText: Get Started → // 按钮的文字 actionLink: /guide/ // 按钮跳转的目录 features: // 首页三个特性 - title: Simplicity First details: Minimal setup with markdown-centered project structure helps you focus on writing. - title: Vue-Powered details: Enjoy the dev experience of Vue + webpack, use Vue components in markdown, and develop custom themes with Vue. - title: Performant details: VuePress generates pre-rendered static HTML for each page, and runs as an SPA once a page is loaded. footer: MIT Licensed | Copyright © 2018-present Evan You // 页尾
Navigation configuration
The navigation configuration file is in .vuepress/config.jsIn the navigation configuration file nav is To control the navigation bar link, you can change it to your own blog directory.nav: [
{
text: 'Guide',
link: '/guide/',
},
{
text: 'Config Reference',
link: '/config/'
},
{
text: 'Default Theme Config',
link: '/default-theme-config/'
}
]Documentation descriptionI won’t go into details here.
Change the default theme color
You can create an override.styl file in the .vuepress/ directory. vuepress provides four changeable colors:$accentColor = #3eaf7c // 主题色 $textColor = #2c3e50 // 文字颜色 $borderColor = #eaecef // 边框颜色 $codeBgColor = #282c34 // 代码背景颜色

Implementation of Sidebar
Since there are many people asking in the comment area, I will update it here. In fact, no matter how detailed I write here, it is not as good as everyone reading the official document. . The configuration of the sidebar is also in .vuepress/config.js:sidebar: [
{
title: 'JavaScript', // 侧边栏名称
collapsable: true, // 可折叠
children: [
'/blog/JavaScript/学会了ES6,就不会写出那样的代码', // 你的md文件地址
]
},
{
title: 'CSS',
collapsable: true,
children: [
'/blog/CSS/搞懂Z-index的所有细节',
]
},
{
title: 'HTTP',
collapsable: true,
children: [
'/blog/HTTP/认识HTTP-Cookie和Session篇',
]
},
]├─blog // docs目录下新建一个博客目录 │ ├─CSS │ ├─HTTP │ └─JavaScript
Deployment
After configuring your blog, execute the command line:Vuepress build
When you see this line, it means success:
Success! Generated static files in vuepress.
will be packaged Upload the good vuepress directory to your github repository, and cooperate with github page to configure your blog website.
I believe you have mastered the method after reading the case in this article. For more exciting information, please pay attention to other related articles on the php Chinese website!
Recommended reading:
Detailed explanation of the steps for Vue to implement mobile WeChat public account
jQuery steps to implement clicking on the title text to switch fonts Detailed explanation
The above is the detailed content of Detailed explanation of the steps to build a personal blog using VuePress (with code). For more information, please follow other related articles on the PHP Chinese website!

Hot AI Tools

Undresser.AI Undress
AI-powered app for creating realistic nude photos

AI Clothes Remover
Online AI tool for removing clothes from photos.

Undress AI Tool
Undress images for free

Clothoff.io
AI clothes remover

Video Face Swap
Swap faces in any video effortlessly with our completely free AI face swap tool!

Hot Article
Hot Tools

Notepad++7.3.1
Easy-to-use and free code editor

SublimeText3 Chinese version
Chinese version, very easy to use

Zend Studio 13.0.1
Powerful PHP integrated development environment

Dreamweaver CS6
Visual web development tools

SublimeText3 Mac version
God-level code editing software (SublimeText3)
Hot Topics


 Start from scratch and guide you step by step to install Flask and quickly establish a personal blog
Feb 19, 2024 pm 04:01 PM
Start from scratch and guide you step by step to install Flask and quickly establish a personal blog
Feb 19, 2024 pm 04:01 PM
Starting from scratch, I will teach you step by step how to install Flask and quickly build a personal blog. As a person who likes writing, it is very important to have a personal blog. As a lightweight Python Web framework, Flask can help us quickly build a simple and fully functional personal blog. In this article, I will start from scratch and teach you step by step how to install Flask and quickly build a personal blog. Step 1: Install Python and pip Before starting, we need to install Python and pi first
 What are the top ten open source PHP blog systems in 2022? 【recommend】
Jul 27, 2022 pm 05:38 PM
What are the top ten open source PHP blog systems in 2022? 【recommend】
Jul 27, 2022 pm 05:38 PM
Blog, also translated as web log, blog or blog, is a website that is usually managed by individuals and posts new articles from time to time. So how to set up a blog? What are the PHP blog systems? Which blogging system is best to use? Below, PHP Chinese website will summarize and share the top ten open source PHP blog systems with you. Let’s take a look!
 Create a simple blog: using PHP and SQLite
Jun 21, 2023 pm 01:23 PM
Create a simple blog: using PHP and SQLite
Jun 21, 2023 pm 01:23 PM
With the development of the Internet, blogs have become a platform for more and more people to share their lives, knowledge and ideas. If you also want to create a blog of your own, then this article will introduce how to use PHP and SQLite to create a simple blog. Determine the needs Before starting to create a blog, we need to determine the functions we want to achieve. For example: Create a blog post Edit a blog post Delete a blog post Display a list of blog posts Display blog post details User authentication and permission control Install PHP and SQLite We need to install PHP and S
 Introduction to methods for individuals to join corporate WeChat
Mar 26, 2024 am 10:16 AM
Introduction to methods for individuals to join corporate WeChat
Mar 26, 2024 am 10:16 AM
1. First, open the enterprise WeChat software you downloaded on your mobile phone. When logging in, there are two ways to choose: one is to use WeChat ID, the other is to use mobile phone number. 3. At this time, the enterprise administrator needs to add your mobile phone number in the background, and then Enterprise WeChat will identify the enterprise based on your mobile phone number. Then display your business and click the Enter Business option below. 4. Then you can enter the use of functions in the software. It can be said that the most important thing is that your mobile phone number must be added to the enterprise by the administrator, otherwise it will not be available.
 Build a blog website using the Python Django framework
Jun 17, 2023 pm 03:37 PM
Build a blog website using the Python Django framework
Jun 17, 2023 pm 03:37 PM
With the popularity of the Internet, blogs play an increasingly important role in information dissemination and communication. In this context, more and more people are starting to build their own blog sites. This article will introduce how to use the PythonDjango framework to build your own blog website. 1. Introduction to the PythonDjango framework PythonDjango is a free and open source web framework that can be used to quickly develop web applications. The framework provides developers with powerful tools to help them build feature-rich
 How to create a simple blog using PHP
Sep 24, 2023 am 08:25 AM
How to create a simple blog using PHP
Sep 24, 2023 am 08:25 AM
How to create a simple blog using PHP 1. Introduction With the rapid development of the Internet, blogs have become an important way for people to share experiences, record life and express opinions. This article will introduce how to use PHP to create a simple blog, with specific code examples. 2. Preparation Before starting, you need to have the following development environment: a computer with a PHP interpreter and Web server (such as Apache) installed, a database management system, such as MySQL, a text editor or IDE3
 How to create a blog
Oct 10, 2023 am 09:46 AM
How to create a blog
Oct 10, 2023 am 09:46 AM
You can create a blog by determining the topic and target audience of the blog, choosing a suitable blogging platform, registering a domain name and purchasing hosting, designing the appearance and layout of the blog, writing quality content, promoting the blog, and analyzing and improving it.
 A complete guide to installing and building a blog on CentOS
Feb 14, 2024 pm 08:27 PM
A complete guide to installing and building a blog on CentOS
Feb 14, 2024 pm 08:27 PM
This article will introduce in detail how to install and build a blog on CentOS system, including the required software installation, configuration and basic usage. At the end of the article, I will share a little Linux knowledge. With the continuous development of Internet technology, more and more people choose to use blogs to record their lives and share knowledge. As a popular Linux distribution, CentOS is stable and secure and is suitable for building blogs. This article will Detailed introduction to the steps of installing and setting up a blog on CentOS. Preparation before installation 1. Make sure that the CentOS operating system has been installed and can be connected to the Internet. 2. Have basic knowledge of Linux command line operations. Install Apache server 1. Open the terminal and use the following command
