

Vue+Observer usage steps instructions
This time I will bring you the step-by-step instructions for using Vue Observer. What are the precautions when using Vue Observer? The following is a practical case, let’s take a look.
Introduction:
This article is an in-depth introduction to the responsive principles of Vue official documentation (https://cn.vuejs.org/v2/guide /reactivity.html) and restore the implementation process through the source code.
The responsive principle can be divided into two steps, the process of relying on collection and the process of triggering and re-rendering. There are three very important classes in the dependency collection process, namely Watcher, Dep, and Observer. This article mainly explains Observer.
This article explains the content of Observer that was not covered in the previous article. Let’s first look at this picture on the official website:
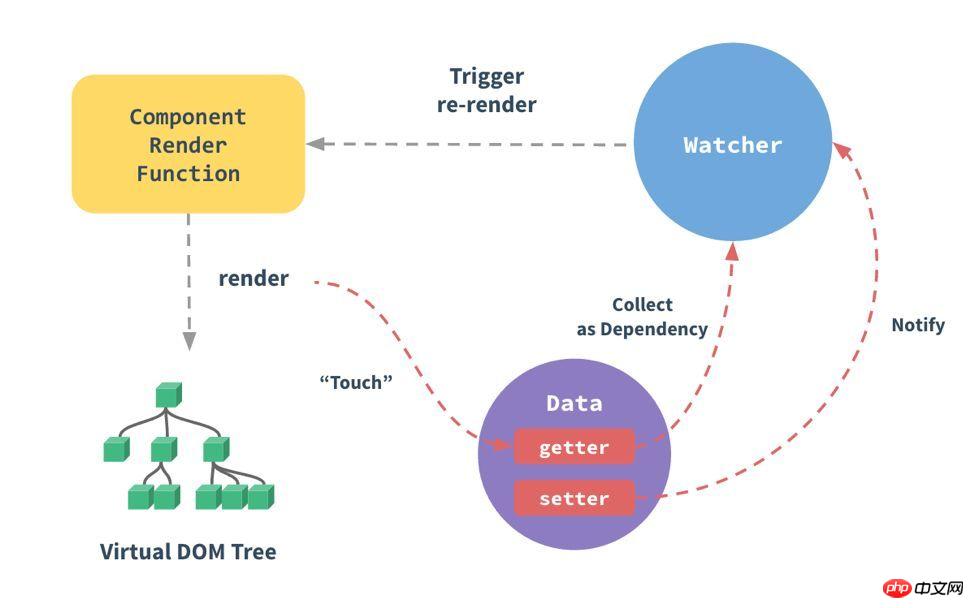
The main function of Observer It realizes the process of touch -Data(getter) - Collect as Dependency in the picture above, which is the process of dependency collection.
Let’s take the following code as an example to sort it out:
(Note: Swipe left and right to view the complete code, the same below)
varvm = newVue({
el: '#demo',
data: {
firstName: 'Hello',
fullName: ''
},
watch: {
firstName(val) {
this.fullName = val + 'TalkingData';
},
}
})In the source code, restore Vue The process of instantiation, step by step from the beginning to the source code of the Observer class, is as follows (a lot of code that is not discussed in this article is omitted):
// src/core/instance/index.js
functionVue(options) {
if(process.env.NODE_ENV !== 'production'&&
!(thisinstanceofVue)
) {
warn('Vue is a constructor and should be called with the `new` keyword')
}
this._init(options)
}
// src/core/instance/init.js
Vue.prototype._init = function(options?: Object) {
constvm: Component = this
// ...
initState(vm)
// ...
}
// src/core/instance/state.js
exportfunctioninitState(vm: Component) {
// ...
constopts = vm.$options
if(opts.data) {
initData(vm)
}
// ...
}
functioninitData(vm: Component) {
letdata = vm.$options.data
data = vm._data = typeofdata === 'function'
? getData(data, vm)
: data || {}
// ...
// observe data
observe(data, true/* asRootData */)
}In the initData method, the data in the data item begins Performing "observation" will turn all data into observable. Next, look at the code of the observe method:
// src/core/observer/index.js
functionobserve(value: any, asRootData: ?boolean): Observer| void{
// 如果不是对象,直接返回
if(!isObject(value) || value instanceofVNode) {
return
}
letob: Observer | void
if(hasOwn(value, 'ob') && value.ob instanceofObserver) {
// 如果有实例则返回实例
ob = value.ob
} elseif(
// 确保value是单纯的对象,而不是函数或者是Regexp等情况
observerState.shouldConvert &&
!isServerRendering() &&
(Array.isArray(value) || isPlainObject(value)) &&
Object.isExtensible(value) &&
!value._isVue
) {
// 实例化一个 Observer
ob = newObserver(value)
}
if(asRootData && ob) {
ob.vmCount++
}
returnob
}The function of the observe method is to create an Observer instance for data and return it. If data has the ob attribute, it means there is already an Observer instance, and the existing instance is returned. Vue's responsive data will have an ob attribute, which stores the Observer instance of the attribute to prevent repeated binding. Let’s look at what happens in the new Observer(value) process:
exportclassObserver{
value: any;
dep: Dep;
vmCount: number; // number of vms that has this object as root $data
constructor(value: any) {
this.value = value
this.dep = newDep()
this.vmCount = 0
def(value, 'ob', this)
if(Array.isArray(value)) {
// ...
this.observeArray(value)
} else{
this.walk(value)
}
}
walk (obj: Object) {
constkeys = Object.keys(obj)
for(leti = 0; i < keys.length; i++) {
defineReactive(obj, keys[i], obj[keys[i]])
}
}
observeArray (items: Array<any>) {
for(leti = 0, l = items.length; i < l; i++) {
observe(items[i])
}
}
}As you can see from the source code, there are two main judgments made in the process of instantiating Observer. If it is an array, call the oberser method again for each item in the array to observe; if it is a non-array object, traverse each attribute of the object and call the defineReactive method on it. The defineReactive method here is the core! Dependency collection is completed by using the Object.defineProperty method to add get/set to each property that needs to be observed. After dependencies are collected, each property will have a Dep to save all Watcher objects. According to the example at the beginning of the article, get/set is added to firstName and fullName respectively, and each of them has a Dep instance to save all the Watcher objects that observe them. The following is the source code of defineReactive:
exportfunctiondefineReactive(
obj: Object,
key: string,
val: any,
customSetter?: ?Function,
shallow?: boolean
) {
constdep = newDep()
// 获取属性的自身描述符
constproperty = Object.getOwnPropertyDeor(obj, key)
if(property && property.configurable === false) {
return
}
// cater for pre-defined getter/setters
// 检查属性之前是否设置了 getter/setter
// 如果设置了,则在之后的 get/set 方法中执行设置了的 getter/setter
constgetter = property && property.get
constsetter = property && property.set
// 通过对属性再次调用 observe 方法来判断是否有子对象
// 如果有子对象,对子对象也进行依赖搜集
letchildOb = !shallow && observe(val)
Object.defineProperty(obj, key, {
enumerable: true,
configurable: true,
get: functionreactiveGetter() {
// 如果属性原本拥有getter方法则执行
constvalue = getter ? getter.call(obj) : val
if(Dep.target) {
// 进行依赖收集
dep.depend()
if(childOb) {
// 如果有子对象,对子对象也进行依赖搜集
childOb.dep.depend()
// 如果属性是数组,则对每一个项都进行依赖收集
// 如果某一项还是数组,则递归
if(Array.isArray(value)) {
dependArray(value)
}
}
}
returnvalue
},
set: functionreactiveSetter(newVal) {
// 如果属性原本拥有getter方法则执行
// 通过getter方法获取当前值,与新值进行比较
// 如果新旧值一样则不需要执行下面的操作
constvalue = getter ? getter.call(obj) : val
/* eslint-disable no-self-compare */
if(newVal === value || (newVal !== newVal && value !== value)) {
return
}
/* eslint-enable no-self-compare */
if(process.env.NODE_ENV !== 'production'&& customSetter) {
customSetter()
}
if(setter) {
// 如果属性原本拥有setter方法则执行
setter.call(obj, newVal)
} else{
// 如果原本没有setter则直接赋新值
val = newVal
}
// 判断新的值是否有子对象,有的话继续观察子对象
childOb = !shallow && observe(newVal)
// 通知所有的观察者,更新状态
dep.notify()
}
})
}According to the Chinese comments in the source code, you should be able to understand what work is done during the execution of defineReactive. In fact, the whole process is recursive, adding getters/setters for each property. For getters/setters, it is also necessary to complete recursion (judgment of sub-objects) for each attributeObserver pattern. For getter, it is used to complete dependency collection, that is, dep.depend() in the source code. For setters, once a piece of data triggers its set method, an update message will be published, notifying all observers of the data that it will also change. That is dep.notify() in the source code.
I believe you have mastered the method after reading the case in this article. For more exciting information, please pay attention to other related articles on the php Chinese website!
Recommended reading:
Detailed explanation of the steps to upload images in the vue axios form
axios sends a post request to submit an image form in detail
The above is the detailed content of Vue+Observer usage steps instructions. For more information, please follow other related articles on the PHP Chinese website!

Hot AI Tools

Undresser.AI Undress
AI-powered app for creating realistic nude photos

AI Clothes Remover
Online AI tool for removing clothes from photos.

Undress AI Tool
Undress images for free

Clothoff.io
AI clothes remover

Video Face Swap
Swap faces in any video effortlessly with our completely free AI face swap tool!

Hot Article
Hot Tools

Notepad++7.3.1
Easy-to-use and free code editor

SublimeText3 Chinese version
Chinese version, very easy to use

Zend Studio 13.0.1
Powerful PHP integrated development environment

Dreamweaver CS6
Visual web development tools

SublimeText3 Mac version
God-level code editing software (SublimeText3)
Hot Topics


 How to use magnet links
Feb 18, 2024 am 10:02 AM
How to use magnet links
Feb 18, 2024 am 10:02 AM
Magnet link is a link method for downloading resources, which is more convenient and efficient than traditional download methods. Magnet links allow you to download resources in a peer-to-peer manner without relying on an intermediary server. This article will introduce how to use magnet links and what to pay attention to. 1. What is a magnet link? A magnet link is a download method based on the P2P (Peer-to-Peer) protocol. Through magnet links, users can directly connect to the publisher of the resource to complete resource sharing and downloading. Compared with traditional downloading methods, magnetic
 How to use mdf and mds files
Feb 19, 2024 pm 05:36 PM
How to use mdf and mds files
Feb 19, 2024 pm 05:36 PM
How to use mdf files and mds files With the continuous advancement of computer technology, we can store and share data in a variety of ways. In the field of digital media, we often encounter some special file formats. In this article, we will discuss a common file format - mdf and mds files, and introduce how to use them. First, we need to understand the meaning of mdf files and mds files. mdf is the extension of the CD/DVD image file, and the mds file is the metadata file of the mdf file.
 What software is crystaldiskmark? -How to use crystaldiskmark?
Mar 18, 2024 pm 02:58 PM
What software is crystaldiskmark? -How to use crystaldiskmark?
Mar 18, 2024 pm 02:58 PM
CrystalDiskMark is a small HDD benchmark tool for hard drives that quickly measures sequential and random read/write speeds. Next, let the editor introduce CrystalDiskMark to you and how to use crystaldiskmark~ 1. Introduction to CrystalDiskMark CrystalDiskMark is a widely used disk performance testing tool used to evaluate the read and write speed and performance of mechanical hard drives and solid-state drives (SSD). Random I/O performance. It is a free Windows application and provides a user-friendly interface and various test modes to evaluate different aspects of hard drive performance and is widely used in hardware reviews
 How to download foobar2000? -How to use foobar2000
Mar 18, 2024 am 10:58 AM
How to download foobar2000? -How to use foobar2000
Mar 18, 2024 am 10:58 AM
foobar2000 is a software that can listen to music resources at any time. It brings you all kinds of music with lossless sound quality. The enhanced version of the music player allows you to get a more comprehensive and comfortable music experience. Its design concept is to play the advanced audio on the computer The device is transplanted to mobile phones to provide a more convenient and efficient music playback experience. The interface design is simple, clear and easy to use. It adopts a minimalist design style without too many decorations and cumbersome operations to get started quickly. It also supports a variety of skins and Theme, personalize settings according to your own preferences, and create an exclusive music player that supports the playback of multiple audio formats. It also supports the audio gain function to adjust the volume according to your own hearing conditions to avoid hearing damage caused by excessive volume. Next, let me help you
 How to use Baidu Netdisk app
Mar 27, 2024 pm 06:46 PM
How to use Baidu Netdisk app
Mar 27, 2024 pm 06:46 PM
Cloud storage has become an indispensable part of our daily life and work nowadays. As one of the leading cloud storage services in China, Baidu Netdisk has won the favor of a large number of users with its powerful storage functions, efficient transmission speed and convenient operation experience. And whether you want to back up important files, share information, watch videos online, or listen to music, Baidu Cloud Disk can meet your needs. However, many users may not understand the specific use method of Baidu Netdisk app, so this tutorial will introduce in detail how to use Baidu Netdisk app. Users who are still confused can follow this article to learn more. ! How to use Baidu Cloud Network Disk: 1. Installation First, when downloading and installing Baidu Cloud software, please select the custom installation option.
 How to use NetEase Mailbox Master
Mar 27, 2024 pm 05:32 PM
How to use NetEase Mailbox Master
Mar 27, 2024 pm 05:32 PM
NetEase Mailbox, as an email address widely used by Chinese netizens, has always won the trust of users with its stable and efficient services. NetEase Mailbox Master is an email software specially created for mobile phone users. It greatly simplifies the process of sending and receiving emails and makes our email processing more convenient. So how to use NetEase Mailbox Master, and what specific functions it has. Below, the editor of this site will give you a detailed introduction, hoping to help you! First, you can search and download the NetEase Mailbox Master app in the mobile app store. Search for "NetEase Mailbox Master" in App Store or Baidu Mobile Assistant, and then follow the prompts to install it. After the download and installation is completed, we open the NetEase email account and log in. The login interface is as shown below
 Simple guide to pip mirror source: easily master how to use it
Jan 16, 2024 am 10:18 AM
Simple guide to pip mirror source: easily master how to use it
Jan 16, 2024 am 10:18 AM
Get started easily: How to use pip mirror source With the popularity of Python around the world, pip has become a standard tool for Python package management. However, a common problem that many developers face when using pip to install packages is slowness. This is because by default, pip downloads packages from Python official sources or other external sources, and these sources may be located on overseas servers, resulting in slow download speeds. In order to improve download speed, we can use pip mirror source. What is a pip mirror source? To put it simply, just
 BTCC tutorial: How to bind and use MetaMask wallet on BTCC exchange?
Apr 26, 2024 am 09:40 AM
BTCC tutorial: How to bind and use MetaMask wallet on BTCC exchange?
Apr 26, 2024 am 09:40 AM
MetaMask (also called Little Fox Wallet in Chinese) is a free and well-received encryption wallet software. Currently, BTCC supports binding to the MetaMask wallet. After binding, you can use the MetaMask wallet to quickly log in, store value, buy coins, etc., and you can also get 20 USDT trial bonus for the first time binding. In the BTCCMetaMask wallet tutorial, we will introduce in detail how to register and use MetaMask, and how to bind and use the Little Fox wallet in BTCC. What is MetaMask wallet? With over 30 million users, MetaMask Little Fox Wallet is one of the most popular cryptocurrency wallets today. It is free to use and can be installed on the network as an extension
