

Configure PHP development environment through docker on Mac

The content of this article is about configuring the PHP development environment through docker on Mac. It has certain reference value. Now I share it with you. Friends in need can refer to it
Install docker
There are many articles on the Internet about installing docker on MAC. I will not describe it here. By the way, it is recommended to use the accelerator provided by Alibaba Cloud or Daocloud.
It is recommended to read this article: https://blog.csdn.net/jiang_x...
This article is equivalent to the Chinese version of the official document translation
Use docker-compose configuration development Environment
Generally, a basic PHP development environment includes PHP, PHP-FPM, WEB server, MySQL database, and related NoSQL services such as Redis or memcache. I mainly configure services through docker-compose.
What is docker-compose
docker-compose is a project defined through a YAML file, which contains single or multiple container services. The general configuration file name is: docker-compose.yml.
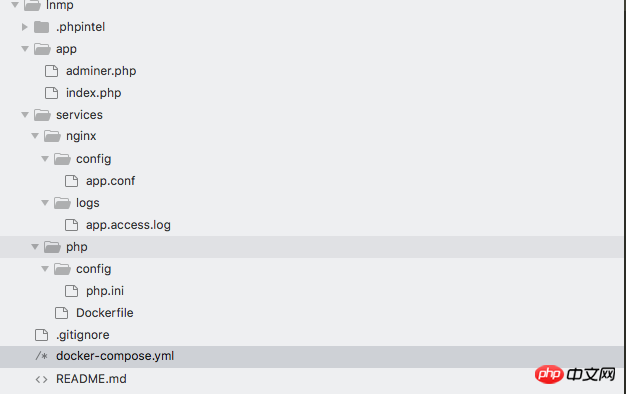
Directory structure
You can organize the project according to your own preferences. Here is the method I use. The app directory contains the application code. Services Below are the things needed to create services. Some The service requires us to create the image ourselves. In a Dockerfile file, explain what the image you want looks like. When creating a custom image, you may also need to use some additional files, such as some configuration files. Generally, these configuration files will be copied to the image when creating the image.
MySQL
Mysql is a data service. First add a data volume to this service, then use this data volume in this service, and put the data generated by the database here, so that even if we delete the container , the data in the data service will also be retained on the host, and you can continue to use the existing data when you create a container next time. Under volumes, add a data volume named mysql:
volumes: mysql: driver: local
Then add a service named MySQL and specify the image used by the service. We can also use the Dockerfile we created to create this image. Or if you don’t plan to customize the image, you can also use the ready-made one. Here I used the mysql:5.7 image. Note that it is best to set the specific version to be used.
There are some environment variables in this image. We can set their values when defining the service. Here I set the password of the root user, the database to be created, the user name, and the password. You can You can modify the values of these variables according to your own needs.
On the mysql service, I used volumes to specify a MySQL data volume for it. The mounting location is /var/lib/mysql of the container, which is the default place to store the database. Because I installed the MySQL service locally and the 3306 port is occupied, I designated the 6306 port to be mapped to the container's 3306
version: "3"services:  mysql:    image: mysql:5.7    environment:       MYSQL_ROOT_PASSWORD: "root"      MYSQL_DATABASE: "app"      MYSQL_USER: "app"      MYSQL_PASSWORD: "123456"    volumes:
      - ./services/mysql/data:/var/lib/mysql    ports:
- "6306:3306"test
There is now a file called For mysql service, under the command line tool, go to the directory where the project is located and execute:
docker-compose up
Then you will see the process of installing the image and starting the container on the terminal, and then open another command terminal. Execute:
docker-compose exec mysql bash
Enter the mysql container, and then enter the database to check:
mysql -uroot -pshow databases;
+--------------------+| Database           |
+--------------------+| information_schema |
| app                |
| mysql              |
| performance_schema || sys                |
+--------------------+5 rows in set (0.03 sec)
这个时候我们发现mysql容器已经可用了
php
定义一个解释 php 的服务,我打算自己创建这个服务用的镜像,所以用了 build,而不是 image 。我告诉了 docker 自己要创建的这个镜像要使用的那个 Dockerfile 文件的位置(./services/php/Dockerfile)。
volumes 下面是服务用的数据卷,我把 compose 文件所在目录下的 app 这个目录,挂载到了容器的 /www/html/app 这个位置上了。这样我可以直接修改项目的代码,然后立即看到结果;同时由于本机9000端口被占用,指定9090端口映射到容器的9000端口
php:    build:       context: ./services/php      dockerfile: Dockerfile    volumes:
      - ./app:/www/html/app    ports:
- "9090:9000"Dockerfile
构建 php 服务的镜像用的 Dockerfile 是 ./services/php/Dockerfile。FROM,设置了一下这个镜像要基于哪个镜像去创建,我用了 php:7.1-fpm 这个官方提供的镜像。RUN 了几行命令,主要是去安装一些软件包,比如一些额外的 php 扩展。在安装这些扩展之前 ,你需要先安装扩展依赖的一些其它的软件包,这里的 libpng12-dev,libjpeg-dev,就是 gd 这个 php 扩展需要的软件包。然后我又 COPY 了配置文件到镜像里面。
FROM php:7.1-fpm
RUN apt-get update && apt-get install -y libpng12-dev libjpeg-dev \
  && rm -rf /var/lib/apt/lists/* \
  && docker-php-ext-configure gd --with-png-dir=/usr --with-jpeg-dir=/usr \
  && docker-php-ext-install gd mysqli pdo_mysql zip opcache
COPY ./config/php.ini /usr/local/etc/php/conf.d/php.ini
php服务中遇到的坑
PHP这个镜像中软件是使用的Debian的源,因为众所周知的缘故会导致镜像安装不成功,如图所示:
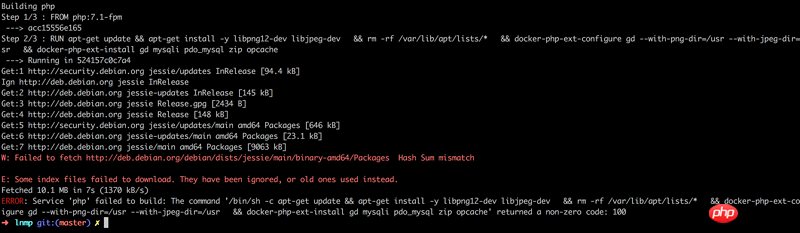
这个时候我们就需要更换源了,第一次换成了中科大的源,然后发现不行,第二次更换成了阿里云的源,完美完成镜像安装,修改过后的Dockerfile如下:
FROM php:7.1-fpm
RUN sed -i 's/deb.debian.org/mirrors.aliyun.com/g' /etc/apt/sources.list \
  && apt-get update && apt-get install -y libpng12-dev libjpeg-dev \
  && rm -rf /var/lib/apt/lists/* \
  && docker-php-ext-configure gd --with-png-dir=/usr --with-jpeg-dir=/usr \
  && docker-php-ext-install gd mysqli pdo_mysql zip opcache
COPY ./config/php.ini /usr/local/etc/php/conf.d/php.ini
使用sed命令搜索软件源文件,把Debian域名修改为阿里云域名
php.ini
自定义的 php 配置。把你想要的 php 配置放到这个文件里,重新 build 镜像,然后再次启动 php 服务的时候会用新的镜像重新创建容器,这样配置就会生效了。
memory_limit = 256Mpost_max_size = 100Mupload_max_filesize = 100M
Nginx
用 image 指定了要使用的镜像,ports 设置了发布的端口号,让主机上的 8000 对应容器的 80 。depends_on 可以设置服务的依赖,我让 nginx 服务依赖之前定义的 php ,这样会先启动 php ,然后再启动 nginx 。
另外我又用了 volumes 自己设置了一个数据卷,让主机上包含 nginx 配置文件的目录,对应容器里的 nginx 服务的配置文件目录,这样我就可以直接在本机上修改 nginx 的配置文件,然后重新启动一下 nginx 服务,配置就可以生效了。这种方法适用在开发环境上,因为修改了配置不需要重新 build 镜像,在生产环境中,你需要自己 build 这个 nginx 镜像,把想要的配置直接复制到镜像里去。在开发阶段有的时候我们需要查看nginx的日志,然后我配置了日志目录映射到容器,最后一个地址是代码目录
nginx:    image: nginx:1.12.2    ports:
      - "8000:80"    depends_on:
      - php    volumes:
      - ./services/nginx/config:/etc/nginx/conf.d
      - ./services/nginx/logs:/etc/nginx/logs/
- ./app:/www/html/appapp.conf
./services/nginx/config/app.conf,这是一个最基本的 nginx 配置文件,设置了应用的 root 是在 /www/html/app 这里,我们已经把主机上的 app 目录挂载到了容器里的 /www/html/app 这个地方。
注意这条指令:fastcgi_pass php:9000; 这里的 php 是我们定义的 php 这个服务的名字,在 compose 文件里定义的服务,它们之间可以使用服务的名字相互进行沟通,因为 docker 内置了 DNS 功能。
server {    listen       80;    server_name  localhost;    root         /www/html/app;    # access_log  /etc/nginx/logs/app.access.log  main;

    location / {
    index  index.html index.htm index.php;       autoindex   on;
    #        include     /usr/local/etc/nginx/conf.d/php-fpm;#        include     /usr/local/etc/nginx/conf.d/pathinfo.conf;
     if (!-e $request_filename) {                        ###一级目录下
                        rewrite ^/(.*)$ /index.php/$1 last;                        ###域名下的二级目录
                        #rewrite ^/html/(.*)$ /uuabc_home/index.php/$1 last;
                }
    }    location = /info {        allow   127.0.0.1;        deny    all;
    }   location ~ \.php(.*)$  {            # comment try_files $uri =404; to enable pathinfo
            # try_files $uri =404;
            fastcgi_pass                php:9000;            fastcgi_index               index.php;            fastcgi_split_path_info ^((?U).+\.php)(/?.+)$;            fastcgi_param SCRIPT_FILENAME $document_root$fastcgi_script_name;            fastcgi_param PATH_INFO $fastcgi_path_info;            fastcgi_param PATH_TRANSLATED $document_root$fastcgi_path_info;            include /etc/nginx/fastcgi_params;
        }   # error_page  404     /404.html;
# error_page 403 /403.html;}启动
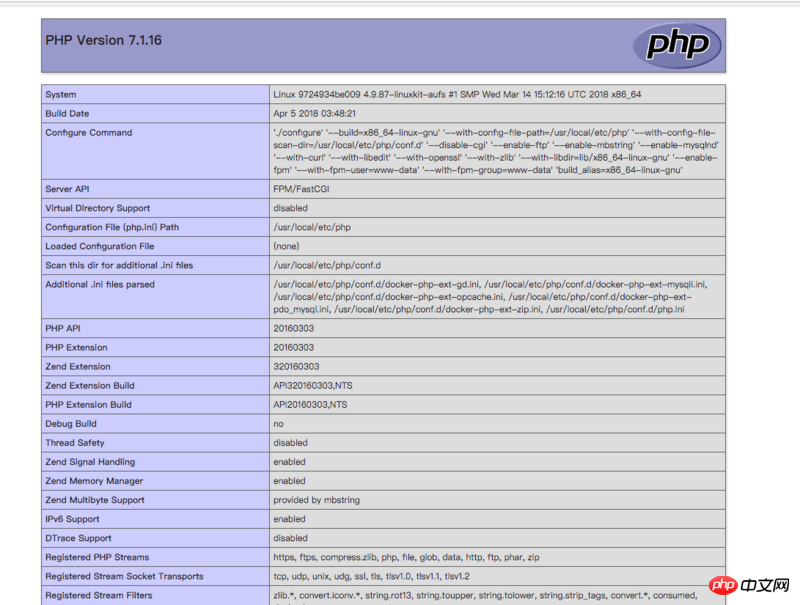
经过上面几个步骤,我们已经把PHP开发最基本的搞好了,下面我们准备看下成果。
在 app 目录下创建一个 index.php ,内容是:
<?php

phpinfo();进入到项目下面,执行:
docker-compose up
打开浏览器访问 http://localhost:8000/,结果如图所示:
连接数据库
在app目录有一个adminer.php文件,这个文件是一个类似于PHPmyadmin的数据库管理工具,比较轻量级,访问http://localhost:8000/adminer.php,如图所示:
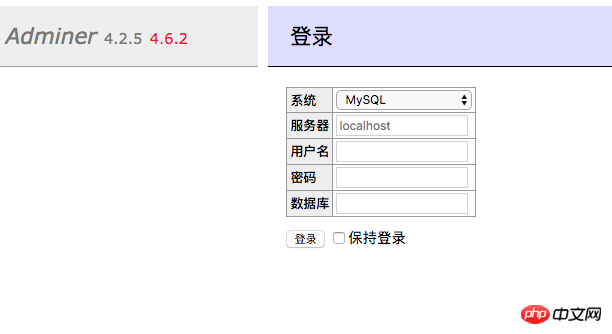
在表单服务器选项中填写mysql,用户名root,密码填写安装MySQL服务时的root密码,然后登陆进去,如图所示:
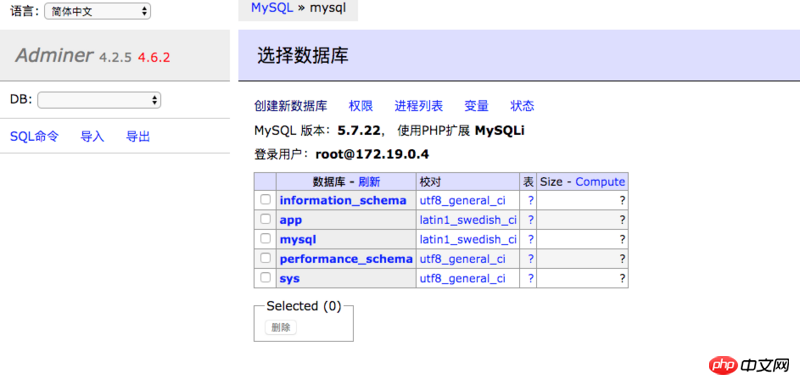
然后我们就可以愉快的管理数据库了。
Summary
At this point, we have installed the basic PHP development environment. If you need to install services such as Redis or memcache, you can do it yourself.
The following is the source code of my project, I hope it can help you, git address: https://github.com/xiaodingchen/docker-lnmp
Related recommendations:
Use docker to create an integrated service lnmp environment
Build a PHP development environment in Docker
The above is the detailed content of Configure PHP development environment through docker on Mac. For more information, please follow other related articles on the PHP Chinese website!

Hot AI Tools

Undresser.AI Undress
AI-powered app for creating realistic nude photos

AI Clothes Remover
Online AI tool for removing clothes from photos.

Undress AI Tool
Undress images for free

Clothoff.io
AI clothes remover

Video Face Swap
Swap faces in any video effortlessly with our completely free AI face swap tool!

Hot Article
Hot Tools

Notepad++7.3.1
Easy-to-use and free code editor

SublimeText3 Chinese version
Chinese version, very easy to use

Zend Studio 13.0.1
Powerful PHP integrated development environment

Dreamweaver CS6
Visual web development tools

SublimeText3 Mac version
God-level code editing software (SublimeText3)
Hot Topics


 PHP and Python: Different Paradigms Explained
Apr 18, 2025 am 12:26 AM
PHP and Python: Different Paradigms Explained
Apr 18, 2025 am 12:26 AM
PHP is mainly procedural programming, but also supports object-oriented programming (OOP); Python supports a variety of paradigms, including OOP, functional and procedural programming. PHP is suitable for web development, and Python is suitable for a variety of applications such as data analysis and machine learning.
 How to exit the container by docker
Apr 15, 2025 pm 12:15 PM
How to exit the container by docker
Apr 15, 2025 pm 12:15 PM
Four ways to exit Docker container: Use Ctrl D in the container terminal Enter exit command in the container terminal Use docker stop <container_name> Command Use docker kill <container_name> command in the host terminal (force exit)
 How to copy files in docker to outside
Apr 15, 2025 pm 12:12 PM
How to copy files in docker to outside
Apr 15, 2025 pm 12:12 PM
Methods for copying files to external hosts in Docker: Use the docker cp command: Execute docker cp [Options] <Container Path> <Host Path>. Using data volumes: Create a directory on the host, and use the -v parameter to mount the directory into the container when creating the container to achieve bidirectional file synchronization.
 Why Use PHP? Advantages and Benefits Explained
Apr 16, 2025 am 12:16 AM
Why Use PHP? Advantages and Benefits Explained
Apr 16, 2025 am 12:16 AM
The core benefits of PHP include ease of learning, strong web development support, rich libraries and frameworks, high performance and scalability, cross-platform compatibility, and cost-effectiveness. 1) Easy to learn and use, suitable for beginners; 2) Good integration with web servers and supports multiple databases; 3) Have powerful frameworks such as Laravel; 4) High performance can be achieved through optimization; 5) Support multiple operating systems; 6) Open source to reduce development costs.
 Choosing Between PHP and Python: A Guide
Apr 18, 2025 am 12:24 AM
Choosing Between PHP and Python: A Guide
Apr 18, 2025 am 12:24 AM
PHP is suitable for web development and rapid prototyping, and Python is suitable for data science and machine learning. 1.PHP is used for dynamic web development, with simple syntax and suitable for rapid development. 2. Python has concise syntax, is suitable for multiple fields, and has a strong library ecosystem.
 How to check the name of the docker container
Apr 15, 2025 pm 12:21 PM
How to check the name of the docker container
Apr 15, 2025 pm 12:21 PM
You can query the Docker container name by following the steps: List all containers (docker ps). Filter the container list (using the grep command). Gets the container name (located in the "NAMES" column).
 How to restart docker
Apr 15, 2025 pm 12:06 PM
How to restart docker
Apr 15, 2025 pm 12:06 PM
How to restart the Docker container: get the container ID (docker ps); stop the container (docker stop <container_id>); start the container (docker start <container_id>); verify that the restart is successful (docker ps). Other methods: Docker Compose (docker-compose restart) or Docker API (see Docker documentation).
 How to start mysql by docker
Apr 15, 2025 pm 12:09 PM
How to start mysql by docker
Apr 15, 2025 pm 12:09 PM
The process of starting MySQL in Docker consists of the following steps: Pull the MySQL image to create and start the container, set the root user password, and map the port verification connection Create the database and the user grants all permissions to the database
