
 Web Front-end
JS Tutorial
Detailed explanation of Node, Git, and Webhook automated deployment examples
Web Front-end
JS Tutorial
Detailed explanation of Node, Git, and Webhook automated deployment examples
Detailed explanation of Node, Git, and Webhook automated deployment examples

本文主要和大家分享Node 、Git 、Webhook自动化部署实例详解,希望能帮助到大家。
准备
首先确定需要完成的内容,明确需求:
1.监听指定 git 提交
2.执行指定多个脚本
而且因为我这边是需要分别对client 和server 目录分别执行部署命令。所以需要特别处理。
首先去域名管理那边增加一条A记录指向新的项目名称.因为Webhooks是需要外网域名的,因此先提前加一条。new.xxx.com
然后就是需要对服务器上Nginx做转发配置。
我的nginx是很久之前配置的
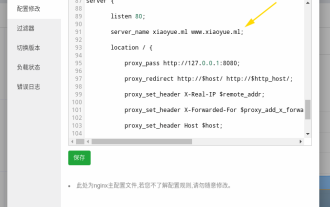
在etc/nginx/conf/vhost里增加一个文件,里面写入如下内容:
server
        {
                listen 80;
                server_name new.xxx.com;
                index index.html index.htm index.php default.html default.htm default.php;

                location / {

                        proxy_pass http://127.0.0.1:8801;
                }
                access_log off;

}将本地的8801转发出去。
然后重启一下Nginx nginx -s reload
然后git clone 仓库
因为项目用了mongodb数据库:
需要创建一个对应的数据库并添加权限。
1. 切换数据库到 abc
2. 指定了数据库 abc ,拥有权限: userAdmin
 db.createUser(
   {
     user: "123",
     pwd: "123",
     roles: [ { role: "userAdmin", db: "abc" } ]
   }
 )
 3. 验证下上面创建的账号 123

 db.auth('123','123')
=> 1配置webhook
这个其实是最简单的,只要在你的github对应的项目仓库右侧选择settings
然后选择webhooks
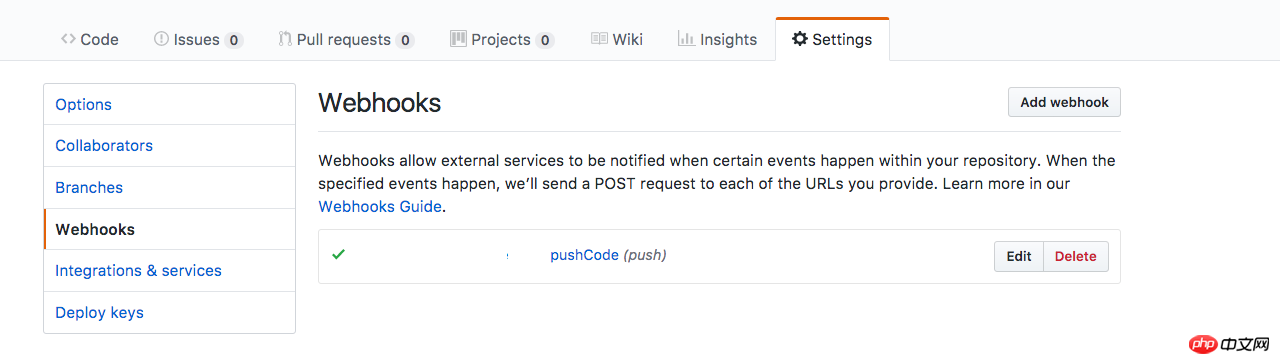
选择add webhook
然后按照如下配置即可:
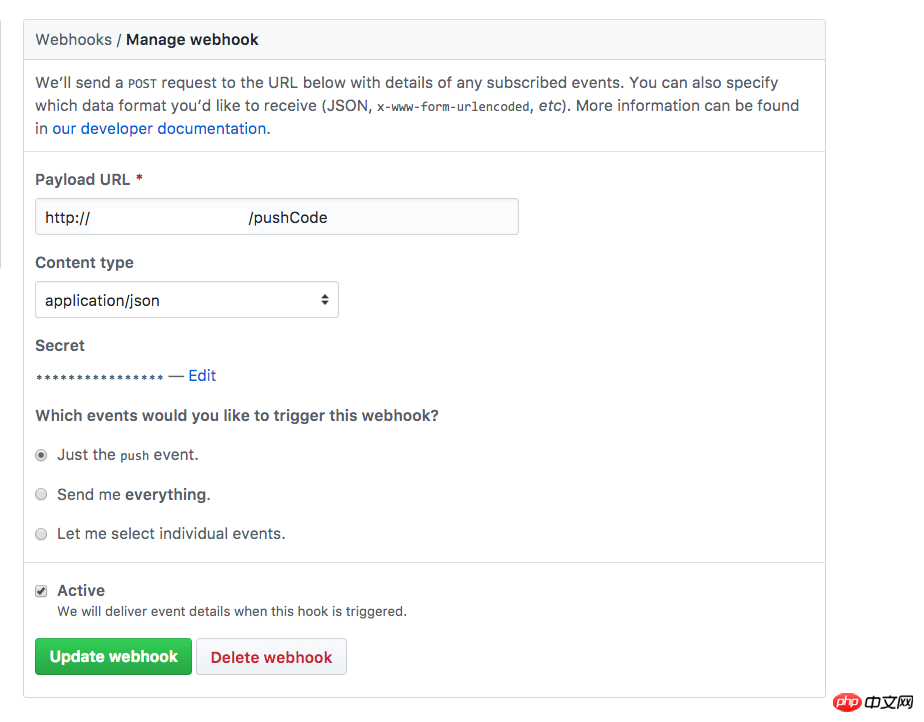
这里需要记住你自己设置的secret 以及你定义的推送动作,我这里是pushCode 。
开始写脚本
写之前先来看下最终的目录结构:
├── README.md
├── clean.sh // 清理缓存,并且执行git命令
├── client
│   ├── autoClient.sh // client端自动监听
│   ├── build
│   ├── config
│   ├── package.json
│   ├── public
│   ├── scripts
│   ├── src
│   ├── tsconfig.json
│   ├── tsconfig.test.json
│   ├── tslint.json
│   ├── www
│   ├── yarn.lock
├── deploy
│   └── index.js // 监听webhook事件然后依次执行 clean.sh autoClient.sh autoServer.sh
├── package.json
├── server
│   ├── autoServer.sh // server端自动监听
│   ├── dist
│   ├── package.json
│   ├── src
│   ├── tsconfig.json
│   ├── tslint.json
│   └── yarn.lock
因为项目原因,脚本还需要做一些定制。
首先是client端,因为前端是用了typescript + React全家桶 所以打包起来特别慢,当在服务器build的时候,因为阿里云内存给的不够,所以会很卡。基于这个考虑,是打算本地bulid完之后,推送到git上,服务器去git pull。
而且前端还有个考虑是用什么跑前端代码。因为服务器没装类似服务,因此打算用node框架koa起一个HTTP服务来跑。
代码如下:
www目录中
app.js

const Koa = require('koa')
const morgan = require('koa-morgan')
const path = require('path');
const static = require('koa-static')
const fs = require('fs')
const app = new Koa();
// logger
app.use(morgan(':remote-addr - :remote-user [:date[clf]] ":method :url HTTP/:http-version" :status :res[content-length] :response-time ms'));
// static assets
app.use(static(path.join(__dirname,'../build')));
//异步读取文件的形式
// app.use(async (ctx,next) =>{
//     ctx.type = 'html';
//     ctx.body = await fs.createReadStream(path.resolve(__dirname, '..', './build', 'index.html'));
// })
module.exports = app;index.js
'use strict';
const app = require('./app');
const PORT = process.env.PORT || 8801;
console.log('client start')
app.listen(PORT, () => {
console.log(`App listening on port ${PORT}!`);
});这样通过命令node ./www/index.js能够监听同级build目录。
当然这比较粗暴,还需要慢慢改进。
我们需要在client目录下建立autoClient.sh
#! /bin/bash
cd ./
echo 'client build'
kill -9 $(lsof -i:8801 |awk '{print $2}' | tail -n 2)
node ./www/index.js用来自动执行监听动作。
因为多次推送监听的前端端口一致,如果不处理会报错。需要先根据端口号8801结束进程然后重新开启服务。
然后是server端,因为整个后端是用koa完成的,项目比较小,在服务端即时编译花费不了多少时间,因此直接执行yarn start( "start": "yarn run build && yarn run watch",)用来编译和监听。
在server目录里建立autoServer.sh
#! /bin/bash
cd ./
echo 'server start'
kill -9 $(lsof -i:8866 |awk '{print $2}' | tail -n 2)
yarn run start同样我们需要在执行监听之前结束上一个端口的进程。
然后我们来看clean.sh 这个shell脚本是用来清理client目录下build文件夹。
#! /bin/bash
rm rf ./client/build
git reset --hard origin/master
git clean -f
git pull
可以看到 先清理了缓存然后再向服务器拉取代码.
最后我们来看部署的脚本deploy/index.js
var spawn = require('child_process').spawn
var http = require('http')
var spawn = require('child_process').spawn
var createHandler = require('github-webhook-handler')
var handler = createHandler({ path: '/pushCode', secret: 'xxx' }) // 根据git上webhook的配置填写
http.createServer(function (req, res) {
  handler(req, res, function (err) {
    res.statusCode = 404;
    res.end('no such location')
  })
}).listen(7777)

handler.on('error', function (err) {
  console.error('Error:', err.message)
})

// 监听 push 事件
handler.on('push', function (event) {
  console.log('Received a push event for %s to %s',
    event.payload.repository.name,
    event.payload.ref)
    init() // 每次拉取都重新监听
}
)
function rumCommand( cmd, args, cwd, callback ) {
  var child = spawn( cmd, args, {cwd: cwd} )
  var response = ''
  child.stdout.on('data', function( buffer ){ response += buffer.toString(); })
  child.stdout.on('end', function(){ callback( response ) })
}

function init() {
  rumCommand('sh', ['../clean.sh'], './' ,function( result ) { // 清理缓存
    console.log(result)
  })

  rumCommand('sh', ['../server/autoServer.sh'], '../server' ,function( result ) { // cLient端更新
    console.log(result)
  })

  rumCommand('sh', ['../client/autoClient.sh'], '../client' ,function( result ) { // server端更新
    console.log(result)
  })

}

init() // 脚本运行第一次默认指向一次这里需要声明的是因为多目录下执行脚本需要对应的环境。因此才把脚本都分开放。
部署
部署我们只需要对pm2 start deploy/index.js
然后就可以在本地开发完之后推送,服务器就能自动拉取代码并且部署。
相关推荐:
The above is the detailed content of Detailed explanation of Node, Git, and Webhook automated deployment examples. For more information, please follow other related articles on the PHP Chinese website!

Hot AI Tools

Undresser.AI Undress
AI-powered app for creating realistic nude photos

AI Clothes Remover
Online AI tool for removing clothes from photos.

Undress AI Tool
Undress images for free

Clothoff.io
AI clothes remover

Video Face Swap
Swap faces in any video effortlessly with our completely free AI face swap tool!

Hot Article
Hot Tools

Notepad++7.3.1
Easy-to-use and free code editor

SublimeText3 Chinese version
Chinese version, very easy to use

Zend Studio 13.0.1
Powerful PHP integrated development environment

Dreamweaver CS6
Visual web development tools

SublimeText3 Mac version
God-level code editing software (SublimeText3)
Hot Topics


 Pi Node Teaching: What is a Pi Node? How to install and set up Pi Node?
Mar 05, 2025 pm 05:57 PM
Pi Node Teaching: What is a Pi Node? How to install and set up Pi Node?
Mar 05, 2025 pm 05:57 PM
Detailed explanation and installation guide for PiNetwork nodes This article will introduce the PiNetwork ecosystem in detail - Pi nodes, a key role in the PiNetwork ecosystem, and provide complete steps for installation and configuration. After the launch of the PiNetwork blockchain test network, Pi nodes have become an important part of many pioneers actively participating in the testing, preparing for the upcoming main network release. If you don’t know PiNetwork yet, please refer to what is Picoin? What is the price for listing? Pi usage, mining and security analysis. What is PiNetwork? The PiNetwork project started in 2019 and owns its exclusive cryptocurrency Pi Coin. The project aims to create a one that everyone can participate
 How to use Nginx web server caddy
May 30, 2023 pm 12:19 PM
How to use Nginx web server caddy
May 30, 2023 pm 12:19 PM
Introduction to Caddy Caddy is a powerful and highly scalable web server that currently has 38K+ stars on Github. Caddy is written in Go language and can be used for static resource hosting and reverse proxy. Caddy has the following main features: Compared with the complex configuration of Nginx, its original Caddyfile configuration is very simple; it can dynamically modify the configuration through the AdminAPI it provides; it supports automated HTTPS configuration by default, and can automatically apply for HTTPS certificates and configure it; it can be expanded to data Tens of thousands of sites; can be executed anywhere with no additional dependencies; written in Go language, memory safety is more guaranteed. First of all, we install it directly in CentO
 Token-based authentication with Angular and Node
Sep 01, 2023 pm 02:01 PM
Token-based authentication with Angular and Node
Sep 01, 2023 pm 02:01 PM
Authentication is one of the most important parts of any web application. This tutorial discusses token-based authentication systems and how they differ from traditional login systems. By the end of this tutorial, you will see a fully working demo written in Angular and Node.js. Traditional Authentication Systems Before moving on to token-based authentication systems, let’s take a look at traditional authentication systems. The user provides their username and password in the login form and clicks Login. After making the request, authenticate the user on the backend by querying the database. If the request is valid, a session is created using the user information obtained from the database, and the session information is returned in the response header so that the session ID is stored in the browser. Provides access to applications subject to
 How to implement form validation for web applications using Golang
Jun 24, 2023 am 09:08 AM
How to implement form validation for web applications using Golang
Jun 24, 2023 am 09:08 AM
Form validation is a very important link in web application development. It can check the validity of the data before submitting the form data to avoid security vulnerabilities and data errors in the application. Form validation for web applications can be easily implemented using Golang. This article will introduce how to use Golang to implement form validation for web applications. 1. Basic elements of form validation Before introducing how to implement form validation, we need to know what the basic elements of form validation are. Form elements: form elements are
 Using Jetty7 for Web server processing in Java API development
Jun 18, 2023 am 10:42 AM
Using Jetty7 for Web server processing in Java API development
Jun 18, 2023 am 10:42 AM
Using Jetty7 for Web Server Processing in JavaAPI Development With the development of the Internet, the Web server has become the core part of application development and is also the focus of many enterprises. In order to meet the growing business needs, many developers choose to use Jetty for web server development, and its flexibility and scalability are widely recognized. This article will introduce how to use Jetty7 in JavaAPI development for We
 How to configure nginx to ensure that the frps server and web share port 80
Jun 03, 2023 am 08:19 AM
How to configure nginx to ensure that the frps server and web share port 80
Jun 03, 2023 am 08:19 AM
First of all, you will have a doubt, what is frp? Simply put, frp is an intranet penetration tool. After configuring the client, you can access the intranet through the server. Now my server has used nginx as the website, and there is only one port 80. So what should I do if the FRP server also wants to use port 80? After querying, this can be achieved by using nginx's reverse proxy. To add: frps is the server, frpc is the client. Step 1: Modify the nginx.conf configuration file in the server and add the following parameters to http{} in nginx.conf, server{listen80
 Real-time protection against face-blocking barrages on the web (based on machine learning)
Jun 10, 2023 pm 01:03 PM
Real-time protection against face-blocking barrages on the web (based on machine learning)
Jun 10, 2023 pm 01:03 PM
Face-blocking barrage means that a large number of barrages float by without blocking the person in the video, making it look like they are floating from behind the person. Machine learning has been popular for several years, but many people don’t know that these capabilities can also be run in browsers. This article introduces the practical optimization process in video barrages. At the end of the article, it lists some applicable scenarios for this solution, hoping to open it up. Some ideas. mediapipeDemo (https://google.github.io/mediapipe/) demonstrates the mainstream implementation principle of face-blocking barrage on-demand up upload. The server background calculation extracts the portrait area in the video screen, and converts it into svg storage while the client plays the video. Download svg from the server and combine it with barrage, portrait
 What are web standards?
Oct 18, 2023 pm 05:24 PM
What are web standards?
Oct 18, 2023 pm 05:24 PM
Web standards are a set of specifications and guidelines developed by W3C and other related organizations. It includes standardization of HTML, CSS, JavaScript, DOM, Web accessibility and performance optimization. By following these standards, the compatibility of pages can be improved. , accessibility, maintainability and performance. The goal of web standards is to enable web content to be displayed and interacted consistently on different platforms, browsers and devices, providing better user experience and development efficiency.
