

Input label input box with prompt text method

This article mainly introduces the input tag to implement the input box with prompt text effect (two methods). Friends who need it can refer to it. I hope it can help everyone.
Method 1: HTML5 cooperates with CSS3 to implement an input box with prompt text (get rid of js);
A CSS unique to webkit, which can control the text style inside and cooperate with the animation of CSS3 Effects and pseudo-classes, we can easily make an animated input box, which is very suitable for system login, search, etc. If you are interested, you can refer to this article, which may help you. Webkit is used as a carrier to develop the system. Of course It is necessary to use Html5 and CSS3 extensively, which not only reduces a large amount of JS but also ensures smoother flow.
When the dialog box is selected, the prompt text becomes lighter and disappears after input. The common practice now is to add a Label after the Input label. Use JS control.
After the advent of HTML5, we have a better way.
<input type="text" placeholder="用户名或邮件地址" name="username"/>
See that there is a placeholder tag, which can be used as a user text prompt. This is very convenient. But in order to be the most perfect, we need to make the text lighter or modify the style of the prompt file after selecting it. What should we do?
input::-webkit-input-placeholder {
color: #999;
-webkit-transition: color.5s;
}
input:focus::-webkit-input-placeholder, input:hover::-webkit-input-placeholder {
color: #c2c2c2;
-webkit-transition: color.5s;
}-webkit-input-placeholder, a CSS unique to webkit, can control the text style inside. With the animation effects and pseudo-classes of CSS3, we can easily make an animated input box. It is suitable for system login, search, etc. Of course, in order to be compatible with IE6, this method will not work. However, Ie9 also supports placeholder tags, but its color cannot be modified.
So, what should I do if it is not supported? You can simply use Jquery directly to help, so it is beyond the scope of this article.
Give me a Demo. The Demo address must be used in a Webkit browser to see the complete effect. Isn't it very convenient?
Method two: js control;
The code is as follows:
<script type="text/javascript">
 $(document).ready(function(){
 $("#focus .input_txt").each(function(){
  var thisVal=$(this).val();
  //判断文本框的值是否为空,有值的情况就隐藏提示语,没有值就显示
  if(thisVal!=""){
  $(this).siblings("span").hide();
  }else{
  $(this).siblings("span").show();
  }
  //聚焦型输入框验证
  $(this).focus(function(){
  $(this).siblings("span").hide();
  }).blur(function(){
  var val=$(this).val();
  if(val!=""){
   $(this).siblings("span").hide();
  }else{
   $(this).siblings("span").show();
  }
  });
 })
 $("#keydown .input_txt").each(function(){
  var thisVal=$(this).val();
  //判断文本框的值是否为空,有值的情况就隐藏提示语,没有值就显示
  if(thisVal!=""){
  $(this).siblings("span").hide();
  }else{
  $(this).siblings("span").show();
  }
  $(this).keyup(function(){
  var val=$(this).val();
  $(this).siblings("span").hide();
  }).blur(function(){
  var val=$(this).val();
  if(val!=""){
   $(this).siblings("span").hide();
  }else{
   $(this).siblings("span").show();
  }
  })
  })
 })
</script>The effect is as shown;
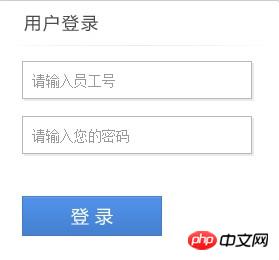
Click When the focus is lost, the prompt text appears, but after inputting content, the prompt text is not displayed when the focus is lost. Also, the password box is different from the text box, and the value of the password box is not displayed.
Method 3: Write directly on the label; (this is more practical)
The code is as follows:
<input type="text" value="提示内容。。。" onFocus="if(value==defaultValue){value='';this.style.color='#000'}" onBlur="if(!value){value=defaultValue;this.style.color='#999'}" style ="#999;"/>
</p>Related recommendations:
The perfect solution to the textarea input box prompt text in html that must add default content
js method of displaying text box prompt text_javascript skills
jQuery Plug-in EnPlaceholder implements input box prompt text_jquery
The above is the detailed content of Input label input box with prompt text method. For more information, please follow other related articles on the PHP Chinese website!

Hot AI Tools

Undresser.AI Undress
AI-powered app for creating realistic nude photos

AI Clothes Remover
Online AI tool for removing clothes from photos.

Undress AI Tool
Undress images for free

Clothoff.io
AI clothes remover

Video Face Swap
Swap faces in any video effortlessly with our completely free AI face swap tool!

Hot Article
Hot Tools

Notepad++7.3.1
Easy-to-use and free code editor

SublimeText3 Chinese version
Chinese version, very easy to use

Zend Studio 13.0.1
Powerful PHP integrated development environment

Dreamweaver CS6
Visual web development tools

SublimeText3 Mac version
God-level code editing software (SublimeText3)
Hot Topics


 What should I do if Google Chrome prompts that the content of this tab is being shared?
Mar 13, 2024 pm 05:00 PM
What should I do if Google Chrome prompts that the content of this tab is being shared?
Mar 13, 2024 pm 05:00 PM
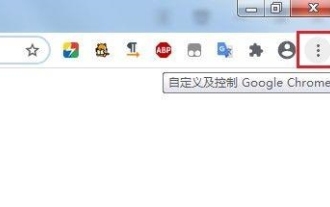
What should I do if Google Chrome prompts that the content of this tab is being shared? When we use Google Chrome to open a new tab, we sometimes encounter a prompt that the content of this tab is being shared. So what is going on? Let this site provide users with a detailed introduction to the problem of Google Chrome prompting that the content of this tab is being shared. Google Chrome prompts that the content of this tab is being shared. Solution: 1. Open Google Chrome. You can see three dots in the upper right corner of the browser "Customize and control Google Chrome". Click the icon with the mouse to change the icon. 2. After clicking, the menu window of Google Chrome will pop up below, and the mouse will move to "More Tools"
 How to make round pictures and text in ppt
Mar 26, 2024 am 10:23 AM
How to make round pictures and text in ppt
Mar 26, 2024 am 10:23 AM
First, draw a circle in PPT, then insert a text box and enter text content. Finally, set the fill and outline of the text box to None to complete the production of circular pictures and text.
 How to add dots to text in word?
Mar 19, 2024 pm 08:04 PM
How to add dots to text in word?
Mar 19, 2024 pm 08:04 PM
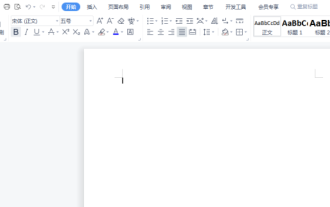
When we create Word documents on a daily basis, we sometimes need to add dots under certain words in the document, especially when there are test questions. To highlight this part of the content, the editor will share with you the tips on how to add dots to text in Word. I hope it can help you. 1. Open a blank word document. 2. For example, add dots under the words "How to add dots to text". 3. We first select the words "How to add dots to text" with the left mouse button. Note that if you want to add dots to that word in the future, you must first use the left button of the mouse to select which word. Today we are adding dots to these words, so we have chosen several words. Select these words, right-click, and click Font in the pop-up function box. 4. Then something like this will appear
 Golang Image Processing: Learn How to Add Watermarks and Text
Aug 17, 2023 am 08:41 AM
Golang Image Processing: Learn How to Add Watermarks and Text
Aug 17, 2023 am 08:41 AM
Golang Image Processing: Learn How to Add Watermarks and Text Quotes: In the modern era of digitalization and social media, image processing has become an important skill. Whether for personal use or business operations, adding watermarks and text are common needs. In this article, we will explore how to use Golang for image processing and learn how to add watermarks and text. Background: Golang is an open source programming language known for its concise syntax, efficient performance and powerful concurrency capabilities. it has become the subject of many developments
 Try new ringtones and text tones: Experience the latest sound alerts on iPhone in iOS 17
Oct 12, 2023 pm 11:41 PM
Try new ringtones and text tones: Experience the latest sound alerts on iPhone in iOS 17
Oct 12, 2023 pm 11:41 PM
In iOS 17, Apple has overhauled its entire selection of ringtones and text tones, offering more than 20 new sounds that can be used for calls, text messages, alarms, and more. Here's how to see them. Many new ringtones are longer and sound more modern than older ringtones. They include arpeggio, broken, canopy, cabin, chirp, dawn, departure, dolop, journey, kettle, mercury, galaxy, quad, radial, scavenger, seedling, shelter, sprinkle, steps, story time , tease, tilt, unfold and valley. Reflection remains the default ringtone option. There are also 10+ new text tones available for incoming text messages, voicemails, incoming mail alerts, reminder alerts, and more. To access new ringtones and text tones, first, make sure your iPhone
 How to modify text on pictures
Aug 29, 2023 am 10:29 AM
How to modify text on pictures
Aug 29, 2023 am 10:29 AM
Modifying the text on the image can be done by using image editing software, online tools or screenshot tools. The specific steps are: 1. Open the picture editing software and import the picture that needs to be modified; 2. Select the text tool; 3. Click the text area on the picture to create a text box; 4. Enter the text you want in the text box. 5. If you just want to delete the text on the picture, you can use the eraser tool or the selection tool to select and delete the text area.
 How to handle user input checksum prompts in Vue
Oct 15, 2023 am 10:10 AM
How to handle user input checksum prompts in Vue
Oct 15, 2023 am 10:10 AM
How to handle the verification and prompts of user input in Vue. Handling the verification and prompts of user input in Vue is a common requirement in front-end development. This article will introduce some common techniques and specific code examples to help developers better handle user input verification and prompts. Validation using computed properties In Vue, you can use computed properties to monitor and validate user input. You can define a calculated attribute to represent the value entered by the user, and perform validation logic in the calculated attribute. Here is an example: data(){
 How to encapsulate input components and unified form data in vue3
May 12, 2023 pm 03:58 PM
How to encapsulate input components and unified form data in vue3
May 12, 2023 pm 03:58 PM
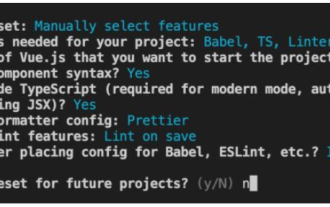
Preparation Use vuecreateexample to create a project. The parameters are roughly as follows: use native input. Native input is mainly value and change. The data needs to be synchronized when changing. App.tsx is as follows: import{ref}from'vue';exportdefault{setup(){//username is the data constusername=ref('Zhang San');//When the input box changes, synchronize the data constonInput=;return( )=>({
