

How to implement the React Native address picker function

This article mainly introduces the React Native imitation address picker function in detail. It has certain reference value. Interested friends can refer to it. I hope it can help everyone.
Product Manager: "You understand, swipe right here to bring up the menu, and then a flashing animation is needed. Also, I think this tab can be pulled down, do you understand?
Designer: “Stop talking nonsense and show me the product you want to copy. ”
…
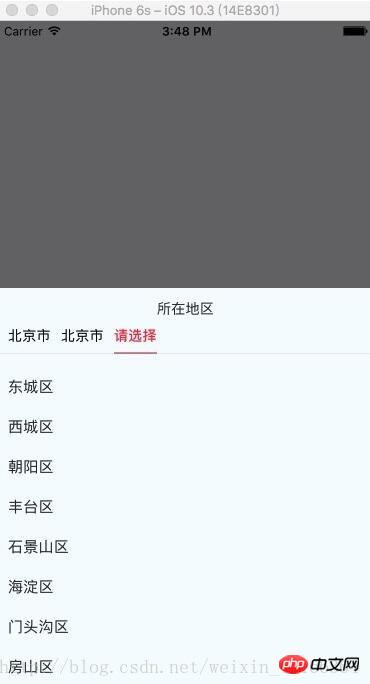
Next, let’s imitate someone else’s address picker
import React, { Component, PropTypes } from 'react';
import {
ViewPropTypes,
StyleSheet,
View,
TouchableOpacity,
TouchableNativeFeedback,
Platform,
Animated,
Text
} from 'react-native';
export default class SelectCityTabBar extends Component {
//属性声名
static propTypes = {
goToPage: PropTypes.func,
activeTab: PropTypes.number,
tabs: PropTypes.array,
backgroundColor: PropTypes.string,
activeTextColor: PropTypes.string,
inactiveTextColor: PropTypes.string,
textStyle: Text.propTypes.style,
tabStyle: ViewPropTypes.style,
renderTab: PropTypes.func,
underlineStyle: ViewPropTypes.style,
};
//默认属性
static defaultProps = {
activeTextColor: '#FA3D4F',
inactiveTextColor: 'black',
backgroundColor: null,
}
renderTab(name, page, isTabActive, onPressHandler) {
const { activeTextColor, inactiveTextColor, textStyle, } = this.props;
const textColor = isTabActive ? activeTextColor : inactiveTextColor;
const fontWeight = isTabActive ? 'bold' : 'normal';
const viewStyle = isTabActive ? [styles.tab, { borderBottomWidth: Constant.sizepiderLarge, borderColor: Constant.colorPrimary }] : styles.tab;
if (Platform.OS !== 'ios') {
return <TouchableNativeFeedback
delayPressIn={0}
background={TouchableNativeFeedback.SelectableBackground()}
key={name + page}
accessible={true}
accessibilityLabel={name}
accessibilityTraits='button'
onPress={() => onPressHandler(page)}
>
<View style={viewStyle}>
<Text style={[{ color: textColor, fontWeight, }, textStyle,]}>
{name}
</Text>
</View>
</TouchableNativeFeedback>
}
return <TouchableOpacity
key={name + page}
accessible={true}
accessibilityLabel={name}
accessibilityTraits='button'
onPress={() => onPressHandler(page)}
>
<View style={viewStyle}>
<Text style={[{ color: textColor, fontWeight, }, textStyle,]}>
{name}
</Text>
</View>
</TouchableOpacity>;
}
render() {
return (
<View style={{ flexDirection: 'row', borderBottomWidth: Constant.sizepiderNormal, borderColor: Constant.colorpider }}>
{this.props.tabs.map((name, page) => {
const isTabActive = this.props.activeTab === page;
const renderTab = this.props.renderTab || this.renderTab;
return this.renderTab(name, page, isTabActive, this.props.goToPage);
})}
</View>
);
}
}
const styles = StyleSheet.create({
tab: {
alignItems: 'center',
justifyContent: 'center',
paddingBottom: 10,
marginLeft: 10,
},
tabs: {
height: 50,
flexDirection: 'row',
justifyContent: 'space-around',
borderWidth: 1,
borderTopWidth: 0,
borderLeftWidth: 0,
borderRightWidth: 0,
borderColor: '#ccc',
},
});npm react-native-scrollable-tab-view component
import React, { Component } from 'react';
import {
StyleSheet,
View,
ScrollView,
Dimensions,
TouchableOpacity,
InteractionManager,
Platform,
UIManager,
Text
} from 'react-native';
import ScrollableTabView from 'react-native-scrollable-tab-view';
import SelectCityTabBar from './SelectCityTabBar'
import AREA_JSON from '../../util/area.json';
const { height, width } = Dimensions.get('window');
export default class AddressSelect extends Component {
static defaultProps = {
commitFun: function (value) {
console.log(value);
},
dissmissFun: function () {
},
lastAddress: null,
};
constructor(props) {
super(props);
if (Platform.OS === 'android') {
UIManager.setLayoutAnimationEnabledExperimental(true)
}
const { lastAddress } = props;
let selectAddress = this.initAddress(lastAddress);
this.state = {
selectAddress
}
}
initAddress(lastAddress) {
let selectAddress = [
{
value: null,
label: null,
children: AREA_JSON,
}, {
value: null,
label: null,
children: null,
}, {
value: null,
label: null,
children: null,
}];
let array = null;
function fun(array, value) {
for (let item of array) {
if (item.value + '' === value + '') {
return item;
}
}
}
try {
selectAddress = selectAddress.map((item, index) => {
let result = fun(array ? array : AREA_JSON, lastAddress[index].value);
if (result.children) {
array = result.children;
}
return result;
});
} catch (e) {
console.log('-----e-', e);
}
return selectAddress
}
/**
* 列表行
* @param item
* @param i
* @returns {XML}
*/
renderListItem(item, i) {
let itemStyle = styles.itemStyle;
let textStyle = styles.itemText;
let { selectAddress } = this.state;
if (item.label === selectAddress[i].label) {
itemStyle = [itemStyle];
textStyle = [textStyle, { color: 'red' }]
}
return (
<TouchableOpacity
style={itemStyle}
key={i + item.label}
onPress={() => {
this.pressItem(item, i)
}}
>
<Text style={textStyle}>{item.label}</Text>
</TouchableOpacity>
)
}
/**
* 点击列表事件
* @param item 选中数据
* @param i 选中行数
*/
pressItem(item, i) {
let { selectAddress } = this.state;
const initObj = {
value: null,
label: null,
children: null,
}
let tempIndex = 0;
if (i === 0) {
selectAddress[0] = item;
selectAddress[1] = initObj;
selectAddress[2] = initObj;
tempIndex = 1
} else if (i === 1) {
selectAddress[1] = item;
selectAddress[2] = initObj;
tempIndex = 2
} else {
selectAddress[2].value = item.value;
selectAddress[2].label = item.label;
tempIndex = 2
let address = [
{
label: selectAddress[0].label,
value: selectAddress[0].value
},
{
label: selectAddress[1].label,
value: selectAddress[1].value
},
{
label: selectAddress[2].label,
value: selectAddress[2].value
}
]
this.props.commitFun && this.props.commitFun(address);
this.props.dissmissFun && this.props.dissmissFun();
return null;
}
this.setState({ selectAddress });
InteractionManager.runAfterInteractions(() => {
this.tabView.goToPage(tempIndex)
})
}
render() {
const { selectAddress } = this.state;
return (
<View style={styles.container}>
<View style={{ width: width, height: 40, flexDirection: 'row', justifyContent: 'center', alignItems: 'center', }}>
<Text>所在地区</Text>
</View>
<ScrollableTabView
ref={(tabView) => {
this.tabView = tabView;
}}
renderTabBar={() => <SelectCityTabBar />}
>
{selectAddress.map((obj, i) => {
let array = (i === 0) ? AREA_JSON : selectAddress[i - 1].children;
if (array) {
return (
<ScrollView
key={i}
tabLabel={obj.label || '请选择'}
style={styles.scrollStyleList}
>
{array && array.map((obj2, j) => {
return this.renderListItem(obj2, i)
})}
</ScrollView>
)
}
})}
</ScrollableTabView>
</View>
);
}
}
const styles = StyleSheet.create({
container: {
height: height * 0.6,
backgroundColor: '#F5FCFF',
},
scrollStyleList: {
width: width,
marginBottom: Constant.sizeMarginDefault,
marginTop: Constant.sizeMarginDefault,
},
itemStyle: {
marginTop: 5,
width: width,
height: 35,
marginLeft: Constant.sizeMarginDefault,
justifyContent: 'center'
},
itemText: {
fontSize: 15,
color: '#333333'
},Usage:
import React, {Component} from 'react';
import {
StyleSheet,
View,
TouchableOpacity,
Alert,
ScrollView,
ART,
TouchableHighlight,
ListView,
Dimensions,
Text
} from 'react-native';
import {ReactNavComponent, Widget} from 'rn-yunxi';
import AddressSelect from '../../app-widget/address-select/index'
export default class extends React.Component {
render() {
return (
<TouchableOpacity style={{flex:1, justifyContent:'center', alignItems:'center'}} onPress={() => this.openAddressSelect()}>
<Text >地址选择</Text>
</TouchableOpacity>
);
}
openAddressSelect() {
Widget.Popup.show( // 这边使用自己封装的modal嵌套地址选择器
<AddressSelect
commitFun={(area) => this.onSelectArea(area)}
dissmissFun={() => Widget.Popup.hide()}
/>,
{
animationType: 'slide-up', backgroundColor: '#00000000', onMaskClose: () => {
Widget.Popup.hide()
}
})
}
onSelectArea = (area) => {
Log(area)
}
};Data type format
##
[
 {
  "value": "110000000000",
  "children": [
   {
    "value": "110100000000",
    "children": [
     {
      "value": "110101000000",
      "label": "东城区"
     },
     {
      "value": "110102000000",
      "label": "西城区"
     },
     {
      "value": "110105000000",
      "label": "朝阳区"
     },
     {
      "value": "110106000000",
      "label": "丰台区"
     },
     {
      "value": "110107000000",
      "label": "石景山区"
     },
     {
      "value": "110108000000",
      "label": "海淀区"
     },
     {
      "value": "110109000000",
      "label": "门头沟区"
     },
     {
      "value": "110111000000",
      "label": "房山区"
     },
     {
      "value": "110112000000",
      "label": "通州区"
     },
     {
      "value": "110113000000",
      "label": "顺义区"
     },
     {
      "value": "110114000000",
      "label": "昌平区"
     },
     {
      "value": "110115000000",
      "label": "大兴区"
     },
     {
      "value": "110116000000",
      "label": "怀柔区"
     },
     {
      "value": "110117000000",
      "label": "平谷区"
     },
     {
      "value": "110118000000",
      "label": "密云区"
     },
     {
      "value": "110119000000",
      "label": "延庆区"
     }
    ],
    "label": "北京市"
   }
  ],
  "label": "北京市"
 }
]How to solve React Native cross-domain resource loading errors
React Native uses Fetch method to send POST requests
Detailed example of React Native time conversion format tool class
The above is the detailed content of How to implement the React Native address picker function. For more information, please follow other related articles on the PHP Chinese website!

Hot AI Tools

Undresser.AI Undress
AI-powered app for creating realistic nude photos

AI Clothes Remover
Online AI tool for removing clothes from photos.

Undress AI Tool
Undress images for free

Clothoff.io
AI clothes remover

Video Face Swap
Swap faces in any video effortlessly with our completely free AI face swap tool!

Hot Article
Hot Tools

Notepad++7.3.1
Easy-to-use and free code editor

SublimeText3 Chinese version
Chinese version, very easy to use

Zend Studio 13.0.1
Powerful PHP integrated development environment

Dreamweaver CS6
Visual web development tools

SublimeText3 Mac version
God-level code editing software (SublimeText3)
Hot Topics


 The difference between vivox100s and x100: performance comparison and function analysis
Mar 23, 2024 pm 10:27 PM
The difference between vivox100s and x100: performance comparison and function analysis
Mar 23, 2024 pm 10:27 PM
Both vivox100s and x100 mobile phones are representative models in vivo's mobile phone product line. They respectively represent vivo's high-end technology level in different time periods. Therefore, the two mobile phones have certain differences in design, performance and functions. This article will conduct a detailed comparison between these two mobile phones in terms of performance comparison and function analysis to help consumers better choose the mobile phone that suits them. First, let’s look at the performance comparison between vivox100s and x100. vivox100s is equipped with the latest
 What exactly is self-media? What are its main features and functions?
Mar 21, 2024 pm 08:21 PM
What exactly is self-media? What are its main features and functions?
Mar 21, 2024 pm 08:21 PM
With the rapid development of the Internet, the concept of self-media has become deeply rooted in people's hearts. So, what exactly is self-media? What are its main features and functions? Next, we will explore these issues one by one. 1. What exactly is self-media? We-media, as the name suggests, means you are the media. It refers to an information carrier through which individuals or teams can independently create, edit, publish and disseminate content through the Internet platform. Different from traditional media, such as newspapers, television, radio, etc., self-media is more interactive and personalized, allowing everyone to become a producer and disseminator of information. 2. What are the main features and functions of self-media? 1. Low threshold: The rise of self-media has lowered the threshold for entering the media industry. Cumbersome equipment and professional teams are no longer needed.
 What are the functions of Xiaohongshu account management software? How to operate a Xiaohongshu account?
Mar 21, 2024 pm 04:16 PM
What are the functions of Xiaohongshu account management software? How to operate a Xiaohongshu account?
Mar 21, 2024 pm 04:16 PM
As Xiaohongshu becomes popular among young people, more and more people are beginning to use this platform to share various aspects of their experiences and life insights. How to effectively manage multiple Xiaohongshu accounts has become a key issue. In this article, we will discuss some of the features of Xiaohongshu account management software and explore how to better manage your Xiaohongshu account. As social media grows, many people find themselves needing to manage multiple social accounts. This is also a challenge for Xiaohongshu users. Some Xiaohongshu account management software can help users manage multiple accounts more easily, including automatic content publishing, scheduled publishing, data analysis and other functions. Through these tools, users can manage their accounts more efficiently and increase their account exposure and attention. In addition, Xiaohongshu account management software has
 PHP, Vue and React: How to choose the most suitable front-end framework?
Mar 15, 2024 pm 05:48 PM
PHP, Vue and React: How to choose the most suitable front-end framework?
Mar 15, 2024 pm 05:48 PM
PHP, Vue and React: How to choose the most suitable front-end framework? With the continuous development of Internet technology, front-end frameworks play a vital role in Web development. PHP, Vue and React are three representative front-end frameworks, each with its own unique characteristics and advantages. When choosing which front-end framework to use, developers need to make an informed decision based on project needs, team skills, and personal preferences. This article will compare the characteristics and uses of the three front-end frameworks PHP, Vue and React.
 Integration of Java framework and front-end React framework
Jun 01, 2024 pm 03:16 PM
Integration of Java framework and front-end React framework
Jun 01, 2024 pm 03:16 PM
Integration of Java framework and React framework: Steps: Set up the back-end Java framework. Create project structure. Configure build tools. Create React applications. Write REST API endpoints. Configure the communication mechanism. Practical case (SpringBoot+React): Java code: Define RESTfulAPI controller. React code: Get and display the data returned by the API.
 What is PHP used for? Explore the role and functions of PHP
Mar 24, 2024 am 11:39 AM
What is PHP used for? Explore the role and functions of PHP
Mar 24, 2024 am 11:39 AM
PHP is a server-side scripting language widely used in web development. Its main function is to generate dynamic web content. When combined with HTML, it can create rich and colorful web pages. PHP is powerful. It can perform various database operations, file operations, form processing and other tasks, providing powerful interactivity and functionality for websites. In the following articles, we will further explore the role and functions of PHP, with detailed code examples. First, let’s take a look at a common use of PHP: dynamic web page generation: P
 Understanding VSCode: What is this tool used for?
Mar 25, 2024 pm 03:06 PM
Understanding VSCode: What is this tool used for?
Mar 25, 2024 pm 03:06 PM
"Understanding VSCode: What is this tool used for?" 》As a programmer, whether you are a beginner or an experienced developer, you cannot do without the use of code editing tools. Among many editing tools, Visual Studio Code (VSCode for short) is very popular among developers as an open source, lightweight, and powerful code editor. So, what exactly is VSCode used for? This article will delve into the functions and uses of VSCode and provide specific code examples to help readers
 What are the uses of mobile and Jiaqin apps?
Mar 27, 2024 pm 09:01 PM
What are the uses of mobile and Jiaqin apps?
Mar 27, 2024 pm 09:01 PM
Mobile Hejiaqin APP is a comprehensive software that integrates family management, intelligent control, and family communication. It aims to create a comfortable, intelligent and harmonious home environment for users through intelligent and convenient operations. Through this application, users can easily control and manage various smart devices at home and enjoy the convenience brought by smart life. So what are the specific functions of the Mobile and Jiaqin App? Users who want to know more about it can follow this article to learn more about it! Tutorial on how to use the Mobile and Jiaqin app: What are the uses of the Mobile and Jiaqin app? Even if you don’t know IT, you can easily manage the network. 2. No matter how many smart products you have, one app is enough. 3. Even if you are thousands of miles away from home, you can still "go home" to watch it. See 4. Rich functions, enjoy smart life
