

Vue.js and ASP.NET Core server-side rendering function

Use Vue.js on the front end, Vue server-side rendering was not supported until the second version. In this example, I want to show how to integrate Vue.js server-side rendering functionality with ASP.NET Core. On the server side, we used the Microsoft.AspNetCore.SpaServices package, which provides the ASP.NET Core API so that we can use contextual information to call Node.js-hosted JavaScript code and inject the resulting HTML string into the rendered page.
In this example, the application will display a list of messages, and the server will only render the last two messages (sorted by date). The remaining messages can be downloaded from the server by clicking the "Get Message" button.
The project structure is as follows:
.
├── VuejsSSRSample
| ├── Properties
| ├── References
| ├── wwwroot
| └── Dependencies
├── Controllers
| └── HomeController.cs
├── Models
| ├── ClientState.cs
| ├── FakeMessageStore.cs
| └── Message.cs
├── Views
| ├── Home
| | └── Index.cshtml
| └── _ViewImports.cshtml
├── VueApp
| ├── components
| | ├── App.vue
| | └── Message.vue
| ├── vuex
| | ├── actions.js
| | └── store.js
| ├── app.js
| ├── client.js
| ├── renderOnServer.js
| └── server.js
├── .babelrc
├── appsettings.json
├── Dockerfile
├── packages.json
├── Program.cs
├── project.json
├── Startup.cs
├── web.config
├── webpack.client.config.js
└── webpack.server.config.js
As you can see, the Vue application is located under the VueApp folder. It has two components, one containing A simple Vuex store with a mutation and an action and some other files we will discuss next: app.js, client.js, renderOnServer.js, server.js.
Implement Vue.js server-side rendering
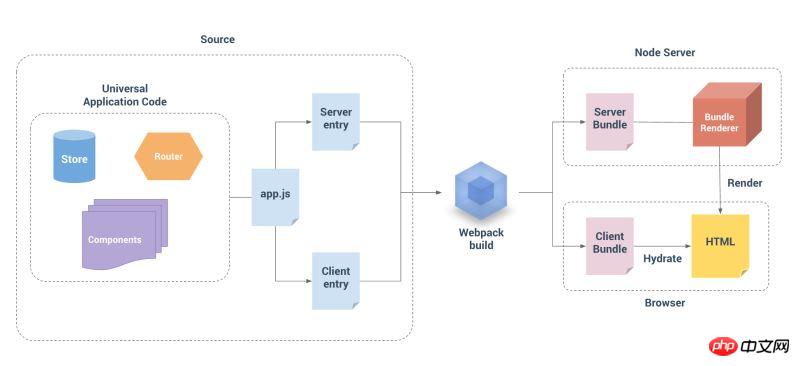
To use the server-side To render, we have to create two different bundles from the Vue application: one for the server side (run by Node.js) and another for the hybrid application that will run in the browser and on the client.
app.js
Bootstrap the Vue instance in this module. It is used by both bundles.
import Vue from 'vue';
import App from './components/App.vue';
import store from './vuex/store.js';
const app = new Vue({
 store,
 ...App
});
export { app, store };server.js
The entry point of this server bundle exports a function, which has a context attribute that is available for pushing any data from the render call.
client.js
The entry point of the client bundle, which replaces the store with a global Javascript object named INITIAL_STATE (which will be created by the pre-rendering module) current state and mounts the app to the specified element (.my-app).
import { app, store } from './app';
store.replaceState(__INITIAL_STATE__);
app.$mount('.my-app');Webpack Configuration
In order to create the bundle, we have to add two Webpack configuration files (one one for the server side and one for the client build), don't forget to install Webpack if you haven't already: npm install -g webpack.
webpack.server.config.js
const path = require('path');
module.exports = {
 target: 'node',
 entry: path.join(__dirname, 'VueApp/server.js'),
 output: {
 libraryTarget: 'commonjs2',
 path: path.join(__dirname, 'wwwroot/dist'),
 filename: 'bundle.server.js',
 },
 module: {
 loaders: [
  {
  test: /\.vue$/,
  loader: 'vue',
  },
  {
  test: /\.js$/,
  loader: 'babel',
  include: __dirname,
  exclude: /node_modules/
  },
  {
  test: /\.json?$/,
  loader: 'json'
  }
 ]
 },
};
webpack.client.config.js
const path = require('path');
module.exports = {
 entry: path.join(__dirname, 'VueApp/client.js'),
 output: {
 path: path.join(__dirname, 'wwwroot/dist'),
 filename: 'bundle.client.js',
 },
 module: {
 loaders: [
  {
  test: /\.vue$/,
  loader: 'vue',
  },
  {
  test: /\.js$/,
  loader: 'babel',
  include: __dirname,
  exclude: /node_modules/
  },
 ]
 },
};Run webpack --config webpack.server.config.js. If the operation is successful, you can find the server bundle at /wwwroot/dist/bundle.server.js . To obtain the client bundle, please run webpack --config webpack.client.config.js. The relevant output can be found in /wwwroot/dist/bundle.client.js.
Implementing Bundle Render
This module will be executed by ASP.NET Core and is responsible for:
Rendering what we created before Server bundle
Set **window.__ INITIAL_STATE__** to the object sent from the server
process.env.VUE_ENV = 'server';
const fs = require('fs');
const path = require('path');
const filePath = path.join(__dirname, '../wwwroot/dist/bundle.server.js')
const code = fs.readFileSync(filePath, 'utf8');
const bundleRenderer = require('vue-server-renderer').createBundleRenderer(code)
module.exports = function (params) {
 return new Promise(function (resolve, reject) {
 bundleRenderer.renderToString(params.data, (err, resultHtml) => { // params.data is the store's initial state. Sent by the asp-prerender-data attribute
  if (err) {
  reject(err.message);
  }
  resolve({
  html: resultHtml,
  globals: {
   __INITIAL_STATE__: params.data // window.__INITIAL_STATE__ will be the initial state of the Vuex store
  }
  });
 });
 });
};Implement ASP .NET Core part
As mentioned before, we used the Microsoft.AspNetCore.SpaServices package, which provides some TagHelpers to easily call Node.js hosted Javascript (under the hood, SpaServices uses the Microsoft.AspNetCore.NodeServices package to execute Javascript).
Views/_ViewImports.cshtml
In order to use the TagHelper of SpaServices, we need to add them to _ViewImports.
@addTagHelper "*, Microsoft.AspNetCore.SpaServices"
Home/Index
public IActionResult Index()
{
 var initialMessages = FakeMessageStore.FakeMessages.OrderByDescending(m => m.Date).Take(2);
 var initialValues = new ClientState() {
 Messages = initialMessages,
 LastFetchedMessageDate = initialMessages.Last().Date
 };
 return View(initialValues);
}It gets the two latest messages (sorted by date in reverse order) from the MessageStore (some static data just for demonstration purposes) and creates a ClientState object, This object will be used as the initial state of the Vuex store.
Vuex store Default state:
const store = new Vuex.Store({
 state: { messages: [], lastFetchedMessageDate: -1 },
 // ...
});

ClientState 类:

public class ClientState
{
 [JsonProperty(PropertyName = "messages")]
 public IEnumerable<Message> Messages { get; set; }

 [JsonProperty(PropertyName = "lastFetchedMessageDate")]
 public DateTime LastFetchedMessageDate { get; set; }
}Index View
Finally, we With the initial state (from the server) and the Vue application, there is only one step: use asp-prerender-module and asp-prerender-data TagHelper to render the Vue application's initial values in the view.
@model VuejsSSRSample.Models.ClientState
<!-- ... -->
<body>
 <p class="my-app" asp-prerender-module="VueApp/renderOnServer" asp-prerender-data="Model"></p>
 <script src="~/dist/bundle.client.js" asp-append-version="true"></script>
</body>
<!-- ... -->
asp-prerender-module property is used to specify the module to render (in our case VueApp/renderOnServer). We can use the asp-prerender-data attribute to specify an object that will be serialized and sent to the module's default function as a parameter.
You can download the original sample code from the following address:
http://github.com/mgyongyosi/VuejsSSRSample
Related recommendations:
Detailed explanation of React server-side rendering examples
Diy page server-side rendering solution_html/css_WEB-ITnose
Nuxt Vue.js server-side rendering practice
The above is the detailed content of Vue.js and ASP.NET Core server-side rendering function. For more information, please follow other related articles on the PHP Chinese website!

Hot AI Tools

Undresser.AI Undress
AI-powered app for creating realistic nude photos

AI Clothes Remover
Online AI tool for removing clothes from photos.

Undress AI Tool
Undress images for free

Clothoff.io
AI clothes remover

Video Face Swap
Swap faces in any video effortlessly with our completely free AI face swap tool!

Hot Article
Hot Tools

Notepad++7.3.1
Easy-to-use and free code editor

SublimeText3 Chinese version
Chinese version, very easy to use

Zend Studio 13.0.1
Powerful PHP integrated development environment

Dreamweaver CS6
Visual web development tools

SublimeText3 Mac version
God-level code editing software (SublimeText3)
Hot Topics


 How to implement an online speech recognition system using WebSocket and JavaScript
Dec 17, 2023 pm 02:54 PM
How to implement an online speech recognition system using WebSocket and JavaScript
Dec 17, 2023 pm 02:54 PM
How to use WebSocket and JavaScript to implement an online speech recognition system Introduction: With the continuous development of technology, speech recognition technology has become an important part of the field of artificial intelligence. The online speech recognition system based on WebSocket and JavaScript has the characteristics of low latency, real-time and cross-platform, and has become a widely used solution. This article will introduce how to use WebSocket and JavaScript to implement an online speech recognition system.
 WebSocket and JavaScript: key technologies for implementing real-time monitoring systems
Dec 17, 2023 pm 05:30 PM
WebSocket and JavaScript: key technologies for implementing real-time monitoring systems
Dec 17, 2023 pm 05:30 PM
WebSocket and JavaScript: Key technologies for realizing real-time monitoring systems Introduction: With the rapid development of Internet technology, real-time monitoring systems have been widely used in various fields. One of the key technologies to achieve real-time monitoring is the combination of WebSocket and JavaScript. This article will introduce the application of WebSocket and JavaScript in real-time monitoring systems, give code examples, and explain their implementation principles in detail. 1. WebSocket technology
 How to use JavaScript and WebSocket to implement a real-time online ordering system
Dec 17, 2023 pm 12:09 PM
How to use JavaScript and WebSocket to implement a real-time online ordering system
Dec 17, 2023 pm 12:09 PM
Introduction to how to use JavaScript and WebSocket to implement a real-time online ordering system: With the popularity of the Internet and the advancement of technology, more and more restaurants have begun to provide online ordering services. In order to implement a real-time online ordering system, we can use JavaScript and WebSocket technology. WebSocket is a full-duplex communication protocol based on the TCP protocol, which can realize real-time two-way communication between the client and the server. In the real-time online ordering system, when the user selects dishes and places an order
 How to implement an online reservation system using WebSocket and JavaScript
Dec 17, 2023 am 09:39 AM
How to implement an online reservation system using WebSocket and JavaScript
Dec 17, 2023 am 09:39 AM
How to use WebSocket and JavaScript to implement an online reservation system. In today's digital era, more and more businesses and services need to provide online reservation functions. It is crucial to implement an efficient and real-time online reservation system. This article will introduce how to use WebSocket and JavaScript to implement an online reservation system, and provide specific code examples. 1. What is WebSocket? WebSocket is a full-duplex method on a single TCP connection.
 JavaScript and WebSocket: Building an efficient real-time weather forecasting system
Dec 17, 2023 pm 05:13 PM
JavaScript and WebSocket: Building an efficient real-time weather forecasting system
Dec 17, 2023 pm 05:13 PM
JavaScript and WebSocket: Building an efficient real-time weather forecast system Introduction: Today, the accuracy of weather forecasts is of great significance to daily life and decision-making. As technology develops, we can provide more accurate and reliable weather forecasts by obtaining weather data in real time. In this article, we will learn how to use JavaScript and WebSocket technology to build an efficient real-time weather forecast system. This article will demonstrate the implementation process through specific code examples. We
 Simple JavaScript Tutorial: How to Get HTTP Status Code
Jan 05, 2024 pm 06:08 PM
Simple JavaScript Tutorial: How to Get HTTP Status Code
Jan 05, 2024 pm 06:08 PM
JavaScript tutorial: How to get HTTP status code, specific code examples are required. Preface: In web development, data interaction with the server is often involved. When communicating with the server, we often need to obtain the returned HTTP status code to determine whether the operation is successful, and perform corresponding processing based on different status codes. This article will teach you how to use JavaScript to obtain HTTP status codes and provide some practical code examples. Using XMLHttpRequest
 How to use insertBefore in javascript
Nov 24, 2023 am 11:56 AM
How to use insertBefore in javascript
Nov 24, 2023 am 11:56 AM
Usage: In JavaScript, the insertBefore() method is used to insert a new node in the DOM tree. This method requires two parameters: the new node to be inserted and the reference node (that is, the node where the new node will be inserted).
 JavaScript and WebSocket: Building an efficient real-time image processing system
Dec 17, 2023 am 08:41 AM
JavaScript and WebSocket: Building an efficient real-time image processing system
Dec 17, 2023 am 08:41 AM
JavaScript is a programming language widely used in web development, while WebSocket is a network protocol used for real-time communication. Combining the powerful functions of the two, we can create an efficient real-time image processing system. This article will introduce how to implement this system using JavaScript and WebSocket, and provide specific code examples. First, we need to clarify the requirements and goals of the real-time image processing system. Suppose we have a camera device that can collect real-time image data
