
 Web Front-end
JS Tutorial
Explanation of the sliding focus carousel diagram in practical implementation of encapsulated motion framework
Web Front-end
JS Tutorial
Explanation of the sliding focus carousel diagram in practical implementation of encapsulated motion framework
Explanation of the sliding focus carousel diagram in practical implementation of encapsulated motion framework

This article mainly brings you a focus carousel diagram (example) that encapsulates the movement framework and actually slides left and right and up and down. The editor thinks it’s pretty good, so I’ll share it with you now and give it as a reference. Let’s follow the editor to take a look, I hope it can help everyone.
In this articleBuilding a universal uniform motion framework (explanation with examples), a uniform motion framework is encapsulated. On the basis of this framework, we add the buffering motion effect, Then use the motion frame to make the slideshow (up and down, left and right).

Buffer movement usually has two common manifestations: for example, letting a p move from 0 to 500, one is when the event is triggered, the speed is very fast, the other is When the event is triggered, it is slow, and then slowly speeds up. Let's implement blocking first and then slowing down. A common way is to drive. For example, a car that just got off the highway is 120km/h, and then enters the ramp and becomes 40km/h. Or Entering the community at 40km/h, and finally parking, it becomes 0km/h. From 120km/h->40km/h, or 40km->0km/h, the speed first slows down and then slows down. How can I use a program to do this kind of exercise? What does it mean?
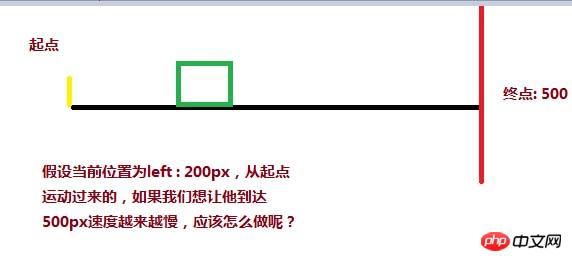
You can use the target distance (500) - current distance (200) / a coefficient (such as 12) to achieve a speed change from block to slow. The current distance is between At the starting point, the numerator (500 - 0) is the largest, so the speed is the largest. If the current distance is close to 500, the molecule is the smallest, and the speed after division is also the smallest.
<style>
p{
width: 200px;
height: 200px;
background:red;
position: absolute;
left: 0px;
}
</style>
<script>
window.onload = function(){
var oBtn = document.querySelector( "input" ),
oBox = document.querySelector( '#box' ),
speed = 0, timer = null;
oBtn.onclick = function(){
timer = setInterval( function(){
speed = ( 500 - oBox.offsetLeft ) / 8;
oBox.style.left = oBox.offsetLeft + speed + 'px';
}, 30 );
}
}
</script>
</head>
<body>
<input type="button" value="动起来">
<p id="box"></p>
</body>However, p will not stop at the target position of 500px, but will eventually stop at 497.375px. Just check the current speed and the current value to know The reason
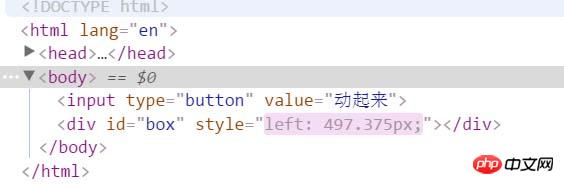
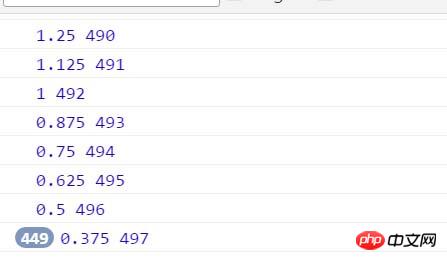
You will find that the speed always stops at 0.375, and the current distance obtained stops at 497px? There is a problem here. Doesn’t our p stop at 497.375px? How can we get it without the decimal 0.375? Computers suffer a loss of precision when processing floating point numbers. We can do a small test separately:
<p id="box"></p> <script> var oBox = document.querySelector( '#box' ); alert( oBox.offsetLeft ); </script>
You will find that the left offset obtained by this code is 30px instead of 30.2px written in the interline style. Because decimals are rounded off when obtaining the current position, the speed will always stop at 0.375px, and the position will always stop at 497. Therefore, in order to reach the target, we have to change the speed to 1 and round the speed up ( Math .ceil ), we can change the speed to 1, and p can also reach 500
oBtn.onclick = function(){
 timer = setInterval( function(){
 speed = ( 500 - oBox.offsetLeft ) / 8;
 if( speed > 0 ) {
  speed = Math.ceil( speed );
 }
 console.log( speed, oBox.offsetLeft );
 oBox.style.left = oBox.offsetLeft + speed + 'px';
 }, 30 );
}The second question, if the position of p is at 900, that is to say From 900 to 500, is there such a demand? There must be one, the carousel picture looks like this from right to left.
<style>
#box{
width: 200px;
height: 200px;
background:red;
position: absolute;
left: 900px;
}
</style>
<script>// <![CDATA[
window.onload = function(){
var oBtn = document.querySelector( "input" ),
oBox = document.querySelector( '#box' ),
speed = 0, timer = null;
oBtn.onclick = function(){
timer = setInterval( function(){
speed = ( 500 - oBox.offsetLeft ) / 8;
if( speed > 0 ) {
speed = Math.ceil( speed );
}
oBox.style.left = oBox.offsetLeft + speed + 'px';
}, 30 );
}
}
// ]]></script>
</head>
<body>
<input type="button" value="动起来">
<p id="box"></p>
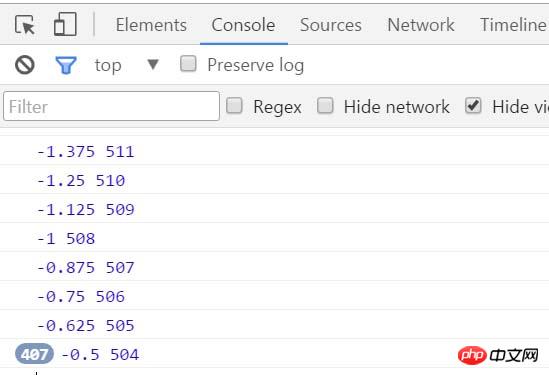
</body>The final target stops at 503.5px, the speed is negative at this time, and the final speed stops at -0.5. For the speed in the opposite direction, we need to change it to -1 to reach the target, so use rounding down (Math.floor)
##
oBtn.onclick = function(){
 timer = setInterval( function(){
 speed = ( 500 - oBox.offsetLeft ) / 8;
 if( speed > 0 ) {
  speed = Math.ceil( speed );
 }else {
  speed = Math.floor( speed );
 }
 console.log( speed, oBox.offsetLeft );
 oBox.style.left = oBox.offsetLeft + speed + 'px';
 }, 30 );
}function css(obj, attr, value) {
if (arguments.length == 3) {
obj.style[attr] = value;
} else {
if (obj.currentStyle) {
return obj.currentStyle[attr];
} else {
return getComputedStyle(obj, false)[attr];
}
}
}
function animate(obj, attr, fn) {
clearInterval(obj.timer);
var cur = 0;
var target = 0;
var speed = 0;
obj.timer = setInterval(function () {
var bFlag = true;
for (var key in attr) {
if (key == 'opacity ') {
cur = css(obj, 'opacity') * 100;
} else {
cur = parseInt(css(obj, key));
}
target = attr[key];
speed = ( target - cur ) / 8;
speed = speed > 0 ? Math.ceil(speed) : Math.floor(speed);
if (cur != target) {
bFlag = false;
if (key == 'opacity') {
obj.style.opacity = ( cur + speed ) / 100;
obj.style.filter = "alpha(opacity:" + ( cur + speed ) + ")";
} else {
obj.style[key] = cur + speed + "px";
}
}
}
if (bFlag) {
clearInterval(obj.timer);
fn && fn.call(obj);
}
}, 30 );
}<!DOCTYPE html> <html lang="en"> <head> <meta charset="UTF-8"> <title>slide - by ghostwu</title> <link rel="stylesheet" href="css/slide3.css" rel="external nofollow" > <script src="js/animate.js"></script> <script src="js/slide.js"></script> </head> <body> <p id="slide"> <p id="slide-img"> <p id="img-container"> <img src="./img/1.jpg" alt=""> <img src="./img/2.jpg" alt=""> <img src="./img/3.jpg" alt=""> <img src="./img/4.jpg" alt=""> <img src="./img/5.jpg" alt=""> </p> </p> <p id="slide-nums"> <ul> <li class="active"></li> <li></li> <li></li> <li></li> <li></li> </ul> </p> </p> </body> </html>
* {
 margin: 0;
 padding: 0;
}
li {
 list-style-type: none;
}
#slide {
 width: 800px;
 height: 450px;
 position: relative;
 margin:20px auto;
}
#slide-img {
 position: relative;
 width: 800px;
 height: 450px;
 overflow: hidden;
}
#img-container {
 position: absolute;
 left: 0px;
 top: 0px;
 height: 2250px;
 /*font-size:0px;*/
}
#img-container img {
 display: block;
 float: left;
}
#slide-nums {
 position: absolute;
 right:10px;
 bottom:10px;
}
#slide-nums li {
 float: left;
 margin:0px 10px;
 background: white;
 width: 20px;
 height: 20px;
 text-align: center;
 line-height: 20px;
 border-radius:10px;
 text-indent:-999px;
 opacity:0.6;
 filter:alpha(opacity:60);
 cursor:pointer;
}
#slide-nums li.active {
 background: red;
}function css(obj, attr, value) {
if (arguments.length == 3) {
obj.style[attr] = value;
} else {
if (obj.currentStyle) {
return obj.currentStyle[attr];
} else {
return getComputedStyle(obj, false)[attr];
}
}
}
function animate(obj, attr, fn) {
clearInterval(obj.timer);
var cur = 0;
var target = 0;
var speed = 0;
obj.timer = setInterval(function () {
var bFlag = true;
for (var key in attr) {
if (key == 'opacity ') {
cur = css(obj, 'opacity') * 100;
} else {
cur = parseInt(css(obj, key));
}
target = attr[key];
speed = ( target - cur ) / 8;
speed = speed > 0 ? Math.ceil(speed) : Math.floor(speed);
if (cur != target) {
bFlag = false;
if (key == 'opacity') {
obj.style.opacity = ( cur + speed ) / 100;
obj.style.filter = "alpha(opacity:" + ( cur + speed ) + ")";
} else {
obj.style[key] = cur + speed + "px";
}
}
}
if (bFlag) {
clearInterval(obj.timer);
fn && fn.call(obj);
}
}, 30 );
}window.onload = function () {
function Slide() {
this.oImgContainer = document.getElementById("img-container");
this.aLi = document.getElementsByTagName("li");
this.index = 0;
}
Slide.prototype.bind = function () {
var that = this;
for (var i = 0; i < this.aLi.length; i++) {
this.aLi[i].index = i;
this.aLi[i].onmouseover = function () {
that.moveTop( this.index );
}
}
}
Slide.prototype.moveTop = function (i) {
this.index = i;
for( var j = 0; j < this.aLi.length; j++ ){
this.aLi[j].className = '';
}
this.aLi[this.index].className = 'active';
animate( this.oImgContainer, {
"top" : -this.index * 450,
"left" : 0
});
}
var oSlide = new Slide();
oSlide.bind();
}* {
margin: 0;
padding: 0;
}
li {
list-style-type: none;
}
#slide {
width: 800px;
height: 450px;
position: relative;
margin:20px auto;
}
#slide-img {
position: relative;
width: 800px;
height: 450px;
overflow: hidden;
}
#img-container {
position: absolute;
left: 0px;
top: 0px;
width: 4000px;
}
#img-container img {
display: block;
float: left;
}
#slide-nums {
position: absolute;
right:10px;
bottom:10px;
}
#slide-nums li {
float: left;
margin:0px 10px;
background: white;
width: 20px;
height: 20px;
text-align: center;
line-height: 20px;
border-radius:10px;
text-indent:-999px;
opacity:0.6;
filter:alpha(opacity:60);
cursor:pointer;
}
#slide-nums li.active {
background: red;
}window.onload = function () {
function Slide() {
this.oImgContainer = document.getElementById("img-container");
this.aLi = document.getElementsByTagName("li");
this.index = 0;
}
Slide.prototype.bind = function () {
var that = this;
for (var i = 0; i < this.aLi.length; i++) {
this.aLi[i].index = i;
this.aLi[i].onmouseover = function () {
that.moveLeft( this.index );
}
}
}
Slide.prototype.moveLeft = function (i) {
this.index = i;
for( var j = 0; j < this.aLi.length; j++ ){
this.aLi[j].className = '';
}
this.aLi[this.index].className = 'active';
animate( this.oImgContainer, {
"left" : -this.index * 800
});
}
var oSlide = new Slide();
oSlide.bind();
}How to create a universal uniform motion framework
A way to write a JS package motion frame
An example of JavaScript implementing a buffer motion frame
The above is the detailed content of Explanation of the sliding focus carousel diagram in practical implementation of encapsulated motion framework. For more information, please follow other related articles on the PHP Chinese website!

Hot AI Tools

Undresser.AI Undress
AI-powered app for creating realistic nude photos

AI Clothes Remover
Online AI tool for removing clothes from photos.

Undress AI Tool
Undress images for free

Clothoff.io
AI clothes remover

Video Face Swap
Swap faces in any video effortlessly with our completely free AI face swap tool!

Hot Article
Hot Tools

Notepad++7.3.1
Easy-to-use and free code editor

SublimeText3 Chinese version
Chinese version, very easy to use

Zend Studio 13.0.1
Powerful PHP integrated development environment

Dreamweaver CS6
Visual web development tools

SublimeText3 Mac version
God-level code editing software (SublimeText3)
Hot Topics


 How to evaluate the cost-effectiveness of commercial support for Java frameworks
Jun 05, 2024 pm 05:25 PM
How to evaluate the cost-effectiveness of commercial support for Java frameworks
Jun 05, 2024 pm 05:25 PM
Evaluating the cost/performance of commercial support for a Java framework involves the following steps: Determine the required level of assurance and service level agreement (SLA) guarantees. The experience and expertise of the research support team. Consider additional services such as upgrades, troubleshooting, and performance optimization. Weigh business support costs against risk mitigation and increased efficiency.
 How does the learning curve of PHP frameworks compare to other language frameworks?
Jun 06, 2024 pm 12:41 PM
How does the learning curve of PHP frameworks compare to other language frameworks?
Jun 06, 2024 pm 12:41 PM
The learning curve of a PHP framework depends on language proficiency, framework complexity, documentation quality, and community support. The learning curve of PHP frameworks is higher when compared to Python frameworks and lower when compared to Ruby frameworks. Compared to Java frameworks, PHP frameworks have a moderate learning curve but a shorter time to get started.
 How do the lightweight options of PHP frameworks affect application performance?
Jun 06, 2024 am 10:53 AM
How do the lightweight options of PHP frameworks affect application performance?
Jun 06, 2024 am 10:53 AM
The lightweight PHP framework improves application performance through small size and low resource consumption. Its features include: small size, fast startup, low memory usage, improved response speed and throughput, and reduced resource consumption. Practical case: SlimFramework creates REST API, only 500KB, high responsiveness and high throughput
 Performance comparison of Java frameworks
Jun 04, 2024 pm 03:56 PM
Performance comparison of Java frameworks
Jun 04, 2024 pm 03:56 PM
According to benchmarks, for small, high-performance applications, Quarkus (fast startup, low memory) or Micronaut (TechEmpower excellent) are ideal choices. SpringBoot is suitable for large, full-stack applications, but has slightly slower startup times and memory usage.
 Golang framework documentation best practices
Jun 04, 2024 pm 05:00 PM
Golang framework documentation best practices
Jun 04, 2024 pm 05:00 PM
Writing clear and comprehensive documentation is crucial for the Golang framework. Best practices include following an established documentation style, such as Google's Go Coding Style Guide. Use a clear organizational structure, including headings, subheadings, and lists, and provide navigation. Provides comprehensive and accurate information, including getting started guides, API references, and concepts. Use code examples to illustrate concepts and usage. Keep documentation updated, track changes and document new features. Provide support and community resources such as GitHub issues and forums. Create practical examples, such as API documentation.
 How to choose the best golang framework for different application scenarios
Jun 05, 2024 pm 04:05 PM
How to choose the best golang framework for different application scenarios
Jun 05, 2024 pm 04:05 PM
Choose the best Go framework based on application scenarios: consider application type, language features, performance requirements, and ecosystem. Common Go frameworks: Gin (Web application), Echo (Web service), Fiber (high throughput), gorm (ORM), fasthttp (speed). Practical case: building REST API (Fiber) and interacting with the database (gorm). Choose a framework: choose fasthttp for key performance, Gin/Echo for flexible web applications, and gorm for database interaction.
 Java Framework Learning Roadmap: Best Practices in Different Domains
Jun 05, 2024 pm 08:53 PM
Java Framework Learning Roadmap: Best Practices in Different Domains
Jun 05, 2024 pm 08:53 PM
Java framework learning roadmap for different fields: Web development: SpringBoot and PlayFramework. Persistence layer: Hibernate and JPA. Server-side reactive programming: ReactorCore and SpringWebFlux. Real-time computing: ApacheStorm and ApacheSpark. Cloud Computing: AWS SDK for Java and Google Cloud Java.
 What are the common misunderstandings in the learning process of Golang framework?
Jun 05, 2024 pm 09:59 PM
What are the common misunderstandings in the learning process of Golang framework?
Jun 05, 2024 pm 09:59 PM
There are five misunderstandings in Go framework learning: over-reliance on the framework and limited flexibility. If you don’t follow the framework conventions, the code will be difficult to maintain. Using outdated libraries can cause security and compatibility issues. Excessive use of packages obfuscates code structure. Ignoring error handling leads to unexpected behavior and crashes.
