

Ajax advanced functions: ajax sends data to the server

This article mainly introduces Ajax Advanced functionsajaxRelated information about sending data to the server. Friends who are interested in ajax can refer to the following
1. Prepare to send data to the server
One of the most common uses of Ajax is to send data to the server. The most typical situation is to send form data from the client, that is, the values entered by the user in each input element contained in the form element. The following code shows a simple form:
##
<!DOCTYPE html>
<html lang="en">
<head>
<meta charset="UTF-8">
<title>基本表单</title>
<style>
.table{display: table;}
.row{display: table-row;}
.cell{display: table-cell;padding: 5px;}
.lable{text-align: right;}
</style>
</head>
<body>
<form id="fruitform" method="post" action="http://127.0.0.1:8080/form">
<p class="lable">
<p class="row">
<p class="cell lable">Apples:</p>
<p class="cell"><input name="apples" value="5" /></p>
</p>
<p class="row">
<p class="cell lable">Bananas:</p>
<p class="cell"><input name="bananas" value="2" /></p>
</p>
<p class="row">
<p class="cell lable">Cherries:</p>
<p class="cell"><input name="cherries" value="20" /></p>
</p>
<p class="row">
<p class="cell lable">Total:</p>
<p id="results" class="cell">0 items</p>
</p>
</p>
<button id="submit" type="submit">Submit Form</button>
</form>
</body>
</html>1.1 Define the server
Javascript. Create a new fruitcalc.js script file as follows:
##
var http = require('http');
var querystring = require('querystring');
function writeResponse(res,data){
var total = 0;
for(fruit in data){
total += Number(data[fruit]);
}
res.writeHead(200,"OK",{
"Content-Type":"text/html",
"Access-Control-Allow-Origin":"http://localhost:63342"
});
res.write('<html><head><title>Fruit Total</title></head><body>');
res.write('<p>'+total+' item ordered</p></body></html>');
res.end();
}
http.createServer(function(req,res){
console.log("[200] "+req.method+" to "+req.url);
if(req.method == "OPTIONS"){
res.writeHead(200,"OK",{
"Access-Control-Allow-Header":"Content-Type",
"Access-Control-Allow-Methods":"*",
"Access-Control-Allow-Origin":"*"
});
res.end();
}else if(req.url == '/form'&& req.method == 'POST'){
var dataObj = new Object();
var contentType = req.headers["content-type"];
var fullBody = '';
if(contentType){
if(contentType.indexOf("application/x-www-form-urlencode") > -1){
req.on('data',function(chunk){
fullBody += chunk.toString();
});
req.on('end',function(){
var dBody = querystring.parse(fullBody);
dataObj.apples = dBody["apples"];
dataObj.bananas = dBody["bananas"];
dataObj.cherries = dBody["cherries"];
writeResponse(res,dataObj);
});
}else if(contentType.indexOf("application/json") > -1){
req.on('data',function(chunk){
fullBody += chunk.toString();
});
req.on('end',function(){
dataObj = JSON.parse(fullBody);
writeResponse(res,dataObj);
});
}
}
}
}).listen(8080);
The highlighted part in the script: writeResponse function. This function is called after extracting the requested form values and is responsible for producing the response to the browser. Currently, this function will create a simple
##This response is very simple, and the effect is to let the server calculate The total number of fruits ordered by the user through each input element in the form. The rest of the server-side script is responsible for decoding the various possible data formats sent by the client using Ajax. 
1.2 Understand the problem
The above picture clearly describes the problem you want to solve with Ajax.
After submitting the form, the browser will display the results on a new page. This means two things:
* The user must wait for the server to process the data and generate a response;
* All document context information is lost because the result is as a new document displayed.
This is the ideal situation for applying Ajax. Requests can be generated asynchronously, allowing users to continue interacting with the document while the form is being processed.
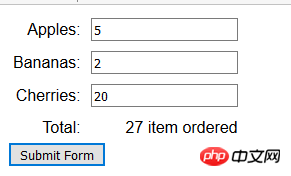
#The most basic way to send data to the server is to collect and format it yourself. The following code shows a script added to the previous HTML document example.html. This is the method used:
<!DOCTYPE html>
<html lang="en">
<head>
<meta charset="UTF-8">
<title>手动收集和发送数据</title>
<style>
.table{display: table;}
.row{display: table-row;}
.cell{display: table-cell;padding: 5px;}
.lable{text-align: right;}
</style>
</head>
<body>
<form id="fruitform" method="post" action="http://127.0.0.1:8080/form">
<p class="lable">
<p class="row">
<p class="cell lable">Apples:</p>
<p class="cell"><input name="apples" value="5" /></p>
</p>
<p class="row">
<p class="cell lable">Bananas:</p>
<p class="cell"><input name="bananas" value="2" /></p>
</p>
<p class="row">
<p class="cell lable">Cherries:</p>
<p class="cell"><input name="cherries" value="20" /></p>
</p>
<p class="row">
<p class="cell lable">Total:</p>
<p id="results" class="cell">0 items</p>
</p>
</p>
<button id="submit" type="submit">Submit Form</button>
</form>
<script>
document.getElementById("submit").onclick = handleButtonPress;
var httpRequest;
function handleButtonPress(e){
//对表单里的button元素而言,其默认行为是用常规的非Ajax方式提交表单。这里不想让他发生,所以调用了preventDefault方法
e.preventDefault();
var form = document.getElementById("fruitform");
//收集并格式化各个input的值
var formData ="";
var inputElements = document.getElementsByTagName("input");
for (var i = 0; i < inputElements.length; i++){
formData += inputElements[i].name + "=" + inputElements[i].value +"&";
}
httpRequest = new XMLHttpRequest();
httpRequest.onreadystatechange = handleResponse;
//数据必须通过POST方法发送给服务器,并读取了HTMLFormElement的action属性获得了请求需要发送的URL
httpRequest.open("POST",form.action);
//添加标头来告诉服务器准备接受的数据格式
httpRequest.setRequestHeader('Content-Type','application/x-www-form-urlencoded');
//把想要发送给服务器的字符串作为参数传递给send方法
httpRequest.send(formData);
}
function handleResponse(){
if(httpRequest.readyState == 4 && httpRequest.status == 200){
document.getElementById("results").innerHTML = httpRequest.responseText;
}
}
</script>
</body>
</html>The rendering is as follows:
The HTML document returned by the server in response to form submission will be displayed on the same page, and the request is executed asynchronously. 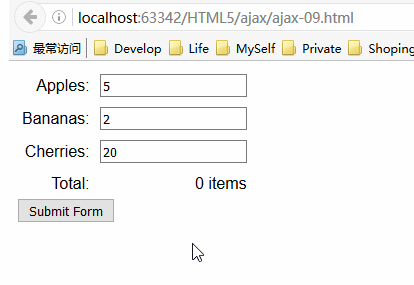
Ajax is not only used to send form data, but can send almost any data, including
JavaScript Object
JSON is often referred to as the "skim" alternative to XML. JSON is easy to read and write, more compact than XML, and already has widespread support. JSON originated from JavaScript, but its development has surpassed JavaScript and is understood and used by countless packages and systems.
The following is an example of a simple JavaScript object expressed in JSON:
##
{"bananas":"2","apples":"5","cherries":"20"}<script>
document.getElementById("submit").onclick = handleButtonPress;
var httpRequest;
function handleButtonPress(e){
e.preventDefault();
var form = document.getElementById("fruitform");
var formData = new Object();
var inputElements = document.getElementsByTagName("input");
for(var i=0;i<inputElements.length;i++){
formData[inputElements[i].name] = inputElements[i].value;
}
httpRequest = new XMLHttpRequest();
httpRequest.onreadystatechange = handleResponse;
httpRequest.open("POST",form.action);
httpRequest.setRequestHeader("Content-Type","application/json");
httpRequest.send(JSON.stringify(formData));
}
function handleResponse(){
if(httpRequest.readyState == 4 && httpRequest.status == 200){
document.getElementById("results").innerHTML = httpRequest.responseText;
}
}
</script>httpRequest.setRequestHeader("Content-Type","application/json");
用JSON对象和JSON格式进行相互的转换。(大多数浏览器能直接支持这个对象,但也可以用下面的网址里的脚本来给旧版的浏览器添加同样的功能:https://github.com/douglascrockford/JSON-js/blob/master/json2.js )JSON对象提供了两个方法:

在上面的例子中,使用了stringify方法,然后把结果传递给XMLHttpRequest 对象的send方法。此例中只有数据的编码方式发生了变化。提交表单的效果还是一样。
4. 使用FormData对象发送表单数据
另一种更简洁的表单收集方式是使用一个FormData对象,它是在XMLHttpRequest的第二级规范中定义的。
由于原来的Node.js代码有点问题,此处用C#新建文件 fruitcalc.aspx作为处理请求的服务器。其cs代码如下:
using System;
namespace Web4Luka.Web.ajax.html5
{
public partial class fruitcalc : System.Web.UI.Page
{
protected void Page_Load(object sender, EventArgs e)
{
int total = 0;
if (Request.HttpMethod == "POST")
{
if (Request.ContentType.IndexOf("multipart/form-data") > -1)
{
for (int i = 0; i < Request.Form.Count; i++)
{
total += Int32.Parse(Request.Form[i]);
}
}
writeResponse(Response, total);
}
}
private void writeResponse(System.Web.HttpResponse Response, int total)
{
string strHtml;
Response.AddHeader("Access-Control-Allow-Origin", "http://localhost:63342");
strHtml = total + " item ordered";
Response.Write(strHtml);
}
}
}4.1 创建 FormData 对象
创建FormData对象时可以传递一个HTMLFormElement对象,这样表单里所有的元素的值都会被自动收集起来。示例如下:
<!DOCTYPE html>
<html lang="en">
<head>
<meta charset="UTF-8">
<title>使用FormData对象</title>
<style>
.row{display: table-row;}
.cell{display: table-cell;padding: 5px;}
.lable{text-align: right;}
</style>
</head>
<body>
<form id="fruitform" method="post" action="http://localhost:53396/ajax/html5/fruitcalc.aspx">
<p class="lable">
<p class="row">
<p class="cell lable">Apples:</p>
<p class="cell"><input name="apples" value="5" /></p>
</p>
<p class="row">
<p class="cell lable">Bananas:</p>
<p class="cell"><input name="bananas" value="2" /></p>
</p>
<p class="row">
<p class="cell lable">Cherries:</p>
<p class="cell"><input name="cherries" value="20" /></p>
</p>
<p class="row">
<p class="cell lable">Total:</p>
<p id="results" class="cell">0 items</p>
</p>
</p>
<button id="submit" type="submit">Submit Form</button>
</form>
<script>
document.getElementById("submit").onclick = handleButtonPress;
var httpRequest;
function handleButtonPress(e){
e.preventDefault();
var form = document.getElementById("fruitform");
var formData = new FormData(form);
httpRequest = new XMLHttpRequest();
httpRequest.onreadystatechange = handleResponse;
httpRequest.open("POST",form.action);
httpRequest.send(formData);
}
function handleResponse(){
if(httpRequest.readyState == 4 && httpRequest.status == 200){
document.getElementById("results").innerHTML = httpRequest.responseText;
}
}
</script>
</body>
</html>当然,关键的变化是使用了FormData对象:
var formData = new FormData(form);
其他需要注意的地方是不再设置Content-Type标头的值了。如果使用FormData对象,数据总是会被编码为multipart/form-data 。本例提交表单后,显示效果如下:
4.2 修改FormData对象
FormData对象定义了一个方法,它允许给要发送到服务器的数据添加名称/值对。

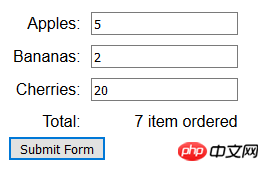
可以用append方法增补从表单中收集的数据,也可以在不使用HTMLFormElement的情况下创建FormData对象。这就意味着可以使用append方法来选择向客户端发送哪些数据值。修改上一示例的JavaScript代码如下:
<script>
document.getElementById("submit").onclick = handleButtonPress;
var httpRequest;
function handleButtonPress(e){
e.preventDefault();
var form = document.getElementById("fruitform");
var formData = new FormData();
var inputElements = document.getElementsByTagName("input");
for(var i=0;i<inputElements.length;i++){
if(inputElements[i].name != "cherries"){
formData.append(inputElements[i].name,inputElements[i].value);
}
}
httpRequest = new XMLHttpRequest();
httpRequest.onreadystatechange = handleResponse;
httpRequest.open("POST",form.action);
httpRequest.send(formData);
}
function handleResponse(){
if(httpRequest.readyState == 4 && httpRequest.status == 200){
document.getElementById("results").innerHTML = httpRequest.responseText;
}
}
</script>此段脚本里,创建FormData对象时并没有提供HTMLFormElement对象。随后用DOM找到文档里所有的input元素,并为那些name属性的值不是cherries的元素添加名称/值对。此例提交表单后,显示效果如下:
5. 发送文件
可以使用FormData 对象和type 属性为 file 的input 元素向服务器发送文件。当表单提交时,FormData对象会自动确保用户选择的文件内容与其他的表单值一同上传。下面的例子展示了如何以这种方式使用FormData对象。
<!DOCTYPE html>
<html lang="en">
<head>
<meta charset="UTF-8">
<title>使用FormData对象发送文件到服务器</title>
<style>
.row{display: table-row;}
.cell{display: table-cell;padding: 5px;}
.lable{text-align: right;}
</style>
</head>
<body>
<form id="fruitform" method="post" action="http://localhost:53396/ajax/html5/fruitcalc.aspx">
<p class="lable">
<p class="row">
<p class="cell lable">Apples:</p>
<p class="cell"><input name="apples" value="5" /></p>
</p>
<p class="row">
<p class="cell lable">Bananas:</p>
<p class="cell"><input name="bananas" value="2" /></p>
</p>
<p class="row">
<p class="cell lable">Cherries:</p>
<p class="cell"><input name="cherries" value="20" /></p>
</p>
<p class="row">
<p class="cell lable">File:</p>
<p class="cell"><input type="file" name="file" /></p>
</p>
<p class="row">
<p class="cell lable">Total:</p>
<p id="results" class="cell">0 items</p>
</p>
</p>
<button id="submit" type="submit">Submit Form</button>
</form>
<script>
document.getElementById("submit").onclick = handleButtonPress;
var httpRequest;
function handleButtonPress(e){
e.preventDefault();
var form = document.getElementById("fruitform");
var formData = new FormData(form);
httpRequest = new XMLHttpRequest();
httpRequest.onreadystatechange = handleResponse;
httpRequest.open("POST",form.action);
httpRequest.send(formData);
}
function handleResponse(){
if(httpRequest.readyState == 4 && httpRequest.status == 200){
document.getElementById("results").innerHTML = httpRequest.responseText;
}
}
</script>
</body>
</html>此例里,最明显的变化发生在 form元素上。添加了input元素后,FormData对象就会上传用户所选的任意文件。
修改 fruitcalc.aspx 的cs文件如下:
using System;
using System.Web;
namespace Web4Luka.Web.ajax.html5
{
public partial class fruitcalc : System.Web.UI.Page
{
protected void Page_Load(object sender, EventArgs e)
{
int total = 0;
if (Request.HttpMethod == "POST")
{
if (Request.ContentType.IndexOf("multipart/form-data") > -1)
{
for (int i = 0; i < Request.Form.Count; i++)
{
total += Int32.Parse(Request.Form[i]);
}
if (Request.Files["file"] != null)
{
HttpPostedFile file = Request.Files["file"];
file.SaveAs(Server.MapPath("/upload/pictures/" + file.FileName));
}
}
writeResponse(Response, total);
}
}
private void writeResponse(System.Web.HttpResponse Response, int total)
{
string strHtml;
Response.AddHeader("Access-Control-Allow-Origin", "http://localhost:63342");
strHtml = total + " item ordered";
Response.Write(strHtml);
}
}
}此例的显示效果如下:

以上所述是小编给大家介绍的Ajax 高级功能之ajax向服务器发送数据,希望对大家有所帮助 !
相关推荐:
巧用ajax请求服务器加载数据列表时提示loading的方法
The above is the detailed content of Ajax advanced functions: ajax sends data to the server. For more information, please follow other related articles on the PHP Chinese website!

Hot AI Tools

Undresser.AI Undress
AI-powered app for creating realistic nude photos

AI Clothes Remover
Online AI tool for removing clothes from photos.

Undress AI Tool
Undress images for free

Clothoff.io
AI clothes remover

Video Face Swap
Swap faces in any video effortlessly with our completely free AI face swap tool!

Hot Article
Hot Tools

Notepad++7.3.1
Easy-to-use and free code editor

SublimeText3 Chinese version
Chinese version, very easy to use

Zend Studio 13.0.1
Powerful PHP integrated development environment

Dreamweaver CS6
Visual web development tools

SublimeText3 Mac version
God-level code editing software (SublimeText3)
Hot Topics


 Solution to the inability to connect to the RPC server and the inability to enter the desktop
Feb 18, 2024 am 10:34 AM
Solution to the inability to connect to the RPC server and the inability to enter the desktop
Feb 18, 2024 am 10:34 AM
What should I do if the RPC server is unavailable and cannot be accessed on the desktop? In recent years, computers and the Internet have penetrated into every corner of our lives. As a technology for centralized computing and resource sharing, Remote Procedure Call (RPC) plays a vital role in network communication. However, sometimes we may encounter a situation where the RPC server is unavailable, resulting in the inability to enter the desktop. This article will describe some of the possible causes of this problem and provide solutions. First, we need to understand why the RPC server is unavailable. RPC server is a
 Detailed explanation of CentOS installation fuse and CentOS installation server
Feb 13, 2024 pm 08:40 PM
Detailed explanation of CentOS installation fuse and CentOS installation server
Feb 13, 2024 pm 08:40 PM
As a LINUX user, we often need to install various software and servers on CentOS. This article will introduce in detail how to install fuse and set up a server on CentOS to help you complete the related operations smoothly. CentOS installation fuseFuse is a user space file system framework that allows unprivileged users to access and operate the file system through a customized file system. Installing fuse on CentOS is very simple, just follow the following steps: 1. Open the terminal and Log in as root user. 2. Use the following command to install the fuse package: ```yuminstallfuse3. Confirm the prompts during the installation process and enter `y` to continue. 4. Installation completed
 How to configure Dnsmasq as a DHCP relay server
Mar 21, 2024 am 08:50 AM
How to configure Dnsmasq as a DHCP relay server
Mar 21, 2024 am 08:50 AM
The role of a DHCP relay is to forward received DHCP packets to another DHCP server on the network, even if the two servers are on different subnets. By using a DHCP relay, you can deploy a centralized DHCP server in the network center and use it to dynamically assign IP addresses to all network subnets/VLANs. Dnsmasq is a commonly used DNS and DHCP protocol server that can be configured as a DHCP relay server to help manage dynamic host configurations in the network. In this article, we will show you how to configure dnsmasq as a DHCP relay server. Content Topics: Network Topology Configuring Static IP Addresses on a DHCP Relay D on a Centralized DHCP Server
 Best Practice Guide for Building IP Proxy Servers with PHP
Mar 11, 2024 am 08:36 AM
Best Practice Guide for Building IP Proxy Servers with PHP
Mar 11, 2024 am 08:36 AM
In network data transmission, IP proxy servers play an important role, helping users hide their real IP addresses, protect privacy, and improve access speeds. In this article, we will introduce the best practice guide on how to build an IP proxy server with PHP and provide specific code examples. What is an IP proxy server? An IP proxy server is an intermediate server located between the user and the target server. It acts as a transfer station between the user and the target server, forwarding the user's requests and responses. By using an IP proxy server
 How to solve the 403 error encountered by jQuery AJAX request
Feb 20, 2024 am 10:07 AM
How to solve the 403 error encountered by jQuery AJAX request
Feb 20, 2024 am 10:07 AM
Title: Methods and code examples to resolve 403 errors in jQuery AJAX requests. The 403 error refers to a request that the server prohibits access to a resource. This error usually occurs because the request lacks permissions or is rejected by the server. When making jQueryAJAX requests, you sometimes encounter this situation. This article will introduce how to solve this problem and provide code examples. Solution: Check permissions: First ensure that the requested URL address is correct and verify that you have sufficient permissions to access the resource.
 How to solve jQuery AJAX request 403 error
Feb 19, 2024 pm 05:55 PM
How to solve jQuery AJAX request 403 error
Feb 19, 2024 pm 05:55 PM
jQuery is a popular JavaScript library used to simplify client-side development. AJAX is a technology that sends asynchronous requests and interacts with the server without reloading the entire web page. However, when using jQuery to make AJAX requests, you sometimes encounter 403 errors. 403 errors are usually server-denied access errors, possibly due to security policy or permission issues. In this article, we will discuss how to resolve jQueryAJAX request encountering 403 error
 What should I do if I can't enter the game when the epic server is offline? Solution to why Epic cannot enter the game offline
Mar 13, 2024 pm 04:40 PM
What should I do if I can't enter the game when the epic server is offline? Solution to why Epic cannot enter the game offline
Mar 13, 2024 pm 04:40 PM
What should I do if I can’t enter the game when the epic server is offline? This problem must have been encountered by many friends. When this prompt appears, the genuine game cannot be started. This problem is usually caused by interference from the network and security software. So how should it be solved? The editor of this issue will explain I would like to share the solution with you, I hope today’s software tutorial can help you solve the problem. What to do if the epic server cannot enter the game when it is offline: 1. It may be interfered by security software. Close the game platform and security software and then restart. 2. The second is that the network fluctuates too much. Try restarting the router to see if it works. If the conditions are OK, you can try to use the 5g mobile network to operate. 3. Then there may be more
 PHP and Ajax: Building an autocomplete suggestion engine
Jun 02, 2024 pm 08:39 PM
PHP and Ajax: Building an autocomplete suggestion engine
Jun 02, 2024 pm 08:39 PM
Build an autocomplete suggestion engine using PHP and Ajax: Server-side script: handles Ajax requests and returns suggestions (autocomplete.php). Client script: Send Ajax request and display suggestions (autocomplete.js). Practical case: Include script in HTML page and specify search-input element identifier.
