
 Backend Development
PHP Tutorial
Detailed explanation of how to add custom classes to IoC container in Laravel5.4
Backend Development
PHP Tutorial
Detailed explanation of how to add custom classes to IoC container in Laravel5.4
Detailed explanation of how to add custom classes to IoC container in Laravel5.4

Laravel is a framework that is easy to use but not easy to understand. Why not simple? Because it contains a lot of so-called "advanced" concepts, among which dependency injection (DI) and Ioc containers are one of the core contents. This article mainly introduces you to the relevant information about adding custom classes to the IoC container in Laravel 5.4. Friends in need can refer to it. I hope to be helpful.
IoC Container
Container, literally means a thing that holds things. Common variables, object properties, etc. can be regarded as containers. What a container can hold depends entirely on how you define the container. Of course, there is such a container, which does not store text or values, but objects, object descriptions (classes, interfaces) or provides callbacks for objects. Through this container, we can implement many advanced functions, the most important of which is What is often mentioned is "decoupling" and "dependency injection (DI)".
IoC container - the core of Laravel
The core of Laravel is an IoC container. According to the documentation, it is called a "service container". As the name suggests, this container provides A range of services are required. As beginners, many people will have trouble with this concept. Therefore, I plan to start with some basic content and gradually uncover the veil of "dependency injection" by understanding the generation and solution of dependencies in object-oriented development. Gradually understand this magical design concept.
This article will introduce in detail the relevant content about adding custom classes to the IoC container in Laravel5.4, and share it for your reference and study. I won’t say much below, let’s take a look at the detailed introduction.
IoC container adds custom class
1. Suppose we want to build a transaction class, app/Trade/Sale.php
<?php
namespace App\Trade;
class Sale
{
public function exchange()
{
dd('交易成功啦!');
}
}2. Create a service provider TradeServiceProvider
php artisan make:provider TradeServiceProvider
3 in the Providers directory, and then bind our class in the register method of TradeServiceProvider.php
/**
 * Register the application services.
 *
 * @return void
 */
public function register()
{
 //
 $this->app->bind('trade',function(){
  return new Sale();
 });
}4. Next, add a line to the providers array under config/app.php,
App\Providers\TradeServiceProvider::class,
5, and then write a test in our routing
Route::get('/',function (){
$trade = app('trade');
dd($trade->exchange());
}Output result: Transaction successful!
6. At this point we have added our own classes to the IoC container
Related recommendations:
Some practical tips to improve the performance of Laravel 5
Laravel Redis multiple processes taking the queue problem at the same time
laravel writing APP interface (API)
The above is the detailed content of Detailed explanation of how to add custom classes to IoC container in Laravel5.4. For more information, please follow other related articles on the PHP Chinese website!

Hot AI Tools

Undresser.AI Undress
AI-powered app for creating realistic nude photos

AI Clothes Remover
Online AI tool for removing clothes from photos.

Undress AI Tool
Undress images for free

Clothoff.io
AI clothes remover

Video Face Swap
Swap faces in any video effortlessly with our completely free AI face swap tool!

Hot Article
Hot Tools

Notepad++7.3.1
Easy-to-use and free code editor

SublimeText3 Chinese version
Chinese version, very easy to use

Zend Studio 13.0.1
Powerful PHP integrated development environment

Dreamweaver CS6
Visual web development tools

SublimeText3 Mac version
God-level code editing software (SublimeText3)
Hot Topics
 1653
1653
 14
1413
52
1304
25
1251
29
1224
24
14
1413
52
1304
25
1251
29
1224
24

 Tutorial on adding a new hard drive in win11
Jan 05, 2024 am 09:39 AM
Tutorial on adding a new hard drive in win11
Jan 05, 2024 am 09:39 AM
When buying a computer, we may not necessarily choose a large hard drive. At this time, if we want to add a new hard drive to win11, we can first install the new hard drive we purchased, and then add partitions to the computer. Tutorial on adding a new hard drive in win11: 1. First, we disassemble the host and find the slot of the hard drive. 2. After finding it, we first connect the "data cable", which usually has a fool-proof design. If it cannot be inserted, just reverse the direction. 3. Then insert the new hard drive into the hard drive slot. 4. After inserting, connect the other end of the data cable to the computer's motherboard. 5. After the installation is completed, you can put it back into the host and turn it on. 6. After booting, we right-click "This Computer" and open "Computer Management" 7. After opening, click "Disk Management" in the lower left corner 8. Then on the right you can
 How to add a TV to Mijia
Mar 25, 2024 pm 05:00 PM
How to add a TV to Mijia
Mar 25, 2024 pm 05:00 PM
Many users are increasingly favoring the electronic ecosystem of Xiaomi smart home interconnection in modern life. After connecting to the Mijia APP, you can easily control the connected devices with your mobile phone. However, many users still don’t know how to add Mijia to their homes. app, then this tutorial guide will bring you the specific connection methods and steps, hoping to help everyone in need. 1. After downloading Mijia APP, create or log in to Xiaomi account. 2. Adding method: After the new device is powered on, bring the phone close to the device and turn on the Xiaomi TV. Under normal circumstances, a connection prompt will pop up. Select "OK" to enter the device connection process. If no prompt pops up, you can also add the device manually. The method is: after entering the smart home APP, click the 1st button on the lower left
 Tutorial to quickly create desktop shortcuts in Win11
Dec 27, 2023 pm 04:29 PM
Tutorial to quickly create desktop shortcuts in Win11
Dec 27, 2023 pm 04:29 PM
In win11, we can quickly start software or files on the desktop by adding desktop shortcuts, and we only need to right-click the required files to operate. Add a desktop shortcut in win11: 1. Open "This PC" and find the file or software you want to add a desktop shortcut to. 2. After finding it, right-click to select it and click "Show more options" 3. Then select "Send to" - "Desktop Shortcut" 4. After the operation is completed, you can find the shortcut on the desktop.
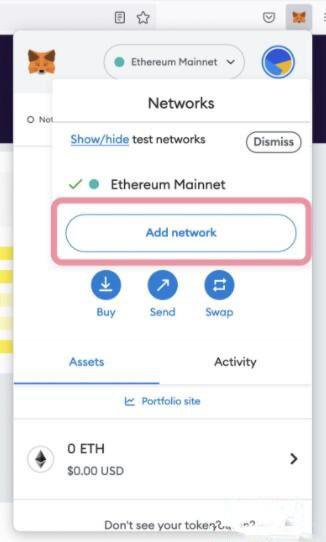 How to connect to Polygon network in MetaMask wallet? Tutorial guide for connecting MetaMask wallet to Polygon network
Jan 19, 2024 pm 04:36 PM
How to connect to Polygon network in MetaMask wallet? Tutorial guide for connecting MetaMask wallet to Polygon network
Jan 19, 2024 pm 04:36 PM
How to add a PolygonMainnet network To use MATIC (Polygon) with Metamask, you need to add a private network called "PolygonMainnet". Transferring in with the wrong network address can cause problems, so be sure to use the "PolygonMainnet" network before transferring out of $MATIC. The Metamask wallet is connected to the Ethereum mainnet by default, but we can simply add "PolygonMainnet" and use $MATIC. Just a few simple copy and paste steps and you're done. First, in the Metamask wallet, click on the network option in the upper right corner and select "C
 AtomHub, an open source container mirroring center jointly created by Huawei, Inspur and other units, announced that it is officially open for public testing and can stably download domestic services.
Jan 02, 2024 pm 03:54 PM
AtomHub, an open source container mirroring center jointly created by Huawei, Inspur and other units, announced that it is officially open for public testing and can stably download domestic services.
Jan 02, 2024 pm 03:54 PM
According to Huawei’s official news, the Open Atomic Developer Conference, with the theme of “Everything for Developers”, was held in Wuxi for two days, from December 16 to 17. The conference was led by the Open Atomic Open Source Foundation, Huawei, and Inspur. , DaoCloud, Xieyun, Qingyun, Hurricane Engine, as well as the OpenSDV Open Source Alliance, openEuler community, OpenCloudOS community and other member units jointly initiated the construction of the AtomHub Trusted Mirror Center, which is officially open for public testing. AtomHub adheres to the concepts of co-construction, co-governance, and sharing, and aims to provide open source organizations and developers with a neutral, open and co-constructed trusted open source container mirror center. In view of the instability and uncontrollability of image warehouses such as DockerHub, and some
 How to add watermark to images in Vue?
Aug 19, 2023 pm 12:37 PM
How to add watermark to images in Vue?
Aug 19, 2023 pm 12:37 PM
How to add watermark to images in Vue? Vue is a popular JavaScript framework that is widely used for building web applications. Sometimes we need to add watermarks to images in Vue applications to protect the copyright of the image or increase the recognizability of the image. In this article, I will introduce you to a method of adding watermarks to images in Vue and provide corresponding code examples. The first step is to introduce a third-party library for adding watermarks to Vue. It is recommended to use watermarkj
 How to install Redhat Podman on Windows 10 or 11 via CMD
Oct 02, 2023 pm 09:33 PM
How to install Redhat Podman on Windows 10 or 11 via CMD
Oct 02, 2023 pm 09:33 PM
Install RedHatPodman on Windows 11 or 10 Follow the steps below to install RedHatPodman on your Windows machine using Command Prompt or Powershell: Step 1: Check System Requirements First, you have to make sure that your Windows system is running with the latest updates so that it can meet the requirements to run Podman requirements. You should be using Windows 11 or Windows 10 version 1709 (Build 16299) or higher and you have to enable Windows Subsystem for Linux 2 (WSL2) and VM features, well if they are not activated yet then you can use The two-step command executes this
 How to add a new script in Tampermonkey-How to delete a script in Tampermonkey
Mar 18, 2024 pm 12:10 PM
How to add a new script in Tampermonkey-How to delete a script in Tampermonkey
Mar 18, 2024 pm 12:10 PM
Tampermonkey Chrome extension is a user script management plug-in that improves user efficiency and browsing experience through scripts. So how does Tampermonkey add new scripts? How to delete the script? Let the editor give you the answer below! How to add a new script to Tampermonkey: 1. Take GreasyFork as an example. Open the GreasyFork web page and enter the script you want to follow. The editor here chooses one-click offline download. 2. Select a script. , after entering the script page, you can see the button to install this script. 3. Click to install this script to come to the installation interface. Just click here to install. 4. We can see the installed one-click in the installation script.
