

Summary of canvas problems in HTML5
Problems encountered when learning HTML5 canvas
1. Non-zero wrapping principle (nonzZero rule)
The non-zero wrapping principle is canvas The basis for judging whether to perform filling when filling.
Draw a line out of the area where the filling is determined and pull it out of the graphic. This drawn line is the auxiliary line. Determine whether the drawn line crosses from the left side of the auxiliary line to the right side of the auxiliary line. At this time, this crossing method is recorded as +1; if it crosses from the right side of the auxiliary line to the left side of the auxiliary line, it is recorded as - 1. Finally, sum up all the recorded numbers. If the summation result is 0, it means that this area should not be filled. Otherwise, it must be filled.
The above principle is difficult to understand. It can be understood that when a small rectangle is drawn in a large rectangle and the drawing direction of the large rectangle is the same as that of the small rectangle, after filling the color, the large and small rectangles are filled with the same color; the drawing direction of the large rectangle is opposite to that of the small rectangle. When, after filling with color, the small rectangle will not be filled with color, and the area between the large rectangle and the small rectangle will be filled with color.
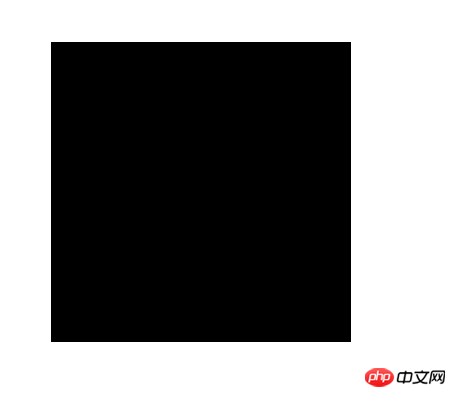
Code when the drawing direction of the large rectangle is the same as the drawing direction of the small rectangle
-
 View Code
1 <!DOCTYPE html> 2 <html lang="en"> 3 4 <head> 5 <meta charset="UTF-8"> 6 <title>非零环绕原则</title> 7 </head> 8 9 <body>10 <canvas id="canvas" style="margin:0 auto;border:1px #666 solid" width="800" height="600">11 </canvas>12 <script>13 var canvas = document.getElementById('canvas');14 var ctx = canvas.getContext('2d');15 ctx.moveTo(100, 100);16 ctx.lineTo(100, 400);17 ctx.lineTo(400, 400);18 ctx.lineTo(400, 100);19 ctx.lineTo(100, 100);20 21 ctx.moveTo(200, 200);22 ctx.lineTo(300, 300);23 ctx.lineTo(300, 300);24 ctx.lineTo(300, 200);25 ctx.lineTo(200, 200);26 ctx.fill();27 </script>28 </body>29 30 </html>Copy after login The rendering when the drawing direction of the large rectangle is the same as the drawing direction of the small rectangle
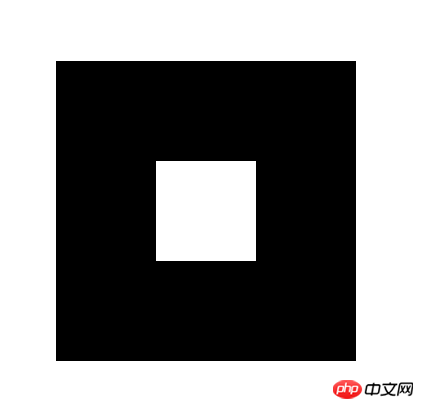
Code when the drawing direction of the large rectangle is opposite to the drawing direction of the small rectangle
-
View Code
1 <!DOCTYPE html> 2 <html lang="en"> 3 4 <head> 5 <meta charset="UTF-8"> 6 <title>非零环绕原则</title> 7 </head> 8 9 <body>10 <canvas id="canvas" style="margin:0 auto;border:1px #666 solid" width="800" height="600">11 </canvas>12 <script>13 var canvas = document.getElementById('canvas');14 var ctx = canvas.getContext('2d');15 ctx.moveTo(100, 100);16 ctx.lineTo(100, 400);17 ctx.lineTo(400, 400);18 ctx.lineTo(400, 100);19 ctx.lineTo(100, 100);20 21 ctx.moveTo(200, 200);22 ctx.lineTo(300, 200);23 ctx.lineTo(300, 300);24 ctx.lineTo(200, 300);25 ctx.lineTo(200, 200);26 ctx.fill();27 </script>28 </body>29 30 </html>Copy after login When the drawing direction of the large rectangle is opposite to that of the small rectangle Rendering


#2. closePath() and The difference between lineTo()
 #2. closePath() and The difference between lineTo()
There is a difference between closePath and lineTo closing, closePath closes naturally, lineTo closes will have jagged edges ,There will be a difference only at the closed connection
Rendering
-
View Code
1 <!DOCTYPE html> 2 <html lang="en"> 3 4 <head> 5 <meta charset="UTF-8"> 6 <title>Document</title> 7 <style> 8 canvas { 9 display: block;10 margin: 100px auto;11 border: 1px solid #000;12 }13 </style>14 </head>15 16 <body>17 <canvas id="myCanvas" width="600px" height="400px"></canvas>18 <script>19 var myCanvas = document.getElementById("myCanvas");20 var ctx = myCanvas.getContext('2d');21 ctx.lineWidth = 20;22 ctx.moveTo(100, 100);23 ctx.lineTo(100, 100 + 100);24 ctx.lineTo(100 + 100, 100 + 100);25 ctx.lineTo(100, 100);26 27 ctx.moveTo(300, 100);28 ctx.lineTo(300, 100 + 100);29 ctx.lineTo(300 + 100, 100 + 100);30 ctx.closePath();31 ctx.stroke();32 </script>33 </body>34 </html>Copy after login


##3. Notes on arc drawing
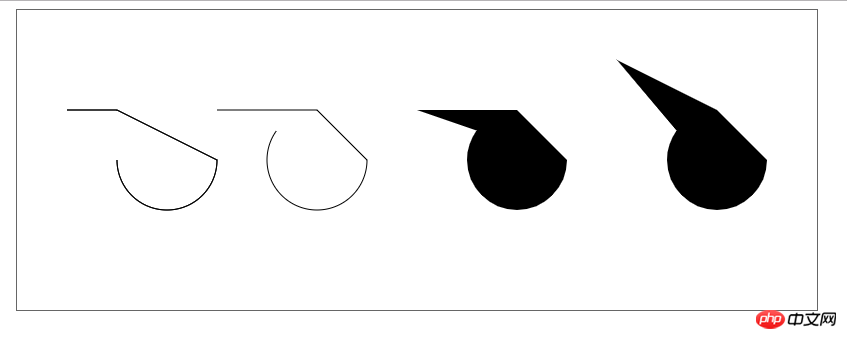
- When using arc drawing, if moveTo is not set, the starting point of arc drawing will be used as the starting point, and the line will be connected to The starting point of the arc.
- If the stroke method is used, the line will be connected to the starting position of the arc. If the fill method is used, the path will be automatically closed and filled.
- View Code
1 <!DOCTYPE html> 2 <html lang="en"> 3 <head> 4 <meta charset="UTF-8"> 5 <title>Document</title> 6 <style> 7 canvas{ 8 display: block; 9 margin: 0 auto;10 border: 1px solid #666;11 }12 </style>13 </head>14 <body>15 <canvas id="myCanvas" width="800" height="300"></canvas>16 <script>17 var myCanvas = document.getElementById("myCanvas");18 var ctx = myCanvas.getContext('2d');19 ctx.moveTo(50,100);20 ctx.lineTo(100,100);21 ctx.arc(150,150,50,0,Math.PI);22 ctx.stroke();23 24 ctx.moveTo(200,100);25 ctx.lineTo(300,100);26 ctx.arc(300,150,50,0,Math.PI*1.2);27 ctx.stroke();28 29 ctx.beginPath();30 ctx.moveTo(400,100);31 ctx.lineTo(500,100);32 ctx.arc(500,150,50,0,Math.PI*1.2);33 ctx.fill();34 35 ctx.beginPath();36 ctx.moveTo(600,50);37 ctx.lineTo(700,100);38 ctx.arc(700,150,50,0,Math.PI*1.2);39 ctx.fill();40 </script>41 </body>42 </html>Copy after login效果图
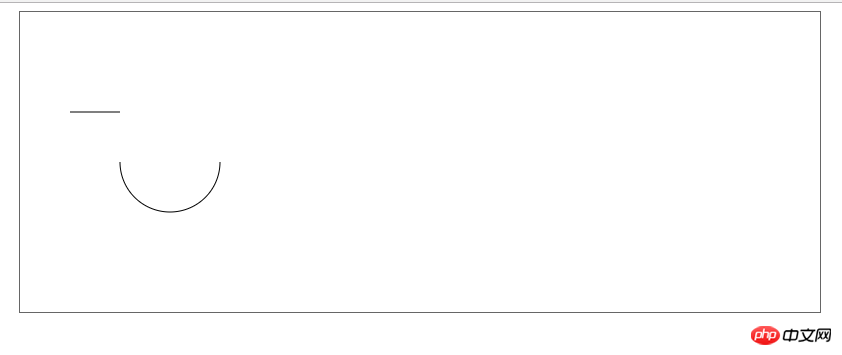
3.1 解决方法一:使用beginPath(),开启新的路径,两次绘制的图形就不会相互产生影响
View Code1 <!DOCTYPE html> 2 <html lang="en"> 3 <head> 4 <meta charset="UTF-8"> 5 <title>Document</title> 6 <style> 7 canvas{ 8 display: block; 9 margin: 0 auto;10 border: 1px solid #666;11 }12 </style>13 </head>14 <body>15 <canvas id="myCanvas" width="800" height="300"></canvas>16 <script>17 var myCanvas = document.getElementById("myCanvas");18 var ctx = myCanvas.getContext('2d');19 ctx.moveTo(50,100);20 ctx.lineTo(100,100);21 //使用beginPath(),多添加的两句代码22 ctx.stroke();23 ctx.beginPath();24 ctx.arc(150,150,50,0,Math.PI);25 ctx.stroke();26 </script>27 </body>28 </html>Copy after login效果图
3.2 解决方法一:使用moveTo(),将上一个图形的终点移动到下一个即将绘制的图形上,就可以解决问题,效果与上面的解决方法相同。但是,该方法只需要使用一次stroke().
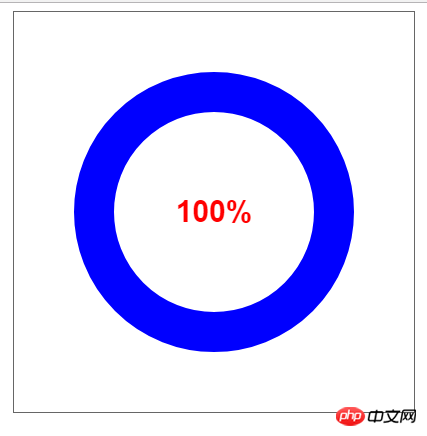
View Code1 <!DOCTYPE html> 2 <html lang="en"> 3 <head> 4 <meta charset="UTF-8"> 5 <title>Document</title> 6 <style> 7 canvas{ 8 display: block; 9 margin: 0 auto;10 border: 1px solid #666;11 }12 </style>13 </head>14 <body>15 <canvas id="myCanvas" width="800" height="300"></canvas>16 <script>17 var myCanvas = document.getElementById("myCanvas");18 var ctx = myCanvas.getContext('2d');19 ctx.moveTo(50,100);20 ctx.lineTo(100,100);21 //添加moveTO()这一句代码即可22 ctx.moveTo(200,150);23 ctx.arc(150,150,50,0,Math.PI);24 ctx.stroke();25 </script>26 </body>27 </html>Copy after login3.3 arc的一个小应用,绘制圆环进度条,使用了lineWidth
View Code1 <!DOCTYPE html> 2 <html lang="en"> 3 4 <head> 5 <meta charset="UTF-8"> 6 <title>Document</title> 7 <style> 8 canvas { 9 display: block;10 margin: 0 auto;11 border: 1px solid #666;12 }13 </style>14 </head>15 16 <body>17 <canvas id="myCanvas" width="400" height="400"></canvas>18 <script>19 var myCanvas = document.getElementById("myCanvas");20 var ctx = myCanvas.getContext('2d');21 22 function toRad(d) {23 return d * Math.PI / 180;24 }25 var x = 200,26 y = 200,27 angle = 0,28 percent = 0;29 var timeId = setInterval(function() {30 ctx.clearRect(0,0,myCanvas.width,myCanvas.height);31 ctx.beginPath();32 ctx.arc(x, y, 120, 0, toRad(angle));33 ctx.strokeStyle = '#00f';34 ctx.lineWidth = 40;35 ctx.stroke();36 37 ctx.fillStyle = '#f00';38 ctx.font = '700 30px Arial';39 ctx.textAlign = 'center';40 ctx.textBaseline = 'middle';41 percent = Math.floor(angle /360*100);42 ctx.fillText(percent + '%', x, y);43 if (percent >= 100) {44 clearInterval(timeId)45 }46 else{47 angle++;48 }49 }, 20);50 </script>51 </body>52 53 </html>Copy after login效果图
绘图方法
canvas画布提供了一个用来作图的平面空间,该空间的每个点都有自己的坐标,x表示横坐标,y表示竖坐标。原点(0, 0)位于图像左上角,x轴的正向是原点向右,y轴的正向是原点向下。
(1)绘制路径
beginPath方法表示开始绘制路径,moveTo(x, y)方法设置线段的起点,lineTo(x, y)方法设置线段的终点,stroke方法用来给透明的线段着色。
ctx.beginPath(); // 开始路径绘制
ctx.moveTo(20, 20); // 设置路径起点,坐标为(20,20)
ctx.lineTo(200, 20); // 绘制一条到(200,20)的直线
ctx.lineWidth = 1.0; // 设置线宽
ctx.strokeStyle = '#CC0000'; // 设置线的颜色
ctx.stroke(); // 进行线的着色,这时整条线才变得可见
moveto和lineto方法可以多次使用。最后,还可以使用closePath方法,自动绘制一条当前点到起点的直线,形成一个封闭图形,省却使用一次lineto方法。
(2)绘制矩形
fillRect(x, y, width, height)方法用来绘制矩形,它的四个参数分别为矩形左上角顶点的x坐标、y坐标,以及矩形的宽和高。fillStyle属性用来设置矩形的填充色。
ctx.fillStyle = 'yellow';
ctx.fillRect(50, 50, 200, 100);
strokeRect方法与fillRect类似,用来绘制空心矩形。
ctx.strokeRect(10,10,200,100);
clearRect方法用来清除某个矩形区域的内容。
ctx.clearRect(100,50,50,50);
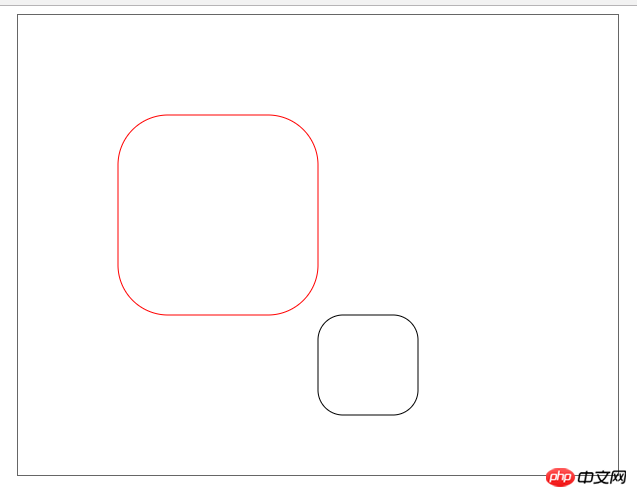
4. arcTo()的使用
arcTo绘制圆角,需要线端点,矩形顶点以及另一线段的端点三个参考点
-
View Code
1 <!DOCTYPE html> 2 <html lang="en"> 3 4 <head> 5 <meta charset="UTF-8"> 6 <title>Document</title> 7 <style> 8 canvas { 9 display: block;10 margin: 0 auto;11 border: 1px solid #666;12 }13 </style>14 </head>15 16 <body>17 <canvas id="myCanvas" width="600" height="460"></canvas>18 <script>19 var myCanvas = document.getElementById("myCanvas");20 var ctx = myCanvas.getContext('2d');21 22 function toRad(d) {23 return d * Math.PI / 180;24 }25 26 function circleRect(x, y, width, height, r, color) {27 //保存之前的绘图状态28 ctx.save();29 ctx.beginPath();30 //绘制四条边31 ctx.moveTo(x + r, y);32 ctx.lineTo(x + width - r, y);33 34 ctx.moveTo(x + r, y + height);35 ctx.lineTo(x + width - r, y + height);36 37 ctx.moveTo(x, y + r);38 ctx.lineTo(x, y + height - r);39 40 ctx.moveTo(x + width, y + r);41 ctx.lineTo(x + width, y + height - r);42 43 ctx.moveTo(x + r, y);44 ctx.arcTo(x, y, x, y + r, r);45 46 ctx.moveTo(x + width - r, y);47 ctx.arcTo(x + width, y, x + width, y + r, r);48 49 ctx.moveTo(x, y + height - r);50 ctx.arcTo(x, y + height, x + r, y + height, r);51 52 ctx.moveTo(x + width - r, y + height);53 ctx.arcTo(x + width, y + height, x + width, y + height - r, r);54 //传入颜色,则使用传入的颜色;否则使用默认黑色55 ctx.strokeStyle = color || '#000';56 ctx.stroke();57 //恢复之前的绘图状态58 ctx.restore();59 }60 61 circleRect(100, 100, 200, 200, 50, 'red');62 circleRect(300, 300, 100, 100, 25);63 </script>64 </body>65 66 </html>Copy after login 效果图


The above is the detailed content of Summary of canvas problems in HTML5. For more information, please follow other related articles on the PHP Chinese website!

Hot AI Tools

Undresser.AI Undress
AI-powered app for creating realistic nude photos

AI Clothes Remover
Online AI tool for removing clothes from photos.

Undress AI Tool
Undress images for free

Clothoff.io
AI clothes remover

Video Face Swap
Swap faces in any video effortlessly with our completely free AI face swap tool!

Hot Article
Hot Tools

Notepad++7.3.1
Easy-to-use and free code editor

SublimeText3 Chinese version
Chinese version, very easy to use

Zend Studio 13.0.1
Powerful PHP integrated development environment

Dreamweaver CS6
Visual web development tools

SublimeText3 Mac version
God-level code editing software (SublimeText3)
Hot Topics


 Table Border in HTML
Sep 04, 2024 pm 04:49 PM
Table Border in HTML
Sep 04, 2024 pm 04:49 PM
Guide to Table Border in HTML. Here we discuss multiple ways for defining table-border with examples of the Table Border in HTML.
 Nested Table in HTML
Sep 04, 2024 pm 04:49 PM
Nested Table in HTML
Sep 04, 2024 pm 04:49 PM
This is a guide to Nested Table in HTML. Here we discuss how to create a table within the table along with the respective examples.
 HTML margin-left
Sep 04, 2024 pm 04:48 PM
HTML margin-left
Sep 04, 2024 pm 04:48 PM
Guide to HTML margin-left. Here we discuss a brief overview on HTML margin-left and its Examples along with its Code Implementation.
 HTML Table Layout
Sep 04, 2024 pm 04:54 PM
HTML Table Layout
Sep 04, 2024 pm 04:54 PM
Guide to HTML Table Layout. Here we discuss the Values of HTML Table Layout along with the examples and outputs n detail.
 HTML Input Placeholder
Sep 04, 2024 pm 04:54 PM
HTML Input Placeholder
Sep 04, 2024 pm 04:54 PM
Guide to HTML Input Placeholder. Here we discuss the Examples of HTML Input Placeholder along with the codes and outputs.
 HTML Ordered List
Sep 04, 2024 pm 04:43 PM
HTML Ordered List
Sep 04, 2024 pm 04:43 PM
Guide to the HTML Ordered List. Here we also discuss introduction of HTML Ordered list and types along with their example respectively
 Moving Text in HTML
Sep 04, 2024 pm 04:45 PM
Moving Text in HTML
Sep 04, 2024 pm 04:45 PM
Guide to Moving Text in HTML. Here we discuss an introduction, how marquee tag work with syntax and examples to implement.
 HTML onclick Button
Sep 04, 2024 pm 04:49 PM
HTML onclick Button
Sep 04, 2024 pm 04:49 PM
Guide to HTML onclick Button. Here we discuss their introduction, working, examples and onclick Event in various events respectively.
