

Implementation example of interface in python

Basic knowledge of interfaces:
Let’s briefly talk about interface testing. The two commonly used interfaces are http api and rpc protocol interfaces. Today we mainly talk about: http apiInterface It uses the http protocol to distinguish calls through paths. The request message format is in the key-value format, and the return message is generally a json string;
Interface protocol:http, webservice, rpc, etc.
Request method: get, post method
Request parameter format:
a. Get requests are all through url?param=xxx¶m1=xxx
b. Common types of request parameters for post requests are: application/json, application/x-www-form-urlencoded, multipart/form-data, text/html, etc.
You also need to know the url of the interface, parameter type, data format of the returned result, and whether the interface has header, cookie and other information.
Interface implementation:
Request method-get, interface writing method:
 1 import flask
 2 from flask import request
 3 from flask import jsonify
 4 import tools
 5 import OP_db
 6 import settings
 7 '''
 8 flask: web框架,可以通过flask提供的装饰器@server.route()将普通函数转换为服务
 9 登录接口,需要传url、username、passwd
 10 '''
 11 #创建一个服务,把当前这个python文件当做一个服务
 12 server = flask.Flask(__name__)
 13 #server.config['JSON_AS_ASCII'] = False
 14
 15 # @server.route()可以将普通函数转变为服务  登录接口的路径、请求方式
 16 @server.route('/login', methods=['get'])
 17 def login():
 18     # 获取通过url请求传参的数据19     username = request.values.get('name')
 20     # 获取url请求传的密码,明文
 21     pwd = request.values.get('pwd')
 22     # 判断用户名、密码都不为空,如果不传用户名、密码则username和pwd为None
 23     if username and pwd:
 24         # 获取加密后的密码
 25         password = tools.md5_pwd(pwd)
 26         #执行sql,如果查询的username和password不为空,说明数据库存在admin的账号
 27         sql = 'select name,password from test where name= "%s" and password= "%s";' %(username, password)
 28         # 从数据查询结果后,res返回是元组
 29         res = OP_db.getconn(
 30             host=settings.mysql_info['host'],
 31             user=settings.mysql_info['user'],
 32             passwd=settings.mysql_info['pwd'],
 33             db=settings.mysql_info['db'],
 34             port=settings.mysql_info['port'],
 35             sql=sql
 36         )
 37         if res:      #res的结果不为空,说明找到了username=admin的用户,且password为加密前的123456
 38             resu = {'code': 200, 'message': '登录成功'}
 39             return jsonify(resu) #将字典转换为json串, json是字符串
 40         else:
 41             resu = {'code': -1, 'message': '账号/密码错误'}
 42             return jsonify(resu)
 43     else:
 44         res = {'code': 999, 'message': '必填参数未填写'}
 45         return jsonify(res)
 46
 47 if __name__ == '__main__':
48 server.run(debug=True, port=8888, host=0.0.0.0) #指定端口、host,0.0.0.0代表不管几个网卡,任何ip都可以访问md5 encryption, For details on the operation of the database mysql, please see my other blogs~~~~~
get access interface:
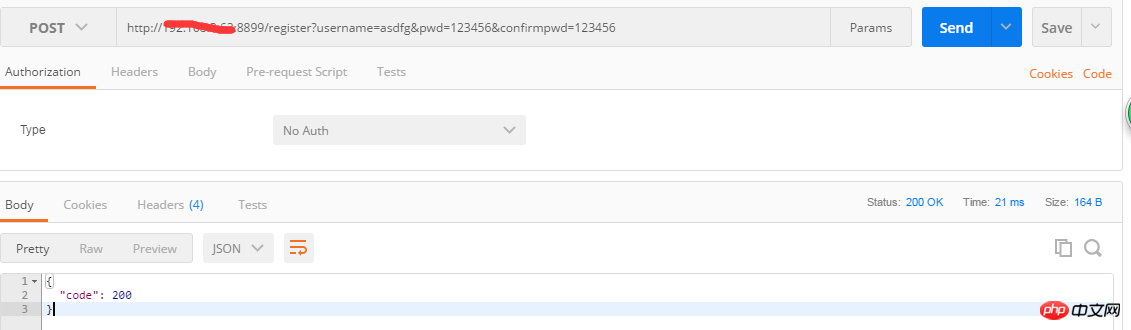
After the project is started, the address of the interface is: http ://127.0.0.1:5000/, the default port is 5000.
Open the browser, enter the url http://127.0.0.1:5000/xxx?name=xxx&pwd=123456, followed by the interface address login, and use the parameters and url directly? Connected, each request parameter is directly connected using &. If the request is successful, {'code': 200, 'message': 'Login successful'} will be returned.
Request method-post, interface writing method:
 1 import flask
 2 from flask import jsonify
 3 from flask import request
 4 from conf import opMysql
 5 from conf import md5_create
 6 '''
 7 注册接口:
 8 post请求,请求参数入参类型json
 9 {
 10     "username":"aaa",
 11     "pwd":"123456",
 12     "c_pwd":"123456"
 13 }
 14 '''
 15 server = flask.Flask(__name__)
 16 @server.route('/register', methods=['GET', 'POST'])
 17 def registerPost():
 18     #判断接口的请求方式是GET还是POST
 19     if request.method == 'POST':
 20         # 获取请求参数是json格式,返回结果是字典
 21         params = request.json
 22         username = params.get('username')
 23         pwd = params.get('pwd')
 24         confirmpwd = params.get('confirmpwd')
 25         if username and pwd and confirmpwd:  # 判断输入的用户名、密码、确认密码都不为空
 26             select_sql = 'select username from lhldemo  where username = "%s" ;'%username
 27             # 查询注册的用户是否存在数据库,如果存在,则username不为空,否则username为空
 28             res_mysql = opMysql.op_select(select_sql)
 29             if res_mysql:
 30                 return jsonify({"code": 999, "mesg": "用户已注册"})
 31             else:
 32                 if pwd == confirmpwd:  # 判断pwd和confirmpwd一致
 33                     new_pwd = md5_create.md5_test(pwd)  # 加密后的密码
 34                     insert_sql = 'insert into lhldemo(username,password) values("%s", "%s") ;' % (username, new_pwd)
 35                     opMysql.op_insert(insert_sql)
 36                     return jsonify({"code": 200, "msg": "注册成功"})
 37                 else:
 38                     return jsonify({"code":998, "msg":"密码不一样"})
 39         else:
 40             return jsonify({"code": 504, "msg": "必填项不能为空"})
 41     else:
 42         return jsonify({"code": 201, "msg": "请求方式不正确"})
 43
 44 if __name__ == '__main__':
 45     #port可以指定端口,默认端口是5000
 46     #host写成0.0.0.0的话,其他人可以访问,代表监听多块网卡上面,默认是127.0.0.1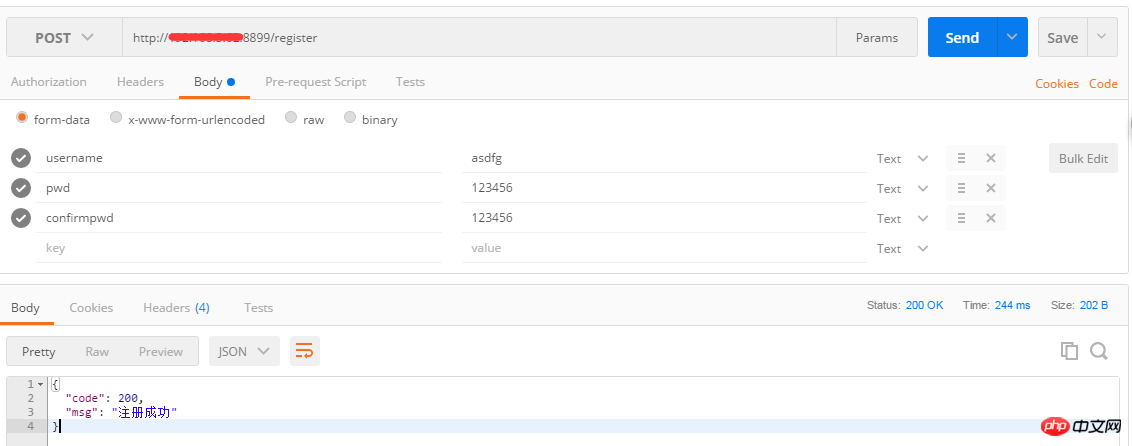
47 server.run(debug=True, port=8899, host='0.0.0.0')post access interface:
After the project is started, the interface address is: 127.0.0.1:5000/, the default port is 5000.
Open the browser, enter the url http://127.0.0.1:5000/xxx, followed by the interface address register, use postman or jmeter to request the parameters, and the parameter type is json. If the request is successful, {'code': 200, 'message': 'Login successful'} will be returned.
Request method - both get and post can be accessed. The writing method is as follows:
 1 import flask
 2 from flask import jsonify
 3 from flask import request
 4 from conf import opMysql
 5 from conf import md5_create
 6 '''
 7 注册接口:
 8 post请求,请求参数入参类型json
 9 {
 10     "username":"aaa",
 11     "pwd":"123456",
 12     "c_pwd":"123456"
 13 }
 14 '''
 15 server = flask.Flask(__name__)
 16 @server.route('/register', methods=['get', 'post'])
 17 def registerPost():
 18     #post请求获取请求的参数,返回结果类型是str
 19     username = request.values.get('username')
 20     pwd = request.values.get('pwd')
 21     confirmpwd = request.values.get('confirmpwd')
 22     if username and pwd and confirmpwd:  # 判断输入的用户名、密码、确认密码都不为空
 23         select_sql = 'select username from lhldemo  where username = "%s" ;'%username
 24         # 查询注册的用户是否存在数据库,如果存在,则username不为空,否则username为空
 25         res_mysql = opMysql.op_select(select_sql)
 26         if res_mysql:
 27             return jsonify({"code": 999, "mesg": "用户已注册"})
 28         else:
 29             if pwd == confirmpwd:  # 判断pwd和confirmpwd一致
 30                 new_pwd = md5_create.md5_test(pwd)  # 加密后的密码
 31                 insert_sql = 'insert into lhldemo(username,password) values("%s", "%s") ;' % (username, new_pwd)
 32                 opMysql.op_insert(insert_sql)
 33                 return jsonify({"code": 200, "msg": "注册成功"})
 34             else:
 35                 return jsonify({"code": 998, "msg": "密码不一样"})
 36     else:
 37         return jsonify({"code": 504, "msg": "必填项不能为空"})
 38
 39
 40 if __name__ == '__main__':
 41     #port可以指定端口,默认端口是5000
 42     #host默认是127.0.0.1,写成0.0.0.0的话,其他人可以访问,代表监听多块网卡上面,
43 server.run(debug=True, port=8899, host='0.0.0.0')You can make a post request in the following two ways, one is as follows:
Through url splicing parameters :
Second access method: access through key-value method:
redis related operations, add The hash type value is transferred to redis. The interface implementation is as follows:
 1 import flask
 2 from flask import jsonify
 3 from conf import opRedis
 4 from flask import request
 5 '''
 6 redis添加数据,存入数据的类型是hash类型,格式如下:
 7 post请求,请求参数入参类型json
 8 {name:{"key":"value"}}
 9 {"username":"url"}
 10 '''
 11 server = flask.Flask(__name__)
 12 @server.route('/set_sties', methods =['post'])
 13 def set_sties():
 14     # 获取url请求参数,返回结果是字典{"username":"byz","url":"http://www.baidu.com"}
 15     res_dic = request.json
 16     if res_dic.get('username') and res_dic.get('url'):
 17         username = res_dic.get('username')
 18         url = res_dic.get('url')
 19         #调用redis的hset方法,将username、url存入redis
 20         opRedis.get_hashall('sites', username, url)
 21         return jsonify({"code":20})
 22     else:
 23         return jsonify({"code": 204, "msg": "必填项不能为空"})
 24
 25 if __name__ == '__main__':
 26     #port可以指定端口,默认端口是5000
 27     #host默认是127.0.0.1,写成0.0.0.0的话,其他人可以访问,代表监听多块网卡上面,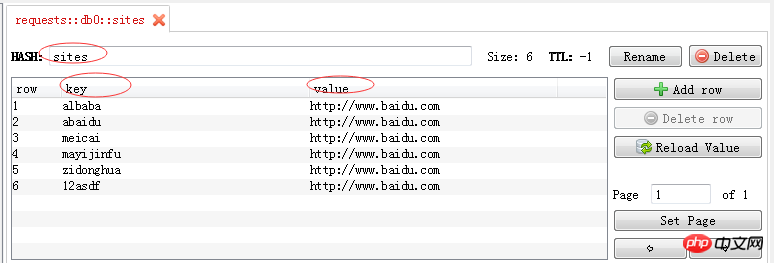
28 server.run(debug=True, port=8899, host='0.0.0.0')The hash type structure is as follows:
{name:{key,value}}. After the interface access is successful, the data storage structure in redis As follows:
After redis adds the data, read the data in redis. The interface is implemented as follows:
 1 import flask
 2 from flask import jsonify
 3 from conf import opRedis
 4 from flask import request
 5 '''
 6 读取redis内的数据,redis数据存储类型是hash类型,格式如下
 7 {name:{"key":"value"}}
 8 思路: 1.通过redis的hgetall(name)方法读取redis所有数据,返回结果类型是字典
 9        2. 循环字典内容,将元素类型转换为str,并将结果存放到字典内
 10 '''
 11 server = flask.Flask(__name__)
 12 @server.route('/get_sties', methods =['get', 'post'])
 13 def get_sties():
 14     #获取redis内所有的数据信息,返回结果类型是字典,里面元素是bytes类型,name=sites
 15     dic = opRedis.get_hashall('sites')
 16     redisList = []
 17     for key, value in dic.items():
 18         redis_dic = {}
 19         #将字典内元素的类型由bytes转换为str
 20         k = key.decode()
 21         v = value.decode()
 22         #字典redis_dic内结构{"username:k, "url":v}
 23         redis_dic['username'] = k
 24         redis_dic['url'] = v
 25         redisList.append(redis_dic)
 26     return jsonify({"code": 200, "msg": redisList})
 27
 28 if __name__ == '__main__':
 29     #port可以指定端口,默认端口是5000
 30     #host默认是127.0.0.1,写成0.0.0.0的话,其他人可以访问,代表监听多块网卡上面,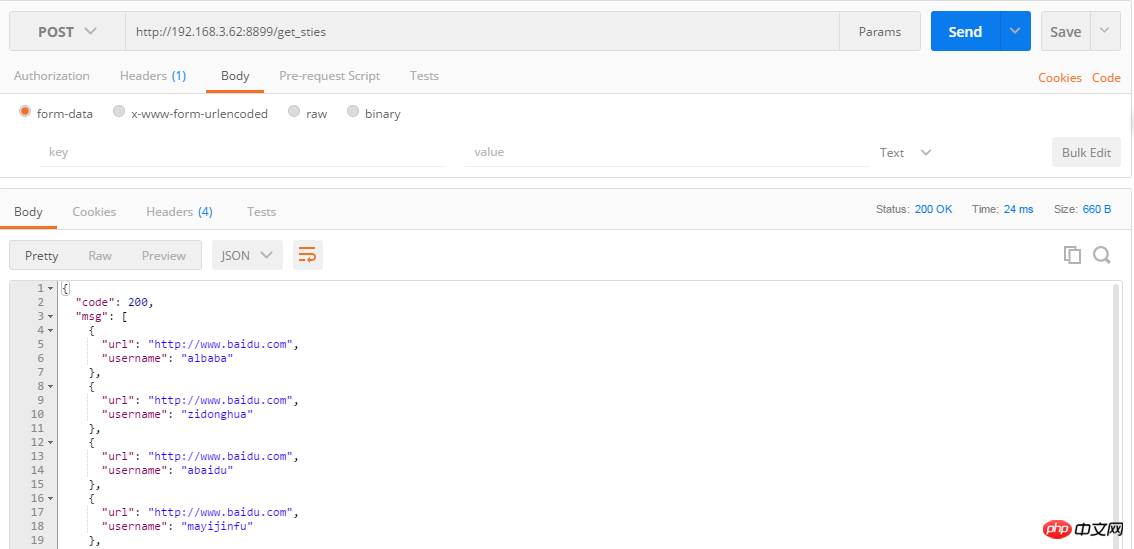
31 server.run(debug=True, port=8899, host='0.0.0.0')Through the postman method interface, the returned data is as follows:
To query the user, you need to pass the token value. The implementation method is as follows:
Login interface:
 1 import flask
 2 from flask import jsonify
 3 from conf import opRedis
 4 from conf import opMysql
 5 from conf import md5_create
 6 from flask import request
 7 import time
 8 '''
 9 登录接口,需要传用户名、密码,通过查询数据库判断用户是否登录成功,若登录成功则将用户名和token存入redis内
 10 '''
 11 server = flask.Flask(__name__)
 12 @server.route('/login', methods=['get','post'])
 13 def set_cookies():
 14     name = request.values.get('username')
 15     pwd = request.values.get('pwd')
 16     if name and pwd:17         #加密后的密码
 18         new_pwd = md5_create.md5_test(pwd)
 19         sql = 'select username,password from lhldemo where username="%s" and password="%s" ; ' % (name, new_pwd)
 20         res_sql = opMysql.op_select(sql)
 21         if res_sql:
 22             token = name + time.strftime('%Y%m%d%H%M%S')
 23             new_token = md5_create.md5_test(token)
 24             #用户登录成功后,将name和token存入redis,存入数据类型是hash类型
 25             opRedis.get_hashall('user', name, new_token)
 26             return jsonify({"code": 200})
 27         else:
 28             return jsonify({"code": 204})
 29     else:
 30         return jsonify({"code": 304})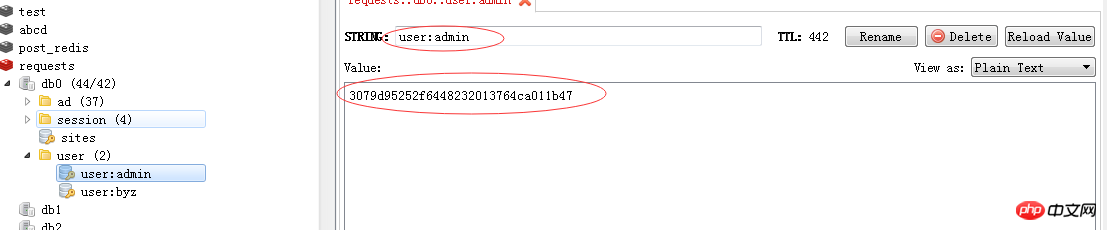
To query a user, you need to pass the user name and token value. The implementation method is as follows:
 1 import flask
 2 from flask import jsonify
 3 from conf import opRedis
 4 from conf import opMysql
 5 from conf import md5_create
 6 from flask import request
 7 import time
 8 '''
 9 登录接口,需要传用户名、密码,通过查询数据库判断用户是否登录成功,若登录成功则将用户名和token存入redis内
 10 '''
 11 server = flask.Flask(__name__)
 12 @server.route('/search_user', methods=['get','post'])
 13 def set_cookies():
 14     name = request.values.get('username')
 15     token = request.values.get('token')
 16     print('token',token)
 17     if name and token:
 18         #查看数据库,看查询的用户是否存在,若存在则返回用户id
 19         sql = 'select id from lhldemo where username="%s" ; ' % (name)
 20         res_sql = opMysql.op_select(sql)
 21         if res_sql:
 22             #从redis中获取user下的用户名对应的token值
 23             res_token = opRedis.getRedis('user:'+name)
 26             if res_token == token:
 27                 return jsonify({"msg": "用户id", "id": res_sql})
 28             else:
 29                 return jsonify({"msg": "token错误"})
 30         else:
 31             return jsonify({"code": "用户不存在"})
 32     else:
 33         return jsonify({"code": "必填项不能为空"})
 34
 35 if __name__ == '__main__':
 36     #port可以指定端口,默认端口是5000
 37     #host默认是127.0.0.1,写成0.0.0.0的话,其他人可以访问,代表监听多块网卡上面,
38 server.run(debug=True, port=8899, host='0.0.0.0')The above are some interface scenarios commonly used in work. When testing payment-related interfaces or third-party interfaces, You can use your own mock interface to return fake data~~~~
The above is the detailed content of Implementation example of interface in python. For more information, please follow other related articles on the PHP Chinese website!

Hot AI Tools

Undresser.AI Undress
AI-powered app for creating realistic nude photos

AI Clothes Remover
Online AI tool for removing clothes from photos.

Undress AI Tool
Undress images for free

Clothoff.io
AI clothes remover

Video Face Swap
Swap faces in any video effortlessly with our completely free AI face swap tool!

Hot Article
Hot Tools

Notepad++7.3.1
Easy-to-use and free code editor

SublimeText3 Chinese version
Chinese version, very easy to use

Zend Studio 13.0.1
Powerful PHP integrated development environment

Dreamweaver CS6
Visual web development tools

SublimeText3 Mac version
God-level code editing software (SublimeText3)
Hot Topics
 1655
1655
 14
1414
52
1307
25
1255
29
1228
24
14
1414
52
1307
25
1255
29
1228
24

 PHP and Python: Different Paradigms Explained
Apr 18, 2025 am 12:26 AM
PHP and Python: Different Paradigms Explained
Apr 18, 2025 am 12:26 AM
PHP is mainly procedural programming, but also supports object-oriented programming (OOP); Python supports a variety of paradigms, including OOP, functional and procedural programming. PHP is suitable for web development, and Python is suitable for a variety of applications such as data analysis and machine learning.
 Choosing Between PHP and Python: A Guide
Apr 18, 2025 am 12:24 AM
Choosing Between PHP and Python: A Guide
Apr 18, 2025 am 12:24 AM
PHP is suitable for web development and rapid prototyping, and Python is suitable for data science and machine learning. 1.PHP is used for dynamic web development, with simple syntax and suitable for rapid development. 2. Python has concise syntax, is suitable for multiple fields, and has a strong library ecosystem.
 PHP and Python: A Deep Dive into Their History
Apr 18, 2025 am 12:25 AM
PHP and Python: A Deep Dive into Their History
Apr 18, 2025 am 12:25 AM
PHP originated in 1994 and was developed by RasmusLerdorf. It was originally used to track website visitors and gradually evolved into a server-side scripting language and was widely used in web development. Python was developed by Guidovan Rossum in the late 1980s and was first released in 1991. It emphasizes code readability and simplicity, and is suitable for scientific computing, data analysis and other fields.
 Python vs. JavaScript: The Learning Curve and Ease of Use
Apr 16, 2025 am 12:12 AM
Python vs. JavaScript: The Learning Curve and Ease of Use
Apr 16, 2025 am 12:12 AM
Python is more suitable for beginners, with a smooth learning curve and concise syntax; JavaScript is suitable for front-end development, with a steep learning curve and flexible syntax. 1. Python syntax is intuitive and suitable for data science and back-end development. 2. JavaScript is flexible and widely used in front-end and server-side programming.
 How to run sublime code python
Apr 16, 2025 am 08:48 AM
How to run sublime code python
Apr 16, 2025 am 08:48 AM
To run Python code in Sublime Text, you need to install the Python plug-in first, then create a .py file and write the code, and finally press Ctrl B to run the code, and the output will be displayed in the console.
 Can vs code run in Windows 8
Apr 15, 2025 pm 07:24 PM
Can vs code run in Windows 8
Apr 15, 2025 pm 07:24 PM
VS Code can run on Windows 8, but the experience may not be great. First make sure the system has been updated to the latest patch, then download the VS Code installation package that matches the system architecture and install it as prompted. After installation, be aware that some extensions may be incompatible with Windows 8 and need to look for alternative extensions or use newer Windows systems in a virtual machine. Install the necessary extensions to check whether they work properly. Although VS Code is feasible on Windows 8, it is recommended to upgrade to a newer Windows system for a better development experience and security.
 Where to write code in vscode
Apr 15, 2025 pm 09:54 PM
Where to write code in vscode
Apr 15, 2025 pm 09:54 PM
Writing code in Visual Studio Code (VSCode) is simple and easy to use. Just install VSCode, create a project, select a language, create a file, write code, save and run it. The advantages of VSCode include cross-platform, free and open source, powerful features, rich extensions, and lightweight and fast.
 How to run python with notepad
Apr 16, 2025 pm 07:33 PM
How to run python with notepad
Apr 16, 2025 pm 07:33 PM
Running Python code in Notepad requires the Python executable and NppExec plug-in to be installed. After installing Python and adding PATH to it, configure the command "python" and the parameter "{CURRENT_DIRECTORY}{FILE_NAME}" in the NppExec plug-in to run Python code in Notepad through the shortcut key "F6".
