
 Backend Development
C#.Net Tutorial
SignalR Self Host multi-terminal message push service example (3)
Backend Development
C#.Net Tutorial
SignalR Self Host multi-terminal message push service example (3)
SignalR Self Host multi-terminal message push service example (3)

This article mainly introduces multi-terminal message push services such as SignalR Self Host+MVC in detail. It has certain reference value. Interested friends can refer to it
1. Overview
Due to project needs, there is a module function in the company's project recently, which needs to be used to obtain immediate approval notification; the original design plan was to use ajax to poll the server regularlyQuery , it was fine when the amount of data and usage was not large at the beginning. Later, as the usage increased and the complexity of various businesses in the system increased, the pressure on the server also increased, so I wanted to replace it with message push. Ajax polling query, when there is an approval submission, the push method is called to push the message to the next approver, thus reducing the pressure on the server.
Signal is an html websocket framework supported by Microsoft that runs on the .NET platform. The main purpose of its appearance is to enable the server to actively push messages to the client page, so that the client does not have to resend the request or use polling technology to obtain the message. And the compatibility of SignalR is also very powerful, so I won’t go into details here. Now that you have chosen SignalR, let’s get started!
My idea is to make SignalR a self-hosted service and separate it from our b/s project. The advantages are: 1. The push service does not depend on iis. Even if iis fails, we The push service can still run normally; 2. We can call this push service on multiple platforms, and multiple projects can be used at the same time;
2. Create the server
Without further ado, this is my first time writing a blog. After introducing the business scenarios and ideas, let’s start coding.
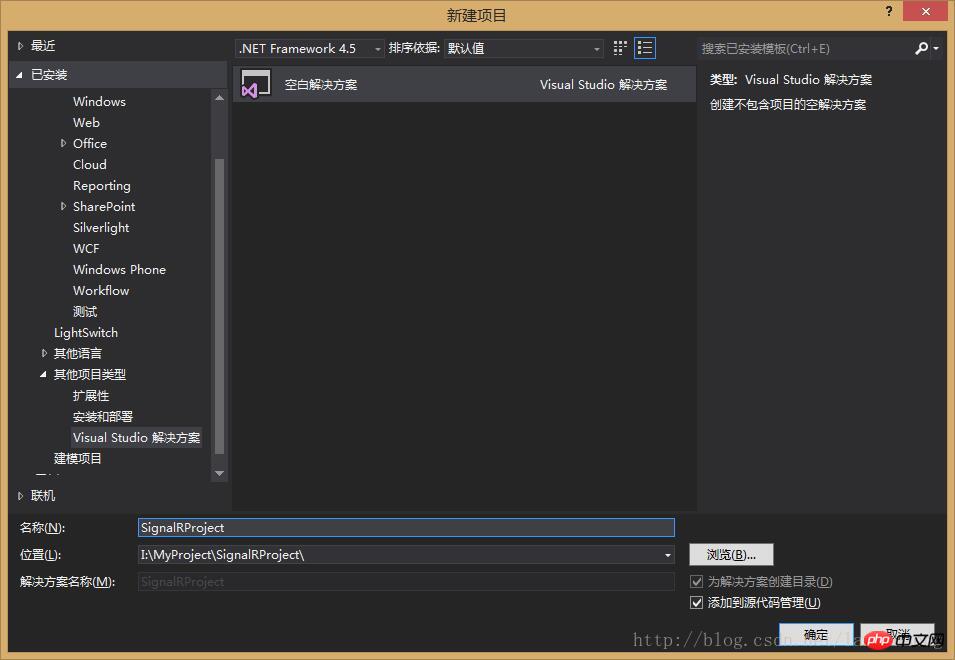
1. Use VS to create a solution named "SignalRProject";
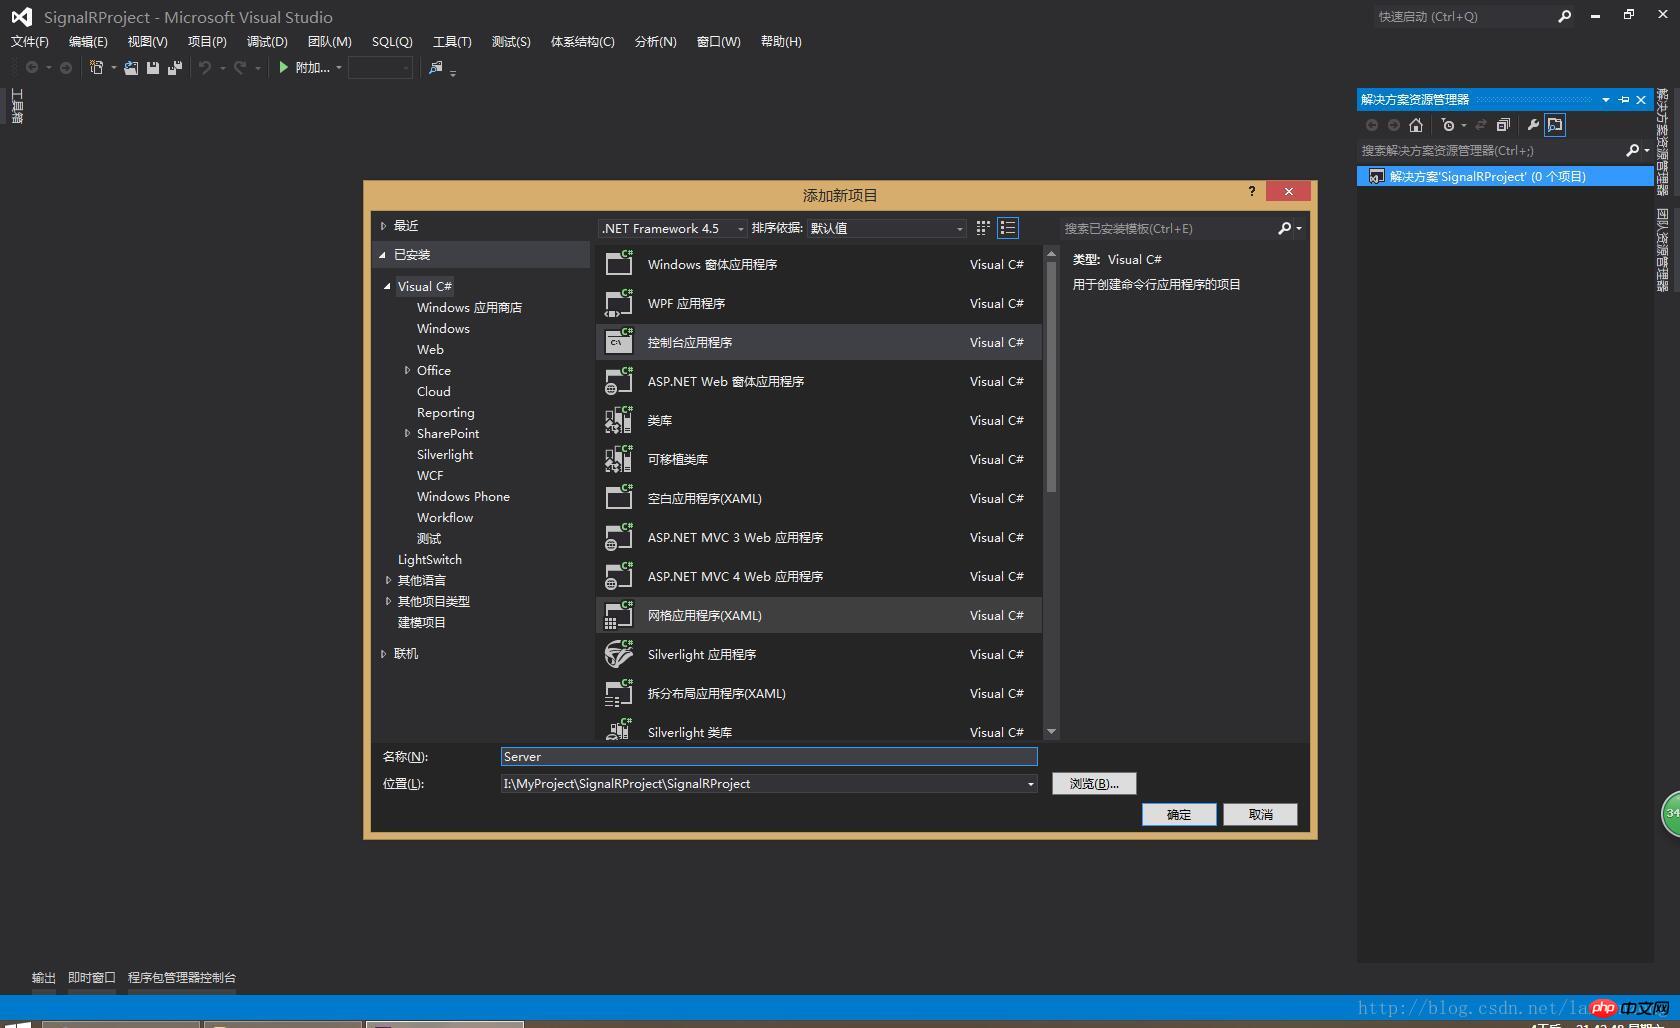
2. Create a new control named Server under the SignalRProject solution Taiwan
3. In the package manager console, enter the following command
Install-Package Microsoft.AspNet.SignalR.SelfHost
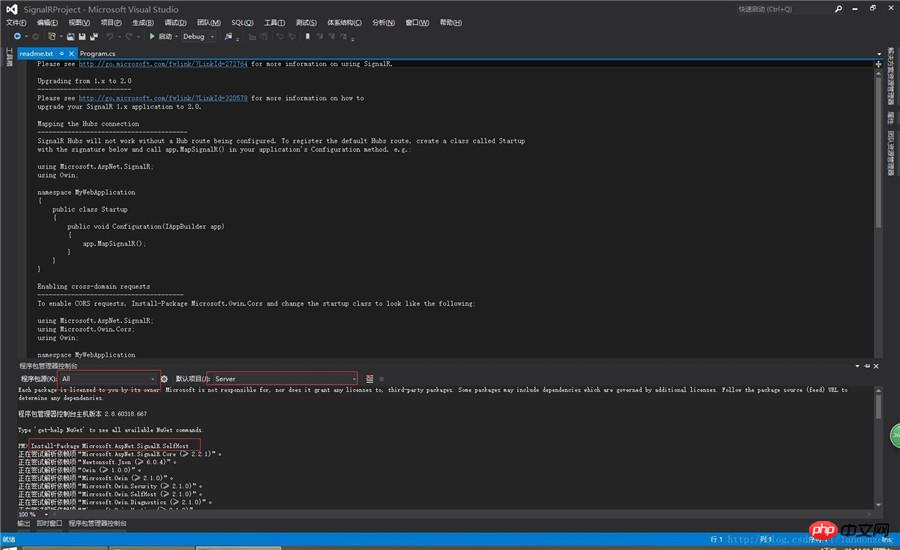
4. Enter the following command:
Install-Package Microsoft.Owin.Cors

5. Add the UserInfo class in the Server console, the code is as follows
using System;

namespace Server
{
 public class UserInfo
 {
  public string ConnectionId { get; set; }
  public string UserName { get; set; }
  public DateTime LastLoginTime { get; set; }
 }
}
6. Add the ChatHub class in the Server console, the code is as follows
using Microsoft.AspNet.SignalR;
using Microsoft.AspNet.SignalR.Hubs;
using System;
using System.Collections.Generic;
using System.Linq;
using System.Threading.Tasks;

namespace Server
{
 [HubName("IMHub")]
 public class ChatHub : Hub
 {
  // 静态属性
  public static List<UserInfo> OnlineUsers = new List<UserInfo>(); // 在线用户列表

  /// <summary>
  /// 登录连线
  /// </summary>
  /// <param name="userId">用户Id</param>
  /// <param name="userName">用户名</param>
  public void Register(string userName)
  {
   var connnectId = Context.ConnectionId;

   if (OnlineUsers.Count(x => x.ConnectionId == connnectId) == 0)
   {
    if (OnlineUsers.Any(x => x.UserName == userName))
    {
     var items = OnlineUsers.Where(x => x.UserName == userName).ToList();
     foreach (var item in items)
     {
      Clients.AllExcept(connnectId).onUserDisconnected(item.ConnectionId, item.UserName);
     }
     OnlineUsers.RemoveAll(x => x.UserName == userName);
    }

    //添加在线人员
    OnlineUsers.Add(new UserInfo
    {
     ConnectionId = connnectId,
     UserName = userName,
     LastLoginTime = DateTime.Now
    });
   }

   // 所有客户端同步在线用户
   Clients.All.onConnected(connnectId, userName, OnlineUsers);
  }

  /// <summary>
  /// 发送私聊
  /// </summary>
  /// <param name="toUserId">接收方用户连接ID</param>
  /// <param name="message">内容</param>
  public void SendPrivateMessage(string toUserName, string message)
  {
   var fromConnectionId = Context.ConnectionId;

   var toUser = OnlineUsers.FirstOrDefault(x => x.UserName == toUserName);
   var fromUser = OnlineUsers.FirstOrDefault(x => x.ConnectionId == fromConnectionId);

   if (toUser != null )
   {
    Clients.Client(toUser.ConnectionId).receivePrivateMessage(fromUser.UserName, message);
    Clients.Client(toUser.ConnectionId).receivePrivateMessage(message);
   }
   else
   {
    //表示对方不在线
    Clients.Caller.absentSubscriber();
   }
  }

  public void Send(string name, string message)
  {
   //Clients.All { get; } // 代表所有客户端
   //Clients.AllExcept(params string[] excludeConnectionIds); // 除了参数中的所有客户端
   //Clients.Client(string connectionId); // 特定的客户端,这个方法也就是我们实现端对端聊天的关键
   //Clients.Clients(IList<string> connectionIds); // 参数中的客户端
   //Clients.Group(string groupName, params string[] excludeConnectionIds); // 指定客户端组,这个也是实现群聊的关键所在
   //Clients.Groups(IList<string> groupNames, params string[] excludeConnectionIds);参数中的客户端组
   //Clients.User(string userId); // 特定的用户
   //Clients.Users(IList<string> userIds); // 参数中的用户

   Console.WriteLine("ConnectionId:{0}, InvokeMethod:{1}", Context.ConnectionId, "Send");
   Clients.All.addMessage(name, message);
  }

  /// <summary>
  /// 连线时调用
  /// </summary>
  /// <returns></returns>
  public override Task OnConnected()
  {
   Console.WriteLine("客户端连接,连接ID是:{0},当前在线人数为{1}", Context.ConnectionId, OnlineUsers.Count+1);
   return base.OnConnected();
  }


  /// <summary>
  /// 断线时调用
  /// </summary>
  /// <param name="stopCalled"></param>
  /// <returns></returns>
  public override Task OnDisconnected(bool stopCalled)
  {
   var user = OnlineUsers.FirstOrDefault(u => u.ConnectionId == Context.ConnectionId);

   // 判断用户是否存在,存在则删除
   if (user == null)
   {
    return base.OnDisconnected(stopCalled);
   }

   Clients.All.onUserDisconnected(user.ConnectionId, user.UserName); //调用客户端用户离线通知
   // 删除用户
   OnlineUsers.Remove(user);
   Console.WriteLine("客户端断线,连接ID是:{0},当前在线人数为{1}", Context.ConnectionId, OnlineUsers.Count);
   return base.OnDisconnected(stopCalled);
  }

  public override Task OnReconnected()
  {
   return base.OnReconnected();
  }
 }
} 
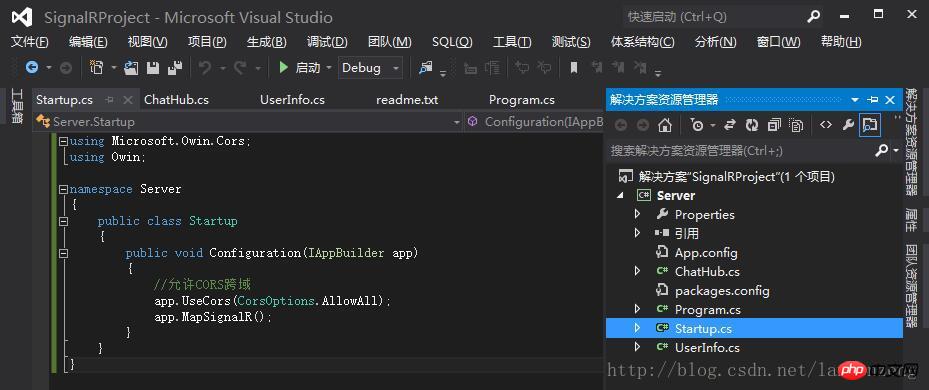
7. Add the Startup class in the Server console, the code is as follows
using Microsoft.Owin.Cors;
using Owin;

namespace Server
{
 public class Startup
 {
  public void Configuration(IAppBuilder app)
  {
   //允许CORS跨域
   app.UseCors(CorsOptions.AllowAll);
   app.MapSignalR();
  }
 }
}
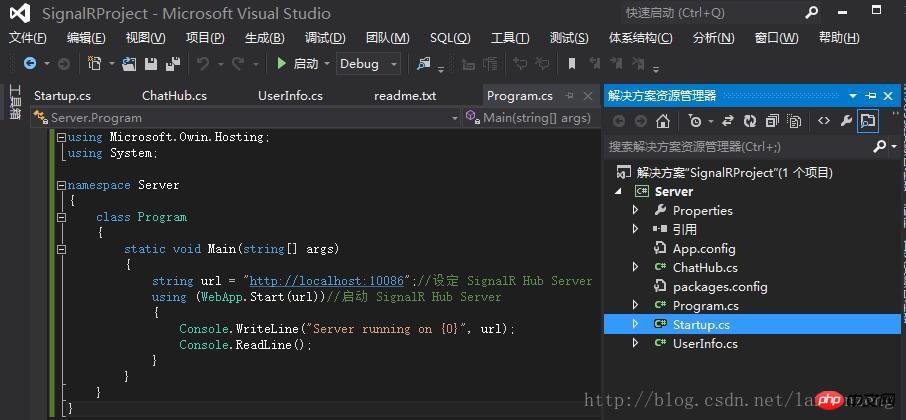
8. Modify the Server Add the Program class to the console, the code is as follows
using Microsoft.Owin.Hosting;
using System;

namespace Server
{
 class Program
 {
  static void Main(string[] args)
  {
   string url = "http://localhost:10086";//设定 SignalR Hub Server 对外的接口
   using (WebApp.Start(url))//启动 SignalR Hub Server
   {
    Console.WriteLine("Server running on {0}", url);
    Console.ReadLine();
   }
  }
 }
}
9. Run F5
and then access http in the browser ://localhost:10086/signalr/hubs
The results are as follows:

As you can see in the picture above, the content is basically completed. Let’s talk about it first today. We don’t have time. It's early, let's take a rest first, and I will make up for the next article when I have time.
The above is the detailed content of SignalR Self Host multi-terminal message push service example (3). For more information, please follow other related articles on the PHP Chinese website!

Hot AI Tools

Undresser.AI Undress
AI-powered app for creating realistic nude photos

AI Clothes Remover
Online AI tool for removing clothes from photos.

Undress AI Tool
Undress images for free

Clothoff.io
AI clothes remover

Video Face Swap
Swap faces in any video effortlessly with our completely free AI face swap tool!

Hot Article
Hot Tools

Notepad++7.3.1
Easy-to-use and free code editor

SublimeText3 Chinese version
Chinese version, very easy to use

Zend Studio 13.0.1
Powerful PHP integrated development environment

Dreamweaver CS6
Visual web development tools

SublimeText3 Mac version
God-level code editing software (SublimeText3)
Hot Topics


 Windows 11 shutdown prompts task host window task host is executing the shutdown task solution
Feb 12, 2024 pm 12:40 PM
Windows 11 shutdown prompts task host window task host is executing the shutdown task solution
Feb 12, 2024 pm 12:40 PM
Recently, many Win11 users have reported that when shutting down, they are prompted that the taskhostwindow task host is executing the shutdown task. So what is going on? Users can enter the Desktop folder under the local registry editor, and then select AutoEndTasks in the right window to set it. Let this site carefully introduce to users the solution to this problem when shutting down. Windows 11 shutdown prompts that the taskhostwindow task host is executing the shutdown task. Solution 1. Use the key combination win key + r key, enter "regedit" and press Enter, as shown in the figure below. 2. Search for [HKEY
 How to check if aggregator host.exe is safe in Windows 11
Apr 13, 2023 pm 04:22 PM
How to check if aggregator host.exe is safe in Windows 11
Apr 13, 2023 pm 04:22 PM
When we launch Task Manager to terminate a task or stop an application, we usually find a large number of processes running. This is completely normal. However, sometimes we see programs that are using system resources that we are completely unaware of. One of these processes is the aggregator host.exe, which has been causing some confusion among users recently. Some of these processes may be legitimate Windows requirements, but others may be malicious programs running in the background and causing problems without the user's knowledge or consent. After we've seen the five ways you can launch Task Manager in Windows 11, we'll show you how to check if aggregator host.exe is safe or a virus. keep up
 Why NameResolutionError(self.host, self, e) from e and how to solve it
Mar 01, 2024 pm 01:20 PM
Why NameResolutionError(self.host, self, e) from e and how to solve it
Mar 01, 2024 pm 01:20 PM
The reason for the error is NameResolutionError(self.host,self,e)frome, which is an exception type in the urllib3 library. The reason for this error is that DNS resolution failed, that is, the host name or IP address attempted to be resolved cannot be found. This may be caused by the entered URL address being incorrect or the DNS server being temporarily unavailable. How to solve this error There may be several ways to solve this error: Check whether the entered URL address is correct and make sure it is accessible Make sure the DNS server is available, you can try using the "ping" command on the command line to test whether the DNS server is available Try accessing the website using the IP address instead of the hostname if behind a proxy
 What is the difference between master and host
Sep 28, 2023 pm 01:34 PM
What is the difference between master and host
Sep 28, 2023 pm 01:34 PM
The differences between master and host are: 1. Host can play the role of client or server, while master is the central server responsible for coordinating and managing other slave servers in a distributed system; 2. Host is an ordinary computer device, and master usually has Higher processing power and resources are used to process and distribute tasks, manage data, and maintain the stability of the entire system; 3. The host is a node in the network, and the master is the server that plays a core role in the distributed system.
 What to do if no route to host
Oct 07, 2023 am 10:50 AM
What to do if no route to host
Oct 07, 2023 am 10:50 AM
The solutions to "no route to host" include checking the network connection, checking the IP address and port, checking the firewall configuration, checking the routing configuration, checking the network device configuration, checking the network service status, checking the network configuration and contacting the network administrator. Detailed introduction: 1. Check the network connection to ensure that the network connection between the client and the target host is normal. You can try to test network connectivity through the ping command or other network tools, and check whether hardware devices such as network cables, wireless networks, and routers are working properly. Make sure the network connection is stable, etc.
 Where is the host file
Jan 04, 2021 am 11:25 AM
Where is the host file
Jan 04, 2021 am 11:25 AM
The host file is located under the path "C:\Windows\System32\drivers\etc"; the host file is a plain text file that can be opened with ordinary text editing software, such as Notepad; the function of the host file is to contain the IP address Mapping relationship with Host name.
 4 Quick Tips to Fix WMI Provider Host High CPU on Windows 11
Apr 18, 2023 pm 08:25 PM
4 Quick Tips to Fix WMI Provider Host High CPU on Windows 11
Apr 18, 2023 pm 08:25 PM
The WMIProviderHost process plays a vital role in Windows 11. It enables other applications to request information about your computer. Processes related to WMIProviderHost typically run in the background; therefore, they typically do not consume large amounts of system resources. However, the service reportedly uses more than 50% of CPU power at times due to other applications. It is worrisome to run your computer's processor at nearly maximum capacity for an extended period of time, as this can lead to overheating and damage to system components. In today's tutorial, we will look at why WMIProviderHost works in C on Windows 11
 How to use self in Python
May 17, 2023 pm 10:40 PM
How to use self in Python
May 17, 2023 pm 10:40 PM
Before introducing the usage of self in Python, let’s first introduce the classes and instances in Python. We know that the most important concepts of object-oriented are classes and instances. Classes are abstract templates, such as abstract things like students. , can be represented by a Student class. Instances are specific "objects" created based on classes. Each object inherits the same methods from the class, but its data may be different. 1. Take the Student class as an example. In Python, the class is defined as follows: classStudent(object):pass(Object) indicates which class the class inherits from. The Object class is all
