

Introduction to python installation and usage

Python installation
#1、下载安装包
https://www.python.org/downloads/
2、安装
默认安装路径:C:\python273、配置环境变量
【右键计算机】--》【属性】--》【高级系统设置】--》【高级】--》【环境变量】--》【在第二个内容框中找到 变量名为Path 的一行,双击】 --> 【Python安装目录追加到变值值中,用 ; 分割】
如:原来的值;C:\python27,切记前面有分号
Copy after login
linux, Mac :
1、下载安装包
    https://www.python.org/downloads/
2、安装
    默认安装路径:C:\python273、配置环境变量
    【右键计算机】--》【属性】--》【高级系统设置】--》【高级】--》【环境变量】--》【在第二个内容框中找到 变量名为Path 的一行,双击】 --> 【Python安装目录追加到变值值中,用 ; 分割】
    如:原来的值;C:\python27,切记前面有分号
1 无需安装,原装Python环境2 3 ps:如果自带2.6,请更新至2.7
Update python:
1 windows: 2 3 1、卸载重装即可 4 5 linux: 6 7 Linux的yum依赖自带Python,为防止错误,此处更新其实就是再安装一个Python 8 9 查看默认Python版本10 python -V11 12 1、安装gcc,用于编译Python源码13 yum install gcc14 2、下载源码包,15 3、解压并进入源码文件16 4、编译安装17 ./configure18 make all19 make install20 5、查看版本21 /usr/local/bin/python2.7 -V22 6、修改默认Python版本23 mv /usr/bin/python /usr/bin/python2.624 ln -s /usr/local/bin/python2.7 /usr/bin/python25 7、防止yum执行异常,修改yum使用的Python版本26 vi /usr/bin/yum27 将头部 #!/usr/bin/python 修改为 #!/usr/bin/python2.6

 Getting started with python
1 print("hello,world")Execute the hello.py file, that is: python /home/dev/hello.py
The internal execution process of python is as follows:
2. Interpreter:
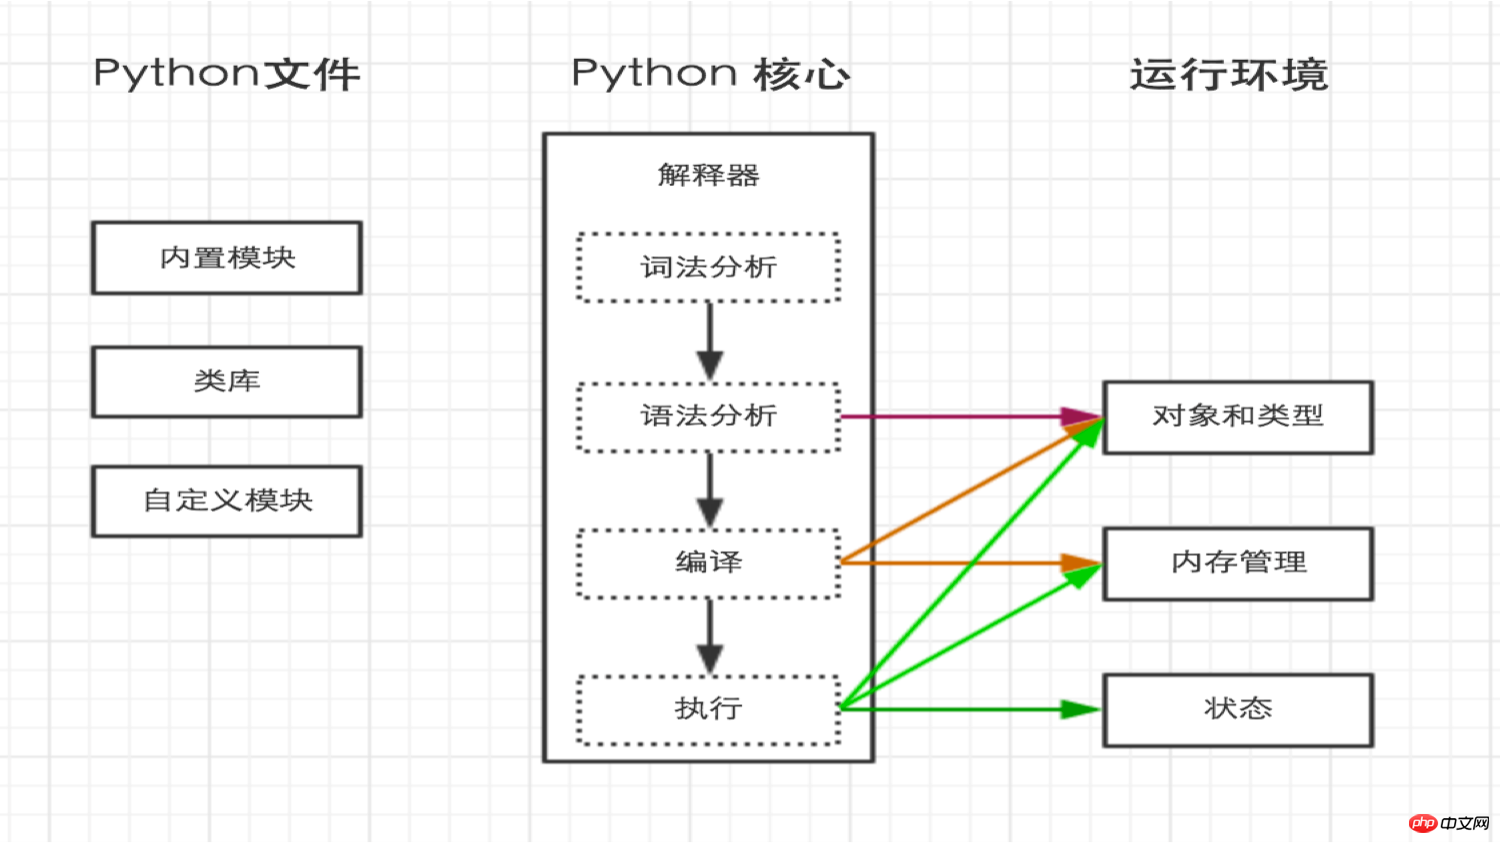 When executing python /home/dev/hello.py in the previous step, it was clearly stated that the hello.py script is executed by the python interpreter.
If you want to execute a python script similar to executing a shell script, for example:
./hello.py, then you need to specify the interpreter at the head of the hello.py file, as follows: 1 #!/usr/bin/env python2 3 print("hello,world")Copy after login
In this case, execute: ./hello.py
. ps: Hello.py needs to be given execution permission before execution, chmod 755 hello.py1 #!/usr/bin/env python2 3 print("hello,world")
When the python interpreter loads the code in the .py file, it will encode the content (default ascill)
Obviously ASCII code cannot convert all kinds of text in the world and symbols are all represented, so a new encoding that can represent all characters and symbols is needed, namely: Unicode
Unicode (Unicode, Universal Code, Single Code) is a code used on computers Character Encoding. Unicode was created to solve the limitations of traditional character encoding schemes. It sets a unified and unique binary encoding for each character in each language, stipulating that all characters and symbols must be represented by at least 16 bits (2 bytes), that is: 2 **16 = 65536,  Note: What is mentioned here is at least 2 bytes, possibly more
UTF-8, which is the compression of Unicode encoding And optimization, he no longer uses at least 2 bytes, but classifies all characters and symbols: the content in the ascii code is saved in 1 byte, European characters are saved in 2 bytes, and East Asian characters Save with 3 bytes...
So, when the python interpreter loads the code in the .py file, it will encode the content (default ascill)
4. Comment:
5. pyc file:
When executing Python code, if other .py files are imported, a .pyc with the same name will be automatically generated during execution. file, which is the bytecode generated after compilation by the Python interpreter. ps: The code can be compiled to produce bytecode; the bytecode can also be decompiled to obtain the code.6. Variables:
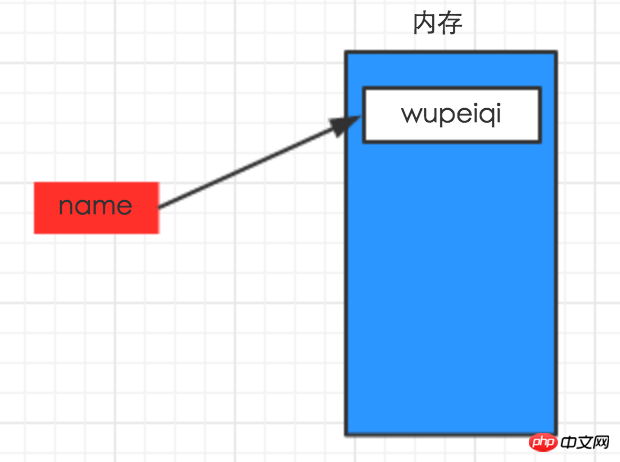
1. Declare variables
1 #!/usr/bin/env python2 # -*- coding: utf-8 -*-3 4 name = "wupeiqi"
上述代码声明了一个变量,变量名为: name,变量name的值为:"wupeiqi"
变量的作用:昵称,其代指内存里某个地址中保存的内容
变量定义的规则:
变量名只能是 字母、数字或下划线的任意组合
变量名的第一个字符不能是数字
以下关键字不能声明为变量名
['and', 'as', 'assert', 'break', 'class', 'continue', 'def', 'del', 'elif', 'else', 'except', 'exec', 'finally', 'for', 'from', 'global', 'if', 'import', 'in', 'is', 'lambda', 'not', 'or', 'pass', 'print', 'raise', 'return', 'try', 'while', 'with', 'yield']
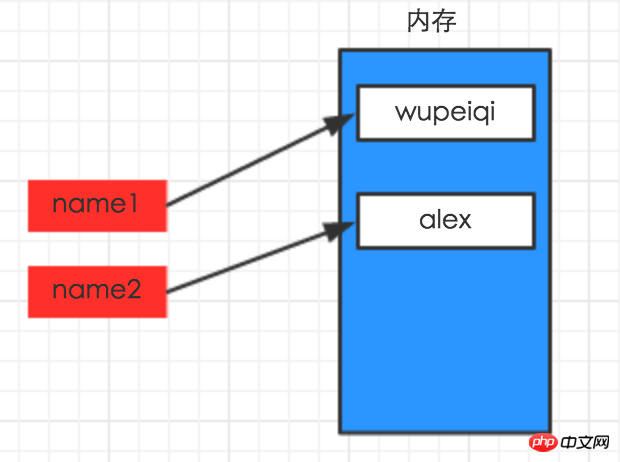
2、变量的赋值:
1 #!/usr/bin/env python2 # -*- coding: utf-8 -*-3 4 name1 = "wupeiqi"5 name2 = "alex"
The above is the detailed content of Introduction to python installation and usage. For more information, please follow other related articles on the PHP Chinese website!

Hot AI Tools

Undresser.AI Undress
AI-powered app for creating realistic nude photos

AI Clothes Remover
Online AI tool for removing clothes from photos.

Undress AI Tool
Undress images for free

Clothoff.io
AI clothes remover

Video Face Swap
Swap faces in any video effortlessly with our completely free AI face swap tool!

Hot Article
Hot Tools

Notepad++7.3.1
Easy-to-use and free code editor

SublimeText3 Chinese version
Chinese version, very easy to use

Zend Studio 13.0.1
Powerful PHP integrated development environment

Dreamweaver CS6
Visual web development tools

SublimeText3 Mac version
God-level code editing software (SublimeText3)
Hot Topics


 PHP and Python: Different Paradigms Explained
Apr 18, 2025 am 12:26 AM
PHP and Python: Different Paradigms Explained
Apr 18, 2025 am 12:26 AM
PHP is mainly procedural programming, but also supports object-oriented programming (OOP); Python supports a variety of paradigms, including OOP, functional and procedural programming. PHP is suitable for web development, and Python is suitable for a variety of applications such as data analysis and machine learning.
 Choosing Between PHP and Python: A Guide
Apr 18, 2025 am 12:24 AM
Choosing Between PHP and Python: A Guide
Apr 18, 2025 am 12:24 AM
PHP is suitable for web development and rapid prototyping, and Python is suitable for data science and machine learning. 1.PHP is used for dynamic web development, with simple syntax and suitable for rapid development. 2. Python has concise syntax, is suitable for multiple fields, and has a strong library ecosystem.
 PHP and Python: A Deep Dive into Their History
Apr 18, 2025 am 12:25 AM
PHP and Python: A Deep Dive into Their History
Apr 18, 2025 am 12:25 AM
PHP originated in 1994 and was developed by RasmusLerdorf. It was originally used to track website visitors and gradually evolved into a server-side scripting language and was widely used in web development. Python was developed by Guidovan Rossum in the late 1980s and was first released in 1991. It emphasizes code readability and simplicity, and is suitable for scientific computing, data analysis and other fields.
 Python vs. JavaScript: The Learning Curve and Ease of Use
Apr 16, 2025 am 12:12 AM
Python vs. JavaScript: The Learning Curve and Ease of Use
Apr 16, 2025 am 12:12 AM
Python is more suitable for beginners, with a smooth learning curve and concise syntax; JavaScript is suitable for front-end development, with a steep learning curve and flexible syntax. 1. Python syntax is intuitive and suitable for data science and back-end development. 2. JavaScript is flexible and widely used in front-end and server-side programming.
 How to run sublime code python
Apr 16, 2025 am 08:48 AM
How to run sublime code python
Apr 16, 2025 am 08:48 AM
To run Python code in Sublime Text, you need to install the Python plug-in first, then create a .py file and write the code, and finally press Ctrl B to run the code, and the output will be displayed in the console.
 Can vs code run in Windows 8
Apr 15, 2025 pm 07:24 PM
Can vs code run in Windows 8
Apr 15, 2025 pm 07:24 PM
VS Code can run on Windows 8, but the experience may not be great. First make sure the system has been updated to the latest patch, then download the VS Code installation package that matches the system architecture and install it as prompted. After installation, be aware that some extensions may be incompatible with Windows 8 and need to look for alternative extensions or use newer Windows systems in a virtual machine. Install the necessary extensions to check whether they work properly. Although VS Code is feasible on Windows 8, it is recommended to upgrade to a newer Windows system for a better development experience and security.
 Can visual studio code be used in python
Apr 15, 2025 pm 08:18 PM
Can visual studio code be used in python
Apr 15, 2025 pm 08:18 PM
VS Code can be used to write Python and provides many features that make it an ideal tool for developing Python applications. It allows users to: install Python extensions to get functions such as code completion, syntax highlighting, and debugging. Use the debugger to track code step by step, find and fix errors. Integrate Git for version control. Use code formatting tools to maintain code consistency. Use the Linting tool to spot potential problems ahead of time.
 Where to write code in vscode
Apr 15, 2025 pm 09:54 PM
Where to write code in vscode
Apr 15, 2025 pm 09:54 PM
Writing code in Visual Studio Code (VSCode) is simple and easy to use. Just install VSCode, create a project, select a language, create a file, write code, save and run it. The advantages of VSCode include cross-platform, free and open source, powerful features, rich extensions, and lightweight and fast.
