

C# serial communication example tutorial

Because I participated in a small project and needed to control the relay through the serial port, I learned basic serial port programming in the past two days. A colleague has a JAVA serial communication package, but it was downloaded from the Internet. It is quite messy and it is difficult to accurately grasp the process and content of serial communication. Therefore, I personally implemented basic serial communication programming using C# by learning the methods of online experts. The following is a summary of the learning results, I hope it will be helpful to everyone.
1. Introduction to serial communication
The serial interface (serial port) is a type that can convert parallel data characters received from the CPU into continuous serial The data stream is sent out, and the received serial data stream can be converted into parallel data characters and supplied to the CPU device. Generally, the circuit that completes this function is called a serial interface circuit.
The concept of serial communications (Serial Communications) is very simple. The serial port sends and receives bytes bit by bit. Although slower than byte-by-byte parallel communication, a serial port can send data on one wire while receiving data on another wire. The most important parameters of serial communication are baud rate, data bits, stop bits and parity. For two ports to communicate, these parameters must match.
1. Baud rate: This is a parameter that measures the symbol transmission rate. It refers to the change in unit time after the signal is modulated, that is, the number of carrier parameter changes per unit time. For example, 960 characters are transmitted per second, and each character format contains 10 bits (1 start bit, 1 Stop bit, 8 data bits), the baud rate at this time is 960Bd, and the bit rate is 10 bits * 960 bits/second = 9600bps.
2. Data bits: This is a parameter that measures the actual data bits in communication. When a computer sends a packet of information, the actual data is often not 8 bits; standard values are 6, 7, and 8 bits. The standard ASCII code is 0~127 (7 bits), and the extended ASCII code is 0~255 (8 bits).
3. Stop bit: used to represent the last few bits of a single packet. Typical values are 1, 1.5 and 2 bits. Since the data is timed on the transmission line, and each device has its own clock, it is possible for a small desynchronization between the two devices to occur during the communication. The stop bit therefore not only indicates the end of the transfer, but also provides the computer with an opportunity to correct clock synchronization.
4. Check digit: A simple error detection method in serial communication. There are four error detection modes: even, odd, high and low. Of course, it is also possible to have no check digit.
2. C# serial port programming class
Starting from .NET Framework 2.0, C# provides the SerialPort class for serial port control. Namespace:System.IO.Ports. For detailed member introduction, please refer to the MSDN documentation. The following introduces its commonly used fields, methods and events.
1. Commonly used fields:
| Name | Description |
| PortName | Get or set the communication port |
| BaudRate | Get or set the serial baud rate |
| DataBits | Get Or set the standard data bit length per byte |
| Parity | Get or set the parity check protocol |
| StopBits | Gets or sets the standard number of stop bits per byte |
2. Commonly used methods:
| Name | Description |
| Close | Close the port connection, set the IsOpen property to false, and release the internal Stream object |
| GetPortNames | Get the serial port name array of the current computer |
| Open | ## Open a new serial port connection |
| ## from the | SerialPortinput buffer Read |
| Write data to the serial port output buffer |
| Description | |
| Indicates the method that will handle the data receiving event of the | SerialPortobject |
3. Basic Usage
The following is a combination of an existing relay to give serial communication Basic usage for reference.
  1 using System;  2 using System.Windows.Forms;  3 using System.IO.Ports;  4 using System.Text;  5   6 namespace Traveller_SerialPortControl  7 {  8     public partial class Form1 : Form  9     { 10         //定义端口类 11         private SerialPort ComDevice = new SerialPort(); 12         public Form1() 13         { 14             InitializeComponent(); 15             InitralConfig(); 16         } 17         /// <summary> 18         /// 配置初始化 19         /// </summary> 20         private void InitralConfig() 21         { 22             //查询主机上存在的串口 23             comboBox_Port.Items.AddRange(SerialPort.GetPortNames()); 24  25             if (comboBox_Port.Items.Count > 0) 26             { 27                 comboBox_Port.SelectedIndex = 0; 28             } 29             else 30             { 31                 comboBox_Port.Text = "未检测到串口"; 32             } 33             comboBox_BaudRate.SelectedIndex = 5; 34             comboBox_DataBits.SelectedIndex = 0; 35             comboBox_StopBits.SelectedIndex = 0; 36             comboBox_CheckBits.SelectedIndex = 0; 37             pictureBox_Status.BackgroundImage = Properties.Resources.red; 38  39             //向ComDevice.DataReceived(是一个事件)注册一个方法Com_DataReceived,当端口类接收到信息时时会自动调用Com_DataReceived方法 40             ComDevice.DataReceived += new SerialDataReceivedEventHandler(Com_DataReceived); 41         } 42  43         /// <summary> 44         /// 一旦ComDevice.DataReceived事件发生,就将从串口接收到的数据显示到接收端对话框 45         /// </summary> 46         /// <param name="sender"></param> 47         /// <param name="e"></param> 48         private void Com_DataReceived(object sender, SerialDataReceivedEventArgs e) 49         { 50             //开辟接收缓冲区 51             byte[] ReDatas = new byte[ComDevice.BytesToRead]; 52             //从串口读取数据 53             ComDevice.Read(ReDatas, 0, ReDatas.Length); 54             //实现数据的解码与显示 55             AddData(ReDatas); 56         } 57  58         /// <summary> 59         /// 解码过程 60         /// </summary> 61         /// <param name="data">串口通信的数据编码方式因串口而异,需要查询串口相关信息以获取</param> 62         public void AddData(byte[] data) 63         { 64             if (radioButton_Hex.Checked) 65             { 66                 StringBuilder sb = new StringBuilder(); 67                 for (int i = 0; i < data.Length; i++) 68                 { 69                     sb.AppendFormat("{0:x2}" + " ", data[i]); 70                 } 71                 AddContent(sb.ToString().ToUpper()); 72             } 73             else if (radioButton_ASCII.Checked) 74             { 75                 AddContent(new ASCIIEncoding().GetString(data)); 76             } 77             else if (radioButton_UTF8.Checked) 78             { 79                 AddContent(new UTF8Encoding().GetString(data)); 80             } 81             else if (radioButton_Unicode.Checked) 82             { 83                 AddContent(new UnicodeEncoding().GetString(data)); 84             } 85             else 86             { 87                 StringBuilder sb = new StringBuilder(); 88                 for (int i = 0; i < data.Length; i++) 89                 { 90                     sb.AppendFormat("{0:x2}" + " ", data[i]); 91                 } 92                 AddContent(sb.ToString().ToUpper()); 93             } 94         } 95  96         /// <summary> 97         /// 接收端对话框显示消息 98         /// </summary> 99         /// <param name="content"></param>100         private void AddContent(string content)101         {102             BeginInvoke(new MethodInvoker(delegate103             {
104                     textBox_Receive.AppendText(content);
105             }));106         }107 108         /// <summary>109         /// 串口开关110         /// </summary>111         /// <param name="sender"></param>112         /// <param name="e"></param>113         private void button_Switch_Click(object sender, EventArgs e)114         {115             if (comboBox_Port.Items.Count <= 0)116             {117                 MessageBox.Show("未发现可用串口,请检查硬件设备");118                 return;119             }120 121             if (ComDevice.IsOpen == false)122             {123                 //设置串口相关属性124                 ComDevice.PortName = comboBox_Port.SelectedItem.ToString();125                 ComDevice.BaudRate = Convert.ToInt32(comboBox_BaudRate.SelectedItem.ToString());126                 ComDevice.Parity = (Parity)Convert.ToInt32(comboBox_CheckBits.SelectedIndex.ToString());127                 ComDevice.DataBits = Convert.ToInt32(comboBox_DataBits.SelectedItem.ToString());128                 ComDevice.StopBits = (StopBits)Convert.ToInt32(comboBox_StopBits.SelectedItem.ToString());129                 try130                 {131                     //开启串口132                     ComDevice.Open();133                     button_Send.Enabled = true;134                 }135                 catch (Exception ex)136                 {137                     MessageBox.Show(ex.Message, "未能成功开启串口", MessageBoxButtons.OK, MessageBoxIcon.Error);138                     return;139                 }140                 button_Switch.Text = "关闭";141                 pictureBox_Status.BackgroundImage = Properties.Resources.green;142             }143             else144             {145                 try146                 {147                     //关闭串口148                     ComDevice.Close();149                     button_Send.Enabled = false;150                 }151                 catch (Exception ex)152                 {153                     MessageBox.Show(ex.Message, "串口关闭错误", MessageBoxButtons.OK, MessageBoxIcon.Error);154                 }155                 button_Switch.Text = "开启";156                 pictureBox_Status.BackgroundImage = Properties.Resources.red;157             }158 159             comboBox_Port.Enabled = !ComDevice.IsOpen;160             comboBox_BaudRate.Enabled = !ComDevice.IsOpen;161             comboBox_DataBits.Enabled = !ComDevice.IsOpen;162             comboBox_StopBits.Enabled = !ComDevice.IsOpen;163             comboBox_CheckBits.Enabled = !ComDevice.IsOpen;164         }165 166       167         /// <summary>168         /// 将消息编码并发送169         /// </summary>170         /// <param name="sender"></param>171         /// <param name="e"></param>172         private void button_Send_Click(object sender, EventArgs e)173         {174             if (textBox_Receive.Text.Length > 0)175             {176                 textBox_Receive.AppendText("\n");177             }178 179             byte[] sendData = null;180 181             if (radioButton_Hex.Checked)182             {183                 sendData = strToHexByte(textBox_Send.Text.Trim());184             }185             else if (radioButton_ASCII.Checked)186             {187                 sendData = Encoding.ASCII.GetBytes(textBox_Send.Text.Trim());188             }189             else if (radioButton_UTF8.Checked)190             {191                 sendData = Encoding.UTF8.GetBytes(textBox_Send.Text.Trim());192             }193             else if (radioButton_Unicode.Checked)194             {195                 sendData = Encoding.Unicode.GetBytes(textBox_Send.Text.Trim());196             }197             else198             {199                 sendData = strToHexByte(textBox_Send.Text.Trim());200             }201 202             SendData(sendData);203         }204 205         /// <summary>206         /// 此函数将编码后的消息传递给串口207         /// </summary>208         /// <param name="data"></param>209         /// <returns></returns>210         public bool SendData(byte[] data)211         {212             if (ComDevice.IsOpen)213             {214                 try215                 {216                     //将消息传递给串口217                     ComDevice.Write(data, 0, data.Length);218                     return true;219                 }220                 catch (Exception ex)221                 {222                     MessageBox.Show(ex.Message, "发送失败", MessageBoxButtons.OK, MessageBoxIcon.Error);223                 }224             }225             else226             {227                 MessageBox.Show("串口未开启", "错误", MessageBoxButtons.OK, MessageBoxIcon.Error);228             }229             return false;230         }231 232         /// <summary>233         /// 16进制编码234         /// </summary>235         /// <param name="hexString"></param>236         /// <returns></returns>237         private byte[] strToHexByte(string hexString)238         {239             hexString = hexString.Replace(" ", "");240             if ((hexString.Length % 2) != 0) hexString += " ";241             byte[] returnBytes = new byte[hexString.Length / 2];242             for (int i = 0; i < returnBytes.Length; i++)243                 returnBytes[i] = Convert.ToByte(hexString.Substring(i * 2, 2).Replace(" ", ""), 16);244             return returnBytes;245         }246 247         //以下两个指令是结合一款继电器而设计的248         private void button_On_Click(object sender, EventArgs e)249         {250             textBox_Send.Text = "005A540001010000B0";251         }252 253         private void button_Off_Click(object sender, EventArgs e)254         {255             textBox_Send.Text = "005A540002010000B1";256         }257     }258 }

The above is the detailed content of C# serial communication example tutorial. For more information, please follow other related articles on the PHP Chinese website!

Hot AI Tools

Undresser.AI Undress
AI-powered app for creating realistic nude photos

AI Clothes Remover
Online AI tool for removing clothes from photos.

Undress AI Tool
Undress images for free

Clothoff.io
AI clothes remover

Video Face Swap
Swap faces in any video effortlessly with our completely free AI face swap tool!

Hot Article
Hot Tools

Notepad++7.3.1
Easy-to-use and free code editor

SublimeText3 Chinese version
Chinese version, very easy to use

Zend Studio 13.0.1
Powerful PHP integrated development environment

Dreamweaver CS6
Visual web development tools

SublimeText3 Mac version
God-level code editing software (SublimeText3)
Hot Topics


 How to delete Xiaohongshu notes
Mar 21, 2024 pm 08:12 PM
How to delete Xiaohongshu notes
Mar 21, 2024 pm 08:12 PM
How to delete Xiaohongshu notes? Notes can be edited in the Xiaohongshu APP. Most users don’t know how to delete Xiaohongshu notes. Next, the editor brings users pictures and texts on how to delete Xiaohongshu notes. Tutorial, interested users come and take a look! Xiaohongshu usage tutorial How to delete Xiaohongshu notes 1. First open the Xiaohongshu APP and enter the main page, select [Me] in the lower right corner to enter the special area; 2. Then in the My area, click on the note page shown in the picture below , select the note you want to delete; 3. Enter the note page, click [three dots] in the upper right corner; 4. Finally, the function bar will expand at the bottom, click [Delete] to complete.
 New generation of optical fiber broadband technology - 50G PON
Apr 20, 2024 pm 09:22 PM
New generation of optical fiber broadband technology - 50G PON
Apr 20, 2024 pm 09:22 PM
In the previous article (link), Xiao Zaojun introduced the development history of broadband technology from ISDN, xDSL to 10GPON. Today, let’s talk about the upcoming new generation of optical fiber broadband technology-50GPON. █F5G and F5G-A Before introducing 50GPON, let’s talk about F5G and F5G-A. In February 2020, ETSI (European Telecommunications Standards Institute) promoted a fixed communication network technology system based on 10GPON+FTTR, Wi-Fi6, 200G optical transmission/aggregation, OXC and other technologies, and named it F5G. That is, the fifth generation fixed network communication technology (The5thgenerationFixednetworks). F5G is a fixed network
 What should I do if the notes I posted on Xiaohongshu are missing? What's the reason why the notes it just sent can't be found?
Mar 21, 2024 pm 09:30 PM
What should I do if the notes I posted on Xiaohongshu are missing? What's the reason why the notes it just sent can't be found?
Mar 21, 2024 pm 09:30 PM
As a Xiaohongshu user, we have all encountered the situation where published notes suddenly disappeared, which is undoubtedly confusing and worrying. In this case, what should we do? This article will focus on the topic of "What to do if the notes published by Xiaohongshu are missing" and give you a detailed answer. 1. What should I do if the notes published by Xiaohongshu are missing? First, don't panic. If you find that your notes are missing, staying calm is key and don't panic. This may be caused by platform system failure or operational errors. Checking release records is easy. Just open the Xiaohongshu App and click "Me" → "Publish" → "All Publications" to view your own publishing records. Here you can easily find previously published notes. 3.Repost. If found
 How to add product links in notes in Xiaohongshu Tutorial on adding product links in notes in Xiaohongshu
Mar 12, 2024 am 10:40 AM
How to add product links in notes in Xiaohongshu Tutorial on adding product links in notes in Xiaohongshu
Mar 12, 2024 am 10:40 AM
How to add product links in notes in Xiaohongshu? In the Xiaohongshu app, users can not only browse various contents but also shop, so there is a lot of content about shopping recommendations and good product sharing in this app. If If you are an expert on this app, you can also share some shopping experiences, find merchants for cooperation, add links in notes, etc. Many people are willing to use this app for shopping, because it is not only convenient, but also has many Experts will make some recommendations. You can browse interesting content and see if there are any clothing products that suit you. Let’s take a look at how to add product links to notes! How to add product links to Xiaohongshu Notes Open the app on the desktop of your mobile phone. Click on the app homepage
 The development history of wireless mice
Jun 12, 2024 pm 08:52 PM
The development history of wireless mice
Jun 12, 2024 pm 08:52 PM
Original title: "How does a wireless mouse become wireless?" 》Wireless mice have gradually become a standard feature of today’s office computers. From now on, we no longer have to drag long cords around. But, how does a wireless mouse work? Today we will learn about the development history of the No.1 wireless mouse. Did you know that the wireless mouse is now 40 years old? In 1984, Logitech developed the world's first wireless mouse, but this wireless mouse used infrared as a The signal carrier is said to look like the picture below, but later failed due to performance reasons. It was not until ten years later in 1994 that Logitech finally successfully developed a wireless mouse that works at 27MHz. This 27MHz frequency also became the wireless mouse for a long time.
 Let's learn how to input the root number in Word together
Mar 19, 2024 pm 08:52 PM
Let's learn how to input the root number in Word together
Mar 19, 2024 pm 08:52 PM
When editing text content in Word, you sometimes need to enter formula symbols. Some guys don’t know how to input the root number in Word, so Xiaomian asked me to share with my friends a tutorial on how to input the root number in Word. Hope it helps my friends. First, open the Word software on your computer, then open the file you want to edit, and move the cursor to the location where you need to insert the root sign, refer to the picture example below. 2. Select [Insert], and then select [Formula] in the symbol. As shown in the red circle in the picture below: 3. Then select [Insert New Formula] below. As shown in the red circle in the picture below: 4. Select [Radical Formula], and then select the appropriate root sign. As shown in the red circle in the picture below:
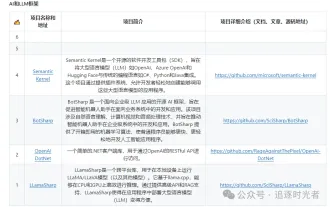 Share several .NET open source AI and LLM related project frameworks
May 06, 2024 pm 04:43 PM
Share several .NET open source AI and LLM related project frameworks
May 06, 2024 pm 04:43 PM
The development of artificial intelligence (AI) technologies is in full swing today, and they have shown great potential and influence in various fields. Today Dayao will share with you 4 .NET open source AI model LLM related project frameworks, hoping to provide you with some reference. https://github.com/YSGStudyHards/DotNetGuide/blob/main/docs/DotNet/DotNetProjectPicks.mdSemanticKernelSemanticKernel is an open source software development kit (SDK) designed to integrate large language models (LLM) such as OpenAI, Azure
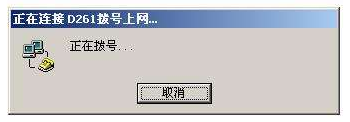 A brief history of broadband Internet technology
Apr 16, 2024 am 09:00 AM
A brief history of broadband Internet technology
Apr 16, 2024 am 09:00 AM
In today's digital age, broadband has become a necessity for each of us and every family. Without it, we would be restless and restless. So, do you know the technical principles behind broadband? From the earliest 56k "cat" dial-up to the current Gigabit cities and Gigabit homes, what kind of changes has our broadband technology experienced? In today’s article, let’s take a closer look at the “Broadband Story”. Have you seen this interface between █xDSL and ISDN? I believe that many friends born in the 70s and 80s must have seen it and are very familiar with it. That's right, this was the interface for "dial-up" when we first came into contact with the Internet. That was more than 20 years ago, when Xiao Zaojun was still in college. In order to surf the Internet, I
