

CSS3+fullPage.js implements full-screen scrolling effect code

This article mainly introduces fullPage.js and CSS3 to achieve the full-screen scrolling effect in detail. It has a certain reference value. Interested friends can refer to it
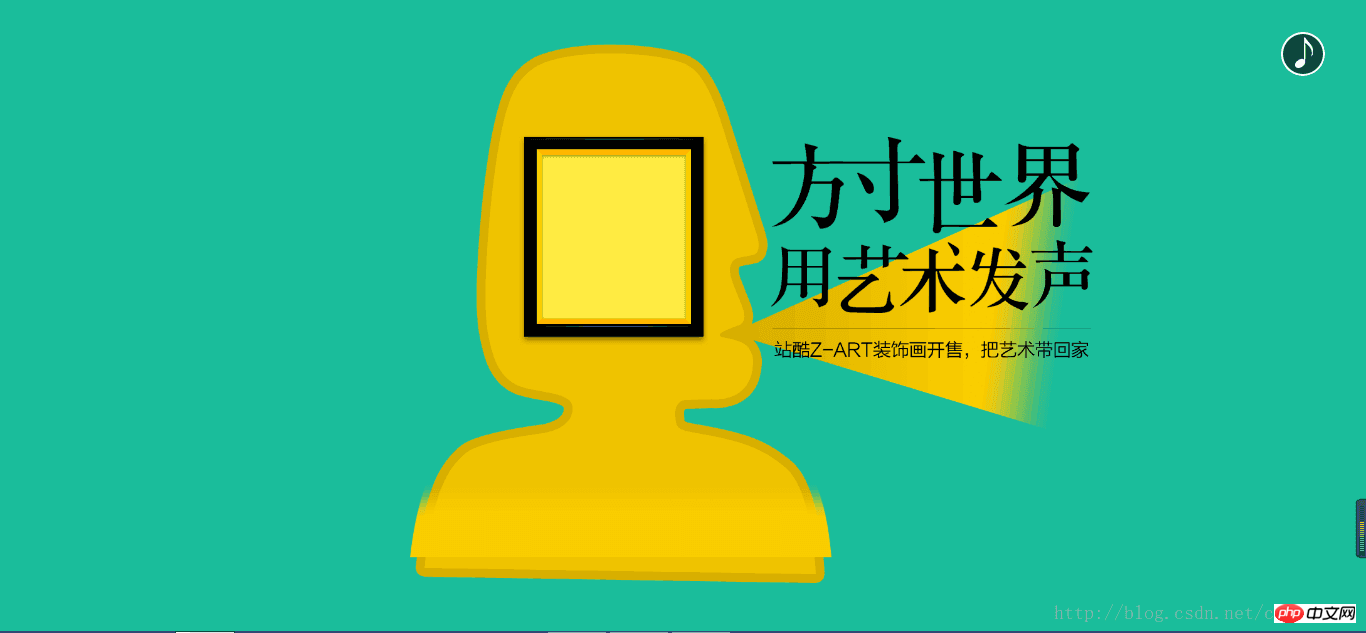
First of all Let’s talk about fullpage. It is a jquery plug-in. It is used to realize that when the mouse slides up and down, it will automatically switch to the previous screen or the next screen. It is indeed a good way to achieve some high-end effects. Very good plugin. First, show the basic renderings.
There are four screens in total
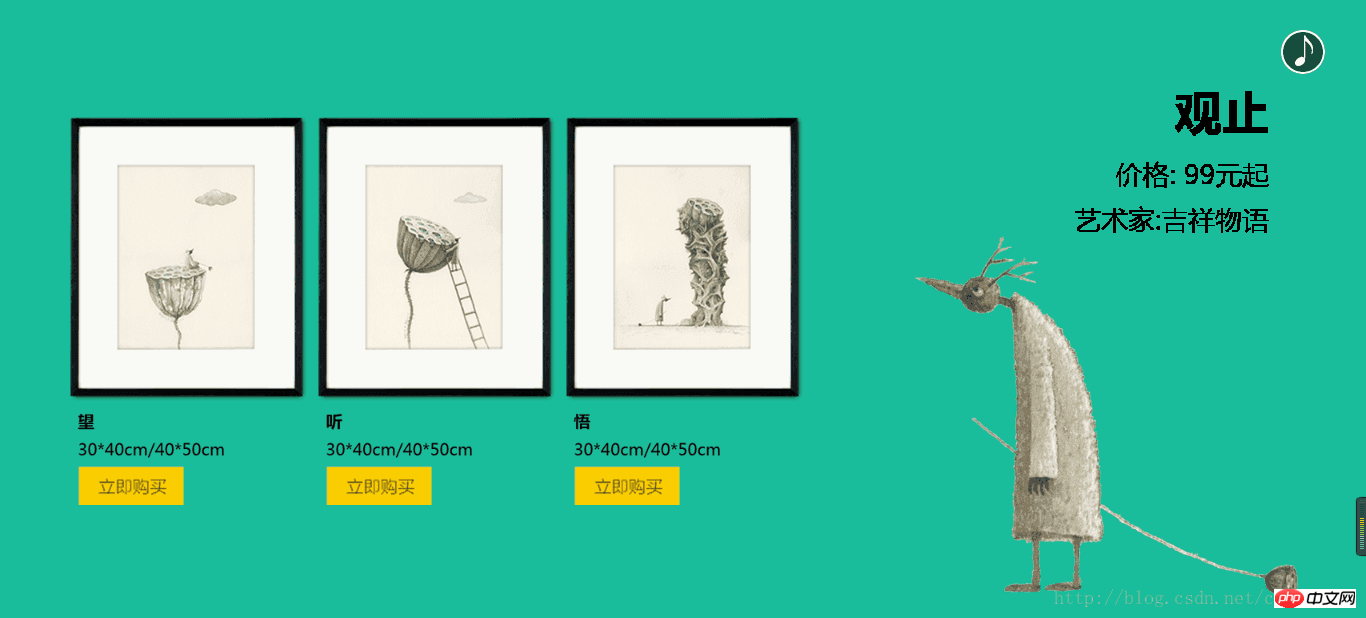
The three pictures on the second screen come out to the correct position from bottom to top when the page is displayed.
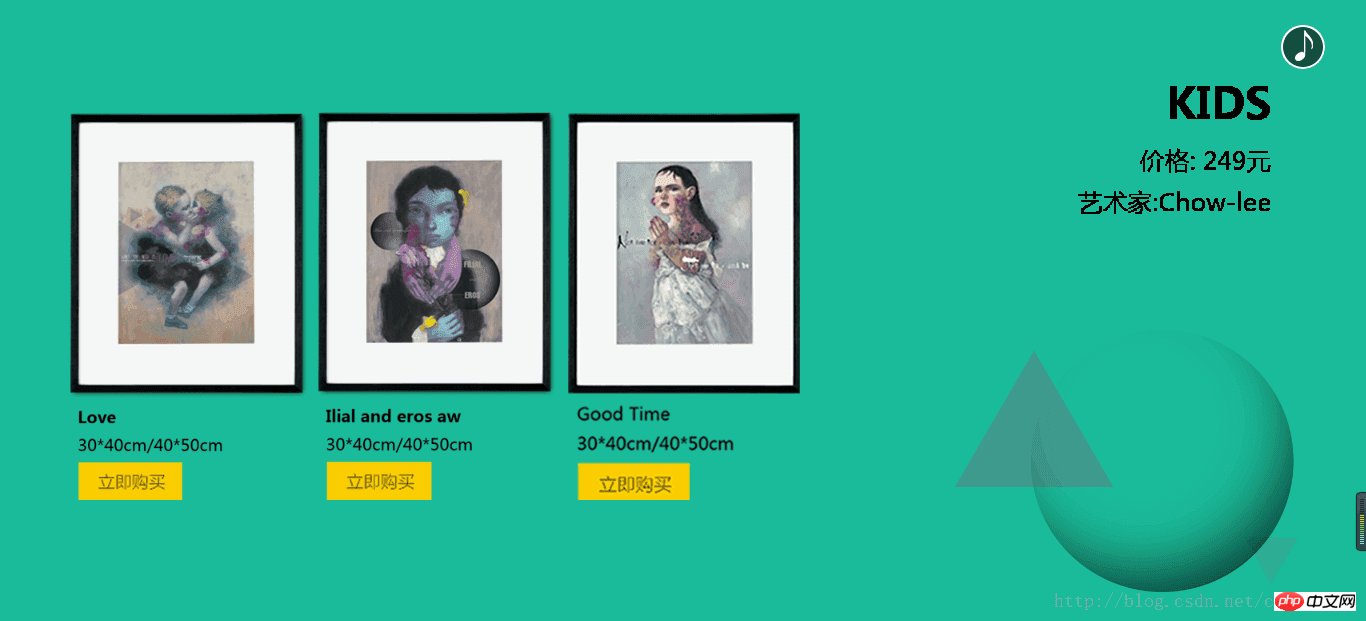
The three pictures on the third screen are expanded to the correct position from left to right when the page is displayed.
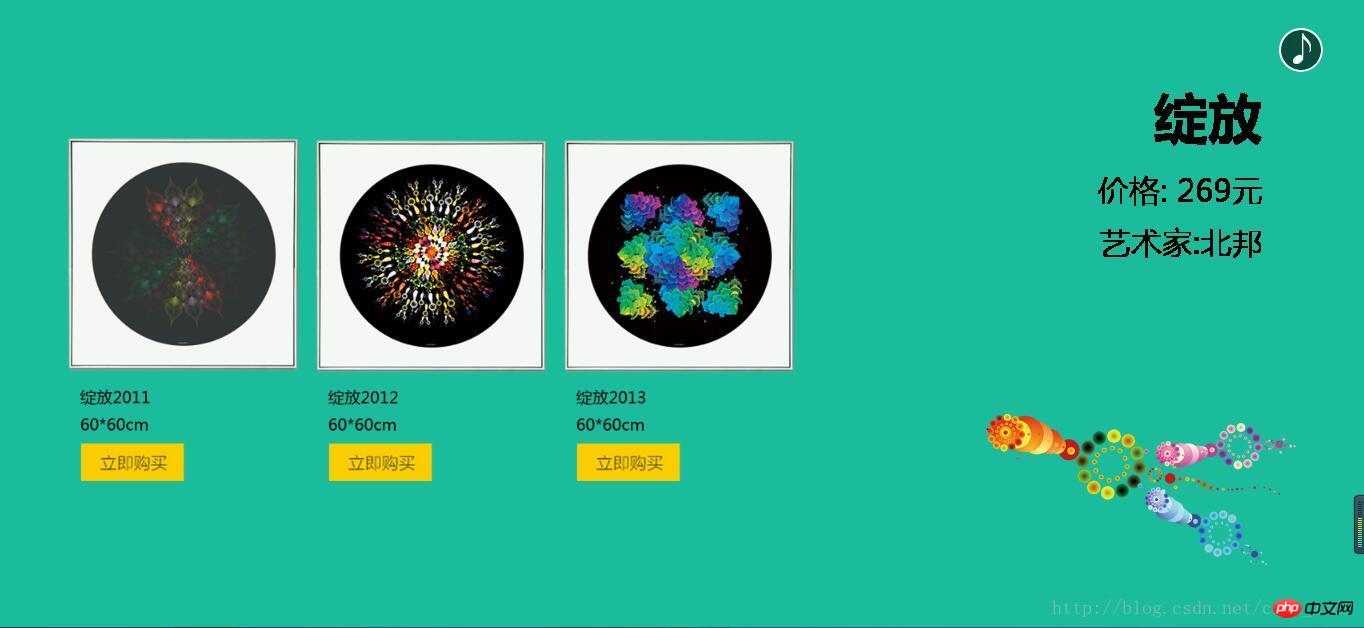
The three pictures on the fourth screen are expanded from the middle to both sides to the correct position when the page is displayed.
Step one:Download jquery and fullpage plug-ins. Fullpage contains css and js and imports them.
<script type="text/javascript" src = "./jQuery/jquery-3.2.0.min.js"></script>
<link rel="stylesheet" type="text/css" href="./fullpage/jquery.fullPage.css">
<script type="text/javascript" src = "./fullpage/jquery.fullPage.min.js"></script>
Second step: Use html to create good elements:
<p class = "main">

  <p class="section page1">
    <img  src="/static/imghw/default1.png"  data-src="./images/page1.png"  class="lazy"   alt="CSS3+fullPage.js implements full-screen scrolling effect code" >
  </p>
  <p class="section page2">
    <p class = "list">
      <img  src = "./images/page2_1.png" alt="CSS3+fullPage.js implements full-screen scrolling effect code" >
      <img  src = "./images/page2_2.png" alt="CSS3+fullPage.js implements full-screen scrolling effect code" >
      <img  src = "./images/page2_3.png" alt="CSS3+fullPage.js implements full-screen scrolling effect code" >
    </p>
      <img  class = "text" src = "./images/page2_4.png" alt="CSS3+fullPage.js implements full-screen scrolling effect code" >
      <img  class = "bg" src = "./images/page2_5.png" alt="CSS3+fullPage.js implements full-screen scrolling effect code" >

  </p>
   <p class="section page3">
    <p class = "list">
      <img  src = "./images/page3_1.png" alt="CSS3+fullPage.js implements full-screen scrolling effect code" >
      <img  src = "./images/page3_2.png" alt="CSS3+fullPage.js implements full-screen scrolling effect code" >
      <img  src = "./images/page3_3.png" alt="CSS3+fullPage.js implements full-screen scrolling effect code" >
    </p>
    <img  class = "text" src = "./images/page3_4.png" alt="CSS3+fullPage.js implements full-screen scrolling effect code" >
      <img  class = "bg" src = "./images/page3_5.png" alt="CSS3+fullPage.js implements full-screen scrolling effect code" >
  </p>

    <p class="section page4">
    <p class = "list">
      <img  src = "./images/page4_1.png" alt="CSS3+fullPage.js implements full-screen scrolling effect code" >
      <img  src = "./images/page4_2.png" alt="CSS3+fullPage.js implements full-screen scrolling effect code" >
      <img  src = "./images/page4_3.png" alt="CSS3+fullPage.js implements full-screen scrolling effect code" >
    </p>
      <img  class = "text" src = "./images/page4_4.png" alt="CSS3+fullPage.js implements full-screen scrolling effect code" >
      <img  class = "bg" src = "./images/page4_5.png" alt="CSS3+fullPage.js implements full-screen scrolling effect code" >
  </p>

</p>
 <p id = "audioBox">
    <audio id = "audio" autoplay loop src= "./music/music.mp3"></audio>
</p>The third step: Use the js of fullpage to realize the background color of each screen, and use the js to realize the pause play of the music
//1.fullpage,由于有四屏,其颜色也一样
    $(".main").fullpage({
sectionsColor: ['#1bbc9b','#1bbc9b','#1bbc9b','#1bbc9b']
    });

    //2.控制音频的播放
    var audioBox = document.getElementById('audioBox');
    var audio = document.getElementById("audio");

    audioBox.onclick = function(){

    if(audio.paused){
      audio.play();
    }
    else
    {
      audio.pause();
    }
}The fourth step: Use css for layout:
<style type="text/css">
  *{
    margin: 0;
    padding:0;
  }

 //设置背景音乐的图标
  #audioBox{
    width: 45px;
    height: 45px;
    position: absolute;
    background: url(./images/music_on.png) no-repeat center;
    border-radius: 22px;
    top: 5%;
    right: 3%;
    cursor: pointer;
  }

  //让每屏超出的都自动隐藏
  .section{
    overflow: hidden;
  }

  /*设置第一屏的图片,因为第一屏也只有一个图片*/
  .page1 img{
    width: 50%;
    margin-left: 30%;
  }

 /*从第二屏开始都包含一个class=list的元素块,设置其距离左侧的距离*/
  [class *= "page"] .list{
    margin-left: 5%;
  }

 /*让左边的图片的宽度都为240px*/
  [class *= "page"] .list img{
    width: 240px;

  }

  /*利用属性选择器,选出所有页的背景图片*/
  [class *= "page"] .bg{
    position: absolute;
    bottom: 5%;
    right: 5%;
    width: 30%;
  }

  /*利用属性选择器,选择出所有页的文字图片*/
  [class *= "page"] .text{
    position: absolute;
    top: 10%;
    right: 5%;
}animation effect has not been achieved for the four-screen pictures.
Step 5:Achieve animation effects.
Idea: Change the transparency by changing the opacity attribute and combining it with transition to achieve the fade-in effect;
.page1 img{
    opacity: 0;  /*初始状态为全透明*/
    /*加上供应商前缀,持续时间为1.5s*/
    -moz-transition: opacity 1.5s;
    -webkit-transition: opacity 1.5s;
  }

/*当第一页显示的时候触发,当第一页时就会自动加上active类*/
  .page1.active img{
    opacity: 1;
}3. Implement the animation of the second screen:
Core idea: Use trans
form:translateY and transition to implement; Transition is to detect attribute value changes
translateY translation
/*动画的完成时间为1s,初始位置三个图片都处于向下移动到1000像素,即移出屏幕外。*/
  .page2 .list img{
    transition:1s;
    transform: translateY(1000px);
  }

 /*当第二屏触发时,图片回到原始位置*/
  .page2.active .list img{
    transform:translateY(0px);
  }

/*利用结构化伪类找到每一个图片并设置延时,为了使动画更灵活*/
  .page2 .list img:nth-child(1){
    transition-delay: 0.5s;
  }
  .page2 .list img:nth-child(2){
    transition-delay: 0.8s;
  }
  .page2 .list img:nth-child(3){
    transition-delay: 1s;
}4. Implementation The animation of the third screen
.page .list img{
/设置动画持续时间为1s,动画开始时延迟0.5s/
transition: 1s 0.5s;
}.page .list img:nth-child(2){
/向左移动了250px刚好与第一个重叠/
transform:translateX(-250px);
}
.page .list img:nth-child(3){
/向左移动了500px刚好与第一个重叠/
transform:translateX(-500px);
}
/设置触发时的动画,让所有的img归位/
.page3.active .list img{
transform:translateX(0px);
}#5 for these two pictures. Set the animation of the fifth screen.
①. It can be achieved by using tanslateX according to the above idea;
.page4 .list img{
    transition: 1s 0.5s;
  }
  /*设置第一个和第三个的初始位置处于中间的位置上*/
  .page4 .list img:nth-child(1){
    transform:translateX(250px);
  }
  .page4 .list img:nth-child(3){
    transform:translateX(-250px);
  }
 /*触发时归位*/
  .page4.active .list img{
    transform:translateX(0px);
}keyframes
.page4.active .list img:nth-child(1){
    transform:translateX(0px);
    -webkit-animation: 'flymove1' 1s ease-in 1;  /*动画名、持续时间、更细粒度动画,重复次数*/
  }

  .page4.active .list img:nth-child(3){
    transform:translateX(0px);
    -webkit-animation: 'flymove2' 1s ease-in 1;
  }

   @-webkit-keyframes flymove1{
    0%{ transform: translateX(250px);}
    100%{ transform: translateX(0px);}
   }

   @-webkit-keyframes flymove2{
    from{ transform: translateX(-250px);}
    to{ transform: translateX(0px);}
}<!DOCTYPE html>
<html>
<head>
<meta charset = "utf-8" />
<title>fullpage 实现全屏滚动</title>
<script type="text/javascript" src = "./jQuery/jquery-3.2.0.min.js"></script>
<link rel="stylesheet" type="text/css" href="./fullpage/jquery.fullPage.css" rel="external nofollow" rel="external nofollow" >
<script type="text/javascript" src = "./fullpage/jquery.fullPage.min.js"></script>
<style type="text/css">
*{
margin: 0;
padding:0;
}
#audioBox{
width: 45px;
height: 45px;
position: absolute;
background: url(./images/music_on.png) no-repeat center;
border-radius: 22px;
top: 5%;
right: 3%;
cursor: pointer;
}
.section{
overflow: hidden;
}
/*设置第一屏的图片*/
.page1 img{
width: 50%;
margin-left: 30%;
}
[class *= "page"] .list{
margin-left: 5%;
}
[class *= "page"] .list img{
width: 240px;
}
/*所有页的背景图片*/
[class *= "page"] .bg{
position: absolute;
bottom: 5%;
right: 5%;
width: 30%;
}
/*所有页的文字图片*/
[class *= "page"] .text{
position: absolute;
top: 10%;
right: 5%;
}
/*第一屏图片的动画
思路:通过改变opacity属性,结合transition来改变透明度,实现淡入的效果;
*/
.page1 img{
opacity: 0;/*初始状态为全透明*/
-moz-transition: opacity 1.5s;
-webkit-transition: opacity 1.5s;
}
/*当第一页显示的时候触发*/
.page1.active img{
opacity: 1;
}
/*第二页的动画
核心思路 :使用transform:translateY 和transition配合实现;
transition是检测属性值变化
translateY平移
*/
.page2 .list img{
transition:1s;
transform: translateY(1000px);
}
.page2.active .list img{
transform:translateY(0px);
}
.page2 .list img:nth-child(1){
transition-delay: 0.5s;
}
.page2 .list img:nth-child(2){
transition-delay: 0.8s;
}
.page2 .list img:nth-child(3){
transition-delay: 1s;
}
/*设置第三页的动画*/
.page3 .list img{
transition: 1s 0.5s;
}
.page3 .list img:nth-child(2){
transform:translateX(-250px);
}
.page3 .list img:nth-child(3){
transform:translateX(-500px);
}
.page3.active .list img{
transform:translateX(0px);
}
/*设置第四页的动画*/
/*.page4 .list img{
transition: 1s 0.5s;
}
.page4 .list img:nth-child(1){
transform:translateX(250px);
}
.page4 .list img:nth-child(3){
transform:translateX(-250px);
}
.page4.active .list img{
transform:translateX(0px);
}*/
.page4.active .list img:nth-child(1){
transform:translateX(0px);
-webkit-animation: 'flymove1' 1s ease-in 1; /*动画名、持续时间、更细粒度动画,重复次数*/
}
.page4.active .list img:nth-child(3){
transform:translateX(0px);
-webkit-animation: 'flymove2' 1s ease-in 1;
}
@-webkit-keyframes flymove1{
0%{ transform: translateX(250px);}
100%{ transform: translateX(0px);}
}
@-webkit-keyframes flymove2{
from{ transform: translateX(-250px);}
to{ transform: translateX(0px);}
}
</style>
</head>
<body>
<p class = "main">
<p class="section page1">
<img src="/static/imghw/default1.png" data-src="./images/page1.png" class="lazy" alt="CSS3+fullPage.js implements full-screen scrolling effect code" >
</p>
<p class="section page2">
<p class = "list">
<img src = "./images/page2_1.png" alt="CSS3+fullPage.js implements full-screen scrolling effect code" >
<img src = "./images/page2_2.png" alt="CSS3+fullPage.js implements full-screen scrolling effect code" >
<img src = "./images/page2_3.png" alt="CSS3+fullPage.js implements full-screen scrolling effect code" >
</p>
<img class = "text" src = "./images/page2_4.png" alt="CSS3+fullPage.js implements full-screen scrolling effect code" >
<img class = "bg" src = "./images/page2_5.png" alt="CSS3+fullPage.js implements full-screen scrolling effect code" >
</p>
<p class="section page3">
<p class = "list">
<img src = "./images/page3_1.png" alt="CSS3+fullPage.js implements full-screen scrolling effect code" >
<img src = "./images/page3_2.png" alt="CSS3+fullPage.js implements full-screen scrolling effect code" >
<img src = "./images/page3_3.png" alt="CSS3+fullPage.js implements full-screen scrolling effect code" >
</p>
<img class = "text" src = "./images/page3_4.png" alt="CSS3+fullPage.js implements full-screen scrolling effect code" >
<img class = "bg" src = "./images/page3_5.png" alt="CSS3+fullPage.js implements full-screen scrolling effect code" >
</p>
<p class="section page4">
<p class = "list">
<img src = "./images/page4_1.png" alt="CSS3+fullPage.js implements full-screen scrolling effect code" >
<img src = "./images/page4_2.png" alt="CSS3+fullPage.js implements full-screen scrolling effect code" >
<img src = "./images/page4_3.png" alt="CSS3+fullPage.js implements full-screen scrolling effect code" >
</p>
<img class = "text" src = "./images/page4_4.png" alt="CSS3+fullPage.js implements full-screen scrolling effect code" >
<img class = "bg" src = "./images/page4_5.png" alt="CSS3+fullPage.js implements full-screen scrolling effect code" >
</p>
</p>
<p id = "audioBox">
<audio id = "audio" autoplay loop src= "./music/music.mp3"></audio>
</p>
<script type="text/javascript">
$(function(){
//1.fullpage
$(".main").fullpage({
sectionsColor: ['#1bbc9b','#1bbc9b','#1bbc9b','#1bbc9b']
});
//2.控制音频的播放
var audioBox = document.getElementById('audioBox');
var audio = document.getElementById("audio");
audioBox.onclick = function(){
if(audio.paused){
audio.play();
}
else
{
audio.pause();
}
}
});
</script>
</body>
</html>Free css online video tutorial
2. 3.php.cn Dugu Jiujian (2)-css video tutorial
The above is the detailed content of CSS3+fullPage.js implements full-screen scrolling effect code. For more information, please follow other related articles on the PHP Chinese website!

Hot AI Tools

Undresser.AI Undress
AI-powered app for creating realistic nude photos

AI Clothes Remover
Online AI tool for removing clothes from photos.

Undress AI Tool
Undress images for free

Clothoff.io
AI clothes remover

Video Face Swap
Swap faces in any video effortlessly with our completely free AI face swap tool!

Hot Article
Hot Tools

Notepad++7.3.1
Easy-to-use and free code editor

SublimeText3 Chinese version
Chinese version, very easy to use

Zend Studio 13.0.1
Powerful PHP integrated development environment

Dreamweaver CS6
Visual web development tools

SublimeText3 Mac version
God-level code editing software (SublimeText3)
Hot Topics


 How to achieve wave effect with pure CSS3? (code example)
Jun 28, 2022 pm 01:39 PM
How to achieve wave effect with pure CSS3? (code example)
Jun 28, 2022 pm 01:39 PM
How to achieve wave effect with pure CSS3? This article will introduce to you how to use SVG and CSS animation to create wave effects. I hope it will be helpful to you!
 Use CSS skillfully to realize various strange-shaped buttons (with code)
Jul 19, 2022 am 11:28 AM
Use CSS skillfully to realize various strange-shaped buttons (with code)
Jul 19, 2022 am 11:28 AM
This article will show you how to use CSS to easily realize various weird-shaped buttons that appear frequently. I hope it will be helpful to you!
 How to hide elements in css without taking up space
Jun 01, 2022 pm 07:15 PM
How to hide elements in css without taking up space
Jun 01, 2022 pm 07:15 PM
Two methods: 1. Using the display attribute, just add the "display:none;" style to the element. 2. Use the position and top attributes to set the absolute positioning of the element to hide the element. Just add the "position:absolute;top:-9999px;" style to the element.
 How to implement lace borders in css3
Sep 16, 2022 pm 07:11 PM
How to implement lace borders in css3
Sep 16, 2022 pm 07:11 PM
In CSS, you can use the border-image attribute to achieve a lace border. The border-image attribute can use images to create borders, that is, add a background image to the border. You only need to specify the background image as a lace style; the syntax "border-image: url (image path) offsets the image border width inward. Whether outset is repeated;".
 How to enlarge the image by clicking the mouse in css3
Apr 25, 2022 pm 04:52 PM
How to enlarge the image by clicking the mouse in css3
Apr 25, 2022 pm 04:52 PM
Implementation method: 1. Use the ":active" selector to select the state of the mouse click on the picture; 2. Use the transform attribute and scale() function to achieve the picture magnification effect, the syntax "img:active {transform: scale(x-axis magnification, y Axis magnification);}".
 It turns out that text carousel and image carousel can also be realized using pure CSS!
Jun 10, 2022 pm 01:00 PM
It turns out that text carousel and image carousel can also be realized using pure CSS!
Jun 10, 2022 pm 01:00 PM
How to create text carousel and image carousel? The first thing everyone thinks of is whether to use js. In fact, text carousel and image carousel can also be realized using pure CSS. Let’s take a look at the implementation method. I hope it will be helpful to everyone!
 How to set animation rotation speed in css3
Apr 28, 2022 pm 04:32 PM
How to set animation rotation speed in css3
Apr 28, 2022 pm 04:32 PM
In CSS3, you can use the "animation-timing-function" attribute to set the animation rotation speed. This attribute is used to specify how the animation will complete a cycle and set the speed curve of the animation. The syntax is "element {animation-timing-function: speed attribute value;}".
 Does css3 animation effect have deformation?
Apr 28, 2022 pm 02:20 PM
Does css3 animation effect have deformation?
Apr 28, 2022 pm 02:20 PM
The animation effect in css3 has deformation; you can use "animation: animation attribute @keyframes ..{..{transform: transformation attribute}}" to achieve deformation animation effect. The animation attribute is used to set the animation style, and the transform attribute is used to set the deformation style. .
