
 Web Front-end
H5 Tutorial
HTML5 game development-Box2dWeb application (1)-Create various rigid bodies
Web Front-end
H5 Tutorial
HTML5 game development-Box2dWeb application (1)-Create various rigid bodies
HTML5 game development-Box2dWeb application (1)-Create various rigid bodies

At the beginning of this article, we will introduce the new functions of lufylegend-1.4.0, how to create a physical world and various rigid bodies in this physical world with box2dweb
Preparation
First you need to download the html5 open source library lufylegend-1.4.0
http://blog.csdn.net/lufy_legend/article/details /7644932
box2dweb You can download it here
http://code.google.com/p/box2dweb/downloads/list
Prepare three pictures,


are used to create circular, rectangular and triangular rigid bodies respectively.
Ready to finish, now start production.
The following is to use the LLoadManage class in lufylegend.js to read the image
init(10,"mylegend",800,400,main);
var backLayer,cLayer,wallLayer,bitmap,loadingLayer;
var imglist = {};
var imgData = new Array(
		{name:"bird1",path:"./images/bird1.png"},
		{name:"bird2",path:"./images/bird2.png"},
		{name:"stage01",path:"./images/stage01.png"}
		);
function main(){
	LGlobal.setDebug(true);
	backLayer = new LSprite();
	addChild(backLayer);


	loadingLayer = new LoadingSample3();
	backLayer.addChild(loadingLayer);
	LLoadManage.load(
		imgData,
		function(progress){
			loadingLayer.setProgress(progress);
		},
		function(result){
			imglist = result;
			backLayer.removeChild(loadingLayer);
			loadingLayer = null;
			gameInit();
		}
	);
}LGlobal.setDebug(true); is to turn on the debug mode, so that when creating a rigid body, all box2dweb will be The created debug rigid body is also displayed together. When releasing the finished product, the debug mode should be turned off.
The LLoadManage class has three parameters, $list, $onupdate, $oncomplete,
$list is the image array to be read, $onupdate is the function that needs to be called during reading, $oncomplete It is the function called when the reading is completed.
The LoadingSample3 class is the progress bar display function in the lufylegend.js library. In addition to the LoadingSample3 class, there are also the LoadingSample1 class and the LoadingSample2 class.
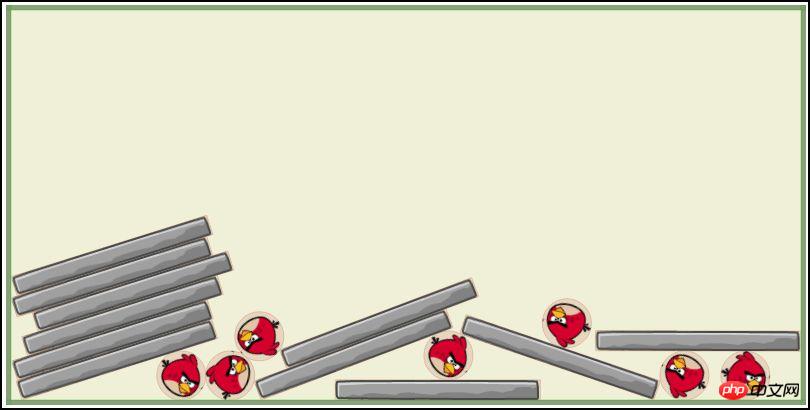
is created Before creating the rigid body, first create four walls, up, down, left and right, to control the movement range of the rigid body to be created later.
wallLayer = new LSprite();
	wallLayer.x = 400;
	wallLayer.y = 0;
	backLayer.addChild(wallLayer);
	wallLayer.addBodyPolygon(800,10,0);
	wallLayer = new LSprite();
	wallLayer.x = 0;
	wallLayer.y = 200;
	backLayer.addChild(wallLayer);
	wallLayer.addBodyPolygon(10,400,0);
	wallLayer = new LSprite();
	wallLayer.x = 400;
	wallLayer.y = 400;
	backLayer.addChild(wallLayer);
	wallLayer.addBodyPolygon(800,10,0);
	wallLayer = new LSprite();
	wallLayer.x = 800;
	wallLayer.y = 200;
	backLayer.addChild(wallLayer);
	wallLayer.addBodyPolygon(10,400,0);
For children who don’t know how to use LSprite, please read my previous articles. I won’t be too wordy here.
addBodyPolygon(w,h,type,density,friction,restitution) is to add a rectangular body to LSprite, the parameters are, (width, height, static or dynamic, density, friction, elasticity)
If the third parameter sets the body to be static, the following parameters can be omitted. Here, the four walls are set to static.
Then, add a mouse click event to backLayer, and prepare to add a rigid body when the mouse clicks.
##
backLayer.addEventListener(LMouseEvent.MOUSE_UP,add);
	cLayer = new LSprite();
	cLayer.x = 50 + Math.random()*700;
	cLayer.y = 50;
	backLayer.addChild(cLayer);
	bitmap = new LBitmap(new LBitmapData(imglist["bird1"]));
	cLayer.addChild(bitmap);
	cLayer.addBodyCircle(bitmap.getWidth()*0.5,bitmap.getHeight()*0.5,bitmap.getWidth()*0.5,1,.5,.4,.5);
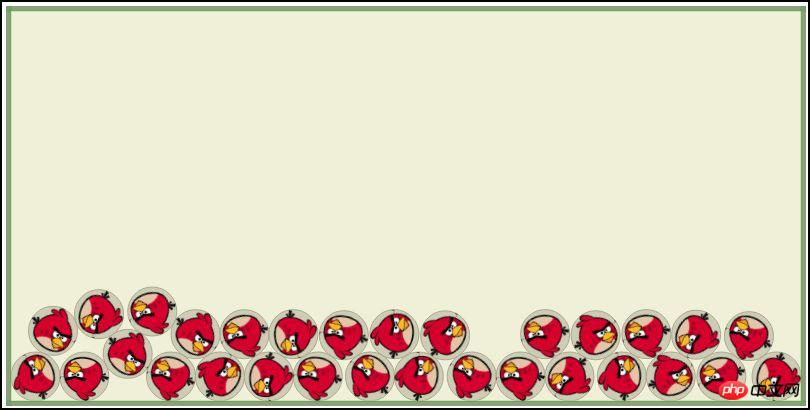
	var rand = Math.random();
	if(rand < 0.5){
		cLayer = new LSprite();
		cLayer.x = 50 + Math.random()*700;
		cLayer.y = 50;
		backLayer.addChild(cLayer);
		bitmap = new LBitmap(new LBitmapData(imglist["bird1"]));
		cLayer.addChild(bitmap);
		cLayer.addBodyCircle(bitmap.getWidth()*0.5,bitmap.getHeight()*0.5,bitmap.getWidth()*0.5,1,.5,.4,.5);
	}else{
		cLayer = new LSprite();
		cLayer.x = 50 + Math.random()*700;
		cLayer.y = 50;
		backLayer.addChild(cLayer);
		bitmap = new LBitmap(new LBitmapData(imglist["stage01"]));
		cLayer.addChild(bitmap);
		cLayer.addBodyPolygon(bitmap.getWidth(),bitmap.getHeight(),1,5,.4,.2);
	}
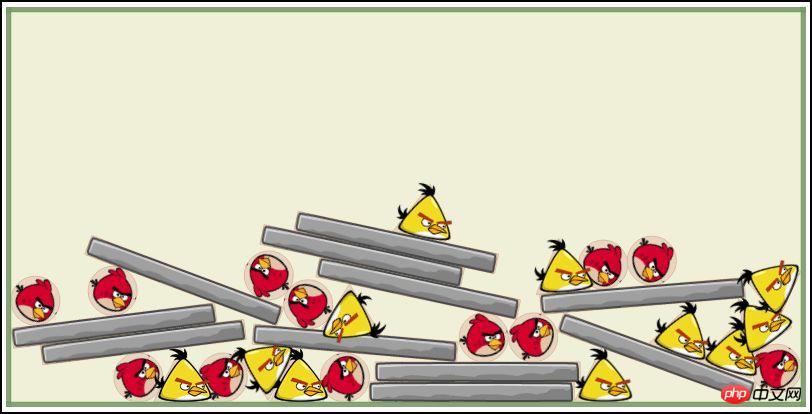
cLayer = new LSprite();
backLayer.addChild(cLayer);
bitmap = new LBitmap(new LBitmapData(imglist["bird2"]));
cLayer.addChild(bitmap);
var shapeArray = [
[[0,54],[27,0],[54,54]]
];
cLayer.addBodyVertices(shapeArray,27,27,1,.5,.4,.5);
cLayer.box2dBody.SetPosition(new LGlobal.box2d.b2Vec2((50 + Math.random()*700)/LGlobal.box2d.drawScale,50/LGlobal.box2d.drawScale));
http://lufy.netne.net/lufylegend-js/lufylegend-1.4/box2d/sample01/index3.htmlThis article is over, the final code is presented, please look forward to the next tutorial
test loading……

Hot AI Tools

Undresser.AI Undress
AI-powered app for creating realistic nude photos

AI Clothes Remover
Online AI tool for removing clothes from photos.

Undress AI Tool
Undress images for free

Clothoff.io
AI clothes remover

Video Face Swap
Swap faces in any video effortlessly with our completely free AI face swap tool!

Hot Article
Hot Tools

Notepad++7.3.1
Easy-to-use and free code editor

SublimeText3 Chinese version
Chinese version, very easy to use

Zend Studio 13.0.1
Powerful PHP integrated development environment

Dreamweaver CS6
Visual web development tools

SublimeText3 Mac version
God-level code editing software (SublimeText3)
Hot Topics


 Table Border in HTML
Sep 04, 2024 pm 04:49 PM
Table Border in HTML
Sep 04, 2024 pm 04:49 PM
Guide to Table Border in HTML. Here we discuss multiple ways for defining table-border with examples of the Table Border in HTML.
 Nested Table in HTML
Sep 04, 2024 pm 04:49 PM
Nested Table in HTML
Sep 04, 2024 pm 04:49 PM
This is a guide to Nested Table in HTML. Here we discuss how to create a table within the table along with the respective examples.
 HTML margin-left
Sep 04, 2024 pm 04:48 PM
HTML margin-left
Sep 04, 2024 pm 04:48 PM
Guide to HTML margin-left. Here we discuss a brief overview on HTML margin-left and its Examples along with its Code Implementation.
 HTML Table Layout
Sep 04, 2024 pm 04:54 PM
HTML Table Layout
Sep 04, 2024 pm 04:54 PM
Guide to HTML Table Layout. Here we discuss the Values of HTML Table Layout along with the examples and outputs n detail.
 HTML Input Placeholder
Sep 04, 2024 pm 04:54 PM
HTML Input Placeholder
Sep 04, 2024 pm 04:54 PM
Guide to HTML Input Placeholder. Here we discuss the Examples of HTML Input Placeholder along with the codes and outputs.
 HTML Ordered List
Sep 04, 2024 pm 04:43 PM
HTML Ordered List
Sep 04, 2024 pm 04:43 PM
Guide to the HTML Ordered List. Here we also discuss introduction of HTML Ordered list and types along with their example respectively
 Moving Text in HTML
Sep 04, 2024 pm 04:45 PM
Moving Text in HTML
Sep 04, 2024 pm 04:45 PM
Guide to Moving Text in HTML. Here we discuss an introduction, how marquee tag work with syntax and examples to implement.
 HTML onclick Button
Sep 04, 2024 pm 04:49 PM
HTML onclick Button
Sep 04, 2024 pm 04:49 PM
Guide to HTML onclick Button. Here we discuss their introduction, working, examples and onclick Event in various events respectively.
