

PHP basic study notes (1)

What is a form? - A form is not a table.
Some html elements where users can provide certain data or information or options. The form usually has a "submit" button, which can then provide this data/information/options to a program on the server for use - data processing.
—The core of the form is data.
The composition and form of form tags:
What are the form items?
Single-line text box:
Other attributes:
value: Set the initial text
size: Set the width of its input box (unit is "character width") - this number of characters can be placed in it
maxlength: Set the maximum number of characters that can be entered in this input box
readonly: This is a "no value" attribute, which means "read only". The writing method is: readonly="readonly"
disable: Set the input box to "invalid", that is, the data is invalid.
Password box:
Other attributes:
value: Set the initial text
size: Set the width of its input box (unit is "character width") - this number of characters can be placed in it
maxlength: Set the maximum number of characters that can be entered in this input box
Single option:
to
Other attributes:possible. It is also a "valueless attribute"
说 NAME special description: The single -option of a group requires that the name value must be the same.
Multiple options:
通 Explanation: Multi -options usually must have a value value;Other attributes:
possible. It is also a "valueless attribute"
Submit button:
交 Explanation: Click the submission button, then the form will be "submitted", that is, the data will be transmitted into the file set by the form of the form.
Image button:
The function of the picture button is actually "submit", but the displayed effect is a picture - this is helpful to beautify the page.
Reset button:
单 Explanation: The data that will be filled in or selected by all users of the form to the initial stateOrdinary button:
没有 Explanation: There is no effect on the form, but "action" can be generated from it to achieve other requirements (JS program)& File domain: & lt; input type = "file" name = "n9" /& gt;
选择 Explanation: allow users to choose local files (and send to the server) -the files are also data.Hidden field:
explained: not visible on the interface, but submitted to the server as a "hidden data" - required for programming.
E Pulling selection: Use Select and Option tag cooperation. But treat this as "a form item"
~ ~ ~
with
The selected attribute can be used on the option tag to indicate the default selected item of the select element (the first item is selected by default).
The multiple attribute can be used on the select tag, so that the select element can "select multiple" (that is, only one can be selected by default)
Multi-line options (also called list options): Multi-line options are actually just a "deformation" of drop-down selection - setting their size value to be greater than or equal to will result in multiple lines.
~ ~
Multi-line text box:
with 的 The number of rows set by ROWS is a number, indicating that the number of texts that can be displayed by the multi -line text box
的 The number of columns set by COLS is a number, indicating that the number of texts that can be displayed by the multi -line text boxThis tag has no value attribute. But its actual "value" is whatever is placed in the middle of this tag.
out out to be stored in the form – all form items must have a name attribute to indicate their "name" - the server retrieves the data based on this name.
Frame Tag
The first concept: We always only display one web page in an open "window".
But:
个 In fact, we can also open multiple web pages in one window -in fact, its essence is still a window to display a web page, but we will use some specific tags to divide a "large window" into several "small windows. ".
First of all, let’s be clear:
1. When using frame tag (frameset), you cannot use body tag - that is, use frameset tag instead of body tag
2. To use the frameset tag, you must use the frameset document type
The specific segmentation code is as follows:
F & lt; Frameset Cols = "Set the current window divided by column" rows = "to set the current window according to the line" & gt;~ ~
. . . . . . . . . . . . .
The value of cols is a continuous number or percentage representing the width of the column, separated by (,), where the "*" sign represents the width of the "rest". For example:
”Cols =" 100,800 ": indicates that the large window is divided into two small windows according to the column, the first is 100 width, and the second is 800 wide’ s to ’ s ’ s 1 t t through ’ ’ s ’ ’ s 1’s 1 100 t-t t t- s s s to be split into 3 small windows according to columns, the first one is 100 wide, the second one is 200 wide, and the rest is given to the third one
cols=”15%, *”
值 The value of ROWS is the number or percentage of the width of the continuous exponential line, which is separated from each other (,), where the "*" indicates the width of the "rest". For example:rows=”100,200,*”
row=”20%, *”
css introduction
CSS: Cascading Style Sheet
CSS allows us to control the appearance of the webpage from the following two aspects:
1. Control the appearance of web pages in batches, allowing us to save labor.
2. Precisely control the appearance of web pages: down to the pixel level.
Basic syntax form of css:
Selector { css attribute name 1: value 1; css attribute name 2: value 2; ………… }
Example:
font{color:red; font-weight:bold; font-size:18px;}
dt{
font-size:14px;
font-weight:bold;
🌜}
A way to differentiate between two attributes
html attribute: written in the tag, in the form: attribute name = "attribute value" - this quotation mark can be omitted, but it is recommended not to omit it for wall cracks
签 -also called "label attribute"—HTML attributes are usually “the own attributes of each tag, which are generally different”
——There are very few tags using the same html attribute
css attribute: written in curly brackets of the selector, in the form: attribute name: attribute value - pay special attention, the value cannot be enclosed in quotes
—can also be called “style attribute”
—CSS properties are usually “available to all tags”, generally the same
——There are very few tags that do not use the same css attributes
Selector Classification
Tag selector:
Format: tag name { …….. }
(Meaning: Refers to the attribute settings in all the labels in the (corresponding) webpage.
Class Selector:
Form: .Class name { …… }
(Meaning: The value of the Class in the (corresponding) webpage is all labels of this type of name apply the attribute settings.Example:
~
ID Selector:
Format: #idname{…… The meaning of (: The value of the ID in the (corresponding) webpage is that the label that names the name is set to the attribute settings.
个 Note: Generally, the ID name in a web page should not be the same, because ID itself means "only".Example:
~
Universal Selector:
Form: *{ ….. } ——Universal selector has only this form (symbol)
Meaning: It automatically refers to "all tags", that is, all tags apply this attribute setting
器 Note: The general choice device is used with caution, which is usually used only to set up a few basic attributes, such as text color, text size, padding, marginPseudo class selector:
Form: :pseudo class name {……}
Note: There are actually only a few pseudo-class names stipulated within the system and not defined by ourselves, such as: link, visited, hover, active. Their meanings are also specific. Usually the above pseudo-classes are only used for a tags, and their form and meaning are usually:
a:visited{…..} :表示一个a链接标签在点击(访问)过之后的时候的状态(访问后状态)
a:hover{….} :表示一个a链接标签在鼠标放上去的时候的状态(悬停状态)
a:active{….} :表示一个a链接标签在鼠标摁住但还没有抬起的状态(活动状态)。
不过,最新的浏览器中,出于安全考虑,a的hover和visited效果有些属性不能用了。
复合选择器之:层级选择器
形式: 选择器1 选择器2 { ……… }
含义: 在选择器1所对应的标签中由选择器2所对应的那些标签。。。。。其中,选择器1和选择器2可以是前面所学的任意某种选择器,而且这种层级关系还可以多层次,比如:
#d1 div{…}
.cc1 p span{…..}
p .cc2 img{…..}
#d1 p a:hover{….}
举例:
段落1
Compound selector: group selector
Form: Selector 1, Selector 2 {………… }
Meaning: It means that both selectors use the same attribute settings. In fact, it is nothing more than a way of writing simplified code, otherwise they have to use two selectors to write.
.a {color:red; font-size:15px;}
.b{ color:red; font-size:15px;}
è
.a, .b{ color:red; font-size:15px;}
Other compound forms (examples):
div.cc1{…} : Represents a div tag with class value cc1, which is completely different from div .cc1{…}.
p
Frame:
Frame tags are a technique used to divide the "current window" into smaller windows. framseset replaces the body tag and uses the frame document type.

Hot AI Tools

Undresser.AI Undress
AI-powered app for creating realistic nude photos

AI Clothes Remover
Online AI tool for removing clothes from photos.

Undress AI Tool
Undress images for free

Clothoff.io
AI clothes remover

Video Face Swap
Swap faces in any video effortlessly with our completely free AI face swap tool!

Hot Article
Hot Tools

Notepad++7.3.1
Easy-to-use and free code editor

SublimeText3 Chinese version
Chinese version, very easy to use

Zend Studio 13.0.1
Powerful PHP integrated development environment

Dreamweaver CS6
Visual web development tools

SublimeText3 Mac version
God-level code editing software (SublimeText3)
Hot Topics
 1669
1669
 14
1428
52
1329
25
1273
29
1256
24
14
1428
52
1329
25
1273
29
1256
24

 Solution: Your organization requires you to change your PIN
Oct 04, 2023 pm 05:45 PM
Solution: Your organization requires you to change your PIN
Oct 04, 2023 pm 05:45 PM
The message "Your organization has asked you to change your PIN" will appear on the login screen. This happens when the PIN expiration limit is reached on a computer using organization-based account settings, where they have control over personal devices. However, if you set up Windows using a personal account, the error message should ideally not appear. Although this is not always the case. Most users who encounter errors report using their personal accounts. Why does my organization ask me to change my PIN on Windows 11? It's possible that your account is associated with an organization, and your primary approach should be to verify this. Contacting your domain administrator can help! Additionally, misconfigured local policy settings or incorrect registry keys can cause errors. Right now
 How to adjust window border settings on Windows 11: Change color and size
Sep 22, 2023 am 11:37 AM
How to adjust window border settings on Windows 11: Change color and size
Sep 22, 2023 am 11:37 AM
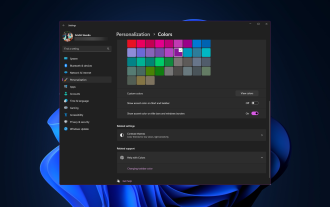
Windows 11 brings fresh and elegant design to the forefront; the modern interface allows you to personalize and change the finest details, such as window borders. In this guide, we'll discuss step-by-step instructions to help you create an environment that reflects your style in the Windows operating system. How to change window border settings? Press + to open the Settings app. WindowsI go to Personalization and click Color Settings. Color Change Window Borders Settings Window 11" Width="643" Height="500" > Find the Show accent color on title bar and window borders option, and toggle the switch next to it. To display accent colors on the Start menu and taskbar To display the theme color on the Start menu and taskbar, turn on Show theme on the Start menu and taskbar
 How to change title bar color on Windows 11?
Sep 14, 2023 pm 03:33 PM
How to change title bar color on Windows 11?
Sep 14, 2023 pm 03:33 PM
By default, the title bar color on Windows 11 depends on the dark/light theme you choose. However, you can change it to any color you want. In this guide, we'll discuss step-by-step instructions for three ways to change it and personalize your desktop experience to make it visually appealing. Is it possible to change the title bar color of active and inactive windows? Yes, you can change the title bar color of active windows using the Settings app, or you can change the title bar color of inactive windows using Registry Editor. To learn these steps, go to the next section. How to change title bar color in Windows 11? 1. Using the Settings app press + to open the settings window. WindowsI go to "Personalization" and then
 How to enable or disable taskbar thumbnail previews on Windows 11
Sep 15, 2023 pm 03:57 PM
How to enable or disable taskbar thumbnail previews on Windows 11
Sep 15, 2023 pm 03:57 PM
Taskbar thumbnails can be fun, but they can also be distracting or annoying. Considering how often you hover over this area, you may have inadvertently closed important windows a few times. Another disadvantage is that it uses more system resources, so if you've been looking for a way to be more resource efficient, we'll show you how to disable it. However, if your hardware specs can handle it and you like the preview, you can enable it. How to enable taskbar thumbnail preview in Windows 11? 1. Using the Settings app tap the key and click Settings. Windows click System and select About. Click Advanced system settings. Navigate to the Advanced tab and select Settings under Performance. Select "Visual Effects"
 OOBELANGUAGE Error Problems in Windows 11/10 Repair
Jul 16, 2023 pm 03:29 PM
OOBELANGUAGE Error Problems in Windows 11/10 Repair
Jul 16, 2023 pm 03:29 PM
Do you see "A problem occurred" along with the "OOBELANGUAGE" statement on the Windows Installer page? The installation of Windows sometimes stops due to such errors. OOBE means out-of-the-box experience. As the error message indicates, this is an issue related to OOBE language selection. There is nothing to worry about, you can solve this problem with nifty registry editing from the OOBE screen itself. Quick Fix – 1. Click the “Retry” button at the bottom of the OOBE app. This will continue the process without further hiccups. 2. Use the power button to force shut down the system. After the system restarts, OOBE should continue. 3. Disconnect the system from the Internet. Complete all aspects of OOBE in offline mode
 Display scaling guide on Windows 11
Sep 19, 2023 pm 06:45 PM
Display scaling guide on Windows 11
Sep 19, 2023 pm 06:45 PM
We all have different preferences when it comes to display scaling on Windows 11. Some people like big icons, some like small icons. However, we all agree that having the right scaling is important. Poor font scaling or over-scaling of images can be a real productivity killer when working, so you need to know how to customize it to get the most out of your system's capabilities. Advantages of Custom Zoom: This is a useful feature for people who have difficulty reading text on the screen. It helps you see more on the screen at one time. You can create custom extension profiles that apply only to certain monitors and applications. Can help improve the performance of low-end hardware. It gives you more control over what's on your screen. How to use Windows 11
 10 Ways to Adjust Brightness on Windows 11
Dec 18, 2023 pm 02:21 PM
10 Ways to Adjust Brightness on Windows 11
Dec 18, 2023 pm 02:21 PM
Screen brightness is an integral part of using modern computing devices, especially when you look at the screen for long periods of time. It helps you reduce eye strain, improve legibility, and view content easily and efficiently. However, depending on your settings, it can sometimes be difficult to manage brightness, especially on Windows 11 with the new UI changes. If you're having trouble adjusting brightness, here are all the ways to manage brightness on Windows 11. How to Change Brightness on Windows 11 [10 Ways Explained] Single monitor users can use the following methods to adjust brightness on Windows 11. This includes desktop systems using a single monitor as well as laptops. let's start. Method 1: Use the Action Center The Action Center is accessible
 How to Fix Activation Error Code 0xc004f069 in Windows Server
Jul 22, 2023 am 09:49 AM
How to Fix Activation Error Code 0xc004f069 in Windows Server
Jul 22, 2023 am 09:49 AM
The activation process on Windows sometimes takes a sudden turn to display an error message containing this error code 0xc004f069. Although the activation process is online, some older systems running Windows Server may experience this issue. Go through these initial checks, and if they don't help you activate your system, jump to the main solution to resolve the issue. Workaround – close the error message and activation window. Then restart the computer. Retry the Windows activation process from scratch again. Fix 1 – Activate from Terminal Activate Windows Server Edition system from cmd terminal. Stage – 1 Check Windows Server Version You have to check which type of W you are using
