
 Backend Development
PHP Tutorial
Detailed explanation of the entire Zend Debugger installation process_PHP tutorial
Backend Development
PHP Tutorial
Detailed explanation of the entire Zend Debugger installation process_PHP tutorial
Detailed explanation of the entire Zend Debugger installation process_PHP tutorial

Debugging technology is an indispensable and important part of our programming, and the debugger is a necessary component of every IDE environment. In this case, it is a matter of course that the integrated environment of Zend Studio has a debugger. However, when the debugger is configured and used, its powerful functions will definitely amaze you!
In fact, the debugging function of Zend Studio (hereinafter referred to as ZDE) is divided into internal debugging and remote debugging. Internal debugging is preliminary code debugging using ZDE's built-in PHP (available in versions 4 and 5). We focus on remote debugging because it can completely simulate a real operating environment.
Remote debugging requires server-side component support. Our content today is how to install this server-side debugging environment. The debugging component used is Zend Debugger, which is light and useful. At the time of writing this article, Its latest version is 5.2.14, which is slightly updated with the 5.2.10 version widely circulated on the Internet. My server is apache under windows, so I downloaded the windows version of Zend Debugger. The compressed package is about 2.1M and has a readme.txt. I think it is necessary to read it:
<ol class="dp-xml">
<li class="alt"><span><span>Zend Debugger installation instructions  </span></span></li>
<li><span>—————————————  </span></li>
<li class="alt"><span>1. Locate ZendDebugger.so or ZendDebugger.dll file that is compiled for the correct version of PHP   </span></li>
<li><span>(4.3.x, 4.4.x, 5.0.x, 5.1.x, 5.2.x) in theappropriate directory.  </span></li>
<li class="alt"><span> </span></li>
<li><span>2. Add the following line to the php.ini file:  </span></li>
<li class="alt">
<span>Linux and Mac OS X: </span><span class="attribute">zend_extension</span><span>=/full/path/to/ZendDebugger.so  </span>
</li>
<li>
<span>Windows: </span><span class="attribute">zend_extension_ts</span><span>=/full/path/to/ZendDebugger.dll  </span>
</li>
<li class="alt">
<span>Windows non-tread safe: </span><span class="attribute">zend_extension</span><span>=/full/path/to/ZendDebugger.dll  </span>
</li>
<li><span>(*) the windows non-thread safe is used only with Zend Core 2.0  </span></li>
<li class="alt"><span> </span></li>
<li><span>3. Add the following lines to the php.ini file:  </span></li>
<li class="alt">
<span class="attribute">zend_debugger.allow_hosts</span><span>=</span><span class="tag"><</span><span class="tag-name">ip_addresses</span><span class="tag">></span><span> </span>
</li>
<li>
<span class="attribute">zend_debugger.expose_remotely</span><span>=</span><span class="attribute-value">always</span><span>   </span>
</li>
<li class="alt"><span> </span></li>
<li><span>4. Place dummy.php file in the document root directory.  </span></li>
<li class="alt"><span> </span></li>
<li><span>5. Restart web server. </span></li>
<li> </li>
</ol>
The installation method has been described in great detail here, so I will describe it again in my obscure language. The following is a list of all files in the compressed package:
<ol class="dp-xml">
<li class="alt"><span><span>ZendDebugger-5.2.14RC9-cygwin_nt-i386md5  </span></span></li>
<li><span>ZendDebugger-5.2.14RC9-cygwin_nt-i386Inventory.xml  </span></li>
<li class="alt"><span>ZendDebugger-5.2.14RC9-cygwin_nt-i3864_3_x_comp  </span></li>
<li><span>ZendDebugger-5.2.14RC9-cygwin_nt-i3864_3_x_compZendDebugger.dll  </span></li>
<li class="alt"><span>ZendDebugger-5.2.14RC9-cygwin_nt-i3864_4_x_comp  </span></li>
<li><span>ZendDebugger-5.2.14RC9-cygwin_nt-i3864_4_x_compZendDebugger.dll  </span></li>
<li class="alt"><span>ZendDebugger-5.2.14RC9-cygwin_nt-i3865_0_x_comp  </span></li>
<li><span>ZendDebugger-5.2.14RC9-cygwin_nt-i3865_0_x_compZendDebugger.dll  </span></li>
<li class="alt"><span>ZendDebugger-5.2.14RC9-cygwin_nt-i3865_1_x_comp  </span></li>
<li><span>ZendDebugger-5.2.14RC9-cygwin_nt-i3865_1_x_compZendDebugger.dll  </span></li>
<li class="alt"><span>ZendDebugger-5.2.14RC9-cygwin_nt-i3865_2_x_comp  </span></li>
<li><span>ZendDebugger-5.2.14RC9-cygwin_nt-i3865_2_x_compZendDebugger.dll  </span></li>
<li class="alt"><span>ZendDebugger-5.2.14RC9-cygwin_nt-i3865_2_x_nts_comp  </span></li>
<li><span>ZendDebugger-5.2.14RC9-cygwin_nt-i3865_2_x_nts_compZendDebugger.dll  </span></li>
<li class="alt"><span>ZendDebugger-5.2.14RC9-cygwin_nt-i386dummy.php  </span></li>
<li><span>ZendDebugger-5.2.14RC9-cygwin_nt-i386README.txt </span></li>
<li> </li>
</ol>
Unzip the appropriate one, which is The Zend Debugger version corresponding to your current PHP version. My PHP version is 5.2.5, so I dragged out 5_2_x_comp (as for 5_2_x_nts_comp refers to non-tread safe, I don’t understand the specific use, so I won’t assume (used), I moved 5_2_x_compZendDebugger.dll to D:myserverZendDebugger5_2_xZendDebugger.dll, and decompressed dummy.php in the compressed package to the web root directory. The DocumentRoot of my apache here is set to D:/myserver/wwwroot, so I copied dummy. php to D:myserverwwwroot, then modify php.ini and add these contents:
<ol class="dp-xml">
<li class="alt"><span><span class="attribute">zend_extension_ts</span><span>=</span><span class="attribute-value">D</span><span>:/myserver/ZendDebugger/5_2_x/ZendDebugger.dll  </span></span></li>
<li>
<span class="attribute">zend_debugger.allow_hosts</span><span>=</span><span class="attribute-value">127</span><span>.0.0.1/32,192.168.1.88/24  </span>
</li>
<li class="alt">
<span class="attribute">zend_debugger.expose_remotely</span><span>=</span><span class="attribute-value">always</span>
</li>
<li class="alt"><span>  </span></li>
</ol>
Then restart apache. After a short wait, we enter phpinfo() to check whether it is successful?

Hot AI Tools

Undresser.AI Undress
AI-powered app for creating realistic nude photos

AI Clothes Remover
Online AI tool for removing clothes from photos.

Undress AI Tool
Undress images for free

Clothoff.io
AI clothes remover

Video Face Swap
Swap faces in any video effortlessly with our completely free AI face swap tool!

Hot Article
Hot Tools

Notepad++7.3.1
Easy-to-use and free code editor

SublimeText3 Chinese version
Chinese version, very easy to use

Zend Studio 13.0.1
Powerful PHP integrated development environment

Dreamweaver CS6
Visual web development tools

SublimeText3 Mac version
God-level code editing software (SublimeText3)
Hot Topics


 How to use LeakSanitizer to debug C++ memory leaks?
Jun 02, 2024 pm 09:46 PM
How to use LeakSanitizer to debug C++ memory leaks?
Jun 02, 2024 pm 09:46 PM
How to use LeakSanitizer to debug C++ memory leaks? Install LeakSanitizer. Enable LeakSanitizer via compile flag. Run the application and analyze the LeakSanitizer report. Identify memory allocation types and allocation locations. Fix memory leaks and ensure all dynamically allocated memory is released.
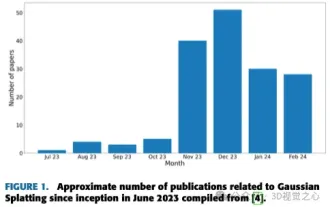 More than just 3D Gaussian! Latest overview of state-of-the-art 3D reconstruction techniques
Jun 02, 2024 pm 06:57 PM
More than just 3D Gaussian! Latest overview of state-of-the-art 3D reconstruction techniques
Jun 02, 2024 pm 06:57 PM
Written above & The author’s personal understanding is that image-based 3D reconstruction is a challenging task that involves inferring the 3D shape of an object or scene from a set of input images. Learning-based methods have attracted attention for their ability to directly estimate 3D shapes. This review paper focuses on state-of-the-art 3D reconstruction techniques, including generating novel, unseen views. An overview of recent developments in Gaussian splash methods is provided, including input types, model structures, output representations, and training strategies. Unresolved challenges and future directions are also discussed. Given the rapid progress in this field and the numerous opportunities to enhance 3D reconstruction methods, a thorough examination of the algorithm seems crucial. Therefore, this study provides a comprehensive overview of recent advances in Gaussian scattering. (Swipe your thumb up
 PHP Debugging Errors: A Guide to Common Mistakes
Jun 05, 2024 pm 03:18 PM
PHP Debugging Errors: A Guide to Common Mistakes
Jun 05, 2024 pm 03:18 PM
Common PHP debugging errors include: Syntax errors: Check the code syntax to make sure there are no errors. Undefined variable: Before using a variable, make sure it is initialized and assigned a value. Missing semicolons: Add semicolons to all code blocks. Function is undefined: Check that the function name is spelled correctly and make sure the correct file or PHP extension is loaded.
 Revolutionary GPT-4o: Reshaping the human-computer interaction experience
Jun 07, 2024 pm 09:02 PM
Revolutionary GPT-4o: Reshaping the human-computer interaction experience
Jun 07, 2024 pm 09:02 PM
The GPT-4o model released by OpenAI is undoubtedly a huge breakthrough, especially in its ability to process multiple input media (text, audio, images) and generate corresponding output. This ability makes human-computer interaction more natural and intuitive, greatly improving the practicality and usability of AI. Several key highlights of GPT-4o include: high scalability, multimedia input and output, further improvements in natural language understanding capabilities, etc. 1. Cross-media input/output: GPT-4o+ can accept any combination of text, audio, and images as input and directly generate output from these media. This breaks the limitation of traditional AI models that only process a single input type, making human-computer interaction more flexible and diverse. This innovation helps power smart assistants
 Problem-Solving with Python: Unlock Powerful Solutions as a Beginner Coder
Oct 11, 2024 pm 08:58 PM
Problem-Solving with Python: Unlock Powerful Solutions as a Beginner Coder
Oct 11, 2024 pm 08:58 PM
Pythonempowersbeginnersinproblem-solving.Itsuser-friendlysyntax,extensivelibrary,andfeaturessuchasvariables,conditionalstatements,andloopsenableefficientcodedevelopment.Frommanagingdatatocontrollingprogramflowandperformingrepetitivetasks,Pythonprovid
 Collection of C++ programming puzzles: stimulate thinking and improve programming skills
Jun 01, 2024 pm 10:26 PM
Collection of C++ programming puzzles: stimulate thinking and improve programming skills
Jun 01, 2024 pm 10:26 PM
C++ programming puzzles cover algorithm and data structure concepts such as Fibonacci sequence, factorial, Hamming distance, maximum and minimum values of arrays, etc. By solving these puzzles, you can consolidate C++ knowledge and improve algorithm understanding and programming skills.
 Unleash Your Inner Programmer: C for Absolute Beginners
Oct 11, 2024 pm 03:50 PM
Unleash Your Inner Programmer: C for Absolute Beginners
Oct 11, 2024 pm 03:50 PM
C is an ideal language for beginners to learn programming, and its advantages include efficiency, versatility, and portability. Learning C language requires: Installing a C compiler (such as MinGW or Cygwin) Understanding variables, data types, conditional statements and loop statements Writing the first program containing the main function and printf() function Practicing through practical cases (such as calculating averages) C language knowledge
 The Key to Coding: Unlocking the Power of Python for Beginners
Oct 11, 2024 pm 12:17 PM
The Key to Coding: Unlocking the Power of Python for Beginners
Oct 11, 2024 pm 12:17 PM
Python is an ideal programming introduction language for beginners through its ease of learning and powerful features. Its basics include: Variables: used to store data (numbers, strings, lists, etc.). Data type: Defines the type of data in the variable (integer, floating point, etc.). Operators: used for mathematical operations and comparisons. Control flow: Control the flow of code execution (conditional statements, loops).
