

给PHP装配amqp扩展

给PHP安装amqp扩展
有史以来最坑爹的一次扩展安装,不晓得诸位有没有尝试过…………各种报错啊!有木有?!¥#@%%&*……
捣鼓半天,只编译了个0.1.x的扩展版本,瞅了下,擦,函数少的可怜啊- -|||
不行,继续~
经过一天的努力,老天总算开眼了,赶紧总结下吧~
----------------------------------------------- 我是分割线 ---------------------------------------------------
AMQP――高级消息队列协议,目前比较有名气的实现大概就是大名鼎鼎的RabbitMQ了。
(不了解的童鞋先看下我这篇转载吧:《[RabbitMQ+Python入门经典] 兔子和兔子窝》)
PHP扩展当然还是官方推荐的好了。OK,就它了 http://php.net/manual/en/book.amqp.php
To install the AMQP PHP extension, you must first install the ? librabbitmq library. You will need the 0-9-1 version of the rabbitmq-c client library, linked to the rabbitmq-codegen version that corresponds to the version of the broker you are using. Use the following steps to download and install the library:
# Download the rabbitmq-c library @ version 0-9-1
hg clone http://hg.rabbitmq.com/rabbitmq-c/rev/b01825ecc112 rabbitmq-c
cd rabbitmq-c
# Add the codegen requirement. To find the full list, go here: http://hg.rabbitmq.com/rabbitmq-codegen/tags
# and copy the URL for the appropriate broker version.
hg clone http://hg.rabbitmq.com/rabbitmq-codegen/rev/16bbcb711380 codegen
# Configure, compile and install
autoreconf -i && ./configure && make && sudo make install
扩展是C写的,由于C与RabbitMQ通信一般需要依赖rabbitmq-c库(也就是librabbitmq),所以编译扩展前需要先装依赖库。好吧,那就按要求装吧~
原文是用hg工具,需要装mercurial(一个轻量级的版本控制系统),这里就不介绍了,我们还是用传统的方法。
首先,到这里下载rabbitmq-c的v0.2版:https://github.com/alanxz/rabbitmq-c/tags OR 直接shell:
wget https://github.com/alanxz/rabbitmq-c/tarball/0.2
tar zxvf 0.2
cd alanxz-rabbitmq*
(为什么0.2版?好吧,我也不知道,总之它的各版本兼容性非常不好,经过我屡试屡败屡败试……发现0.2版还算顺利 - -)
接着,到这里下载最新版的codegen配件:https://github.com/rabbitmq/rabbitmq-codegen/downloads ,OR 直接shell:
wget https://github.com/rabbitmq/rabbitmq-codegen/tarball/master
tar zxvf master
mv rabbitmq-* codegen
(上面这步必须要把其解压,并放到rabbitmq-c的目录中的codegen目录中,也就是上面最后那步做的。)
按照手册介绍,先进行:
autoreconf -i
如果你一切顺利,没有报错,那么恭喜了!后面则是常规操作:
./configure && make && make install
如果仍未报错,哇塞,我只能说你NB!可以直接进行扩展编译了。
不过大部分情况下你或许和我一样遇到各种各样报错信息,那么后面我们再说,这里先把编译扩展顺带说完。
直接回到官方下载(我下载的是1.0.0版,新的版本我没事试,应该也可以的) http://pecl.php.net/package/amqp ,并编译成so文件 OR shell:
wget http://pecl.php.net/get/amqp-1.0.0.tgz
tar zxvf amqp-1.0.0.tgz
cd amqp-1.0.0
/usr/local/php/bin/phpize
./configure --with-php-config=/usr/local/php/bin/php-config --with-amqp
make && make install
(/usr/local/php/bin/phpize 和 /usr/local/php/bin/php-config 为实际php所在目录,如果不清楚,可以whereis php查看。)
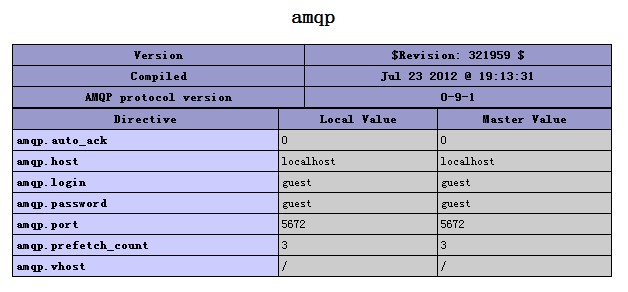
如果之前的步骤顺利,这步应该没什么问题,直接在php.ini中添加生成的amqp.so,重启httpd或php-cgi即可,不再赘述。
---------------------------------------------------我是分割线----------------------------------------------------
好了,如果你和我一样悲催,从autoreconf -i就开始作死地报错,那么我这里提供一些可能有用的处理方法。
autoreconf 时有可能遇到如下报错:
onfigure.ac:60: error: possibly undefined macro: AS_CASE
If this token and others are legitimate, please use m4_pattern_allow.
See the Autoconf documentation.
configure.ac:69: error: possibly undefined macro: AS_IF
configure.ac:92: error: possibly undefined macro: AC_PATH_PROGS_FEATURE_CHECK
configure.ac:97: error: possibly undefined macro: AC_MSG_RESULT
configure:2907: error: possibly undefined macro: m4_foreach_w
autoreconf: /usr/bin/autoconf failed with exit status: 1
奇怪的是,当我再次执行却报不同的错。。。
configure.ac: installing `./install-sh'
configure.ac: installing `./missing'
configure.ac:34: installing `./config.guess'
configure.ac:34: installing `./config.sub'
Makefile.am:3: Libtool library used but `LIBTOOL' is undefined
Makefile.am:3:
Makefile.am:3: The usual way to define `LIBTOOL' is to add `AC_PROG_LIBTOOL'
Makefile.am:3: to `configure.ac' and run `aclocal' and `autoconf' again.
Makefile.am: C objects in subdir but `AM_PROG_CC_C_O' not in `configure.ac'
Makefile.am: installing `./compile'
Makefile.am: installing `./depcomp'
autoreconf: automake failed with exit status: 1
首先确保一些必要的依赖库是否已安装,如:libtool、autoconf、automake 等
这个大家自行google下载并编译安装,常规操作,没啥说的,这里我直接yum了:
yum install libtool autoconf automake
看下libtoolize在哪:
whereis libtoolize
显示例如:libtoolize: /usr/bin/libtoolize,则可执行一下
/usr/bin/libtoolize
---------------------------------------------------我是分割线----------------------------------------------------
/usr/bin/libtoolize 时可能会报的错:
libtoolize: putting auxiliary files in `.'.
libtoolize: linking file `./ltmain.sh'
libtoolize: Consider adding `AC_CONFIG_MACRO_DIR([m4])' to configure.ac and
libtoolize: rerunning libtoolize, to keep the correct libtool macros in-tree.
libtoolize: Consider adding `-I m4' to ACLOCAL_AMFLAGS in Makefile.am.
报错很明确,按照提示操作即可:
编辑:configure.ac
添加一行:AC_CONFIG_MACRO_DIR([m4])
重新执行:/usr/bin/libtoolize
编辑:Makefile.am
添加一行:ACLOCAL_AMFLAGS=-I m4
---------------------------------------------------我是分割线----------------------------------------------------
./configure 时可能会报的错:
checking location of AMQP codegen directory... configure: error: could not find AMQP spec file at "'/codegen/amqp-0.9.1.json'"
configure文件中目录与实际情况不符,虽然可以通过手动修改解决,但不建议,其实应该是rabbitmq-c和codegen的版本不匹配造成的,更换版本。
checking finding a python with simplejson installed... configure: error: could not find a python that can 'import simplejson'
很明显,该错误是由于python缺少simplejson包造成,可通过easy_install方式安装即可。
---------------------------------------------------我是分割线----------------------------------------------------
还有更多报错情况,没有一一记录,总之解决方法就是:“报错信息”+“google”!
BTW:相信搜一会儿你就会由衷得体会到:F*CK THE GFW!!!

Hot AI Tools

Undresser.AI Undress
AI-powered app for creating realistic nude photos

AI Clothes Remover
Online AI tool for removing clothes from photos.

Undress AI Tool
Undress images for free

Clothoff.io
AI clothes remover

Video Face Swap
Swap faces in any video effortlessly with our completely free AI face swap tool!

Hot Article
Hot Tools

Notepad++7.3.1
Easy-to-use and free code editor

SublimeText3 Chinese version
Chinese version, very easy to use

Zend Studio 13.0.1
Powerful PHP integrated development environment

Dreamweaver CS6
Visual web development tools

SublimeText3 Mac version
God-level code editing software (SublimeText3)
Hot Topics
 1664
1664
 14
1423
52
1318
25
1269
29
1248
24
14
1423
52
1318
25
1269
29
1248
24

 Solution: Your organization requires you to change your PIN
Oct 04, 2023 pm 05:45 PM
Solution: Your organization requires you to change your PIN
Oct 04, 2023 pm 05:45 PM
The message "Your organization has asked you to change your PIN" will appear on the login screen. This happens when the PIN expiration limit is reached on a computer using organization-based account settings, where they have control over personal devices. However, if you set up Windows using a personal account, the error message should ideally not appear. Although this is not always the case. Most users who encounter errors report using their personal accounts. Why does my organization ask me to change my PIN on Windows 11? It's possible that your account is associated with an organization, and your primary approach should be to verify this. Contacting your domain administrator can help! Additionally, misconfigured local policy settings or incorrect registry keys can cause errors. Right now
 How to adjust window border settings on Windows 11: Change color and size
Sep 22, 2023 am 11:37 AM
How to adjust window border settings on Windows 11: Change color and size
Sep 22, 2023 am 11:37 AM
Windows 11 brings fresh and elegant design to the forefront; the modern interface allows you to personalize and change the finest details, such as window borders. In this guide, we'll discuss step-by-step instructions to help you create an environment that reflects your style in the Windows operating system. How to change window border settings? Press + to open the Settings app. WindowsI go to Personalization and click Color Settings. Color Change Window Borders Settings Window 11" Width="643" Height="500" > Find the Show accent color on title bar and window borders option, and toggle the switch next to it. To display accent colors on the Start menu and taskbar To display the theme color on the Start menu and taskbar, turn on Show theme on the Start menu and taskbar
 How to change title bar color on Windows 11?
Sep 14, 2023 pm 03:33 PM
How to change title bar color on Windows 11?
Sep 14, 2023 pm 03:33 PM
By default, the title bar color on Windows 11 depends on the dark/light theme you choose. However, you can change it to any color you want. In this guide, we'll discuss step-by-step instructions for three ways to change it and personalize your desktop experience to make it visually appealing. Is it possible to change the title bar color of active and inactive windows? Yes, you can change the title bar color of active windows using the Settings app, or you can change the title bar color of inactive windows using Registry Editor. To learn these steps, go to the next section. How to change title bar color in Windows 11? 1. Using the Settings app press + to open the settings window. WindowsI go to "Personalization" and then
 How to enable or disable taskbar thumbnail previews on Windows 11
Sep 15, 2023 pm 03:57 PM
How to enable or disable taskbar thumbnail previews on Windows 11
Sep 15, 2023 pm 03:57 PM
Taskbar thumbnails can be fun, but they can also be distracting or annoying. Considering how often you hover over this area, you may have inadvertently closed important windows a few times. Another disadvantage is that it uses more system resources, so if you've been looking for a way to be more resource efficient, we'll show you how to disable it. However, if your hardware specs can handle it and you like the preview, you can enable it. How to enable taskbar thumbnail preview in Windows 11? 1. Using the Settings app tap the key and click Settings. Windows click System and select About. Click Advanced system settings. Navigate to the Advanced tab and select Settings under Performance. Select "Visual Effects"
 Display scaling guide on Windows 11
Sep 19, 2023 pm 06:45 PM
Display scaling guide on Windows 11
Sep 19, 2023 pm 06:45 PM
We all have different preferences when it comes to display scaling on Windows 11. Some people like big icons, some like small icons. However, we all agree that having the right scaling is important. Poor font scaling or over-scaling of images can be a real productivity killer when working, so you need to know how to customize it to get the most out of your system's capabilities. Advantages of Custom Zoom: This is a useful feature for people who have difficulty reading text on the screen. It helps you see more on the screen at one time. You can create custom extension profiles that apply only to certain monitors and applications. Can help improve the performance of low-end hardware. It gives you more control over what's on your screen. How to use Windows 11
 10 Ways to Adjust Brightness on Windows 11
Dec 18, 2023 pm 02:21 PM
10 Ways to Adjust Brightness on Windows 11
Dec 18, 2023 pm 02:21 PM
Screen brightness is an integral part of using modern computing devices, especially when you look at the screen for long periods of time. It helps you reduce eye strain, improve legibility, and view content easily and efficiently. However, depending on your settings, it can sometimes be difficult to manage brightness, especially on Windows 11 with the new UI changes. If you're having trouble adjusting brightness, here are all the ways to manage brightness on Windows 11. How to Change Brightness on Windows 11 [10 Ways Explained] Single monitor users can use the following methods to adjust brightness on Windows 11. This includes desktop systems using a single monitor as well as laptops. let's start. Method 1: Use the Action Center The Action Center is accessible
 How to Fix Activation Error Code 0xc004f069 in Windows Server
Jul 22, 2023 am 09:49 AM
How to Fix Activation Error Code 0xc004f069 in Windows Server
Jul 22, 2023 am 09:49 AM
The activation process on Windows sometimes takes a sudden turn to display an error message containing this error code 0xc004f069. Although the activation process is online, some older systems running Windows Server may experience this issue. Go through these initial checks, and if they don't help you activate your system, jump to the main solution to resolve the issue. Workaround – close the error message and activation window. Then restart the computer. Retry the Windows activation process from scratch again. Fix 1 – Activate from Terminal Activate Windows Server Edition system from cmd terminal. Stage – 1 Check Windows Server Version You have to check which type of W you are using
 How to build a reliable messaging app with React and RabbitMQ
Sep 28, 2023 pm 08:24 PM
How to build a reliable messaging app with React and RabbitMQ
Sep 28, 2023 pm 08:24 PM
How to build a reliable messaging application with React and RabbitMQ Introduction: Modern applications need to support reliable messaging to achieve features such as real-time updates and data synchronization. React is a popular JavaScript library for building user interfaces, while RabbitMQ is a reliable messaging middleware. This article will introduce how to combine React and RabbitMQ to build a reliable messaging application, and provide specific code examples. RabbitMQ overview:
