

How to crop a picture on Mac with native tools or apps


Many people think they need expensive apps like Adobe Photoshop for cropping pictures on Mac. It’s not true; even your Mac’s basic photo editing tools can handle image adjustments like cropping or rotating photos.
We should all familiarize ourselves with how to edit, resize, and trim our images on the Mac. When you know how to crop photos on Mac, you can edit the aspect ratio or size to suit any need. It’s also handy for social media; apps like Instagram may cut things you want to leave in the image. Cropping your own perfect square is a much better option!
Here we’ll tell you how to crop an image on Mac, how to crop a photo in Preview, and discuss why it’s important to know how to adjust images manually rather than relying on an algorithm or platform.
Tips to remember while cropping
Before we get into how to crop in Preview and with native apps, there are a few tips to keep in mind before adjusting any image:
- Make a copy. It’s highly recommended you create a duplicate of the image you’re about to edit. If you make a mistake, at least the changes you made weren’t to the original! You may also want to make multiple copies of the source image just in case.
- Adjust before you crop. When you want to crop an image on Mac, chances are you’re focused on the act of trimming the picture and losing sight of the rest. When an image is cropped, it can change the pixel density. We suggest any edits – like tint, color, or balance – be made before you actually crop the image to ensure the cropped image is as gorgeous as you want it to be.
- Make small changes. It’s better to make small, incremental changes than try to go for gold on the first edit. When cropping pics on a Mac, adjust the borders of the crop area slowly. You can continue editing an image right up until you save your changes.
- Don’t click save or confirm your actions until you’re sure. As you edit an image, the app is noting your changes but won’t commit to them until you click ‘save’ or the ‘crop’ button in Preview. Know that once you click the option to save the image you’re editing, all changes are final.
How to crop photos on a MacBook
Ready to learn how to crop a picture on Mac? There are several ways to go about it, including using the Preview and Photos apps built into the Mac. If you use iCloud and take images with your iPhone or iPad, the image you want to edit may already be in Photos, too!
How to crop images using Preview
An easy way to crop photo Mac has saved is to use Preview, an app built into every computer Apple builds. It is a great tool for editing any image and has other handy markup tools built right in if you need them. Here’s a how to guide to crop picture Mac preview:
- Open Preview on your Mac
- Select the image from the Finder window that appears
- Click the “open” button at the bottom right corner of the window
- Select the “markup” tool at the top of the Preview window
- Select the area you’d like to crop by clicking and dragging your mouse or trackpad pointer
- A ‘crop’ button will appear once you’ve selected an area
- Click the crop button once you’re happy with your selection
- Close the Preview app

Note:
You now know how to crop around an image on Mac, but be careful. Step 7 cannot be reversed. Make sure the area you want to crop isexactlywhat you’re looking for.

That’s all it takes! Just remember clicking the ‘crop’ button is non-reversible.
How to crop pictures in the Photos app
Before you edit an image using the Photos app, keep two things in mind:
- The image has to be in your Photos library. If you downloaded a picture to your Mac, drag it from Finder into either the “Library” or “Imports” section of the Photos app.
- If you add an image to Photos, it’s a copy. The above step will create a copy of the image in Photos. The image will still be in Finder, unchanged. If you forget to make a copy in Photos, don’t worry – there’s still the original in Finder.
Here’s how to crop an image using Photos on Mac:
- Open the Photos app on your Mac
- Select the image you’d like to crop
- Click the “edit” button at the top right corner of the Photos window
- Select “crop” at the top of the Photos window
- Drag the corners or edges of the ‘crop’ frame to suit your needs (Note: if you make a mistake, you can drag the edges or corners back out. Photos will display a cropped version of your image, but you can ‘reverse’ the crop by dragging outward.)
- When you’re done cropping the image, select “done”


Read also:
- Resize Images on Mac
- Enhance A Photo
- Adobe Lightroom Alternative Apps
- Unblur an Image
Using third-party apps
Preview and Photos are good, basic apps for editing images. There are better options waiting for you, though.
Luminar Neo is a pro-level photo editor with some incredible built-in artificial intelligence tools for automatically enhancing photos using your Mac’s processors. The app also allows for detailed manual editing, with dozens of built-in filters to choose from as jumping-off points for editing photos, or the final touch for your cropped or edited image. Use the histogram to quickly see the balance of your final edited image, and utilize the apps filters to manicure the perfect image, every time.
Here’s how to crop an image using Luminar Neo:
- Download Luminar Neo from Setapp
- Then open the app on your Mac
- Choose the image you’d like to edit from the menu bar (File > Edit Single Image)
- With the image open in Luminar Neo, simply type “c” on your Mac keyboard
- When the crop window appears, drag the corners and edges to complete your crop
- Click the Apply button on the right side of the window.


Incredibly powerful, CameraBag Pro adds a few clever wrinkles to the photo editing game. Its minimal interface has all the bells and whistles you’d expect form a professional-grade photo editing app, only surfacing editing features when you select them. When you click on an adjustment like exposure, saturation, or temperature, CameraBag Pro adds a module to the bottom of the screen. Selecting it will surface a slider for that feature.
CameraBag Pro has tons of presets as well as dozens of editing selections you can make for any image. Of course, cropping is also an option – here’s how it’s done:
- Open CameraBag Pro on your Mac
- Select the image you’d like to crop from the Finder window that appears
- With the image open, select “Crop/Straighten” at the top right corner of the window
- Drag the corners and edges to crop your image as you like (Note: Like Photos, you can drag the corners and edges out again if you went a bit too far.)
- Select “Done” at the bottom of the screen


Meant for bulk editing, PhotoBulk is also great for individual edits as well. You can drag and drop images onto the app window, or add via the familiar ‘Finder’ option. The apps trimmed down feature set only makes it faster to crop an image, add a watermark, compress its file size, or rotate. It’s great for handling batches of images, and an excellent option for trimming and uploading to social media.
Here’s how to crop an image with PhotoBulk:
- Open PhotoBulk on your Mac
- Drag and drop an image onto the PhotoBulk window, or select the “plus” icon at the bottom left corner (Note: If you add an image using the “plus” icon, the familiar Finder window will appear. Choose the image you want to edit, then select “open.”)
- Choose “Resize” from the left side of the PhotoBulk window
- Select the type of crop you’d like to make. PhotoBulk crops images by width, height, percentage, free size, or max size. The last two options are customizable.
- Click “Start” at the bottom right corner of the window

That’s all it takes! Your image (or images) will be cropped to your exact specifications.
Another option for cropping is Clop. This app is the best solution if you need to both compress and crop an image.
Install and launch Clop.
Copy the image (Command C or Shift Control C). The app will shrink it on the fly and display it in a preview window in the lower right corner. If you're happy with the compression, go to the next step. If you want to restore the original file size, press Command Z.
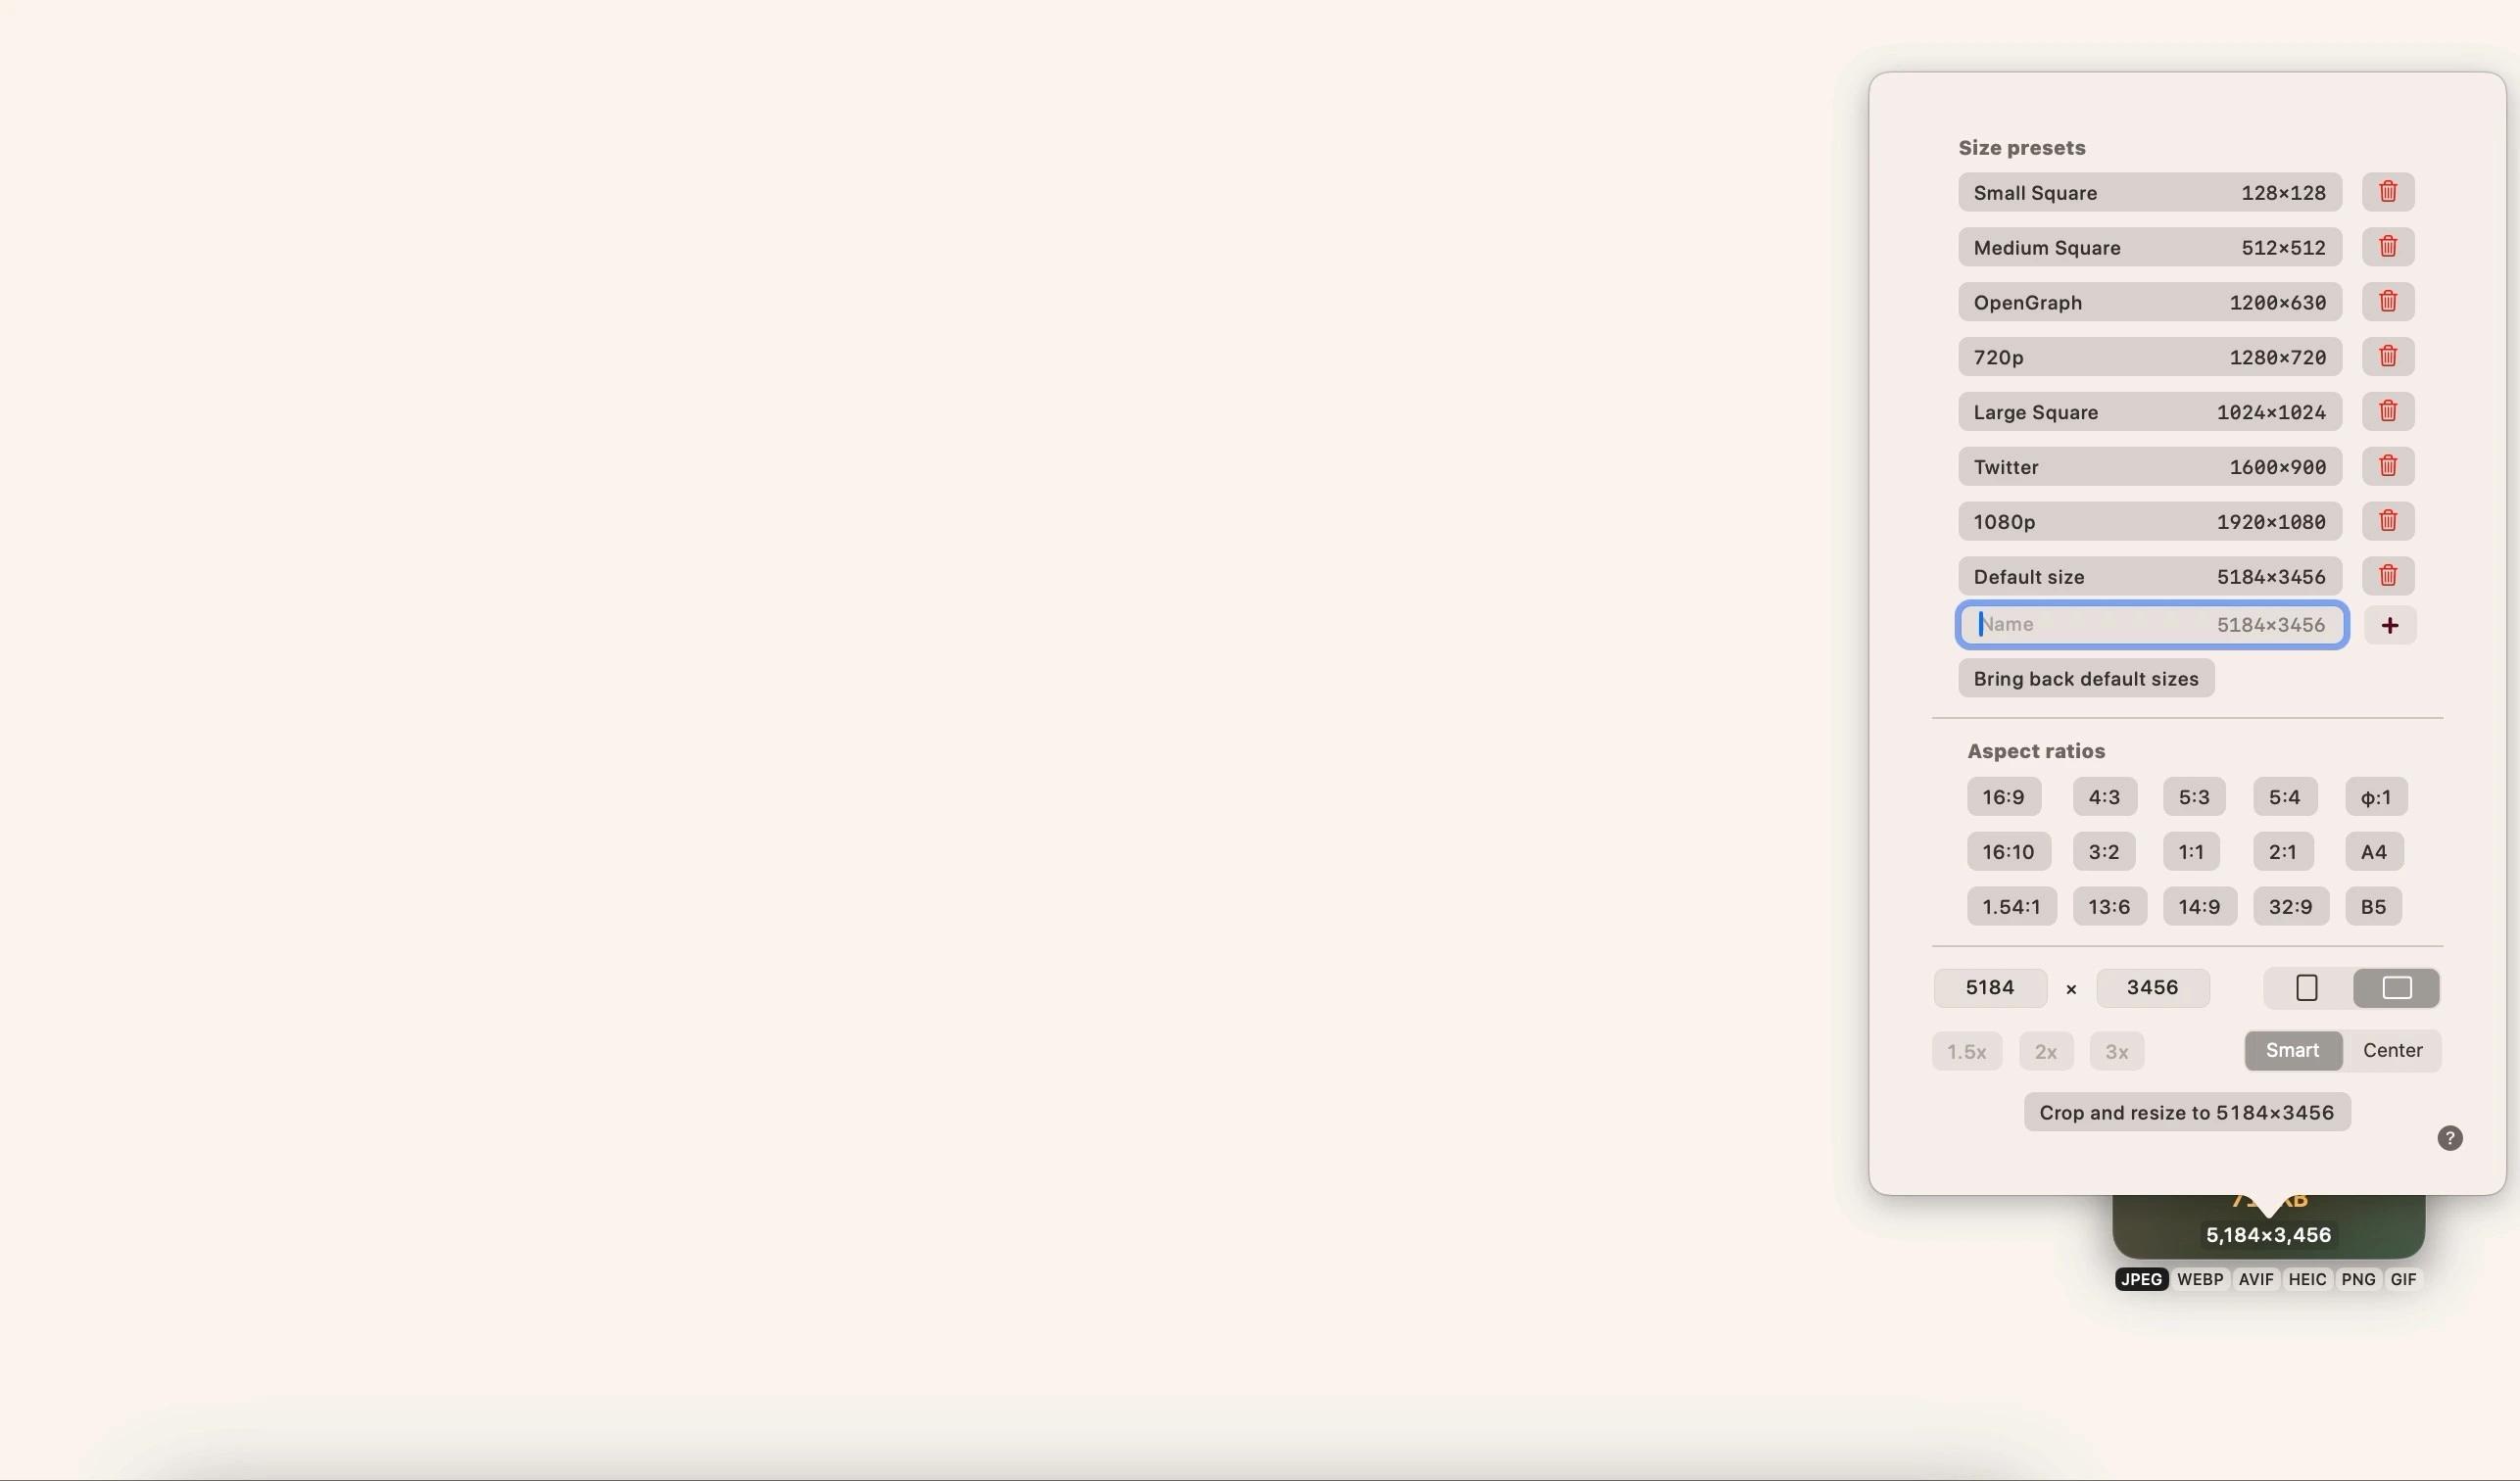
Click the image size at the bottom (for example, 824x824) and select or type the size you want.
Click Crop and Resize.
Once the file is edited, it's ready to paste into any app.
Conclusion
Cropping an image on your Mac is really simple. Apps like PhotoBulk, CameraBag Pro, Clop, and Luminar Neo only make it easier, and help you edit your images with striking granularity and ease.
All three are also free during a seven day trial of Setapp for Mac. Alongside these amazing photo editing apps, you’ll enjoy unlimited access to over 200 other incredible, native Mac apps spanning a wide variety of categories during your week-long trial.
When your week is up, continued access to Setapp is only $9.99 per month, an incredible deal for total access to some of the best Mac apps ever built. Don’t hesitate any longer, give Setapp a try today!
The above is the detailed content of How to crop a picture on Mac with native tools or apps. For more information, please follow other related articles on the PHP Chinese website!

Hot AI Tools

Undresser.AI Undress
AI-powered app for creating realistic nude photos

AI Clothes Remover
Online AI tool for removing clothes from photos.

Undress AI Tool
Undress images for free

Clothoff.io
AI clothes remover

Video Face Swap
Swap faces in any video effortlessly with our completely free AI face swap tool!

Hot Article
Hot Tools

Notepad++7.3.1
Easy-to-use and free code editor

SublimeText3 Chinese version
Chinese version, very easy to use

Zend Studio 13.0.1
Powerful PHP integrated development environment

Dreamweaver CS6
Visual web development tools

SublimeText3 Mac version
God-level code editing software (SublimeText3)
Hot Topics


 Spotify on Apple Watch: How to use it in 2025
Apr 04, 2025 am 09:55 AM
Spotify on Apple Watch: How to use it in 2025
Apr 04, 2025 am 09:55 AM
With the support of Apple devices' interconnected ecosystem, managing and synchronizing your Apple devices has become a breeze. Unlock Mac with Apple Watch? Simple! (If you haven't set this unlocking method yet, you should really try it, it's very time-saving). Can you pay with Apple Watch without using iPhone? Apple can handle it easily! Today we will focus on how to download the Spotify playlist to an Apple Watch and play without an iPhone. Spoiler: This is possible. How to use Spotify on Apple Watch: A quick overview Let's dive into the key issues and their solutions directly. If this form helps you, that would be great! If you
 Floating screen recording: how to capture a specific app window on a Mac
Mar 28, 2025 am 09:16 AM
Floating screen recording: how to capture a specific app window on a Mac
Mar 28, 2025 am 09:16 AM
Mac Screen Recording: Easily capture windows, areas and drop-down menus The screenshot tool (Command Shift 5) that comes with Mac systems can record full screen or selected areas, but cannot record specific application windows separately. At this time, more powerful tools are needed to complete the task. This article will introduce several ways to help you record your Mac windows as easily as a professional. Record the application window separately Record a single window to avoid cluttered desktop backgrounds and create more professional and prominent images and videos. Here are some excellent screen recording applications: Function comparison Gifox CleanShot X Dropshare Record a specific window ✓ ✓ ✓


 How to get rid of 'Your screen is being observed' error
Apr 05, 2025 am 10:19 AM
How to get rid of 'Your screen is being observed' error
Apr 05, 2025 am 10:19 AM
When you see the message "Your screen is being monitored", the first thing you think of is someone hacking into your computer. But that's not always the case. Let's try to find out if there are any issues that need you to worry about. Protect your Mac With Setapp, you don't need to worry about choosing a tool to protect your computer. You can quickly form your own suite of privacy and security software on Setapp. Free Trial Security Test What does "Your screen is being monitored" mean? There are many reasons why there is a Mac lock screen message that appears with “Your screen is being monitored”. You are sharing the screen with others You are recording the screen You are using AirPlay You are using some apps that try to access your screen Your computer is infected with evil
 Email is not syncing? How to refresh the Mail app on Mac
Apr 04, 2025 am 09:45 AM
Email is not syncing? How to refresh the Mail app on Mac
Apr 04, 2025 am 09:45 AM
Mac mail synchronization failed? Quick solution! Many Mac users rely on the included Mail app because it is simple and convenient. But even reliable software can have problems. One of the most common problems is that Mail cannot be synced, resulting in recent emails not being displayed. This article will guide you through email synchronization issues and provide some practical tips to prevent such issues. How to refresh the Mail app on your Mac Operation steps Click the envelope icon Open the Mail app > View > Show Tab Bar > Click the Envelope icon to refresh. Use shortcut keys or menu options Press Shift Command N. Or open the Mail app
 How to show only active apps in Dock on Mac
Apr 09, 2025 am 11:44 AM
How to show only active apps in Dock on Mac
Apr 09, 2025 am 11:44 AM
Mac Dockbar Optimization Guide: Show only running applications The dock bar of your Mac is the core of the system, from which you can launch Finder, Trash, recently used apps, active apps, and bookmark apps, and even add folders such as Document and Downloads. By default, the Mac dock bar will display more than a dozen Apple-owned applications. Most users will add more applications, but rarely delete any applications, resulting in the dock bar being cluttered and difficult to use effectively. This article will introduce several ways to help you organize and clean up your Mac dock bar in just a few minutes. Method 1: Manually organize the dock bar You can manually remove unused applications and keep only commonly used applications. Remove the application: Right-click on the application

