
 Mobile Game Tutorial
Mobile Game Guide
The First Berserker: Khazan - Transcendental Sword Walkthrough
Mobile Game Tutorial
Mobile Game Guide
The First Berserker: Khazan - Transcendental Sword Walkthrough
The First Berserker: Khazan - Transcendental Sword Walkthrough

The Transcendental Sword is one of the key side missions in The First Berserker: Khazan. If you are hoping to clear the game with the best ending, you'll need to work your way through it. While it isn't the largest mission in the game, it is loaded with traps and treasures. With the bridge lowering aspect, it also has the potential to disorient and confuse players.

Thankfully, we're happy to take you through the ins and the outs of this mission. We'll show you where to go, point you in the direction of all the treasures, and tell you how to beat the many tough enemies you'll encounter throughout this dungeon.
Passage To Darion Castle

|
Enemies |
Undead Archer, Undead Vagrant, Undead Warrior, Renowned Warrior's Shadow, Undead Assassin, |
|---|---|
|
Notable Items |
Unstable Soul Tearstone, Ghost Twin Blades |
|
Soulstones? |
1 |
|
Jarling? |
No. |
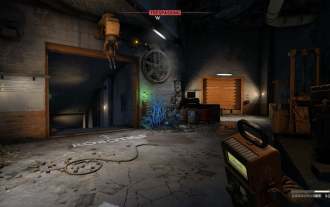
Head straight, then take your first right and activate the Passage To Darion Castle Blade Nexus. You can talk to Lantimos while you're here, and he'll tell you a little about the sword's legacy. Have the Undead Hunter lantern activated and put a skill point in the Rest in Peach javelin skill.
Head back down the hallway and there will be an Undead Archer on look to pick you off at the end of it. Be careful, as an Undead Vagrant is sitting in the hallway on your left, looking to ambush you. After you defeat them, you'll find a Fire Resistance Elixir in the beside where the archer was.
The First Soulstone

Head down the stairs. While it will look like the only path forward is by going down the ladder, attack the wall to the right of the ladder. You will be able to break open a hole, revealing the first Soulstone (1/2). Rush the two archers here, and kill the undead warrior who will rise from the ground. Once you've shattered the Soulstone, perform a drop attack on one of the Undead Vagrants below (one will be lying down in the corner, another will be patrolling.

Once you've dealt with them, follow the path forward until you run into a Renowned Warrior's Shadow. Kill them, and knock down the nearby bridge. Head back down the path until you came from until you hit a ladder, climb it, and you'll be back where you started. Return to the area where you fought the archer and vagrant, and head down the hallway this time...
Head down the stairs, and head through the hallway. Watch out for the arrow trap. Additionally, there is an Undead Assassin patrolling this area. Take the first left and grab the Fire Cleanse Potion. Head straight down the hallway, watch out for the arrow trap at the end of the hallway, take a left, and you'll be facing a raised drawbridge. Cut the rope holding it up, cross the bridge, and grab the Unstable Soul Tearstone.

Now, climb down the ladder, and take out the two Vagrants. On your left, you'll enter a room with Ghost Twin Blades behind a wooden screen. There's another trap in this room, so don't step on it. Head down the hallway, take a left, kill the archer, avoid yet another trap tile, and you will be facing a gap. You'll also be able to see a raised bridge in the distance. Aim a javelin at the rope holding it up to lower that bridge.
Now, climb back up, and look for the platform hanging over the edge. Walk off of it, and you'll land on the bridge you just lowered. Here you can activate the Path of the Fallen Blade Nexus.
Path Of The Fallen

|
Enemies |
Elite Soulbound Knight, Yoma Jester, Yoma Shamen, Yoma Pursuer |
|---|---|
|
Notable Items |
Unstable Soul Tearstone, |
|
Soulstones? |
|
|
Jarling? |
No |
Before you enter through the big set of doors, you may want to equip a Hallucination Cleanse Potion. Once you are ready, open the doors, and you will be confronted by an Elite Soulbound Knight. This guy is really just a rangey fighter who will, momentarily, become invincible, generate a spirit, at which point the spirit will perform a thrust attack and then the corporeal version of the knight will perform that same thrust attack.
The only other attack he'll use is a Burst Attack, which is easy to dodge to the side, or you can go for the counterattack. If you get hit too many times by the spirit, you will hallucinate, which will reverse all your controls.
The Day the Black Moon Rose 3

Once you defeat the Soulbound Knight, go back to the entrance. Now, look to your right. Hit the suspicious-looking wall, and it will vanish, revealing The Day the Black Moon Rose 3 diary fragment.
From here, head up the stairs, and you'll find a chest. Open the chest to get a Strategist's Ring, Necklace of the Bloodmoon, and two Chaos Cleanse Potions. Take a left into the room beside this one, head down the stairs, and you'll fight three Yoma Jesters and a Yoma Shamen. Kill them, pull the lever to lower the statue, and head into the hallway. You'll find an Unstable Soul Tearstone in here.
There is a Yoma Pursuer here, and a fire arrow trap behind them. Back away from them a little to fight them, otherwise you will push them into the trap and get shot by the arrows (tricky). Push ahead, open the gate, and you'll be facing the Tomb of the Forgotten Black Nexus.
Tomb of the Forgotten

|
Enemies |
Yoma Shamen, Yoma Pursuer, Undead Shieldbearer, Undead Ice Archer, Renowned Spellblade's Shadow, Undead Vagrant |
|---|---|
|
Notable Items |
Unstable Soul Tearstone, Ghost Hilt |
|
Soulstones? |
|
|
Jarling? |
No |
Head left of the entrance, past the barricades, and grab the Earth Enhancer. Backtrack a little, and look for the area with an overhang. Look over the edge and you should see a stone platform below. Aim to perform a drop attack on the Shaman or the Pursuer stalking about. Now, clear out the rest of this area.

You will be able to see two more Shamans and another Pursuer. There is a third Pursuer hiding on the left at the end of this section. Now, backtrack to where you first jumped down, and look for a hole in the ground. You'll see two Shamans down there. Jump down and kill them, then climb back on the ladder.
At the end of this floor, where there steel grates form a bridge, drop down and follow this path forward. Eventually, you'll reach an open area with an Undead Shieldbearer and an Undead Ice Archer. At the Shieldbearer's back, then take out the archer. There will be a second Shieldbearer in the back. They'll reveal themselves soon after, though you should have already killed their buddies by the time they arrive.
The Jarling
Once you defeat the Renowned Spellblade's Shadow, take a left, but be mindful of the arrow traps. In the corner, right beside the arrow slits, you'll find the jar holding this missions' Jarling!
The Second Soulstone And Hismar Conquest 1

In the next room, you'll fight two Undead Vagrants. Climb the ladder, and head toward the stairs. On your left, you'll see the Hismar Conquest 1 diary fragment. Go grab it, then move upward. At the top of the stairs, take a left. Now, loop up. You'll see the second Soulstone (2/2) inside the cage dangling above. Hit it with a javelin.
Head down to the end of the bridge and you will battle a robust Servant of Chaos. Just do your best to circle to his back as much as possible, thay way his beam attacks will all miss you, and defend against his heavy punches. You can try to counterattack his Burst Attacks, but they can deal a hefty amount of damage, and they are easy to dodge away from, so I'd say you'd be better off just getting your distance. But keep in mind that these burst attacks always come in pairs, so give you seld a decent amount of space between him and you before you dive back in.

Once you've reduced the Servant of Chaos to rubble, follow the path as is hooks left. This will take you to a chest. Open it to get a Ghost Hilt, Butcher's Helm, Butcher's Pauldrons, Butcher's Gauntlets, Butcher's Leggings, and Butcher's Shoes.
Elite Corrupted High Cleric

Head back to the gate where you fought the golem, pull the lever, activate the Velied Path Blade Nexus, and push forward to fight the Elite Corrupted High Cleric. You won't have fought many of these guys at this point, but if you stick close to them, and focus on Brink Guarding his giant hammer attacks, you should be fine.
He will occasionally place down a number of magic circles that you won't want to step on, but that is typically only when you are far away. He does have a fairly effective move where he will rush forward with his shield drawn. This can definitely take you by surprise. Just look for it if he has gained a little distance, and dodge through him. Now, head through the final gate to confront this stage's final boss: the Remnant of Elamein.
The Remnant of Elamein Boss Fight

As is often the case with these revisited boss fights, this battle against Elamein is largely the same as the last. However, there are a few key differences. For starters, she seemingly has access to all of her tools right from the onset. So, you may see her lbig lightning projectiles right at the beginning of the fight. Additionally, much like the other spectral bosses you've faced, she'll have a teleport now.
If she dodges to the side, she'll often disappear, then reappear in front of you performing an overhead slash, a spinning side slash, or a shield bash. She'll always double these up. So, if she reappears with the overhead slash, prepare for her to perform an additional, bigger overhead slash. She'll do the same thing with the shield bash and spinning attack. So, if you see her disappear, wait for her to reappear and Brink Guard her attacks.
Keep on her, try to circle to her back, perform guard penetrating attacks, and you'll take Elamein down quickly enough. Of course, you may want to review our comprehensive Elamein boss guide. She really is the same boss, just with those teleport shenanigans I mentioned above. Once you defeat her, watch the cutscene, and then talk to Daphrona to finish the mission.

The above is the detailed content of The First Berserker: Khazan - Transcendental Sword Walkthrough. For more information, please follow other related articles on the PHP Chinese website!

Hot AI Tools

Undresser.AI Undress
AI-powered app for creating realistic nude photos

AI Clothes Remover
Online AI tool for removing clothes from photos.

Undress AI Tool
Undress images for free

Clothoff.io
AI clothes remover

Video Face Swap
Swap faces in any video effortlessly with our completely free AI face swap tool!

Hot Article
Hot Tools

Notepad++7.3.1
Easy-to-use and free code editor

SublimeText3 Chinese version
Chinese version, very easy to use

Zend Studio 13.0.1
Powerful PHP integrated development environment

Dreamweaver CS6
Visual web development tools

SublimeText3 Mac version
God-level code editing software (SublimeText3)
Hot Topics


 Assassin's Creed Shadows: Seashell Riddle Solution
Mar 28, 2025 am 01:58 AM
Assassin's Creed Shadows: Seashell Riddle Solution
Mar 28, 2025 am 01:58 AM
Assassin's Creed: Shadows boasts a vast world brimming with activities beyond the main storyline. Side missions and various encounters significantly enrich the immersive experience of in-game Japan. One particularly memorable encounter is the Seashe
 Where to find the Crane Control Keycard in Atomfall
Mar 28, 2025 am 02:17 AM
Where to find the Crane Control Keycard in Atomfall
Mar 28, 2025 am 02:17 AM
In Atomfall, discover hidden keys and passages, including multiple ways to access key locations. This guide focuses on using the Crane Control Keycard for easy, unguarded Entry to Skethermoor Prison, bypassing the need to cooperate with Captain Sims
 InZoi: How To Apply To School And University
Apr 02, 2025 am 12:08 AM
InZoi: How To Apply To School And University
Apr 02, 2025 am 12:08 AM
In the vibrant world of InZoi, you're free to shape your character's life, from exploring its diverse environments to mastering various skills. Whether it's culinary adventures, household chores, or relaxing on the beach, the choices are yours. But
 How to activate all Radio Towers for Joyce Tanner in Atomfall
Mar 28, 2025 am 12:04 AM
How to activate all Radio Towers for Joyce Tanner in Atomfall
Mar 28, 2025 am 12:04 AM
At this point in Atomfall, you’ve no doubt wandered into the Interchange, restored power to your first Data Store, and met the enigmatic Joyce Tanner inside. Tanner is more than happy to see someone who hasn’t immediately tried to kill her, an
 Roblox: Dead Rails – How To Summon And Defeat Nikola Tesla
Mar 31, 2025 am 11:08 AM
Roblox: Dead Rails – How To Summon And Defeat Nikola Tesla
Mar 31, 2025 am 11:08 AM
Dead Rails is currently one of the most popular games on Roblox. Where players take on the role of a survivor in a post-apocalyptic scenario, trying to escape from a variety of special enemies. It’s a game widely appreciated by the community, with fr
 Blue Prince: How To Get To The Basement
Apr 11, 2025 am 04:04 AM
Blue Prince: How To Get To The Basement
Apr 11, 2025 am 04:04 AM
Unlocking the Basement in Blue Prince: A Comprehensive Guide Finding the basement in Blue Prince is crucial for progressing to Room 46, but its location and access method aren't immediately obvious. This guide will walk you through accessing the base
 Where to find the Site Office Key in Atomfall
Apr 02, 2025 pm 06:03 PM
Where to find the Site Office Key in Atomfall
Apr 02, 2025 pm 06:03 PM
In Atomfall's Interchange, the locked Site Office presents an early challenge. The "Strange Noises From Below" note hints at the key's location: the Robotics lab. However, accessing Robotics requires completing several preliminary tasks.
 InZoi: How To Surf
Apr 03, 2025 am 03:43 AM
InZoi: How To Surf
Apr 03, 2025 am 03:43 AM
In InZoi, your Zois can enjoy a variety of activities, fulfilling their ever-changing Urges to keep them happy. Surfing is a popular choice, particularly for Zois with the "Life of Excitement" Desired Life. This guide explains how and whe
