

External hard drive not showing up on Mac? Here's what to do

Mac cannot recognize external hard drive? Try these methods!
After the external hard drive is connected to the USB port of your Mac, it is usually displayed on the desktop and under "Position" of the Finder. But sometimes, external hard drives cannot be displayed. What is the reason? It may be caused by various reasons such as data corruption, incorrect format or NVRAM problems. Let's take a look at the issues that may arise and how to fix it when your external hard drive is not showing up on your Mac.

| question | Solution |
|---|---|
| The hard disk is not displayed | Check connections and cables |
| USB port problem | Try different USB ports |
| The hard drive is not visible in Finder | Finder > Preferences > General > External Disks |
| NVRAM issues | Shut down > Press and hold Option Command PR 20 seconds |
| Disk not mounted | Disk Utility > Select Hard Disk > Mount |
| Incorrect format | Disk Utility > Cleanup > Select APFS Format |
| File system issues | Disk Utility > First Aid > Run |
| macOS issues | Apple Menu > Restart |
| Recover lost data | Using Disk Drill |
| Unable to write to NTFS drive | Install iBoysoft NTFS for Mac |

iBoysoft NTFS allows you to manage files immediately after connecting to an NTFS drive. In addition, you can check for disk errors, format disks, and more. Available on Setapp.
Free trial security test
Reasons why Mac cannot recognize external hard drives
There are many reasons why external hard drives cannot be displayed, the most common ones are:
- Cable issues
- Power issues
- Hard disk is damaged
- macOS cannot read hard disk
- NTFS read-only problem
For the M1 chip, if the internal SSD fails, the Mac cannot be started, so the threat is very real.
How to fix external hard drives that cannot be displayed on Mac
While it is not possible to find out why the SSD cannot be displayed immediately, there are some effective ways to help you solve the problem. Let's check out the list.
1. Check if the hard drive is inserted correctly
I know you may have checked this, but I still need to mention it just in case. Since the connection depends on a cable (USB or HDMI cable), if the connection is incorrect, the hard drive will not appear on your desktop.
Assuming it is plugged in correctly and not loose, the cable may be malfunctioning. Try connecting the same device with different cables.
2. Replace the USB port
A corrupt USB or flash drive port on your Mac may be the reason why the external hard drive cannot display. If you have another port, try connecting the device to that port.
3. Edit Finder settings
When connecting the drive to your Mac, it should appear under Finder's "position". If Finder doesn't see your drive, in most cases you just need to change a few things in the settings. Let's see how to solve this problem.
- Go to Finder menu > Preferences.
- In General, click External Disk to make sure it appears on the desktop from now on.
In the Sidebar tab, you can select which folders and devices will appear in the left column of the Finder window.

4. Reset NVRAM
NVRAM is used to store different settings, including boot disk selection settings. Therefore, resetting NVRAM may help fix issues with these settings if the USB drive is not displayed.
To reset NVRAM on an Intel-based Mac:
- Shut down or restart your Mac.
- Restart and hold these four keys immediately for at least 20 seconds: Option Command PR . The Mac should look like it's restarted.
- If restarted, release the button after hearing the second start sound. Hopefully the hard drive has been displayed now.
Note: NVRAM works differently on Apple Silicon Macs and does not require manual reset. On these newer Mac models, the NVRAM settings are checked at startup and automatically reset if necessary.
5. Use Apple's Disk Utility to manually mount external hard disks
You can find Disk Utility in System Settings or through Spotlight. If the external hard disk is visible in Disk Utility, select it and click Mount, which should make it visible on the desktop and in the Finder menu.

6. Check system information
If the external hard disk does not appear in Disk Utility, continue to the next step: Check System Information. Go to Applications > Utilities > System Information and select USB (or Thunderbolt, if applicable).
Is your external hard drive listed there? If it appears in System Information, but is not in Disk Utility, it may mean that the system has detected the hardware, but may be trying to repair the hard disk.

I recommend stopping this process because it can be lengthy and destructive and try to enable external hard drive visibility. The method is as follows:
- Open Activity Monitor.
- Search for a process named
fsck_hfs. - Select it and click the "X" button in the upper left corner.
Now, check again Disk Utility – the drive may have been shown there. This solution may also work if your new hard drive does not show up.
7. Force mount external hard disk using terminal
Using a terminal is another way to manually mount a hard disk. You can do this even if you have never used a terminal before. The key is to accurately copy the instructions described in the description – any extra or missing characters or spaces will cause an error.
The following is how to use a terminal to mount an external hard disk:
- Connect the drive to your Mac.
- Open the terminal (you can find it using Spotlight).
- Enter the command: diskutil list . The terminal will display a list of available drives. Find the identifier of the disk to be mounted (for example, disk2).
- Command to insert the mounted disk: sudo diskutil mount /dev/disk2 (Replace disk2 with the identifier of your external hard drive).
- Enter your password (no characters will be displayed on the screen - it doesn't matter) and wait for the process to complete.

If the described method fails, you can try to mount a specific volume: sudo diskutil mount /dev/disk2s1 . Remember to replace "disk2s1" with the name of your drive partition.
If the drive still fails to mount, check if it needs to be repaired: sudo diskutil repairDisk /dev/disk2 .
8. Change the hard disk format
Many people who switch from PC to Mac don't realize or forget (including myself when switching) these computers use different file formats. You may be trying to connect to something that works only for interaction with Windows devices, such as NTFS. If you have a PC or laptop, it's worth connecting and seeing if files can be accessed from another device.
The best way to find incorrectly formatted drives on your Mac is to go to Apple (in the top toolbar menu) > About Native > Storage. Check whether the external hard drive is displayed here. For more information, go to the same menu options and select System Reports.
If you are connected to an NTFS drive, it is normal for the Mac to not read the external hard drive (or cannot write). In this case, the easy way I can recommend is to install iBoysoft NTFS for Mac, an application that unlocks NTFS drive read and write support on Mac.
If you are working on other unsupported drive formats, you can try changing their format.
Note: Before you change the format, you need to erase all data on the drive. Here is how to change the drive format:
- Connect your external hard drive.
- Open Disk Utility, select the drive, and click Erashes.
- Under Format Select the correct format (APFS is the standard format for macOS) > Erase.

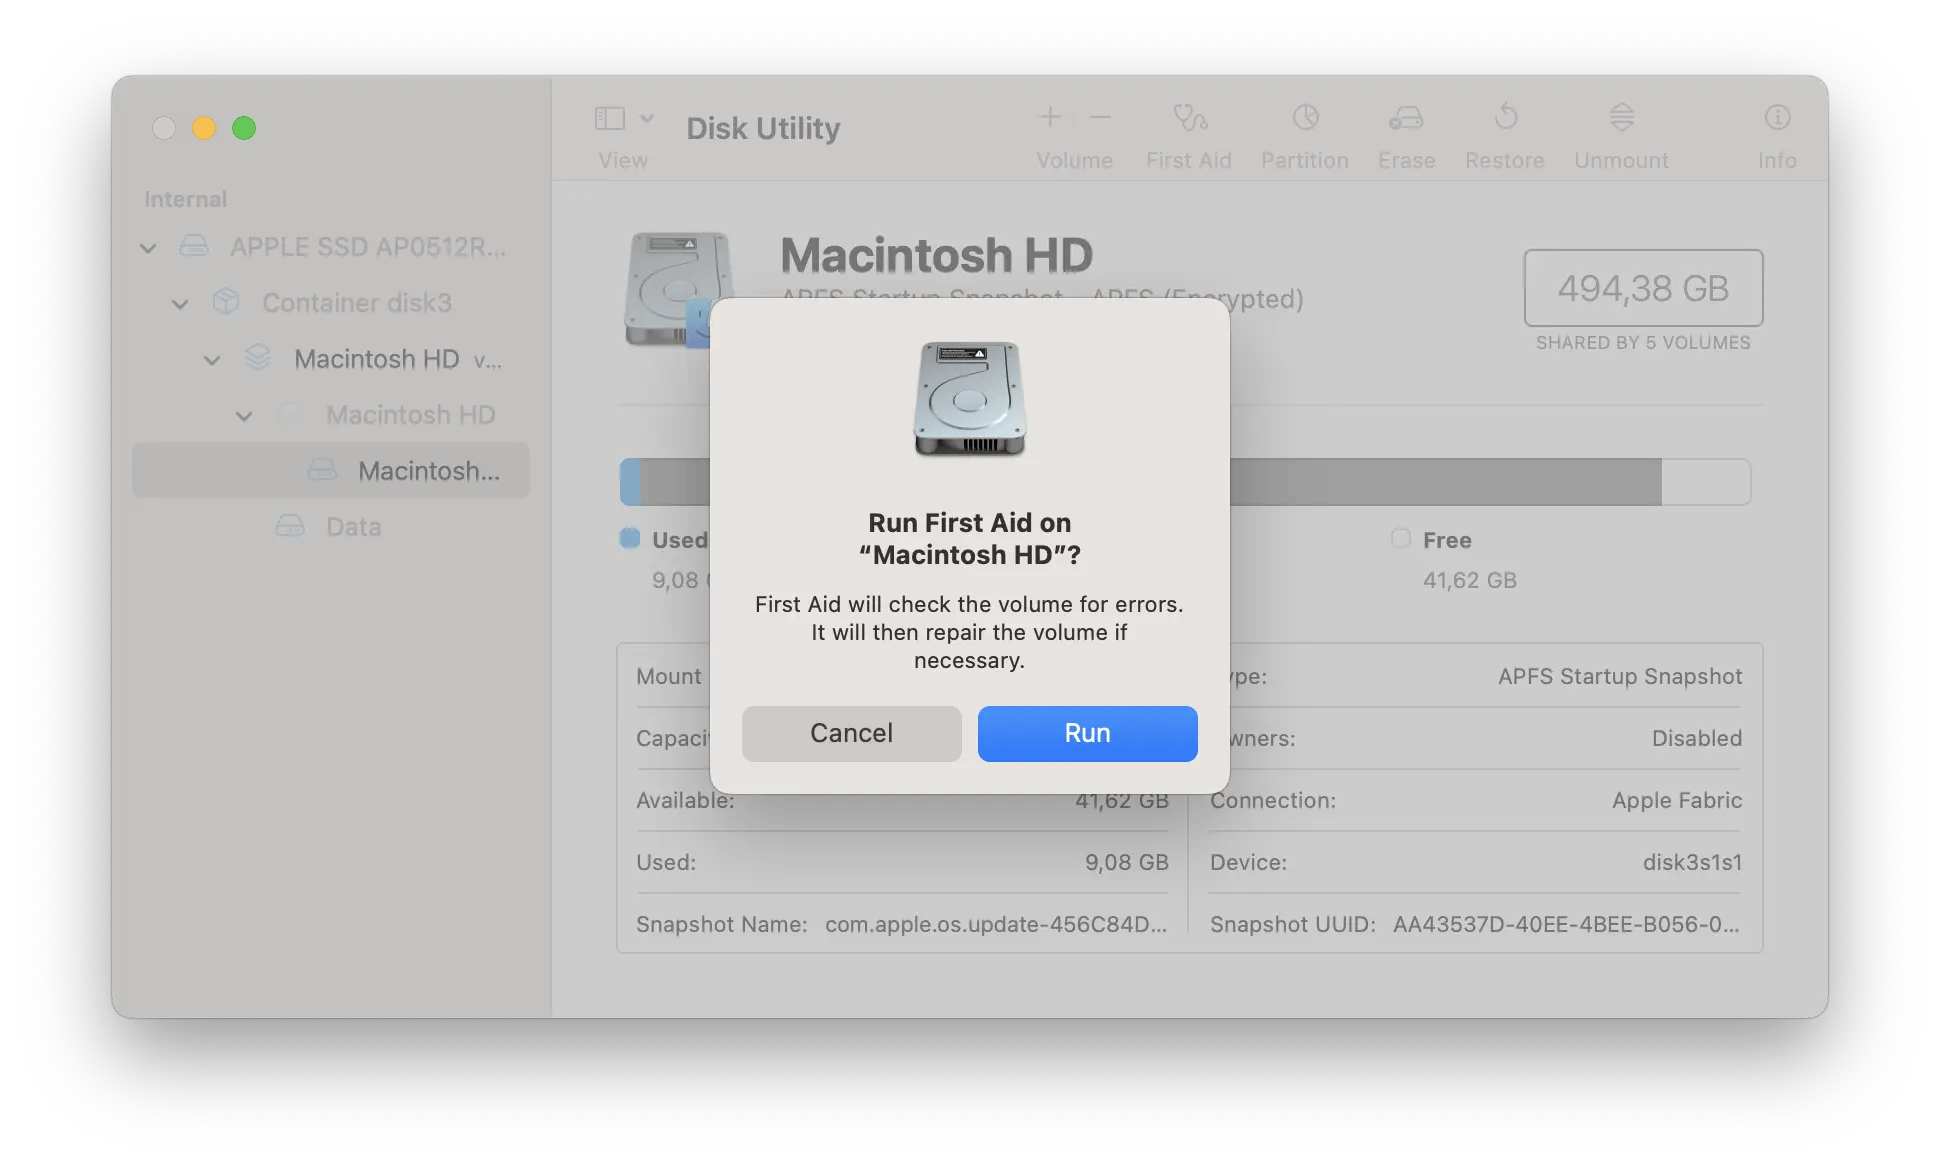
9. Run "first aid"
The most direct reason why the external hard disk is detected but cannot be opened is file system problems. If your drive has such problems, you can try to fix them yourself using First Aid to access your files. The First Aid tool will check for disk errors and then try to fix it as needed. It helps verify and fix various issues related to booting HD and external hard drive issues. If you are able to use Disk Utility to repair a hard drive or SSD (or any external hard drive) in your Mac, you will hopefully be able to recover your files.
To run "First Aid" on an external hard drive:
- Open Disk Utility. You can search using Spotlight or via Finder > Go to > Utility.
- Select your external hard drive.
- Visit the First Aid tab and click Run to start running the diagnostics.
10. Restart your Mac
The Mac's not detecting a hard drive may be a macOS issue. Hopefully, some data corruption can be fixed by restarting your Mac. Go to the Apple menu > Restart. Or hold down the power button and when the dialog box appears, click Restart or press R. Restarting your Mac actually clears the macOS's memory and starts it in a completely new state.

11. Run Apple Diagnostics
If none of these solutions work, I recommend running the Apple Diagnostics at the end. It will check for any Mac hardware issues and may provide a prompt if something interferes with the proper operation of the external hard drive.
To run Apple Diagnostics on a Mac with Silicon chip, follow these steps:
- Disconnect all devices on your Mac except basic devices (such as keyboard, monitor, mouse, etc.).
- Turn off your computer.
- Press and hold the power button to start the Mac until you see the boot option.
- according to Command D Run diagnostic tests on your Mac.
If the Apple Diagnostics finds a problem, it returns an error code. Find it in the reference code list and study the solution.
The diagnostic process for Intel Mac is slightly different. Check out our article on how to run diagnostics on your Mac for details and other solutions.
How to recover data from a crashed drive
If you have completed all the steps but still can't fix the issue where the Mac doesn't detect an external hard drive, your drive is indeed corrupted or formatted using a file system that the Mac cannot read. If a damaged drive contains data that you can't bear to lose, I recommend trying to restore it with Disk Drill. It saved me several times after I accidentally deleted important files and thought they were gone forever.
Disk Drill is the world's leading Mac data recovery software. Powerful enough to retrieve long-term lost and incorrectly deleted files from Mac, external hard drives, USB drives, and camera cards.

Recover deleted files
Install Disk Drill, a powerful Mac tool for recovering files from corrupted or crashed drives.
Free trial security test
Here is how to recover files using Disk Drill:
- Connect the drive to your Mac.
- Exit all other applications on your Mac, especially those that may be trying to access external hard drives (such as iPhoto, Words).
- Open Disk Drill.
- Click the external drive from which you want to recover files. If it has partitions, you will see all partitions. However, if you still don't see any volumes on your external drive, you may want to try some of the steps mentioned above again or read the Disk Drill Scan FAQ.
- Scan the missing files in the drive.
- Preview the scan results and once the file you want to recover is found, click Recover.
Disk Drill does have other ways to recover lost files, but this method is most effective assuming there are no complications.

How to fix the NTFS read-only problem of external hard disk
The external hard drive has been detected but not turned on? As mentioned earlier, one common reason why Macs cannot recognize external hard drives is file format. Windows uses the NTFS file format, while Macs did not use HFS until Sierra was launched. Now Apple has introduced Apple File System (APFS) for newer operating systems.
If you connect an NTFS drive, your Mac will be able to read it, but cannot edit it. This means that as long as you have read-only issues, you can't really complete your tasks (moving, copying, or deleting any files). The easiest solution to this problem I've tried is iBoysoft NTFS, an application that enables full read and write support for NTFS drives on Mac.

Some extra tips for recovering files
Here are some extra tips that I think can help you avoid similar issues in the future.
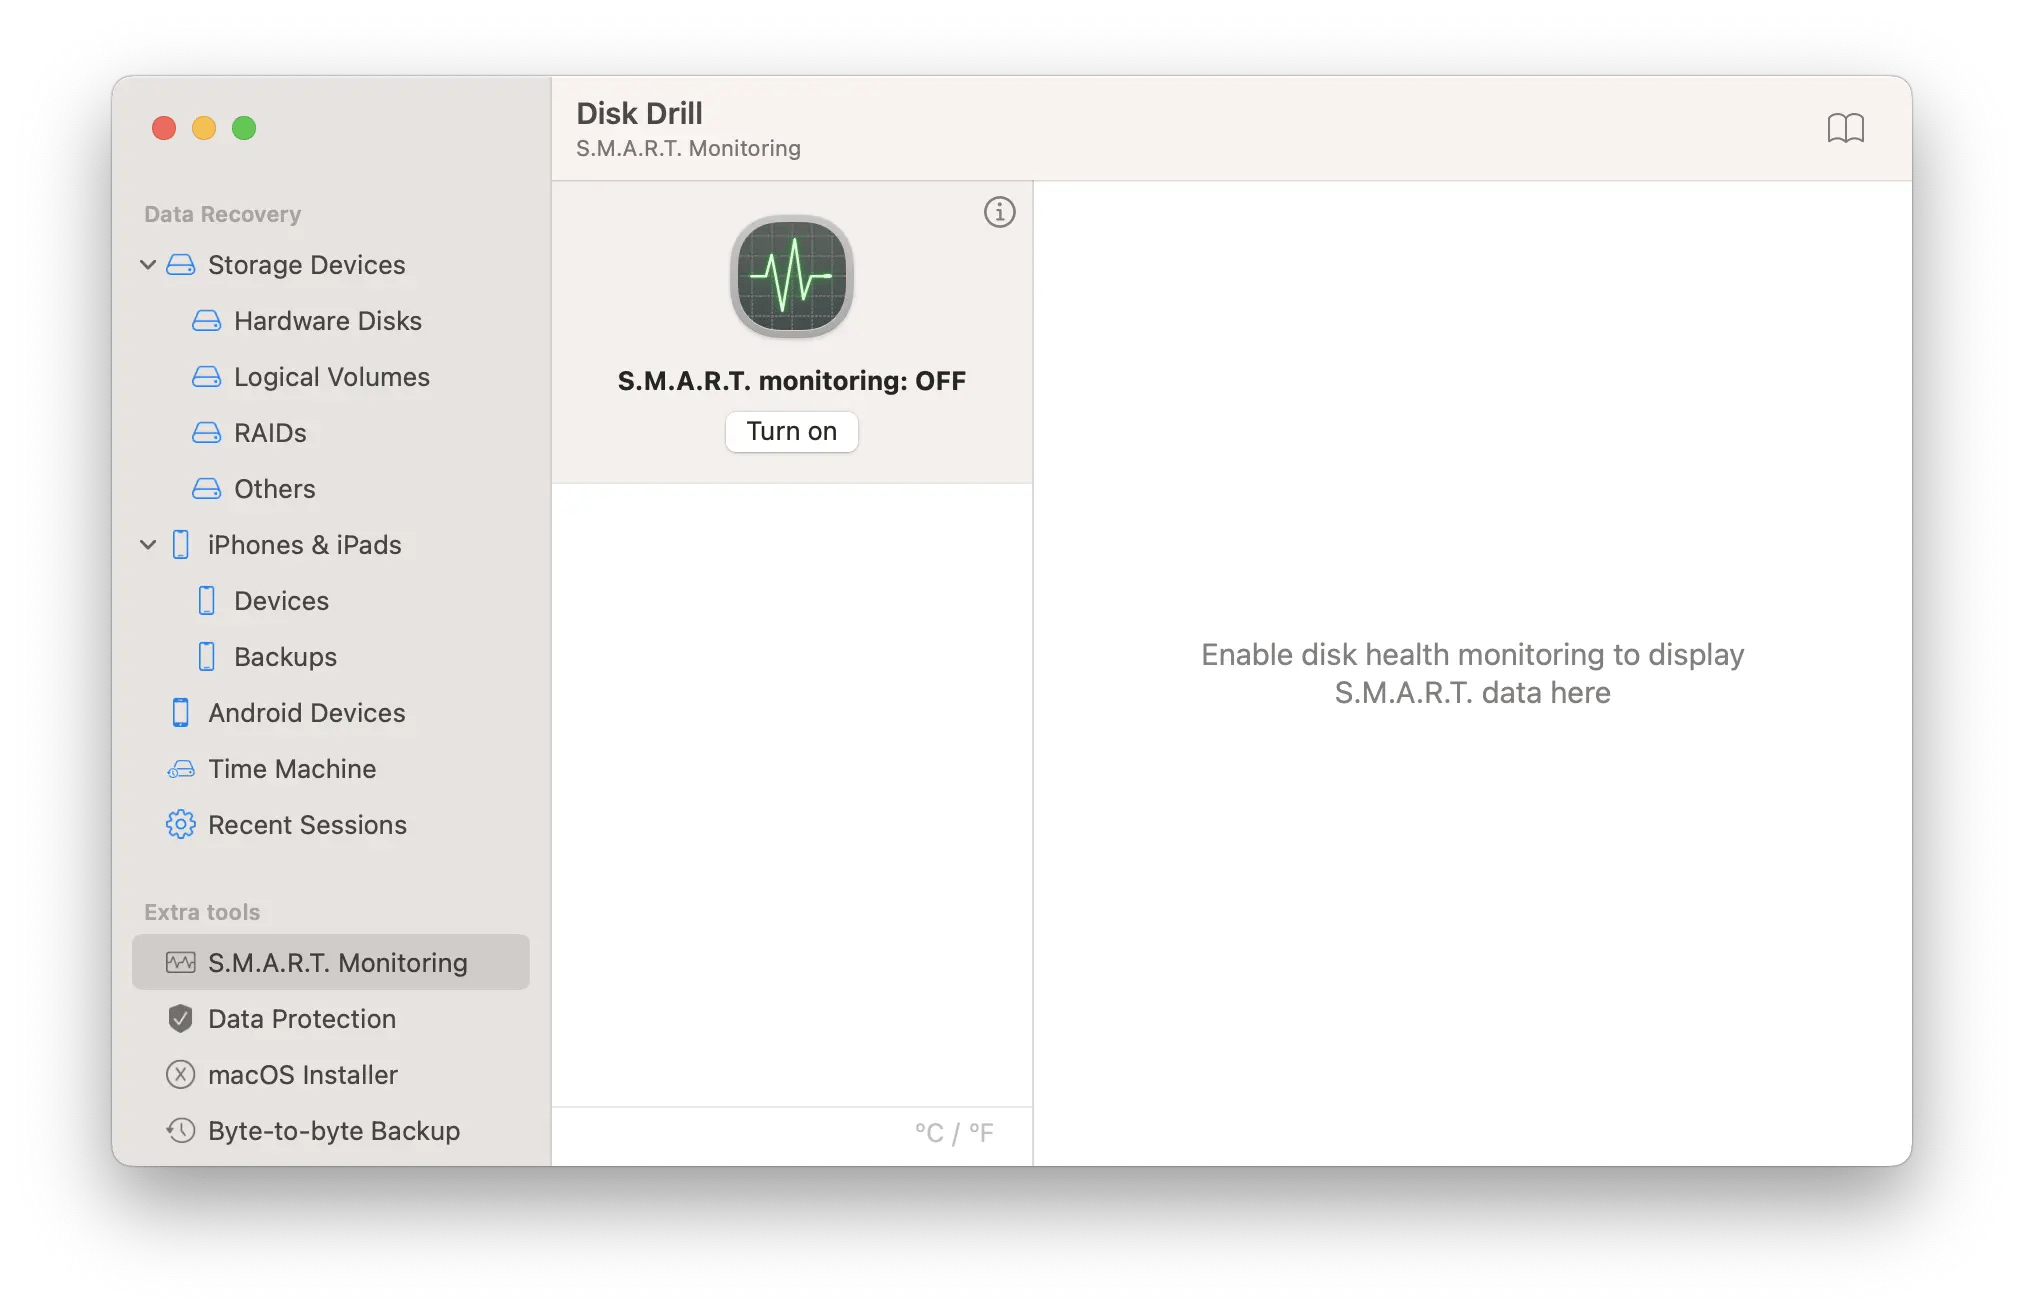
- Both Mac and third-party applications that manage Macs, such as Disk Drill and iStat Menus, come with SMART (also known as self-monitoring, analytics and reporting technology) status monitors. If the SMART check reports an error, it may mean that the hard drive is at risk of complete damage. In Disk Utility and Disk Drill, there are several solutions: Repair disk permissions and repair disks. If neither of them works, I recommend backing up all data on disk, erasing it, and running the SMART check again. The external hard drive should be displayed as "Verified".
- Partitions in the hard disk may be lost , temporarily hiding all information contained in it. Disk Drill can help identify and recover this information.
- In Disk Drill, you can recover data , which is also where Disk Utility can help you when your hard drive is corrupted or formatted.
- CleanMyMac is another useful application provided by Setapp that can help you identify and fix external hard drive errors . This is an important tool worth trying when you are having trouble connecting to an external hard drive.

- One trick that can help you fix the hard drive not displayed on your Mac is to replace it with cloud storage . You can install cloud storage on your Mac as a local drive. By connecting Google Drive, Dropbox, or Amazon to your computer, you can get more space to securely access and share files. To add cloud drives to Finder and keep them in hand, I use CloudMounter. I recommend you read the detailed instructions on managing cloud storage as a local drive.

Summary: Tools you should try if the external hard drive is not recognized on your Mac
Hopefully I've covered the topic so you don't have to search for "External Hard Drives Disappeared from Computer". Always start with the basics: correctly pop up external devices, check that the USB port is clean and the connection is secure, and make sure your operating system is up to date.
If these don't solve the problem, try a more specific solution. There are many potential solutions to solve the problem that Macs cannot read/write to external hard drives. If you are trying to connect an NTFS drive, use iBoysoft NTFS for Mac. If you need to add cloud storage, CloudMounter will help. Most importantly, you never have to worry about a crash or a corrupt external hard drive, as Disk Drill will help you recover all the data stored on it.
Other powerful applications such as iBoysoft NTFS, CloudMounter, Disk Drill, and CleanMyMac are available through Setapp, an application subscription service that provides you with more than 250 applications to complete your tasks in one subscription.
FAQ
What should I do when my external hard drive is not detected?
When your external hard drive is not detected, start with the basics: Check the cables and ports, see if the drive appears in Disk Utility, and restart the Mac. If this doesn't work, try running First Aid, resetting NVRAM, forcing the drive through Disk Utility or terminal, or running Apple Diagnostics.
How to find an external hard drive on a Mac?
To find an external hard drive, first plug in your external hard drive, open Finder, and then search for the drive under Location. Is your Mac not recognizing an external hard drive? Make sure it is set to appear under Location: Finder>Preferences>General>Select External Disks.
Why is my external hard drive not read on Mac?
Your external hard drive is not readable on your Mac because your drive may be incorrect in format. In this case, you need to use Disk Utility to change the format of the drive. Other causes may include power problems, cable failures, and drive damage.
What does "Corrupt Disk" mean in Disk Utility?
"Corrupt Disk" in Disk Utility means that the hard disk is not detected or is not mounted correctly on the Mac. A "Corrupt Disk" error usually occurs when the system fails to complete writing to the drive, making the data stored on that drive inaccessible. The best way to try to rescue data is to use data recovery software, such as Disk Drill.
What should I do if my Mac is shut down when connecting to the hard drive?
If your Mac is turned off when connecting to a hard drive, it means your Mac cannot provide the required power to the external hard drive. This is basically the opposite of the problem of insufficient power. In this case, you may need to connect an additional USB hub or any other power supply. If you have an Intel-based Mac, you can also try resetting your SMC.
The above is the detailed content of External hard drive not showing up on Mac? Here's what to do. For more information, please follow other related articles on the PHP Chinese website!

Hot AI Tools

Undresser.AI Undress
AI-powered app for creating realistic nude photos

AI Clothes Remover
Online AI tool for removing clothes from photos.

Undress AI Tool
Undress images for free

Clothoff.io
AI clothes remover

Video Face Swap
Swap faces in any video effortlessly with our completely free AI face swap tool!

Hot Article
Hot Tools

Notepad++7.3.1
Easy-to-use and free code editor

SublimeText3 Chinese version
Chinese version, very easy to use

Zend Studio 13.0.1
Powerful PHP integrated development environment

Dreamweaver CS6
Visual web development tools

SublimeText3 Mac version
God-level code editing software (SublimeText3)
Hot Topics


 Spotify on Apple Watch: How to use it in 2025
Apr 04, 2025 am 09:55 AM
Spotify on Apple Watch: How to use it in 2025
Apr 04, 2025 am 09:55 AM
With the support of Apple devices' interconnected ecosystem, managing and synchronizing your Apple devices has become a breeze. Unlock Mac with Apple Watch? Simple! (If you haven't set this unlocking method yet, you should really try it, it's very time-saving). Can you pay with Apple Watch without using iPhone? Apple can handle it easily! Today we will focus on how to download the Spotify playlist to an Apple Watch and play without an iPhone. Spoiler: This is possible. How to use Spotify on Apple Watch: A quick overview Let's dive into the key issues and their solutions directly. If this form helps you, that would be great! If you
 Floating screen recording: how to capture a specific app window on a Mac
Mar 28, 2025 am 09:16 AM
Floating screen recording: how to capture a specific app window on a Mac
Mar 28, 2025 am 09:16 AM
Mac Screen Recording: Easily capture windows, areas and drop-down menus The screenshot tool (Command Shift 5) that comes with Mac systems can record full screen or selected areas, but cannot record specific application windows separately. At this time, more powerful tools are needed to complete the task. This article will introduce several ways to help you record your Mac windows as easily as a professional. Record the application window separately Record a single window to avoid cluttered desktop backgrounds and create more professional and prominent images and videos. Here are some excellent screen recording applications: Function comparison Gifox CleanShot X Dropshare Record a specific window ✓ ✓ ✓

 Email is not syncing? How to refresh the Mail app on Mac
Apr 04, 2025 am 09:45 AM
Email is not syncing? How to refresh the Mail app on Mac
Apr 04, 2025 am 09:45 AM
Mac mail synchronization failed? Quick solution! Many Mac users rely on the included Mail app because it is simple and convenient. But even reliable software can have problems. One of the most common problems is that Mail cannot be synced, resulting in recent emails not being displayed. This article will guide you through email synchronization issues and provide some practical tips to prevent such issues. How to refresh the Mail app on your Mac Operation steps Click the envelope icon Open the Mail app > View > Show Tab Bar > Click the Envelope icon to refresh. Use shortcut keys or menu options Press Shift Command N. Or open the Mail app

 How to get rid of 'Your screen is being observed' error
Apr 05, 2025 am 10:19 AM
How to get rid of 'Your screen is being observed' error
Apr 05, 2025 am 10:19 AM
When you see the message "Your screen is being monitored", the first thing you think of is someone hacking into your computer. But that's not always the case. Let's try to find out if there are any issues that need you to worry about. Protect your Mac With Setapp, you don't need to worry about choosing a tool to protect your computer. You can quickly form your own suite of privacy and security software on Setapp. Free Trial Security Test What does "Your screen is being monitored" mean? There are many reasons why there is a Mac lock screen message that appears with “Your screen is being monitored”. You are sharing the screen with others You are recording the screen You are using AirPlay You are using some apps that try to access your screen Your computer is infected with evil
 How to show only active apps in Dock on Mac
Apr 09, 2025 am 11:44 AM
How to show only active apps in Dock on Mac
Apr 09, 2025 am 11:44 AM
Mac Dockbar Optimization Guide: Show only running applications The dock bar of your Mac is the core of the system, from which you can launch Finder, Trash, recently used apps, active apps, and bookmark apps, and even add folders such as Document and Downloads. By default, the Mac dock bar will display more than a dozen Apple-owned applications. Most users will add more applications, but rarely delete any applications, resulting in the dock bar being cluttered and difficult to use effectively. This article will introduce several ways to help you organize and clean up your Mac dock bar in just a few minutes. Method 1: Manually organize the dock bar You can manually remove unused applications and keep only commonly used applications. Remove the application: Right-click on the application

