
 Software Tutorial
Office Software
How to Use the TRANSLATE and DETECTLANGUAGE Functions in Excel
Software Tutorial
Office Software
How to Use the TRANSLATE and DETECTLANGUAGE Functions in Excel
How to Use the TRANSLATE and DETECTLANGUAGE Functions in Excel

Microsoft Excel can now translate! With the help of Microsoft Translation Service, Excel can implement language translation (TRANSLATE function) and identify existing languages in the workbook (DETECTLANGUAGE function).
These translation features (added in December 2024) are limited to users who use Microsoft 365 subscriptions, web versions of Excel or Excel mobile applications that use Excel Windows or Mac desktop applications.
Function syntax
Before showing the practical application examples of each function, let's first understand their syntax.
TRANSLATE function
TRANSLATE function contains three parameters:
<code>=TRANSLATE(a,b,c)</code>
Of:
- a (required) is the text to be translated (enclosed in double quotes), or a reference to the cell containing the text to be translated.
- b (optional) is the source language code enclosed in double quotes (see the "Language Code" section below). If this parameter is omitted, Excel attempts to automatically detect the language. While this parameter is optional, if you know the language and its code, it is better to include it to ensure that the translation is accurate.
- c (optional) is the target language enclosed in double quotes. If this parameter is skipped, Excel will use your system language as the target language. However, again, for better translation results, try adding the target language code.
If you do not enclose the language code in double quotes, Excel will return a #NAME? error.
DETECTLANGUAGE function
This function is more direct, only one parameter is required:
<code>=DETECTLANGUAGE(x)</code>
Of:
- x is the text to be detected (enclosed in double quotes), or a reference to the cell containing the text to be detected.
Language Code
The following are some language codes from the longer list of language codes provided by Microsoft. Remember that all language codes in formulas must be enclosed in double quotes.
| 代码 | 语言 |
|---|---|
| "en" | 英语 |
| "es" | 西班牙语 |
| "fr" | 法语 |
| "de" | 德语 |
| "zh-chs" | 普通话(简体) |
| "ru" | 俄语 |
| "ar" | 阿拉伯语 |
TRANSLATE function example
Let's understand the TRANSLATE function with two practical examples. The first example is a basic translation of multiple cells in Excel, and the second example demonstrates how to use the TRANSLATE function dynamically using the drop-down list.
Example 1: Translate text in a cell
Suppose you have a vehicle fee form where you want to translate the title, total part and header of the form from English to Spanish.

Enter:
In cell C2<code>=TRANSLATE(a,b,c)</code>
and press Enter.

Now, use the format brush tool to apply the format of English titles to Spanish titles. You can also use red fonts to distinguish between the two languages.

Now you can translate the next part of the form. First, select cell C1, and then select and copy the formula in the (Ctrl C) formula bar.

Now, select cell B3, paste the copied formula (Ctrl V) into the formula bar, change the first parameter to reference cell A3, and press Enter.

Now, use the fill handle to apply the same relative formula to cells B4 to B6.

To complete this part, copy and paste the formula into cell E3 and use the fill handle again.

Since some Spanish translations contain more characters than their English counterparts, please adjust the font size (or, if you prefer, adjust the column width) so that they fit well with their respective cells. Remember to change the font color to red as well for consistency.

Finally, follow the same steps to translate your header.

Example 2: Select the translation language from the drop-down list
This survey contains some questions that the respondents need to fill in. Your goal is to create a language drop-down list so that respondents can choose the language they want to see.

The first step is to create a list of available languages. Suppose you want to provide Spanish, French and Arabic as options. Open Sheet 2 using the tab at the bottom of the Excel window. Then, enter these languages into different rows in column A and enter their corresponding code into column B.
Because you will refer to cells containing these language codes instead of entering them directly into the formula, you don't need to enclose them in double quotes.

Now, enter:
in cell C1<code>=TRANSLATE(a,b,c)</code>
Press Enter and use the fill handle to fill the remaining rows.

It's time to create a dropdown list in Sheet 1. Select the cell that will be placed on the drop-down list, click the Data Verification drop-down icon in the Data tab, and select Data Verification.

Select List in the Allow field and then place the cursor in the Source field, select the three cells that contain the translation of the selected language (cells C1 to C3 in Sheet 2).

When you click OK, you will see a drop-down list appearing at the top of the survey, and when you click on it, Spanish, French, and Arabic words for their respective languages will be displayed.

To prepare your spreadsheet for the last step, select one of the languages in this list.
Now you can translate your question into the language you selected. Enter (or copy and paste) the following formula in cell B3:
<code>=DETECTLANGUAGE(x)</code>
Of:
- A3 is the cell containing the text to be translated (investigating the question),
- "en"is the source language of the text,
- The third parameter is an XLOOKUP formula that takes the selected language, looks for the language in the table in Sheet 2, and then returns the language code.
Note that in the third parameter, I used the dollar sign ($) to lock their positions in each referenced position. If you don't do this, when you apply the formula to other cells, the formula will work relative to each other, meaning it won't work as you want it to.
When pressing Enter, the first question will be translated into the language you selected from the drop-down list. Then, use the fill handle to apply the formula to the rest of the questions in the investigation.

Slightly reduce the font size in cells B3 to B7 to consider that some translations may contain more characters than English questions.
Lastly, change the language in the drop-down menu to see if the translation will magically change accordingly!

DETECTLANGUAGE function example
If your spreadsheet contains data in multiple languages, you may find it useful to use Excel's DETECTLANGUAGE function.
Suppose you receive this spreadsheet where cells A1 to A3 contain three non-English sentences that you want Excel to recognize in their language.

Enter:
In cell B1<code>=TRANSLATE(a,b,c)</code>
and press Enter. Then, use the fill handle to copy this formula to cells B2 and B3.

B now contains the language code for each sentence. If you are not sure what these codes represent, you can view the full list on Microsoft's Translation Language Support page.
In addition to translating in Excel, you can also translate text in Microsoft Word documents. To translate a part of the file, select the relevant text and click Review > Translate > Translate Selected. This opens the Translation pane where you can select the target language. Alternatively, to open a translated copy of the entire document, click Review >Translation>Translation Document.
The above is the detailed content of How to Use the TRANSLATE and DETECTLANGUAGE Functions in Excel. For more information, please follow other related articles on the PHP Chinese website!

Hot AI Tools

Undresser.AI Undress
AI-powered app for creating realistic nude photos

AI Clothes Remover
Online AI tool for removing clothes from photos.

Undress AI Tool
Undress images for free

Clothoff.io
AI clothes remover

Video Face Swap
Swap faces in any video effortlessly with our completely free AI face swap tool!

Hot Article
Hot Tools

Notepad++7.3.1
Easy-to-use and free code editor

SublimeText3 Chinese version
Chinese version, very easy to use

Zend Studio 13.0.1
Powerful PHP integrated development environment

Dreamweaver CS6
Visual web development tools

SublimeText3 Mac version
God-level code editing software (SublimeText3)
Hot Topics
 1662
1662
 14
1419
52
1311
25
1262
29
1234
24
14
1419
52
1311
25
1262
29
1234
24

 If You Don't Rename Tables in Excel, Today's the Day to Start
Apr 15, 2025 am 12:58 AM
If You Don't Rename Tables in Excel, Today's the Day to Start
Apr 15, 2025 am 12:58 AM
Quick link Why should tables be named in Excel How to name a table in Excel Excel table naming rules and techniques By default, tables in Excel are named Table1, Table2, Table3, and so on. However, you don't have to stick to these tags. In fact, it would be better if you don't! In this quick guide, I will explain why you should always rename tables in Excel and show you how to do this. Why should tables be named in Excel While it may take some time to develop the habit of naming tables in Excel (if you don't usually do this), the following reasons illustrate today
 How to change Excel table styles and remove table formatting
Apr 19, 2025 am 11:45 AM
How to change Excel table styles and remove table formatting
Apr 19, 2025 am 11:45 AM
This tutorial shows you how to quickly apply, modify, and remove Excel table styles while preserving all table functionalities. Want to make your Excel tables look exactly how you want? Read on! After creating an Excel table, the first step is usual
 You Need to Know What the Hash Sign Does in Excel Formulas
Apr 08, 2025 am 12:55 AM
You Need to Know What the Hash Sign Does in Excel Formulas
Apr 08, 2025 am 12:55 AM
Excel Overflow Range Operator (#) enables formulas to be automatically adjusted to accommodate changes in overflow range size. This feature is only available for Microsoft 365 Excel for Windows or Mac. Common functions such as UNIQUE, COUNTIF, and SORTBY can be used in conjunction with overflow range operators to generate dynamic sortable lists. The pound sign (#) in the Excel formula is also called the overflow range operator, which instructs the program to consider all results in the overflow range. Therefore, even if the overflow range increases or decreases, the formula containing # will automatically reflect this change. How to list and sort unique values in Microsoft Excel
 How to Format a Spilled Array in Excel
Apr 10, 2025 pm 12:01 PM
How to Format a Spilled Array in Excel
Apr 10, 2025 pm 12:01 PM
Use formula conditional formatting to handle overflow arrays in Excel Direct formatting of overflow arrays in Excel can cause problems, especially when the data shape or size changes. Formula-based conditional formatting rules allow automatic formatting to be adjusted when data parameters change. Adding a dollar sign ($) before a column reference applies a rule to all rows in the data. In Excel, you can apply direct formatting to the values or background of a cell to make the spreadsheet easier to read. However, when an Excel formula returns a set of values (called overflow arrays), applying direct formatting will cause problems if the size or shape of the data changes. Suppose you have this spreadsheet with overflow results from the PIVOTBY formula,
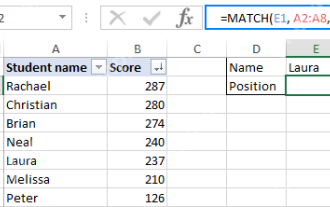 Excel MATCH function with formula examples
Apr 15, 2025 am 11:21 AM
Excel MATCH function with formula examples
Apr 15, 2025 am 11:21 AM
This tutorial explains how to use MATCH function in Excel with formula examples. It also shows how to improve your lookup formulas by a making dynamic formula with VLOOKUP and MATCH. In Microsoft Excel, there are many different lookup/ref

 How to Use Excel's AGGREGATE Function to Refine Calculations
Apr 12, 2025 am 12:54 AM
How to Use Excel's AGGREGATE Function to Refine Calculations
Apr 12, 2025 am 12:54 AM
Quick Links The AGGREGATE Syntax
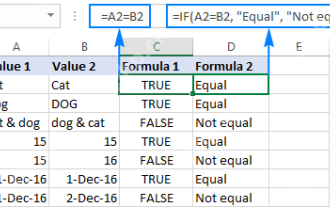 Excel: Compare strings in two cells for matches (case-insensitive or exact)
Apr 16, 2025 am 11:26 AM
Excel: Compare strings in two cells for matches (case-insensitive or exact)
Apr 16, 2025 am 11:26 AM
The tutorial shows how to compare text strings in Excel for case-insensitive and exact match. You will learn a number of formulas to compare two cells by their values, string length, or the number of occurrences of a specific character, a
