
 Backend Development
Python Tutorial
Automating Deployment of Flask and PostgreSQL on KVM with Terraform and Ansible
Backend Development
Python Tutorial
Automating Deployment of Flask and PostgreSQL on KVM with Terraform and Ansible
Automating Deployment of Flask and PostgreSQL on KVM with Terraform and Ansible

? Intro
Hi, in this post, we will use Libvirt with Terraform to provision 2 KVM locally and after that, we will Deploy Flask App & PostgreSQL using Ansible.
Content
- Project Architecture
- Requirements
- Create KVM
-
Create Ansible Playbook
- Playbook to install Docker
- Playbook to install and configure postgresql
- Playbook to deploy Flask App
- Run Playbook and testing
- Conclusion
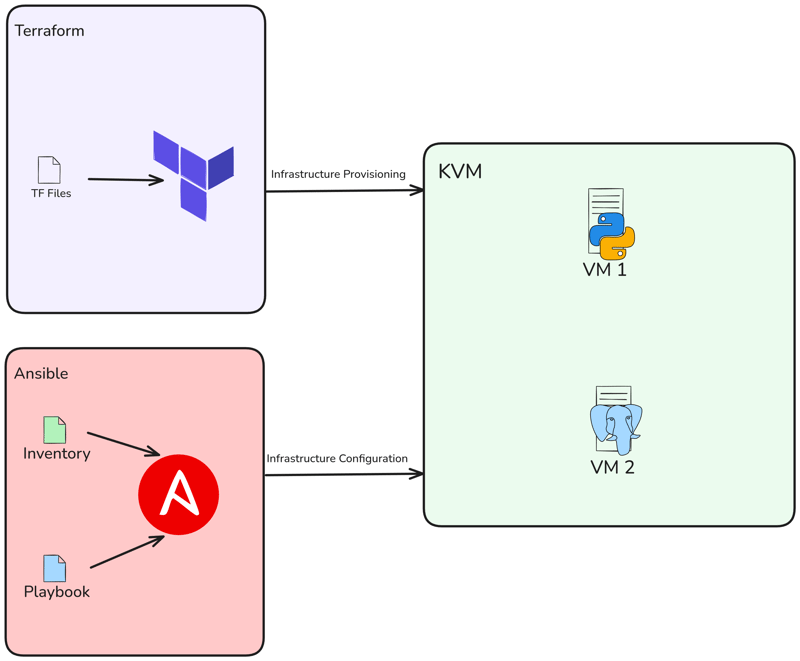
? Project Architecture
So we will create 2 VMs using Terraform, then deploy a Flask project and the database using Ansible.
? Requirements
I used Ubuntu 22.04 LTS as the OS for this project. If you're using a different OS, please make the necessary adjustments when installing the required dependencies.
The major pre-requisite for this setup is KVM hypervisor. So you need to install KVM in your system. If you use Ubuntu you can follow this step:
sudo apt -y install bridge-utils cpu-checker libvirt-clients libvirt-daemon qemu qemu-kvm
Execute the following command to make sure your processor supports virtualisation capabilities:
$ kvm-ok

INFO: /dev/kvm exists
KVM acceleration can be used
Install Terraform
$ wget -O - https://apt.releases.hashicorp.com/gpg | sudo gpg --dearmor -o /usr/share/keyrings/hashicorp-archive-keyring.gpg
$ echo "deb [arch=$(dpkg --print-architecture) signed-by=/usr/share/keyrings/hashicorp-archive-keyring.gpg] https://apt.releases.hashicorp.com $(lsb_release -cs) main" | sudo tee /etc/apt/sources.list.d/hashicorp.list
$ sudo apt update && sudo apt install terraform -y
Verify installation:
$ terraform version

Terraform v1.9.8
on linux_amd64
Install Ansible
$ sudo apt update
$ sudo apt install software-properties-common
$ sudo add-apt-repository --yes --update ppa:ansible/ansible
$ sudo apt install ansible -y
Verify installation:
$ ansible --version

ansible [core 2.15.1]
...
Create KVM
we will use the libvirt provider with Terraform to deploy a KVM Virtual Machine.
Create main.tf, just specify the provider and version you want to use:
terraform {
  required_providers {
    libvirt = {
      source = "dmacvicar/libvirt"
      version = "0.8.1"
    }
  }
}

provider "libvirt" {
  uri = "qemu:///system"
}
Thereafter, run terraform init command to initialize the environment:
$ terraform init

Initializing the backend...
Initializing provider plugins...
- Reusing previous version of hashicorp/template from the dependency lock file
- Reusing previous version of dmacvicar/libvirt from the dependency lock file
- Reusing previous version of hashicorp/null from the dependency lock file
- Using previously-installed hashicorp/template v2.2.0
- Using previously-installed dmacvicar/libvirt v0.8.1
- Using previously-installed hashicorp/null v3.2.3

Terraform has been successfully initialized!

You may now begin working with Terraform. Try running "terraform plan" to see
any changes that are required for your infrastructure. All Terraform commands
should now work.

If you ever set or change modules or backend configuration for Terraform,
rerun this command to reinitialize your working directory. If you forget, other
commands will detect it and remind you to do so if necessary.
Now create our variables.tf. This variables.tf file defines inputs for the libvirt disk pool path, the Ubuntu 20.04 image URL as OS for the VMs , and a list of VM hostnames.
variable "libvirt_disk_path" {
  description = "path for libvirt pool"
  default     = "default"
}

variable "ubuntu_20_img_url" {
  description = "ubuntu 20.04 image"
  default     = "https://cloud-images.ubuntu.com/releases/focal/release/ubuntu-20.04-server-cloudimg-amd64.img"
}

variable "vm_hostnames" {
  description = "List of VM hostnames"
  default     = ["vm1", "vm2"]
}
Let's update our main.tf:
resource "null_resource" "cache_image" {
  provisioner "local-exec" {
    command = "wget -O /tmp/ubuntu-20.04.qcow2 ${var.ubuntu_20_img_url}"
  }
}

resource "libvirt_volume" "base" {
  name   = "base.qcow2"
  source = "/tmp/ubuntu-20.04.qcow2"
  pool   = var.libvirt_disk_path
  format = "qcow2"
  depends_on = [null_resource.cache_image]
}
# Volume for VM with size 10GB
resource "libvirt_volume" "ubuntu20-qcow2" {
  count          = length(var.vm_hostnames)
  name           = "ubuntu20-${count.index}.qcow2"
  base_volume_id = libvirt_volume.base.id
  pool           = var.libvirt_disk_path
  size           = 10737418240  # 10GB
}

data "template_file" "user_data" {
  count    = length(var.vm_hostnames)
  template = file("${path.module}/config/cloud_init.yml")
}

data "template_file" "network_config" {
  count    = length(var.vm_hostnames)
  template = file("${path.module}/config/network_config.yml")
}

resource "libvirt_cloudinit_disk" "commoninit" {
  count          = length(var.vm_hostnames)
  name           = "commoninit-${count.index}.iso"
  user_data      = data.template_file.user_data[count.index].rendered
  network_config = data.template_file.network_config[count.index].rendered
  pool           = var.libvirt_disk_path
}

resource "libvirt_domain" "domain-ubuntu" {
  count  = length(var.vm_hostnames)
  name   = var.vm_hostnames[count.index]
  memory = "1024" # VM memory
  vcpu   = 1 # VM CPU

  cloudinit = libvirt_cloudinit_disk.commoninit[count.index].id

  network_interface {
    network_name   = "default"
    wait_for_lease = true
    hostname       = var.vm_hostnames[count.index]
  }

  console {
    type        = "pty"
    target_port = "0"
    target_type = "serial"
  }

  console {
    type        = "pty"
    target_type = "virtio"
    target_port = "1"
  }

  disk {
    volume_id = libvirt_volume.ubuntu20-qcow2[count.index].id
  }

  graphics {
    type        = "spice"
    listen_type = "address"
    autoport    = true
  }
}
the script will provisions multiple KVM VMs using the Libvirt provider. It downloads an Ubuntu 20.04 base image, clones it for each VM, configures cloud-init for user and network settings, and deploys VMs with specified hostnames, 1GB memory, and SPICE graphics. The setup dynamically adapts based on the number of hostnames provided in var.vm_hostnames.
As I've mentioned, I'm using cloud-init, so lets setup the network config and cloud init under the config directory:
mkdir config/
Then create our config/cloud_init.yml, just make sure that you configure your public ssh key for ssh access in the config:
#cloud-config
runcmd:
  - sed -i '/PermitRootLogin/d' /etc/ssh/sshd_config
  - echo "PermitRootLogin yes" >> /etc/ssh/sshd_config
  - systemctl restart sshd
ssh_pwauth: true
disable_root: false
chpasswd:
  list: |
    root:cloudy24
  expire: false
users:
  - name: ubuntu
    gecos: ubuntu
    groups:
      - sudo
    sudo:
      - ALL=(ALL) NOPASSWD:ALL
    home: /home/ubuntu
    shell: /bin/bash
    lock_passwd: false
    ssh_authorized_keys:
      - ssh-rsa AAAA...
And then network config, in config/network_config.yml:
version: 2
ethernets:
  ens3:
    dhcp4: true
Our project structure should look like this:
sudo apt -y install bridge-utils cpu-checker libvirt-clients libvirt-daemon qemu qemu-kvm
Now run a plan, to see what will be done:
$ kvm-ok

INFO: /dev/kvm exists
KVM acceleration can be used
And run terraform apply to run our deployment:
$ wget -O - https://apt.releases.hashicorp.com/gpg | sudo gpg --dearmor -o /usr/share/keyrings/hashicorp-archive-keyring.gpg
$ echo "deb [arch=$(dpkg --print-architecture) signed-by=/usr/share/keyrings/hashicorp-archive-keyring.gpg] https://apt.releases.hashicorp.com $(lsb_release -cs) main" | sudo tee /etc/apt/sources.list.d/hashicorp.list
$ sudo apt update && sudo apt install terraform -y
Verify VM creation using virsh command:
$ terraform version

Terraform v1.9.8
on linux_amd64
Get instances IP address:
$ sudo apt update
$ sudo apt install software-properties-common
$ sudo add-apt-repository --yes --update ppa:ansible/ansible
$ sudo apt install ansible -y
Try to access the vm using ubuntu user:
$ ansible --version

ansible [core 2.15.1]
...
Create Ansible Playbook
Now let's create the Ansible Playbook to deploy Flask & Postgresql on Docker. First you need to create ansible directory and ansible.cfg file:
terraform {
  required_providers {
    libvirt = {
      source = "dmacvicar/libvirt"
      version = "0.8.1"
    }
  }
}

provider "libvirt" {
  uri = "qemu:///system"
}
$ terraform init

Initializing the backend...
Initializing provider plugins...
- Reusing previous version of hashicorp/template from the dependency lock file
- Reusing previous version of dmacvicar/libvirt from the dependency lock file
- Reusing previous version of hashicorp/null from the dependency lock file
- Using previously-installed hashicorp/template v2.2.0
- Using previously-installed dmacvicar/libvirt v0.8.1
- Using previously-installed hashicorp/null v3.2.3

Terraform has been successfully initialized!

You may now begin working with Terraform. Try running "terraform plan" to see
any changes that are required for your infrastructure. All Terraform commands
should now work.

If you ever set or change modules or backend configuration for Terraform,
rerun this command to reinitialize your working directory. If you forget, other
commands will detect it and remind you to do so if necessary.
Then create inventory file called hosts:
variable "libvirt_disk_path" {
  description = "path for libvirt pool"
  default     = "default"
}

variable "ubuntu_20_img_url" {
  description = "ubuntu 20.04 image"
  default     = "https://cloud-images.ubuntu.com/releases/focal/release/ubuntu-20.04-server-cloudimg-amd64.img"
}

variable "vm_hostnames" {
  description = "List of VM hostnames"
  default     = ["vm1", "vm2"]
}
checking our VMs using ansible ping command:
resource "null_resource" "cache_image" {
  provisioner "local-exec" {
    command = "wget -O /tmp/ubuntu-20.04.qcow2 ${var.ubuntu_20_img_url}"
  }
}

resource "libvirt_volume" "base" {
  name   = "base.qcow2"
  source = "/tmp/ubuntu-20.04.qcow2"
  pool   = var.libvirt_disk_path
  format = "qcow2"
  depends_on = [null_resource.cache_image]
}
# Volume for VM with size 10GB
resource "libvirt_volume" "ubuntu20-qcow2" {
  count          = length(var.vm_hostnames)
  name           = "ubuntu20-${count.index}.qcow2"
  base_volume_id = libvirt_volume.base.id
  pool           = var.libvirt_disk_path
  size           = 10737418240  # 10GB
}

data "template_file" "user_data" {
  count    = length(var.vm_hostnames)
  template = file("${path.module}/config/cloud_init.yml")
}

data "template_file" "network_config" {
  count    = length(var.vm_hostnames)
  template = file("${path.module}/config/network_config.yml")
}

resource "libvirt_cloudinit_disk" "commoninit" {
  count          = length(var.vm_hostnames)
  name           = "commoninit-${count.index}.iso"
  user_data      = data.template_file.user_data[count.index].rendered
  network_config = data.template_file.network_config[count.index].rendered
  pool           = var.libvirt_disk_path
}

resource "libvirt_domain" "domain-ubuntu" {
  count  = length(var.vm_hostnames)
  name   = var.vm_hostnames[count.index]
  memory = "1024" # VM memory
  vcpu   = 1 # VM CPU

  cloudinit = libvirt_cloudinit_disk.commoninit[count.index].id

  network_interface {
    network_name   = "default"
    wait_for_lease = true
    hostname       = var.vm_hostnames[count.index]
  }

  console {
    type        = "pty"
    target_port = "0"
    target_type = "serial"
  }

  console {
    type        = "pty"
    target_type = "virtio"
    target_port = "1"
  }

  disk {
    volume_id = libvirt_volume.ubuntu20-qcow2[count.index].id
  }

  graphics {
    type        = "spice"
    listen_type = "address"
    autoport    = true
  }
}
Now create playbook.yml and roles, this playbook will install and configure Docker, Flask and PostgreSQL:
mkdir config/
Playbook to install Docker
Now create new directory called roles/docker:
#cloud-config
runcmd:
  - sed -i '/PermitRootLogin/d' /etc/ssh/sshd_config
  - echo "PermitRootLogin yes" >> /etc/ssh/sshd_config
  - systemctl restart sshd
ssh_pwauth: true
disable_root: false
chpasswd:
  list: |
    root:cloudy24
  expire: false
users:
  - name: ubuntu
    gecos: ubuntu
    groups:
      - sudo
    sudo:
      - ALL=(ALL) NOPASSWD:ALL
    home: /home/ubuntu
    shell: /bin/bash
    lock_passwd: false
    ssh_authorized_keys:
      - ssh-rsa AAAA...
Create a new directory in docker called tasks, then create new file main.yml. This file will install Docker & Docker Compose:
version: 2
ethernets:
  ens3:
    dhcp4: true
$ tree
.
├── config
│   ├── cloud_init.yml
│   └── network_config.yml
├── main.tf
└── variables.tf
Playbook to install and configure postgresql
Then create new directory called psql, create subdirectory called vars, tempalates & tasks:
$  terraform plan

data.template_file.user_data[1]: Reading...
data.template_file.user_data[0]: Reading...
data.template_file.network_config[1]: Reading...
data.template_file.network_config[0]: Reading...
...

Plan: 8 to add, 0 to change, 0 to destroy
After that, in vars, create main.yml. These are variables used to set username, passwords, etc:
$ terraform apply

...
null_resource.cache_image: Creation complete after 10m36s [id=4239391010009470471]
libvirt_volume.base: Creating...
libvirt_volume.base: Creation complete after 3s [id=/var/lib/libvirt/images/base.qcow2]
libvirt_volume.ubuntu20-qcow2[1]: Creating...
libvirt_volume.ubuntu20-qcow2[0]: Creating...
libvirt_volume.ubuntu20-qcow2[1]: Creation complete after 0s [id=/var/lib/libvirt/images/ubuntu20-1.qcow2]
libvirt_volume.ubuntu20-qcow2[0]: Creation complete after 0s [id=/var/lib/libvirt/images/ubuntu20-0.qcow2]
libvirt_domain.domain-ubuntu[1]: Creating...
...

libvirt_domain.domain-ubuntu[1]: Creation complete after 51s [id=6221f782-48b7-49a4-9eb9-fc92970f06a2]

Apply complete! Resources: 8 added, 0 changed, 0 destroyed
Next, we will create jinja file called docker-compose.yml.j2. With this file we will create postgresql container:
$ virsh list

 Id   Name   State
----------------------
 1    vm1    running
 2    vm2    running
Next, create main.yml to tasks. So we will copy docker-compose.yml.j2 and run using docker compose:
$ virsh net-dhcp-leases --network default

Expiry Time           MAC address         Protocol   IP address          Hostname   Client ID or DUID
-----------------------------------------------------------------------------------------------------------------------------------------------
2024-12-09 19:50:00   52:54:00:2e:0e:86   ipv4       192.168.122.19/24   vm1        ff:b5:5e:67:ff:00:02:00:00:ab:11:b0:43:6a:d8:bc:16:30:0d
2024-12-09 19:50:00   52:54:00:86:d4:ca   ipv4       192.168.122.15/24   vm2        ff:b5:5e:67:ff:00:02:00:00:ab:11:39:24:8c:4a:7e:6a:dd:78
Playbook to deploy Flask App
First, you need to create directory called flask, then create sub-directory again:
$ ssh ubuntu@192.168.122.15

The authenticity of host '192.168.122.15 (192.168.122.15)' can't be established.
ED25519 key fingerprint is SHA256:Y20zaCcrlOZvPTP+/qLLHc7vJIOca7QjTinsz9Bj6sk.
This key is not known by any other names
Are you sure you want to continue connecting (yes/no/[fingerprint])? yes
Warning: Permanently added '192.168.122.15' (ED25519) to the list of known hosts.
Welcome to Ubuntu 20.04.6 LTS (GNU/Linux 5.4.0-200-generic x86_64)
...

ubuntu@ubuntu:~$
Next, add main.yml to vars. This file refer to posgtresql variable before, with addition IP address of VM2(database VM):
$ mkdir ansible && cd ansible
Next, create config.py.j2 to templates. This file will replace the old config file from Flask project:
[defaults]
inventory = hosts
host_key_checking = True
deprecation_warnings = False
collections = ansible.posix, community.general, community.postgresql
Next, create docker-compose.yml.j2 to templates. With this file we will create a container using docker compose:
[vm1]
192.168.122.19 ansible_user=ubuntu

[vm2]
192.168.122.15 ansible_user=ubuntu
Next, create main.yml in tasks. With this file we will clone flask project, add compose file, replace config.py and create new container using docker compose:
$ ansible -m ping all

192.168.122.15 | SUCCESS => {
    "ansible_facts": {
        "discovered_interpreter_python": "/usr/bin/python3"
    },
    "changed": false,
    "ping": "pong"
}
192.168.122.19 | SUCCESS => {
    "ansible_facts": {
        "discovered_interpreter_python": "/usr/bin/python3"
    },
    "changed": false,
    "ping": "pong"
}
Our project structure should look like this:
---
- name: Deploy Flask
  hosts: vm1
  become: true
  remote_user: ubuntu
  roles:
    - flask
    - config

- name: Deploy Postgresql
  hosts: vm2
  become: true
  remote_user: ubuntu
  roles:
    - psql
    - config
Run Playbook and testing
Finally, let's run ansible-playbook to deploy PostgreSQL and Flask:
$ mkdir roles
$ mkdir docker
After complete, just make sure there is no error. Then you see there are two created. In VM1 is Flask and VM2 is Postgresql:
sudo apt -y install bridge-utils cpu-checker libvirt-clients libvirt-daemon qemu qemu-kvm
Try to access the app using browsers, just type http://

Try to add a new task and then the data will be added to the database:

Conclusion
Finally, thank you for reading this article. Feel free to leave a comment if you have any questions, suggestions, or feedback.
Nb: Project Repo: danielcristho/that-i-write
The above is the detailed content of Automating Deployment of Flask and PostgreSQL on KVM with Terraform and Ansible. For more information, please follow other related articles on the PHP Chinese website!

Hot AI Tools

Undresser.AI Undress
AI-powered app for creating realistic nude photos

AI Clothes Remover
Online AI tool for removing clothes from photos.

Undress AI Tool
Undress images for free

Clothoff.io
AI clothes remover

Video Face Swap
Swap faces in any video effortlessly with our completely free AI face swap tool!

Hot Article
Hot Tools

Notepad++7.3.1
Easy-to-use and free code editor

SublimeText3 Chinese version
Chinese version, very easy to use

Zend Studio 13.0.1
Powerful PHP integrated development environment

Dreamweaver CS6
Visual web development tools

SublimeText3 Mac version
God-level code editing software (SublimeText3)
Hot Topics
 1665
1665
 14
1423
52
1321
25
1269
29
1249
24
14
1423
52
1321
25
1269
29
1249
24

 Python vs. C : Applications and Use Cases Compared
Apr 12, 2025 am 12:01 AM
Python vs. C : Applications and Use Cases Compared
Apr 12, 2025 am 12:01 AM
Python is suitable for data science, web development and automation tasks, while C is suitable for system programming, game development and embedded systems. Python is known for its simplicity and powerful ecosystem, while C is known for its high performance and underlying control capabilities.
 Python: Games, GUIs, and More
Apr 13, 2025 am 12:14 AM
Python: Games, GUIs, and More
Apr 13, 2025 am 12:14 AM
Python excels in gaming and GUI development. 1) Game development uses Pygame, providing drawing, audio and other functions, which are suitable for creating 2D games. 2) GUI development can choose Tkinter or PyQt. Tkinter is simple and easy to use, PyQt has rich functions and is suitable for professional development.
 Python vs. C : Learning Curves and Ease of Use
Apr 19, 2025 am 12:20 AM
Python vs. C : Learning Curves and Ease of Use
Apr 19, 2025 am 12:20 AM
Python is easier to learn and use, while C is more powerful but complex. 1. Python syntax is concise and suitable for beginners. Dynamic typing and automatic memory management make it easy to use, but may cause runtime errors. 2.C provides low-level control and advanced features, suitable for high-performance applications, but has a high learning threshold and requires manual memory and type safety management.
 Python and Time: Making the Most of Your Study Time
Apr 14, 2025 am 12:02 AM
Python and Time: Making the Most of Your Study Time
Apr 14, 2025 am 12:02 AM
To maximize the efficiency of learning Python in a limited time, you can use Python's datetime, time, and schedule modules. 1. The datetime module is used to record and plan learning time. 2. The time module helps to set study and rest time. 3. The schedule module automatically arranges weekly learning tasks.
 Python vs. C : Exploring Performance and Efficiency
Apr 18, 2025 am 12:20 AM
Python vs. C : Exploring Performance and Efficiency
Apr 18, 2025 am 12:20 AM
Python is better than C in development efficiency, but C is higher in execution performance. 1. Python's concise syntax and rich libraries improve development efficiency. 2.C's compilation-type characteristics and hardware control improve execution performance. When making a choice, you need to weigh the development speed and execution efficiency based on project needs.
 Python: Automation, Scripting, and Task Management
Apr 16, 2025 am 12:14 AM
Python: Automation, Scripting, and Task Management
Apr 16, 2025 am 12:14 AM
Python excels in automation, scripting, and task management. 1) Automation: File backup is realized through standard libraries such as os and shutil. 2) Script writing: Use the psutil library to monitor system resources. 3) Task management: Use the schedule library to schedule tasks. Python's ease of use and rich library support makes it the preferred tool in these areas.
 Which is part of the Python standard library: lists or arrays?
Apr 27, 2025 am 12:03 AM
Which is part of the Python standard library: lists or arrays?
Apr 27, 2025 am 12:03 AM
Pythonlistsarepartofthestandardlibrary,whilearraysarenot.Listsarebuilt-in,versatile,andusedforstoringcollections,whereasarraysareprovidedbythearraymoduleandlesscommonlyusedduetolimitedfunctionality.
 Learning Python: Is 2 Hours of Daily Study Sufficient?
Apr 18, 2025 am 12:22 AM
Learning Python: Is 2 Hours of Daily Study Sufficient?
Apr 18, 2025 am 12:22 AM
Is it enough to learn Python for two hours a day? It depends on your goals and learning methods. 1) Develop a clear learning plan, 2) Select appropriate learning resources and methods, 3) Practice and review and consolidate hands-on practice and review and consolidate, and you can gradually master the basic knowledge and advanced functions of Python during this period.
