

Final Fantasy 14: Complete Guide To Playing Samurai

Melee DPS is an incredibly popular role in Final Fantasy 14 and contains five awesome Jobs to choose from that will surely make you feel like a badass. Amongst those Jobs is the Samurai, which made its debut with the Stormblood expansion, becoming popular amongst the community almost instantaneously.

While the realm of Eorzea is in no shortage of Melee DPS players, diving into the role for the first time is still highly recommended, even if you may have to wait a tad longer in queues. The Samurai Job can seem daunting to newcomers, even more so to players who have yet to play a Melee DPS class in general, but it's not so bad once you get the swing of things.
Updated December 18, 2024, by Seth Parmer: Dawntrail Patch 7.11 is here, and we have not touched this guide since the expansion was first released, meaning there's a lot to get up to date. While the Opener has remained the same, there have been some adjustments to the Samurai's Actions, which we have updated accordingly throughout the guide. Furthermore, the Best Gear section will now display the current best build for the Samurai, along with the best Materia pairing and how to obtain the equipment!
Becoming A Samurai

Unlike most Jobs found in Final Fantasy 14, Samurai is not available as a starting Job when creating your character, nor does it have a class that evolves into it either. However, it still has a few prerequisites you must meet before wielding the blade.
Requirements
- Own the Stormblood expansion
- Level 50 (Disciple of War or Magic)
After meeting the requirements listed above, you will then head to Ul'dah, Steps of Nald, and speak with the Ul'dah Citizen (X:9.2, Y:9.1) to begin the quest "The Way of the Samurai." Completing the quest will unlock the Samurai Job! From there, it's just simply leveling the Job to the current max level, which is 100.
It can be a bit rough leveling a new Job, especially in the end-game content, but there are ways you can alleviate some of the grind and tedium.
Samurai Rotations

One of the most essential aspects of any role in Final Fantasy 14 is staying on top of your rotations while weaving Off-GCD (Global Cooldown) actions in between attacks to get the most out of your Job.
However, instead of dumping everything on you at once off the bat, we will go over the Samurai's basic rotations now without any of the fancy stuff thrown into the mix. For that, head to this guide's "Managing Off-GCD Action" and "Opener" sections located further below!
Basic Single-Target Rotation
-
Gyofu > Jinpu > Gekko
- Increases your Kenki Gauge while also increasing your damage dealt and granting Getsu.
-
Gyofu > Shifu > Kasha
- Increases your Kenki Gauge and grants you Ka while also reducing your weaponskill cast time and recast time.
-
Gyofu > Yukikaze
- Grants you Setsu while increasing your Kenki Gauge significantly.
There are three basic single-target rotations available for the Samurai Job. Essentially, using the first two listed will be your default rotations, while the third will be used to fill your Kenki Gauge faster, depending on your situation.
Basic AoE Rotation
-
Fuko > Mangetsu
- Increases your Kenki Gauge and increases damage dealt while also granting Getsu.
-
Fuko > Oka
- Grants you Ka and increases your Kenki Gauge while also reducing your weaponskill cast and recast time.
Unlike most DPS Jobs in Final Fantasy 14, the Samurai has more than one AoE rotation. Depending on your situation, you will need to choose increased damage or reduced weaponskill casting time as both are beneficial in their own way.
We recommend using the AoE rotations on groups of three or more enemies and sticking to the single-target ones for anything smaller.
Samurai Positional Attacks

When carrying out your rotations, you should also correctly land your positional attacks, which can grant you additional damage, and buffs, and will help you and your teammates out in the long run. Missing or ignoring your positionals will leave tons of damage on the table over time, which is never good.
That said, if you know you cannot rotate quick enough to land a positional attack or that area of the arena will put you in harm's way, you can skip them from time to time but should absolutely land them if you are able. Getting the timing of your rotations and positional attacks down is one of the most crucial aspects of the game, especially in late-game content.
Rear
- Gekko: 50 Damage Potency when striking the enemy from behind.
Flank
- Kasha: 50 Damage Potency when striking the enemy from the side.
Samurai Off-GCD Actions

Off-GCD Actions refer to the abilities you use and Weave between your primary GCD actions. These traits allow you to get the most out of your Job and will help you and your team out in the long run. Having an optimized Rotation and Opener is a must for the game's later content.
|
Action |
Recast Time |
Kenki Gauge Cost |
Information |
|---|---|---|---|
| Third Eye | 15s | N/A | Incoming damage is reduced by 10 percent for 4s. |
| Meikyo Shisui | 55s | N/A | For 20s, you can execute any weaponskill combos without needing to meet the combo requirements. This does not have an impact on Iaijutsu or Ogo Namikiri. |
| Hissatsu: Shinten | 1s | 25 | Attack a single target with a potency of 250. |
| Hissatsu: Gyoten | 10s | 10 | Rush to your target's position and deliver an attack with a potency of 100. |
| Hissatsu: Yaten | 10s | 10 | Attack a single target with a potency of 100 while backstepping 10 yalms. |
| Meditate | 60s | N/A | Raises your Kenki Gauge gradually over time for 15s, granting up to three stacks of Meditation. |
| Hissatsu: Kyuten | 1s | 25 | Deliver an AoE attack to all enemies with a potency of 120. |
| Hagakure | 5s | N/A | Increases your Kenki Gauge by 10 by converting Setsu, Getsu, and Ka into Kenki. |
| Ikishoten | 120s | N/A | Raises your Kenki Gauge by 50. |
| Hissatsu: Guren | 60s | 25 | Attack in a straight line with a potency of 500 to the first targetand 25 percent less to the remaining enemies. |
| Hissatsu: Senei | 60s | 25 | Attack a single target with a potency of 800. |
| Shoha | 15s | N/A | Attack multiple targets in a straight line with a potency of 640 to the first target and 65 percent less for all others in the area. |
| Shoha II | 15s | N/A | Deliver an AoE attack that deals damage to all enemies in the area with a potency of 200. |
| Kaeshi: Namikiri | 1s | N/A | Attack with a cone-shaped AoE that delivers a Critical Strike to all enemies with a potency of 850 on the first target and 75 percent less for the remaining enemies. |
| Kaeshi: Higanbana | 60s | N/A | Attack a single target with a potency of 200. This action also deals Damage Overtime with the potency of 45 for 60s. |
| Kaeshi: Goken | 60s | N/A | Attack with an AoE that damages all enemies in the area with a potency of 300. |
| Kaeshi: Setsugekka | 60s | N/A | Attack with a Critical Strike that has a potency of 640. |
| Tengentsu | 15s | N/A | Reduces incoming damage by ten percent for 4s. |
| Zanshin | 1s | 50 | Deliver a conal AoE attack with a potency of 900 on the initial target and 60 percent less for all remaining enemies in the area. |
Additional Off-GCD Information
- Using Meikyo Shisui immediately after performing Kaeshi: Setsugekka will maximize damage output and potential.
- Using Ikishoten as early as possible (typically after the second attack) will grant you a buff for the duration of the rotation and is an excellent way to increase damage output.
- Mixing True North into your pre-pull allows you to temporarily ignore Positional Attack, enabling you to get the highest damage output in the first attack combo without having to worry about rotating around the target.
You can find an example of an optimized Opener for a Level 90 Samurai below, which will show you when you should sprinkle in Off-GCDs into your rotation.
Essentially, there should never be a moment where you're doing nothing. You should always be dealing damage, applying buffs, or setting something up. If you are still lost on Off-GCDs, and when to use them, the section below should help you out!
Best Samurai Opener In FFXIV Dawntrail

Your "Opener" is essentially the most optimized sequence of Actions you will perform at the start of every boss fight or significant encounter. A well-optimized opener will allow you to deal a pretty decent chunk of damage at the beginning of the battle and has the added bonus of allowing you to maximize your buffs and manage your cooldowns.
You can find one example of an Opener below for a Level 100 Samurai, with the Off-GCD Actions being bolded and in parentheses, which allows us to make clear distinctions between the primary GCD Actions and the Off-GCD ones. Keep in mind that this is one of - potentially - many optimized Openers for the Samurai and can change with a new patch.
Basic Opener
- Pre-Pull: (Meikyo Shisui) > (True North)
- Gekko (Grade 1 Gemdraught of Strength) > Kasha (Ikishoten) > Yukikaze > Tendo Setsugekka (Hissatsu: Senei) > Tendo Kaeshi Setsugekka (Meikyo Gekko (Zanshin) > Higanbana > Ogi Namikiri (Shoha) > Kaeshi: Namikiri > Kasha (Hissatsu: Shinten) > (Hissatsu: Gyoten) > Gyofu > Yukikaze (Hissatsu: Shinten) > Tendo Setsugekka > Tendo Kaeshi Setsugekka
Opener will be different from your main rotation, they will be very similar once you start mixing Off-GCDs into your core Actions.
Having anoptimized Opener will allow you to better manage your cooldown times on Buffs and other goodies while also allowing you to output the maximum amount of damage throughout the course of the battle. >If you can stay on top of your positional attack and rotations, you will excel at the Melee DPS Role! Best Gear For Samurai In FFXIV Dawntrail
 Getting the most out of your Job can be tricky, especially when looking into the
However, there are situations in the post-game content that call for you to take full advantage of your Job, which typically boil down to having the "Best in Slot" for equipment and Materia. Below is an
example of a Samurai build that reflects where most post-game players might be, giving you an idea of what Materia you should pair with each piece along with the Stats provided. Equipment Materia Stats How To Obtain Weapon Head Body Hands Legs Feet Earrings Necklace Bracelets Left Ring Right Ring Additionally, if you are looking for a bit more damage, don't forget about the Grade 1 Gemdraught of Strength, which you can use in your opener to maximize your damage. Eating before jumping into high-level content is also one of the best methods to increase your stats, with the Moqueca being one of the best options for the Samurai.
Dark Horse Champion's Samurai Blade
Can drop during AAC Light-heavyweight M4 (Savage) or purchased from Hhihwi in Solution Nine (X:8.7, Y:13.7) for x8 AAC Illustrated: LHW Edition IV.
Augmented Quetzalli Visor of Striking
Upgraded by giving x1 Surgelight Twine and the corresponding Quetzalli Armor to Theone in Solution Nine (X:8.5, Y:13.6).
Augmented Quetzalli Jacket of Striking
Upgraded by giving x1 Surgelight Twine and the corresponding Quetzalli Armor to Theone in Solution Nine (X:8.5, Y:13.6).
Augmented Quetzalli Vambraces of Striking
Upgraded by giving x1 Surgelight Twine and the corresponding Quetzalli Armor to Theone in Solution Nine (X:8.5, Y:13.6).
Dark Horse Champion's Brais of Striking
Can drop during AAC Light-heavyweight M3 (Savage) or purchased from Hhihwi in Solution Nine (X:8.7, Y:13.7) for x4 AAC Illustrated: LHW Edition II.
Dark Horse Champion's Boots of Striking
Can drop during AAC Light-heavyweight M3 (Savage) or purchased from Hhihwi in Solution Nine (X:8.7, Y:13.7) for x4 AAC Illustrated: LHW Edition II.
Dark Horse Champion's Earring of Slaying
Can drop during AAC Light-heavyweight M1 (Savage) or purchased from Hhihwi in Solution Nine (X:8.7, Y:13.7) for x3 AAC Illustrated: LHW Edition I.
Augmented Quetzalli Necklace of Slaying
Upgraded by giving x1 Surgelight Glaze and the corresponding Quetzalli Accessory to Theone in Solution Nine (X:8.5, Y:13.6).
Dark Horse Champion's Bangle of Slaying
Can drop during AAC Light-heavyweight M1 (Savage) or purchased from Hhihwi in Solution Nine (X:8.7, Y:13.7) for x3 AAC Illustrated: LHW Edition I.
Augmented Quetzalli Ring of Slaying
Upgraded by giving x1 Surgelight Glaze and the corresponding Quetzalli Accessory to Theone in Solution Nine (X:8.5, Y:13.6).
Dark Horse Champion's Ring of Slaying
Can drop during AAC Light-heavyweight M1 (Savage) or purchased from Hhihwi in Solution Nine (X:8.7, Y:13.7) for x3 AAC Illustrated: LHW Edition I.

The above is the detailed content of Final Fantasy 14: Complete Guide To Playing Samurai. For more information, please follow other related articles on the PHP Chinese website!

Hot AI Tools

Undresser.AI Undress
AI-powered app for creating realistic nude photos

AI Clothes Remover
Online AI tool for removing clothes from photos.

Undress AI Tool
Undress images for free

Clothoff.io
AI clothes remover

Video Face Swap
Swap faces in any video effortlessly with our completely free AI face swap tool!

Hot Article
Hot Tools

Notepad++7.3.1
Easy-to-use and free code editor

SublimeText3 Chinese version
Chinese version, very easy to use

Zend Studio 13.0.1
Powerful PHP integrated development environment

Dreamweaver CS6
Visual web development tools

SublimeText3 Mac version
God-level code editing software (SublimeText3)
Hot Topics


 InZoi: How To Apply To School And University
Apr 02, 2025 am 12:08 AM
InZoi: How To Apply To School And University
Apr 02, 2025 am 12:08 AM
In the vibrant world of InZoi, you're free to shape your character's life, from exploring its diverse environments to mastering various skills. Whether it's culinary adventures, household chores, or relaxing on the beach, the choices are yours. But
 Roblox: Dead Rails – How To Summon And Defeat Nikola Tesla
Mar 31, 2025 am 11:08 AM
Roblox: Dead Rails – How To Summon And Defeat Nikola Tesla
Mar 31, 2025 am 11:08 AM
Dead Rails is currently one of the most popular games on Roblox. Where players take on the role of a survivor in a post-apocalyptic scenario, trying to escape from a variety of special enemies. It’s a game widely appreciated by the community, with fr
 Blue Prince: How To Get To The Basement
Apr 11, 2025 am 04:04 AM
Blue Prince: How To Get To The Basement
Apr 11, 2025 am 04:04 AM
Unlocking the Basement in Blue Prince: A Comprehensive Guide Finding the basement in Blue Prince is crucial for progressing to Room 46, but its location and access method aren't immediately obvious. This guide will walk you through accessing the base
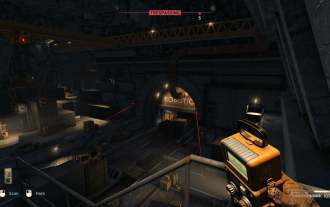 Where to find the Site Office Key in Atomfall
Apr 02, 2025 pm 06:03 PM
Where to find the Site Office Key in Atomfall
Apr 02, 2025 pm 06:03 PM
In Atomfall's Interchange, the locked Site Office presents an early challenge. The "Strange Noises From Below" note hints at the key's location: the Robotics lab. However, accessing Robotics requires completing several preliminary tasks.
 InZoi: How To Surf
Apr 03, 2025 am 03:43 AM
InZoi: How To Surf
Apr 03, 2025 am 03:43 AM
In InZoi, your Zois can enjoy a variety of activities, fulfilling their ever-changing Urges to keep them happy. Surfing is a popular choice, particularly for Zois with the "Life of Excitement" Desired Life. This guide explains how and whe
 Roblox: Dead Rails - How To Tame Wolves
Apr 07, 2025 am 06:05 AM
Roblox: Dead Rails - How To Tame Wolves
Apr 07, 2025 am 06:05 AM
In the desolate landscapes of Roblox's Dead Rails, survival hinges on overcoming numerous threats. Undead hordes, vampires, and werewolves roam the wasteland, alongside the outlaws and wolves that predate the outbreak. However, a unique opportunity
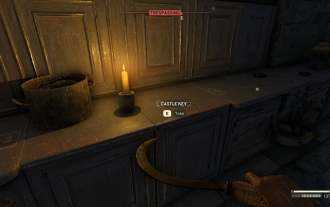 Where to find and use the Castle Key in Atomfall
Apr 04, 2025 am 01:02 AM
Where to find and use the Castle Key in Atomfall
Apr 04, 2025 am 01:02 AM
In Atomfall, numerous keys unlock the game's many locked doors and bunkers. One such key, the Castle Key, can be easily overlooked. This guide details its location and use. To view this content, please enable targeting cookies. Locating the Castle K
 Roblox: Bubble Gum Simulator Infinity - How To Get And Use Royal Keys
Apr 16, 2025 am 11:05 AM
Roblox: Bubble Gum Simulator Infinity - How To Get And Use Royal Keys
Apr 16, 2025 am 11:05 AM
Royal Keys are some of the most valuable items you can find in Roblox's Bubble Gum Simulator Infinity. These rare tools allow you to open Royal Chests — limited-time loot containers packed with high-tier items, boosts, and even ultra-rare rewards. If
