

How to Sync Messages From iPhone to Mac: A Step-By-Step Guide

The interoperability between iPhone and Mac is unparalleled; from using the iPhone as Mac’s webcam to syncing messages from iPhone to Mac. However, there’s stuff to know and settings to enable before you can send and receive messages from Mac. Read along to learn them all.

If you want to send an urgent message, but don’t have your iPhone next to you, or want to continue a conversation while using your Mac, here’s how you can connect iMessage to Mac.
How to Get Messages on Mac
The basic premise of this feature is iCloud. So, you’ll need to:
- Enable iCloud Message sync on iPhone and Mac (basically all the devices you want to use for Messages).
- Use the same Apple ID on all devices, namely the iPhone and Mac.
In addition to iMessage, you can also sync text messages from iPhone to Mac. Once set up, you’ll receive every new message on your iPhone and Mac.
Moreover, you can choose to reply or react from any device. And anything you delete will be deleted from all devices.
Chiefly there are three steps to sync iMessage history and attachments to Mac; so let’s get going.
1. Enable iCloud Sync for Messages on iPhone and iPad
Step 1: Launch Settings and tap your profile (your name and image) from the top.
Step 2: Tap iCloud


Step 3: Select Show All under Apps Using iCloud.
Step 4: Look for Messages and tap it.


Step 5: Turn on the toggle for Sync this iPhone.

Altogether the upload process might take some time depending on the size/number of messages.
Now, your message history will be synced to iCloud. Correspondingly any old messages stored in iCloud will be accessible on this device and all-new conversations will be stored on iCloud for backup.
Tip: Try to do the initial sync with a stable Wi-Fi connection as it can eat up a lot of your cellular data. Also, ensure there’s ample battery life to avoid battery drain before the sync is complete.
2. Allow Mac to Send and Receive Messages From iPhone
To turn on iMessage sync:
Step 1: Go to Setting → Messages.
Step 2: Select Send & Receive.

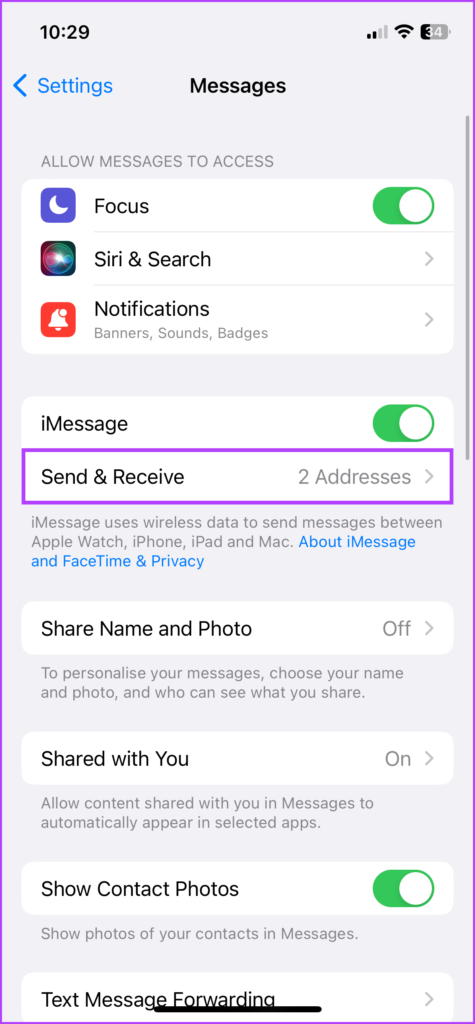
Step 3: Here, check the phone numbers and email addresses you want to send and receive messages from on each device.
Step 4: Check the preferred number or email address under ‘Start New Conversation From.’

To get an SMS on Mac,
Step 1: Go to Settings → Messages.
Step 2: Scroll down to Text Message Forwarding.
Step 3: Turn on the toggle for your Mac.


Note: If you haven’t activated two-factor authentication on your Apple ID, a six-digit activation code will appear on your Mac. Subsequently, enter this code on your iPhone and tap Allow.
3. Sync Messages From iPhone to Mac
Step 1: Launch the Messages app on Mac.
Step 2: Do one of the following, depending on your macOS:
- macOS Ventura: From the menu bar, select Messages → Settings → iMessage tab.
- macOS Monterey or earlier: From the menu bar, select Messages → Preferences → iMessage tab.

Step 3: Check the box next to ‘Enable Messages in iCloud’. Next, select the phone numbers and email addresses you want to send and receive messages from the Mac.
Step 4: Also, click the drop-down menu under ‘Start new conversations from’ and select the number/email ID. (It should match the setting on iPhone)

Thereupon, all messages stored in iCloud will be accessible from your Mac. Reversibly, any message sent and received on your Mac will be synced to your iCloud.
Tip: If the Messages app didn’t auto-sync all messages, you can click Sync Now to do so.

How to Send a Message From Mac
A great thing about enabling messages on Mac is that you are privy to almost all the features available on iPhone. So, alongside texting to an individual or a group, you can also:
- Send audio messages: Similar to sending a voice text on an iPhone, you have to click the Record Audio button (the wavy icon), speak, and click the Send Button.

- Attach and send photos and videos: Click the Apps button (app icon) → Photos → select the photo/video from the library. Additionally, you can copy and paste or drag and drop them in the message field directly.
- Tapback: Click and hold the message and choose the reaction you want to send. To unsend or send a different reaction, repeat the process and de-select or select any other Tapback.


- Scan an image or import a file from iPhone: Go to Files (from the menu bar) → Import from iPhone or iPad → choose between Take Photo, Scan Documents, and Add Sketch.

- Create and use Memoji: Click the Apps button (app icon) → Memoji Stickers → select an already existing Memoji or click plus ( ) icon/ three-dot icon → make the Memoji and share it.


- Add Message effects: Type the message or add the emoji, click the Apps button (app icon) → Message Effects → select the effect and send the message. If you want some tricks up your sleeve, check out these iMessage effects like Pew Pew.
- Edit or unsend messages: Remarkably, with iOS 16 and macOS Ventura you can now edit or unsend an iMessage. Right-click on the message and select Edit or Undo Send.
well, that’s how you can set up and send messages from your MacBook. However, if you no longer wish to sync iMessage on Mac, move on to the next section.
How to Stop Getting Messages on Mac From iPhone
To stop receiving messages on your Mac, you’ll need to turn off Messages in iCloud on Mac.
Step 1: Launch Messages.
Step 2: Select Messages from the top bar and select,
- Settings (macOS Ventura and later)
- Preferences (macOS Monterey and earlier)
(Alternatively, you can simply open messages and press Cmd , to open Settings/Preferences.)
Step 3: Here, uncheck ‘Enable Messages in iCloud.’

Step 4: Choose,
- Disable This Device: To turn off iCloud sync for Messages from Mac.
- Disable All: Turns off iCloud sync for Messages on all devices associated with the Apple ID.

The sync instantly stops when you turn off Messages in iCloud on any device. As for your message history on this device, it will be stored separately in the iCloud backup while the sync of other devices remains intact.

That’s it! You have successfully disconnected iMessage from Mac. Have more queries? Move on to the next section.
FAQs About Syncing Messages From iPhone to Mac
There can be a variety of reasons, from errors in connecting to iCloud to system bugs. Check out these fixes to get your iMessage working again on Mac.
Yes, you can register for iMessage on your Mac with your Apple ID. However, this will be limited to iMessage, you won’t be able to receive and send SMS.
No, you’ll need iCloud/Apple ID to set up messages on Mac and to sync text messages from iPhone to Mac.
There might be a glitch in iMessage sync or something. Albeit to fix it, go to Settings → Messages → Toggle off iMessage → restart device → Toggle on and sign back into iMessage.
Yes, Apple uses end-to-end encryption for all messages stored in iCloud. Whether you’re downloading or uploading messages, iCloud keeps it safe.
Turn on Messages on Mac for Ultimate Ease
Shared messages between your iPhone, iPad, and Mac are remarkably smooth. If used wisely, it can help you achieve work/life balance. Conversely, it can also cause distractions in your workflow.
And while some love the feature and depend on it, some prefer keeping the setting disabled. So, which side are you on, would you prefer keeping it on or off? Share in the comments below.
The above is the detailed content of How to Sync Messages From iPhone to Mac: A Step-By-Step Guide. For more information, please follow other related articles on the PHP Chinese website!

Hot AI Tools

Undresser.AI Undress
AI-powered app for creating realistic nude photos

AI Clothes Remover
Online AI tool for removing clothes from photos.

Undress AI Tool
Undress images for free

Clothoff.io
AI clothes remover

Video Face Swap
Swap faces in any video effortlessly with our completely free AI face swap tool!

Hot Article
Hot Tools

Notepad++7.3.1
Easy-to-use and free code editor

SublimeText3 Chinese version
Chinese version, very easy to use

Zend Studio 13.0.1
Powerful PHP integrated development environment

Dreamweaver CS6
Visual web development tools

SublimeText3 Mac version
God-level code editing software (SublimeText3)
Hot Topics


 Spotify on Apple Watch: How to use it in 2025
Apr 04, 2025 am 09:55 AM
Spotify on Apple Watch: How to use it in 2025
Apr 04, 2025 am 09:55 AM
With the support of Apple devices' interconnected ecosystem, managing and synchronizing your Apple devices has become a breeze. Unlock Mac with Apple Watch? Simple! (If you haven't set this unlocking method yet, you should really try it, it's very time-saving). Can you pay with Apple Watch without using iPhone? Apple can handle it easily! Today we will focus on how to download the Spotify playlist to an Apple Watch and play without an iPhone. Spoiler: This is possible. How to use Spotify on Apple Watch: A quick overview Let's dive into the key issues and their solutions directly. If this form helps you, that would be great! If you
 Floating screen recording: how to capture a specific app window on a Mac
Mar 28, 2025 am 09:16 AM
Floating screen recording: how to capture a specific app window on a Mac
Mar 28, 2025 am 09:16 AM
Mac Screen Recording: Easily capture windows, areas and drop-down menus The screenshot tool (Command Shift 5) that comes with Mac systems can record full screen or selected areas, but cannot record specific application windows separately. At this time, more powerful tools are needed to complete the task. This article will introduce several ways to help you record your Mac windows as easily as a professional. Record the application window separately Record a single window to avoid cluttered desktop backgrounds and create more professional and prominent images and videos. Here are some excellent screen recording applications: Function comparison Gifox CleanShot X Dropshare Record a specific window ✓ ✓ ✓

 Email is not syncing? How to refresh the Mail app on Mac
Apr 04, 2025 am 09:45 AM
Email is not syncing? How to refresh the Mail app on Mac
Apr 04, 2025 am 09:45 AM
Mac mail synchronization failed? Quick solution! Many Mac users rely on the included Mail app because it is simple and convenient. But even reliable software can have problems. One of the most common problems is that Mail cannot be synced, resulting in recent emails not being displayed. This article will guide you through email synchronization issues and provide some practical tips to prevent such issues. How to refresh the Mail app on your Mac Operation steps Click the envelope icon Open the Mail app > View > Show Tab Bar > Click the Envelope icon to refresh. Use shortcut keys or menu options Press Shift Command N. Or open the Mail app

 How to get rid of 'Your screen is being observed' error
Apr 05, 2025 am 10:19 AM
How to get rid of 'Your screen is being observed' error
Apr 05, 2025 am 10:19 AM
When you see the message "Your screen is being monitored", the first thing you think of is someone hacking into your computer. But that's not always the case. Let's try to find out if there are any issues that need you to worry about. Protect your Mac With Setapp, you don't need to worry about choosing a tool to protect your computer. You can quickly form your own suite of privacy and security software on Setapp. Free Trial Security Test What does "Your screen is being monitored" mean? There are many reasons why there is a Mac lock screen message that appears with “Your screen is being monitored”. You are sharing the screen with others You are recording the screen You are using AirPlay You are using some apps that try to access your screen Your computer is infected with evil
 How to show only active apps in Dock on Mac
Apr 09, 2025 am 11:44 AM
How to show only active apps in Dock on Mac
Apr 09, 2025 am 11:44 AM
Mac Dockbar Optimization Guide: Show only running applications The dock bar of your Mac is the core of the system, from which you can launch Finder, Trash, recently used apps, active apps, and bookmark apps, and even add folders such as Document and Downloads. By default, the Mac dock bar will display more than a dozen Apple-owned applications. Most users will add more applications, but rarely delete any applications, resulting in the dock bar being cluttered and difficult to use effectively. This article will introduce several ways to help you organize and clean up your Mac dock bar in just a few minutes. Method 1: Manually organize the dock bar You can manually remove unused applications and keep only commonly used applications. Remove the application: Right-click on the application

