
 Backend Development
Python Tutorial
Automate Build, Test & Deploy Processes with GitHub Actions
Backend Development
Python Tutorial
Automate Build, Test & Deploy Processes with GitHub Actions
Automate Build, Test & Deploy Processes with GitHub Actions

This project is a quick sample project that demonstrates the automation of the build, test, and deployment process of an application to a staging environment on push to the main branch.
To adequately demonstrate the CI/CD pipeline, we will create a simple Python project with minimal code and then integrate it into GitHub Actions.
Create a Simple Python Project
Like I earlier stated, we will create a simple project that we will use in our pipeline. I chose to do this in python for no particular reason, you can use any other programming language you choose, the main of this project is to demonstrate the pipeline.
Create Project Folder
So go ahead and create the project folder and navigate into that folder:
mkdir automated-testing
cd automated-testing
Write Application File
Now we will write the simple python application. Create a new file app.py in the project folder.
touch app.py
Add the below code block to the file:
def hello():
  return "Hello, World!"

if __name__ == "__main__":
  print(hello())
This is a very simple python "Hello world" function that serves as an example of basic functionality that can be tested in the CI pipeline.
def hello() defines a function named hello which takes no arguments. When this function is called, it returns the string "Hello, World!".
if __name__ == "__main__" is a standard Python construct used to ensure that certain code only runs when the file is executed directly (not when imported as a module). It acts as an entry point for the script.
When app.py is run directly (e.g., by running python app.py), the script will call the hello() function and print the result, which is "Hello, World!".
Create a Requirements File.
A typical project would have dependencies and in a python project they are usually defined in the requirements.txt file.
Create a new file requirements.txt
touch requirements.txt
Add this to the file:
pytest
Create Unit Test
Now we will add a basic test file, test_app.py, to test the function in app.py. Add the below to the file:
from app import hello

def test_hello():
  assert hello() == "Hello, World!"
Now we are ready to create our pipeline.
Set Up GitHub Actions for CI/CD
To configure GitHub actions we need to create a .github/workflows folder inside our repo, this is how we notify GitHub of the CI/CD pipeline in our repo.
Create a new file:
mkdir -p .github/workflows
You can have multiple pipelines in one repo, so create a file proj.yml in the .github/workflows folder. This is where we will define the steps for building, testing, and deploying our Python project.
Add the below code to your file:
name: Build, Test and Deploy

# Trigger the workflow on pushes to the main branch
on:
  push:
    branches:
      - main

jobs:
  build-and-test:
    runs-on: ubuntu-latest

    steps:
    # Checkout the code from the repository
    - name: Checkout repo
      uses: actions/checkout@v4

    # Set up Python environment
    - name: Setup Python
      uses: actions/setup-python@v5
      with:
        python-version: '3.x'

    # Install dependencies
    - name: Install Dependecies
      run: |
        python -m pip install --upgrade pip
        pip install -r requirements.txt

    # Build (this project deosn't require a build but we will simulate a build by creating a file)
    - name: Build Project
      run: |
        mkdir -p build
        # Simulate build output by creating a file
        touch build/output_file.txt

    # Run tests using pytest
    - name: Run tests
      run:
        pytest

    # Upload the build output as an artifact (we created a file in the build step to simulate an artifact)
    - name: Upload build artifact
      uses: actions/upload-artifact@v4
      with:
        name: build-artifact
        path: build/

  deploy:
    runs-on: ubuntu-latest
    needs: build-and-test
    if: success()

    steps:
    # Download the artifact from the build stage
    - name: Download build artifact
      uses: actions/download-artifact@v4
      with:
        name: build-artifact
        path: build/

    - name: Simulate Deployment
      run: |
        echo "Deploying to staging..."
        ls build/
Breakdown of the CI/CD Pipeline Steps
- Trigger on Push to main: The pipeline is triggered whenever there is a push to the main branch.
- Checkout Code: This step uses GitHub’s checkout action to pull our code from the repository.
- Set Up Python: The pipeline sets up a Python environment on the CI runner (GitHub's virtual machine), ensuring that the correct Python version is used.
- Install Dependencies: It installs the required dependencies for our Python project (pytest in this case). This dependency was just added as an example of when a project has dependencies as this particular sample python application does not require any.
- Build: This stage was also just added for demonstration purposes, supposing this was a JavaScript/Node.js project this is where we would run the npm run build command and this will create an artifact we can upload and use in the deploy stage. Since this is a python project and it doesn't really require a build, we will create a file and folder in this stage. The file will serve as our artifact for the deploy stage.
- Run Tests: It runs the tests using pytest to validate the code.
- Upload Build Artifact: After running the tests, the build-and-test stage creates and saves a build artifact (in this case, a simulated output_file.txt in the build folder from the build step). The action upload-artifact is used to store this artifact. You can replace this with whatever actual build output your project creates.
- Deploy Stage: Our application will only be deployed if the test was successful which is why I have added the conditionals needs and if. Using “needs” we can require that the deploy job won’t even run unless the test job is successful. The download-artifact action retrieves the build artifact and the last step "Simulate Deployment" simulates deployment by printing a message and lists the artifact. If this was a live project we would have the actual deployment commands to deploy to a real staging environment here. You can replace the echo and ls commands with actual deployment commands (e.g., deploying to a cloud platform). This approach ensures that the output from the build-and-test stage is properly passed to the deploy stage, simulating how a real deployment would work with build artifacts.
Push to GitHub
If you haven't already, you need to initialize a git repository using the commands below:
git init
git add .
git commit -m "Create project as well as CI/CD pipeline"
Now we push to GitHub. Create a GitHub repository and push your code using the below commands:
git remote add origin <your-repo-url>
git push -u origin main
Verify the Pipeline
After pushing the code, you can visit the Actions tab in your GitHub repository. You should see the pipeline triggered, running the steps defined in your proj.yml file.
If everything is set up correctly, the pipeline will build, test, and simulate deployment. You can changes things around in your project and make new pushes to see the the pipeline works, create errors intentional so you can see how the pipeline works when the tests fail.
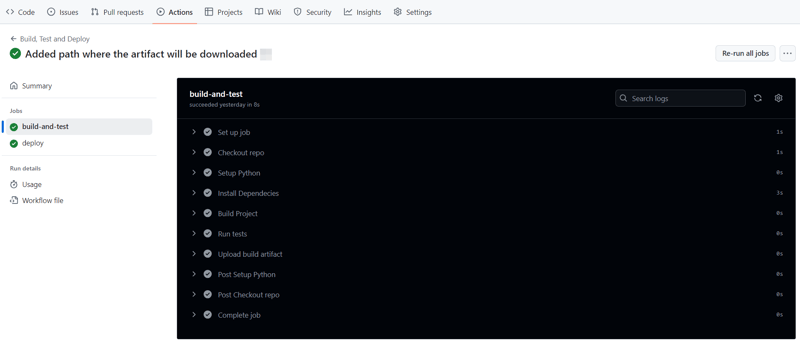
On a successful run this is how your Actions tab should look.
And that's it, this setup provides a working example of a CI/CD pipeline for a very basic Python project. If you found this helpful, please share with your connection and if you have any questions, do not hesitate to drop the question in the comments.
The above is the detailed content of Automate Build, Test & Deploy Processes with GitHub Actions. For more information, please follow other related articles on the PHP Chinese website!

Hot AI Tools

Undresser.AI Undress
AI-powered app for creating realistic nude photos

AI Clothes Remover
Online AI tool for removing clothes from photos.

Undress AI Tool
Undress images for free

Clothoff.io
AI clothes remover

Video Face Swap
Swap faces in any video effortlessly with our completely free AI face swap tool!

Hot Article
Hot Tools

Notepad++7.3.1
Easy-to-use and free code editor

SublimeText3 Chinese version
Chinese version, very easy to use

Zend Studio 13.0.1
Powerful PHP integrated development environment

Dreamweaver CS6
Visual web development tools

SublimeText3 Mac version
God-level code editing software (SublimeText3)
Hot Topics


 Python vs. C : Applications and Use Cases Compared
Apr 12, 2025 am 12:01 AM
Python vs. C : Applications and Use Cases Compared
Apr 12, 2025 am 12:01 AM
Python is suitable for data science, web development and automation tasks, while C is suitable for system programming, game development and embedded systems. Python is known for its simplicity and powerful ecosystem, while C is known for its high performance and underlying control capabilities.
 How Much Python Can You Learn in 2 Hours?
Apr 09, 2025 pm 04:33 PM
How Much Python Can You Learn in 2 Hours?
Apr 09, 2025 pm 04:33 PM
You can learn the basics of Python within two hours. 1. Learn variables and data types, 2. Master control structures such as if statements and loops, 3. Understand the definition and use of functions. These will help you start writing simple Python programs.
 Python: Games, GUIs, and More
Apr 13, 2025 am 12:14 AM
Python: Games, GUIs, and More
Apr 13, 2025 am 12:14 AM
Python excels in gaming and GUI development. 1) Game development uses Pygame, providing drawing, audio and other functions, which are suitable for creating 2D games. 2) GUI development can choose Tkinter or PyQt. Tkinter is simple and easy to use, PyQt has rich functions and is suitable for professional development.
 The 2-Hour Python Plan: A Realistic Approach
Apr 11, 2025 am 12:04 AM
The 2-Hour Python Plan: A Realistic Approach
Apr 11, 2025 am 12:04 AM
You can learn basic programming concepts and skills of Python within 2 hours. 1. Learn variables and data types, 2. Master control flow (conditional statements and loops), 3. Understand the definition and use of functions, 4. Quickly get started with Python programming through simple examples and code snippets.
 Python: Exploring Its Primary Applications
Apr 10, 2025 am 09:41 AM
Python: Exploring Its Primary Applications
Apr 10, 2025 am 09:41 AM
Python is widely used in the fields of web development, data science, machine learning, automation and scripting. 1) In web development, Django and Flask frameworks simplify the development process. 2) In the fields of data science and machine learning, NumPy, Pandas, Scikit-learn and TensorFlow libraries provide strong support. 3) In terms of automation and scripting, Python is suitable for tasks such as automated testing and system management.
 Python vs. C : Learning Curves and Ease of Use
Apr 19, 2025 am 12:20 AM
Python vs. C : Learning Curves and Ease of Use
Apr 19, 2025 am 12:20 AM
Python is easier to learn and use, while C is more powerful but complex. 1. Python syntax is concise and suitable for beginners. Dynamic typing and automatic memory management make it easy to use, but may cause runtime errors. 2.C provides low-level control and advanced features, suitable for high-performance applications, but has a high learning threshold and requires manual memory and type safety management.
 Python and Time: Making the Most of Your Study Time
Apr 14, 2025 am 12:02 AM
Python and Time: Making the Most of Your Study Time
Apr 14, 2025 am 12:02 AM
To maximize the efficiency of learning Python in a limited time, you can use Python's datetime, time, and schedule modules. 1. The datetime module is used to record and plan learning time. 2. The time module helps to set study and rest time. 3. The schedule module automatically arranges weekly learning tasks.
 Python: Automation, Scripting, and Task Management
Apr 16, 2025 am 12:14 AM
Python: Automation, Scripting, and Task Management
Apr 16, 2025 am 12:14 AM
Python excels in automation, scripting, and task management. 1) Automation: File backup is realized through standard libraries such as os and shutil. 2) Script writing: Use the psutil library to monitor system resources. 3) Task management: Use the schedule library to schedule tasks. Python's ease of use and rich library support makes it the preferred tool in these areas.
