

Design Web Page in HTML

HTML, known as HyperText Markup Language, is one of the most popular languages used for designing web pages and structuring content. HTML uses tags, elements, images, and some latest components to make Web Pages more attractive and user-friendly.
By combining HTML with CSS, the appearance of a web page can be easily customized. HTML plays a crucial role in properly structuring web pages on the World Wide Web. It can be edited using simple text editors, allowing users to make changes whenever needed.
How to Design a Web Page in HTML? (Step-by-Step)
Step 1: Set up Your Project
- Create a new folder on your computer to store the files for your web page.

- Open a text editor like Notepad, Sublime Text, or Visual Studio Code in order to write your HTML code.

Step 2: Start with the HTML Structure
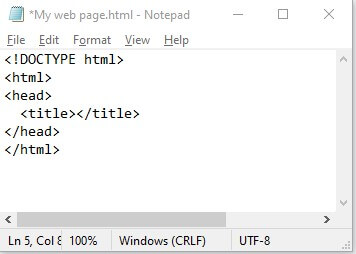
- Begin your HTML file by adding the declaration at the top. This tells the browser that you’re using HTML5.
- Create the opening and closing HTML tags: .
- Inside the HTML tags, create the opening and closing head tags: .
- Within the head tags, add the opening and closing title tags:
. This is where you’ll write the title of your web page.
Step 3: Add Content to the Body
- After the closing head tag, create the opening and closing body tags: . This is where you’ll put all the visible content of your web page.
- Inside the body tags, you can start adding elements such as headings, paragraphs, images, and links.
- To add a heading, use the tags for the main heading and , , and so on for subheadings.
- To add a paragraph, use the
- To add an image, use the
Within the
tag, you need to specify the src attribute, which should contain the file path or URL pointing to the location of the image file.
- To add a link, use the tags with the href attribute specifying the URL.
For a better understanding, here is the code:
<!DOCTYPE html>
<html>
<head>
<title>My First Web Page</title>
</head>
<body>
<h1>Unlock the Power of Online Learning</h1>
<p>Master 1000+ Tools & Technologies.</p>
<img src="C:\Users\Demo2\Desktop\HTML\webimage.PNG">
<ul>
<li>Python</li>
<li>Artificial Intelligence</li>
<li>Java</li>
</ul>
<a href="https://www.educba.com">View All 1000 Skills</a>
</body>
</html>
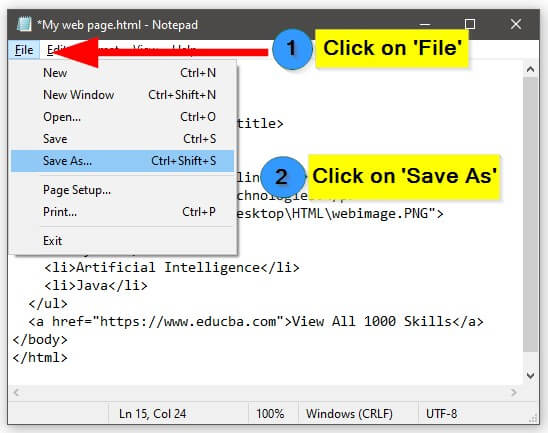
Step 4: Save your HTML File
- Save your file with a .html extension in the folder you created earlier.
- Choose a descriptive name for your file, such as my web page.html (which is commonly used as the main page of a website).

Step 5: View your Web Page
- Open the HTML file in a web browser such as Chrome, Firefox, or Safari.

- You should see the below web page displayed in the browser, showing the content we added.
Output:

Step 6: Continue Enhancing your Web Page
- Explore additional HTML tags and attributes to further enhance the structure and design of your web page.
- Learn CSS (Cascading Style Sheets) to style your web page and make it visually appealing.
- Experiment with more advanced HTML features like forms, tables, and multimedia elements.
HTML Tags and Elements for Web Design
Here’s a list of essential HTML tags and elements that are crucial for designing web pages in HTML.
| HTML Tag/Element | Purpose | |||||||||||||||||||||||||||||||
to |
Define different levels of headings | |||||||||||||||||||||||||||||||
| Define paragraphs of text | ||||||||||||||||||||||||||||||||
| Create line breaks | ||||||||||||||||||||||||||||||||
| Create an ordered list | ||||||||||||||||||||||||||||||||
| Create an unordered list | ||||||||||||||||||||||||||||||||
| Define items within a list | ||||||||||||||||||||||||||||||||
| Create hyperlinks | ||||||||||||||||||||||||||||||||
| Insert images | ||||||||||||||||||||||||||||||||
Examples of Design Web Pages in HTMLLet’s create some web pages to see the resultant web page. Example #1: Travel WebpageHere, we will create an amazing travel webpage showcasing places to visit in Switzerland. We will set one background image and add some text using HTML Code and Styling. HTML Code: <head>
<style>
.card {
max-width: 380px;
margin: auto;
text-align: center;
}
#main {
background-image: url('switzerland.jpg');
background-repeat: no-repeat;
background-size: cover;
}
.price {
color: #f1294a;
font-size: 18px;
}
.card button {
padding: 10px;
color: white;
background-color: #f1294a;
text-align: center;
}
</style>
</head>
<body id="main">
<h2 style="text-align:center">Places to Visit in Switzerland</h2>
<div class="card">
<h1><b>Explore Switzerland</b></h1>
<h3 class="price">Starting from CHF 2000</h3>
<h2>
<ul>
<li>Zurich</li>
<li>Geneva</li>
<li>Lucerne</li>
<li>Interlaken</li>
<li>Zermatt</li>
</ul>
</h2>
<p><button>Book Here</button></p>
</div>
</body>Copy after login Output: Example #2: Feedback FormWe will build one Feedback form in the form of a web page in this example. <!DOCTYPE html>
<html>
<head>
<meta name="viewport" content="width=device-width, initial-scale=1">
<style>
body {
font-family: Arial, sans-serif;
}
input[type=text], select, textarea {
width: 100%;
padding: 8px;
border: 1px solid #ccc;
border-radius: 4px;
margin-top: 4px;
margin-bottom: 10px;
}
input[type=submit] {
background-color: #4CAF50;
color: white;
padding: 8px 12px;
border: none;
border-radius: 4px;
cursor: pointer;
}
.container {
width: 80%;
max-width: 500px;
margin: 0 auto;
border-radius: 6px;
background-color: #F2F2F2;
padding: 20px;
}
h3 {
text-align: center;
}
label {
font-weight: bold;
}
textarea {
resize: vertical;
}
/* Optional: Add additional styles to make it more visually appealing */
.container {
box-shadow: 0 2px 4px rgba(0, 0, 0, 0.1);
}
input[type=submit]:hover {
background-color: #45a049;
}
</style>
</head>
<body>
<h3>We Value Your Suggestions!</h3>
<div class="container">
<form>
<label for="fname">First Name</label>
<input type="text" id="fname" name="firstname" placeholder="Enter your name">
<label for="lname">Last Name</label>
<input type="text" id="lname" name="lastname" placeholder="Enter your last name">
<label for="email">Email</label>
<input type="text" id="email" name="email" placeholder="Enter your email here">
<label for="subject">Suggestion</label>
<textarea id="subject" name="subject" placeholder="Provide your suggestion" style="height: 100px"></textarea>
<input type="submit" value="Submit">
</form>
</div>
</body>
</html>Copy after login Output: Example #3: OTT Platform HomepageIn this example, we will create another web page that showcases an amazing homepage for an OTT platform. HTML Code: <!DOCTYPE html>
<html>
<head>
<title>My OTT Platform</title>
<style>
/* CSS styles for the website */
body {
font-family: Arial, sans-serif;
margin: 0;
padding: 0;
background-color: #000;
color: #fff;
}
header {
background-color: #e50914;
padding: 20px;
text-align: center;
}
header h1 {
margin: 0;
font-size: 28px;
text-transform: uppercase;
color: #fff;
}
nav {
background-color: #000;
padding: 10px;
text-align: center;
}
nav a {
text-decoration: none;
margin: 10px;
color: #fff;
font-weight: bold;
}
main {
padding: 20px;
}
footer {
background-color: #e50914;
padding: 20px;
text-align: center;
}
.video {
display: flex;
flex-wrap: wrap;
justify-content: center;
margin-bottom: 20px;
}
.video .thumbnail {
position: relative;
width: 250px;
height: 140px;
margin: 10px;
overflow: hidden;
transition: transform 0.3s;
background-color: #333;
}
.video .thumbnail img {
width: 100%;
height: 100%;
object-fit: cover;
}
.video .thumbnail:hover {
transform: scale(1.1);
}
.video .title {
position: absolute;
bottom: 0;
left: 0;
width: 100%;
background-color: rgba(0, 0, 0, 0.7);
color: #fff;
padding: 10px;
margin: 0;
font-weight: bold;
}
/* Additional styles for Netflix-like appearance */
header, nav, main, footer {
max-width: 1200px;
margin: 0 auto;
}
.video .thumbnail {
width: 275px;
height: 155px;
}
.video .title {
font-size: 14px;
padding: 8px;
}
</style>
</head>
<body>
<header>
<h1>Welcome to My OTT Platform</h1>
</header>
<nav>
<a href="#">Home</a>
<a href="#">Movies</a>
<a href="#">TV Shows</a>
<a href="#">Documentaries</a>
<a href="#">My Account</a>
</nav>
<main>
<h2>Trending Now</h2>
<div class="video">
<div class="thumbnail">
<img src="video5.jpg" alt="Video 5">
<div class="title">Movie1</div>
</div>
<div class="thumbnail">
<img src="video6.jpg" alt="Video 6">
<div class="title">Movie2</div>
</div>
<div class="thumbnail">
<img src="video7.jpg" alt="Video 7">
<div class="title">Movie3</div>
</div>
</div>
<h2>Top 3 Shows</h2>
<div class="video">
<div class="thumbnail">
<img src="video8.jpg" alt="Video 8">
<div class="title">Show1</div>
</div>
<div class="thumbnail">
<img src="video9.jpg" alt="Video 9">
<div class="title">Show2</div>
</div>
<div class="thumbnail">
<img src="video10.jpg" alt="Video 10">
<div class="title">Show3</div>
</div>
</div>
<h2>International Movies</h2>
<div class="video">
<div class="thumbnail">
<img src="video11.jpg" alt="Video 11">
<div class="title">Movie1</div>
</div>
<div class="thumbnail">
<img src="video12.jpg" alt="Video 12">
<div class="title">Movie2</div>
</div>
<div class="thumbnail">
<img src="video13.jpg" alt="Video 13">
<div class="title">Movie3</div>
</div>
</div>
</main>
<footer>
<p>© 2023 My OTT Platform. All rights reserved.</p>
</footer>
</body>
</html>Copy after login Output: Example #4 Newsletter Subscription PageIn this example, let’s create a simple subscription page where users can subscribe to a newsletter. <form action="newsletter.php" method="post" style="background-color: #f2f2f2; padding: 20px; border-radius: 10px;"> <h2 style="color: #333;">Join our Newsletter!</h2> <div class="form-group"> <label for="name" style="color: #333;">Name:</label> <input type="text" id="name" name="name" placeholder="Enter your name" required style="padding: 5px; border: 1px solid #ccc; border-radius: 5px;"> </div> <div class="form-group"> <label for="email" style="color: #333;">Email:</label> <input type="email" id="email" name="email" placeholder="Enter your email" required style="padding: 5px; border: 1px solid #ccc; border-radius: 5px;"> </div> <div class="form-group"> <label for="interests" style="color: #333;">Interests:</label> <select id="interests" name="interests" multiple style="padding: 5px; border: 1px solid #ccc; border-radius: 5px;"> <option value="technology">Technology</option> <option value="fashion">Fashion</option> <option value="food">Food</option> <option value="travel">Travel</option> <option value="sports">Sports</option> </select> </div> <button type="submit" style="background-color: #04aa6d; color: #fff; padding: 10px 20px; border: none; border-radius: 5px; cursor: pointer;">Subscribe Now!</button> </form> Copy after login Output: Example #5: Guess the Number GameIn this instance, we will design a simple game where users have to guess the number generated by the system. <!DOCTYPE html>
<html>
<head>
<title>Guessing Game</title>
<style>
body {
text-align: center;
padding-top: 100px;
font-family: Arial, sans-serif;
background-color: #f2f2f2;
}
h1 {
color: #333333;
}
p {
color: #666666;
}
input {
padding: 10px;
font-size: 16px;
border-radius: 4px;
border: 1px solid #cccccc;
}
button {
padding: 10px 20px;
font-size: 16px;
background-color: #4CAF50;
color: white;
border-radius: 4px;
border: none;
cursor: pointer;
}
button:hover {
background-color: #45a049;
}
#result {
margin-top: 20px;
font-weight: bold;
}
</style>
</head>
<body>
<h1>Guessing Game</h1>
<p>Guess a number between 1 and 10:</p>
<input type="number" id="guess" min="1" max="10">
<button onclick="checkGuess()">Submit</button>
<p id="result"></p>
<script>
function checkGuess() {
var guess = parseInt(document.getElementById("guess").value);
var randomNumber = Math.floor(Math.random() * 10) + 1;
if (guess === randomNumber) {
document.getElementById("result").innerHTML = "Congratulations! You guessed the correct number.";
} else {
document.getElementById("result").innerHTML = "Wrong guess. The correct number was " + randomNumber + ".";
}
}
</script>
</body>
</html>Copy after login Output: ConclusionFrom all the above discussion, we can say that Web pages are created by using HTML code in a very simplified manner. Just simply put your HTML code in any one editor, save it with the .html extension, and open it within any browser. The above is the detailed content of Design Web Page in HTML. For more information, please follow other related articles on the PHP Chinese website! Statement of this Website
The content of this article is voluntarily contributed by netizens, and the copyright belongs to the original author. This site does not assume corresponding legal responsibility. If you find any content suspected of plagiarism or infringement, please contact admin@php.cn

Hot AI Tools
Undresser.AI UndressAI-powered app for creating realistic nude photos 
AI Clothes RemoverOnline AI tool for removing clothes from photos. 
Undress AI ToolUndress images for free 
Clothoff.ioAI clothes remover 
Video Face SwapSwap faces in any video effortlessly with our completely free AI face swap tool! 
Hot Article
Assassin's Creed Shadows: Seashell Riddle Solution
1 months ago
By DDD
What's New in Windows 11 KB5054979 & How to Fix Update Issues
3 weeks ago
By DDD
Where to find the Crane Control Keycard in Atomfall
1 months ago
By DDD
How to fix KB5055523 fails to install in Windows 11?
2 weeks ago
By DDD
InZoi: How To Apply To School And University
3 weeks ago
By DDD
Hot Tools
Notepad++7.3.1Easy-to-use and free code editor 
SublimeText3 Chinese versionChinese version, very easy to use 
Zend Studio 13.0.1Powerful PHP integrated development environment 
Dreamweaver CS6Visual web development tools 
SublimeText3 Mac versionGod-level code editing software (SublimeText3)
Hot Topics Table Border in HTML
Sep 04, 2024 pm 04:49 PM
Table Border in HTML
Sep 04, 2024 pm 04:49 PM
Guide to Table Border in HTML. Here we discuss multiple ways for defining table-border with examples of the Table Border in HTML.  Nested Table in HTML
Sep 04, 2024 pm 04:49 PM
Nested Table in HTML
Sep 04, 2024 pm 04:49 PM
This is a guide to Nested Table in HTML. Here we discuss how to create a table within the table along with the respective examples.  HTML margin-left
Sep 04, 2024 pm 04:48 PM
HTML margin-left
Sep 04, 2024 pm 04:48 PM
Guide to HTML margin-left. Here we discuss a brief overview on HTML margin-left and its Examples along with its Code Implementation.  HTML Table Layout
Sep 04, 2024 pm 04:54 PM
HTML Table Layout
Sep 04, 2024 pm 04:54 PM
Guide to HTML Table Layout. Here we discuss the Values of HTML Table Layout along with the examples and outputs n detail.  HTML Input Placeholder
Sep 04, 2024 pm 04:54 PM
HTML Input Placeholder
Sep 04, 2024 pm 04:54 PM
Guide to HTML Input Placeholder. Here we discuss the Examples of HTML Input Placeholder along with the codes and outputs.  HTML Ordered List
Sep 04, 2024 pm 04:43 PM
HTML Ordered List
Sep 04, 2024 pm 04:43 PM
Guide to the HTML Ordered List. Here we also discuss introduction of HTML Ordered list and types along with their example respectively  Moving Text in HTML
Sep 04, 2024 pm 04:45 PM
Moving Text in HTML
Sep 04, 2024 pm 04:45 PM
Guide to Moving Text in HTML. Here we discuss an introduction, how marquee tag work with syntax and examples to implement.  HTML onclick Button
Sep 04, 2024 pm 04:49 PM
HTML onclick Button
Sep 04, 2024 pm 04:49 PM
Guide to HTML onclick Button. Here we discuss their introduction, working, examples and onclick Event in various events respectively. 
|


