HTML tables have a number of rows and columns where we can insert, arrange, and display data. This data is then shown on the web page in a tabular format. These tables help us present data in an orderly way, like displaying a list of items, showing tabular data like sales reports, creating layouts for web page sections, etc.
In this article, we will learn how to create the following types of HTML tables:
Simple Table
Table with borders and padding
Table with styling
Table with captions
Table with nested tables
Table with col span and row span
Table with colgroup
Essentials for Creating a Table in HTML
Text editor or HTML editor: Open a text editor or HTML editor like Notepad++, Sublime Text, or Visual Studio Code to write and save your HTML code. We have used Notepad++ as our default editor, but you can use any editor you like.
HTML file: Create a new file in Notepad++. Let’s name it “table.html” or any other name you prefer, but remember to end the file name with “.html”. This file is where you will write your code for your webpage. If you need help creating this file, you can check out our tutorial, “Design Web Page in HTML.”
HTML code: We have provided all the essential codes in this article for creating different types of tables. Simply copy and paste the code into your “table.html” file.
Web browser: After you finish writing your HTML code in the “table.html” file, you need to view and test your webpage. You can use a web browser like Google Chrome, Mozilla Firefox, or Microsoft Edge. We have used Google Chrome to view webpages for all examples in this article, but you can choose any browser you prefer.
Tags Used in HTML
Before creating a table in HTML, it is important to understand the tags used to create and structure it. Here are the key tags used for creating HTML tables:
Tag
Description
Defines a table and its content.
Defines a title or caption for a table.
Groups the header content in a table.
Groups the body content in a table.
Groups the footer content in a table.
Defines a table row.
Defines a table header cell.
Defines a table data/cell.
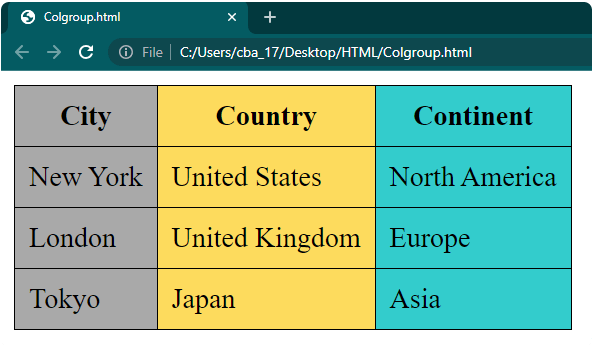
Specifies a set of one or more columns in a table for the purpose of formatting.
Defines the attributes for a group of columns in a table.
Tag
Description
Defines a table and its content.
Defines a title or caption for a table.
Groups the header content in a table.
Groups the body content in a table.
Groups the footer content in a table.
Defines a table row.
Defines a table header cell.
Defines a table data/cell.
Specifies a set of one or more columns in a table for the purpose of formatting.
Defines the attributes for a group of columns in a table.
Examples of Tables in HTML
Example 1: Simple Table
Let’s create a basic HTML table that showcases product information. We will include two columns labeled “Product” and “Price.” The table will contain a single row displaying data for the product “Apple” with a price of $20.
To create a simple HTML table:
Open an HTML file in a text or HTML editor.
Add the
element to define the table.
Use the
element to create table rows.
The
element defines table headers (column labels).
Use the
element to create table cells (data).
Insert the desired data within the table cells.
Save the file with the .html extension, and then open it in a web browser to view the table.
Let’s see how to add borders to an HTML table. This is a way to visually separate the different sections of the table and make it easier to read and understand.
Example 2: Table with Borders and Padding
In this example, we will add a table element and set the border and cellpadding attribute. We will use the border attribute and set the width of the table’s border to 1 pixel. For the cellpadding attribute, we will use 5 pixels of padding for the content inside each cell.
If you want to improve the appearance of your table, you can use CSS (Cascading Style Sheets) to add various styles and formatting.
One way to enhance the table is by giving different cells a background color. To do this, you can simply add the style attribute with the background-color property inside the opening
tag. For instance, you can use style=”background-color: #33cccc;” to set the background color to a nice shade of teal.
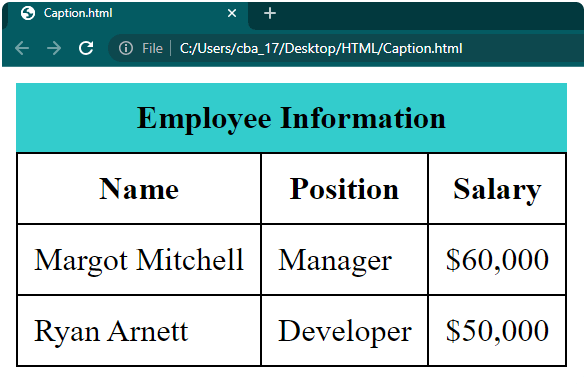
Using an HTML table with a caption is a great way to present information on a webpage in a tidy and organized manner. It’s like giving your table a title or a brief description to help people grasp its content easily. To include a caption, all you have to do is use the
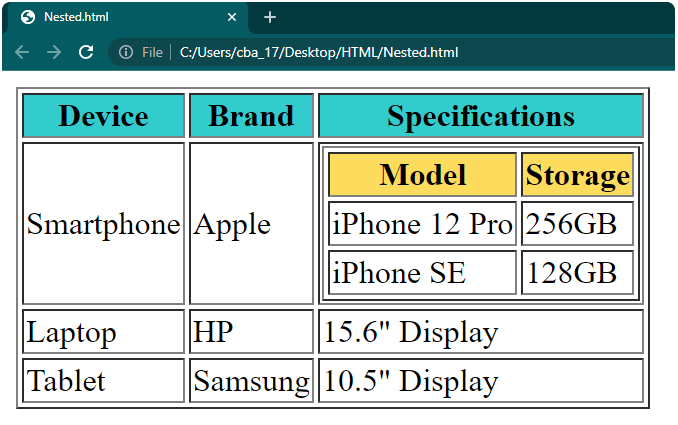
In HTML, when we talk about a nested table, it means we have a table placed inside another table. So, basically, some cells in the outer table contain a whole new table structure within them. If you want to include a nested table, you just need to insert another table inside any cell of your main table. To understand better, here is an example:
In HTML, the “colspan” and “rowspan” give you the power to merge or split cells horizontally (colspan) and vertically (rowspan) to create more advanced table structures.
If you want to merge cells horizontally, simply use “colspan” followed by the number of cells you want to merge. And if you want to merge cells vertically, you can use “rowspan” along with the number of cells you want to merge.
To use the colspan and rowspan attributes, you can add them directly within the
The above is the detailed content of Create Tables in HTML. For more information, please follow other related articles on the PHP Chinese website!
Statement of this Website
The content of this article is voluntarily contributed by netizens, and the copyright belongs to the original author. This site does not assume corresponding legal responsibility. If you find any content suspected of plagiarism or infringement, please contact admin@php.cn