

Python设计模式编程中Adapter适配器模式的使用实例

将一个类的接口转换成客户希望的另外一个接口。使得原本由于接口不兼容而不能一起工作的那些类可以一起工作。
应用场景:希望复用一些现存的类,但是接口又与复用环境要求不一致。
模式特点:将一个类的接口转换成为客户希望的另外一个接口。
分类:类适配器(通过多重继承)、对象适配器。
来通过例子说明,下面是用户通过适配器使用一个类的方法
class Target:
 def Request():
  print "common request."

class Adaptee(Target):
 def SpecificRequest(self):
  print "specific request."

class Adapter(Target):
 def __init__(self,ada):
  self.adaptee = ada
 def Request(self):
  self.adaptee.SpecificRequest()

if __name__ == "__main__":
 adaptee = Adaptee()
 adapter = Adapter(adaptee)
 adapter.Request()
类图:
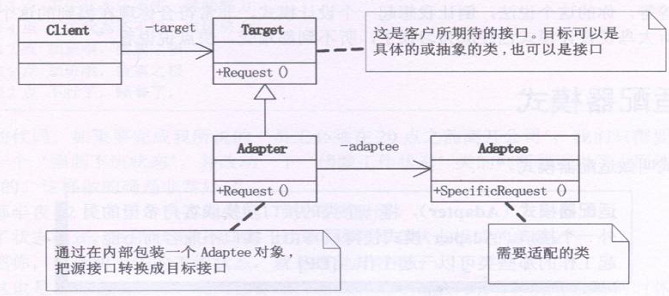
实例:
我们再来看一个简单的Adapter例子
#encoding=utf-8
#
#by panda
#适配器模式


def printInfo(info):
 print unicode(info, 'utf-8').encode('gbk')

#球员类
class Player():
 name = ''
 def __init__(self,name):
  self.name = name

 def Attack(self,name):
  pass

 def Defense(self):
  pass

#前锋
class Forwards(Player):
 def __init__(self,name):
  Player.__init__(self,name)

 def Attack(self):
  printInfo("前锋%s 进攻" % self.name)

 def Defense(self,name):
  printInfo("前锋%s 防守" % self.name)

#中锋(目标类)
class Center(Player):
 def __init__(self,name):
  Player.__init__(self,name)

 def Attack(self):
  printInfo("中锋%s 进攻" % self.name)

 def Defense(self):
  printInfo("中锋%s 防守" % self.name)

#后卫
class Guards(Player):
 def __init__(self,name):
  Player.__init__(self,name)

 def Attack(self):
  printInfo("后卫%s 进攻" % self.name)

 def Defense(self):
  printInfo("后卫%s 防守" % self.name)

#外籍中锋(待适配类)
#中锋
class ForeignCenter(Player):
 name = ''
 def __init__(self,name):
  Player.__init__(self,name)

 def ForeignAttack(self):
  printInfo("外籍中锋%s 进攻" % self.name)

 def ForeignDefense(self):
  printInfo("外籍中锋%s 防守" % self.name)


#翻译(适配类)
class Translator(Player):
 foreignCenter = None
 def __init__(self,name):
  self.foreignCenter = ForeignCenter(name)

 def Attack(self):
  self.foreignCenter.ForeignAttack()

 def Defense(self):
  self.foreignCenter.ForeignDefense()


def clientUI():
 b = Forwards('巴蒂尔')
 m = Guards('麦克格雷迪')
 ym = Translator('姚明')

 b.Attack()
 m.Defense()
 ym.Attack()
 ym.Defense()
 return

if __name__ == '__main__':
 clientUI();

Hot AI Tools

Undresser.AI Undress
AI-powered app for creating realistic nude photos

AI Clothes Remover
Online AI tool for removing clothes from photos.

Undress AI Tool
Undress images for free

Clothoff.io
AI clothes remover

Video Face Swap
Swap faces in any video effortlessly with our completely free AI face swap tool!

Hot Article
Hot Tools

Notepad++7.3.1
Easy-to-use and free code editor

SublimeText3 Chinese version
Chinese version, very easy to use

Zend Studio 13.0.1
Powerful PHP integrated development environment

Dreamweaver CS6
Visual web development tools

SublimeText3 Mac version
God-level code editing software (SublimeText3)
Hot Topics


 PHP and Python: Different Paradigms Explained
Apr 18, 2025 am 12:26 AM
PHP and Python: Different Paradigms Explained
Apr 18, 2025 am 12:26 AM
PHP is mainly procedural programming, but also supports object-oriented programming (OOP); Python supports a variety of paradigms, including OOP, functional and procedural programming. PHP is suitable for web development, and Python is suitable for a variety of applications such as data analysis and machine learning.
 Choosing Between PHP and Python: A Guide
Apr 18, 2025 am 12:24 AM
Choosing Between PHP and Python: A Guide
Apr 18, 2025 am 12:24 AM
PHP is suitable for web development and rapid prototyping, and Python is suitable for data science and machine learning. 1.PHP is used for dynamic web development, with simple syntax and suitable for rapid development. 2. Python has concise syntax, is suitable for multiple fields, and has a strong library ecosystem.
 PHP and Python: A Deep Dive into Their History
Apr 18, 2025 am 12:25 AM
PHP and Python: A Deep Dive into Their History
Apr 18, 2025 am 12:25 AM
PHP originated in 1994 and was developed by RasmusLerdorf. It was originally used to track website visitors and gradually evolved into a server-side scripting language and was widely used in web development. Python was developed by Guidovan Rossum in the late 1980s and was first released in 1991. It emphasizes code readability and simplicity, and is suitable for scientific computing, data analysis and other fields.
 Python vs. JavaScript: The Learning Curve and Ease of Use
Apr 16, 2025 am 12:12 AM
Python vs. JavaScript: The Learning Curve and Ease of Use
Apr 16, 2025 am 12:12 AM
Python is more suitable for beginners, with a smooth learning curve and concise syntax; JavaScript is suitable for front-end development, with a steep learning curve and flexible syntax. 1. Python syntax is intuitive and suitable for data science and back-end development. 2. JavaScript is flexible and widely used in front-end and server-side programming.
 How to run sublime code python
Apr 16, 2025 am 08:48 AM
How to run sublime code python
Apr 16, 2025 am 08:48 AM
To run Python code in Sublime Text, you need to install the Python plug-in first, then create a .py file and write the code, and finally press Ctrl B to run the code, and the output will be displayed in the console.
 Can vs code run in Windows 8
Apr 15, 2025 pm 07:24 PM
Can vs code run in Windows 8
Apr 15, 2025 pm 07:24 PM
VS Code can run on Windows 8, but the experience may not be great. First make sure the system has been updated to the latest patch, then download the VS Code installation package that matches the system architecture and install it as prompted. After installation, be aware that some extensions may be incompatible with Windows 8 and need to look for alternative extensions or use newer Windows systems in a virtual machine. Install the necessary extensions to check whether they work properly. Although VS Code is feasible on Windows 8, it is recommended to upgrade to a newer Windows system for a better development experience and security.
 Where to write code in vscode
Apr 15, 2025 pm 09:54 PM
Where to write code in vscode
Apr 15, 2025 pm 09:54 PM
Writing code in Visual Studio Code (VSCode) is simple and easy to use. Just install VSCode, create a project, select a language, create a file, write code, save and run it. The advantages of VSCode include cross-platform, free and open source, powerful features, rich extensions, and lightweight and fast.
 Can visual studio code be used in python
Apr 15, 2025 pm 08:18 PM
Can visual studio code be used in python
Apr 15, 2025 pm 08:18 PM
VS Code can be used to write Python and provides many features that make it an ideal tool for developing Python applications. It allows users to: install Python extensions to get functions such as code completion, syntax highlighting, and debugging. Use the debugger to track code step by step, find and fix errors. Integrate Git for version control. Use code formatting tools to maintain code consistency. Use the Linting tool to spot potential problems ahead of time.
