

Hadoop集群间的hbase数据迁移

在日常的使用过程中,可能经常需要将一个集群中hbase的数据迁移到或者拷贝到另外一个集群中,这时候,可能会出很多问题 以下是我在处理的过程中的一些做法和处理方式。 前提,两个hbase的版本一直,否则可能出现不可预知的问题,造成数据迁移失败 当两个集群
在日常的使用过程中,可能经常需要将一个集群中hbase的数据迁移到或者拷贝到另外一个集群中,这时候,可能会出很多问题以下是我在处理的过程中的一些做法和处理方式。
前提,两个hbase的版本一直,否则可能出现不可预知的问题,造成数据迁移失败
当两个集群不能通讯的时候,可以先将数据所在集群中hbase的数据文件拷贝到本地
具体做法如下:
在Hadoop目录下执行如下命令,拷贝到本地文件。
bin/Hadoop fs -copyToLocal /hbase/tab_keywordflow /home/test/xiaochenbak
然后你懂得,将文件拷贝到你需要的你需要迁移到的那个集群中,目录是你的表的目录,
如果这个集群中也有对应的表文件,那么删除掉,然后拷贝。
/bin/Hadoop fs -rmr /hbase/tab_keywordflow
/bin/Hadoop fs -copyFromLocal /home/other/xiaochenbak /hbase/tab_keywordflow
此时的/home/other/xiaochenbak为你要迁移到数据的集群。
重置该表在.META.表中的分区信息
bin/hbase org.jruby.Main /home/other/hbase/bin/add_table.rb /hbase/tab_keywordflow
/home/other/hbase/bin/add_table.rb为ruby脚本,可以执行,脚本内容如下:另存为add_table.rb即可
#
# Copyright 2009 The Apache Software Foundation
#
# Licensed to the Apache Software Foundation (ASF) under one
# or more contributor license agreements. See the NOTICE file
# distributed with this work for additional information
# regarding copyright ownership. The ASF licenses this file
# to you under the Apache License, Version 2.0 (the
# "License"); you may not use this file except in compliance
# with the License. You may obtain a copy of the License at
#
# http://www.apache.org/licenses/LICENSE-2.0
#
# Unless required by applicable law or agreed to in writing, software
# distributed under the License is distributed on an "AS IS" BASIS,
# WITHOUT WARRANTIES OR CONDITIONS OF ANY KIND, either express or implied.
# See the License for the specific language governing permissions and
# limitations under the License.
#
# Script adds a table back to a running hbase.
# Currently only works on if table data is in place.
#
# To see usage for this script, run:
#
# ${HBASE_HOME}/bin/hbase org.jruby.Main addtable.rb
#
include Java
import org.apache.Hadoop.hbase.util.Bytes
import org.apache.Hadoop.hbase.HConstants
import org.apache.Hadoop.hbase.regionserver.HRegion
import org.apache.Hadoop.hbase.HRegionInfo
import org.apache.Hadoop.hbase.client.HTable
import org.apache.Hadoop.hbase.client.Delete
import org.apache.Hadoop.hbase.client.Put
import org.apache.Hadoop.hbase.client.Scan
import org.apache.Hadoop.hbase.HTableDescriptor
import org.apache.Hadoop.hbase.HBaseConfiguration
import org.apache.Hadoop.hbase.util.FSUtils
import org.apache.Hadoop.hbase.util.Writables
import org.apache.Hadoop.fs.Path
import org.apache.Hadoop.fs.FileSystem
import org.apache.commons.logging.LogFactory
# Name of this script
NAME = "add_table"
# Print usage for this script
def usage
puts 'Usage: %s.rb TABLE_DIR [alternate_tablename]' % NAME
exit!
end
# Get configuration to use.
c = HBaseConfiguration.new()
# Set Hadoop filesystem configuration using the hbase.rootdir.
# Otherwise, we'll always use localhost though the hbase.rootdir
# might be pointing at hdfs location.
c.set("fs.default.name", c.get(HConstants::HBASE_DIR))
fs = FileSystem.get(c)
# Get a logger and a metautils instance.
LOG = LogFactory.getLog(NAME)
# Check arguments
if ARGV.size 2
usage
end
# Get cmdline args.
srcdir = fs.makeQualified(Path.new(java.lang.String.new(ARGV[0])))
if not fs.exists(srcdir)
raise IOError.new("src dir " + srcdir.toString() + " doesn't exist!")
end
# Get table name
tableName = nil
if ARGV.size > 1
tableName = ARGV[1]
raise IOError.new("Not supported yet")
elsif
# If none provided use dirname
tableName = srcdir.getName()
end
HTableDescriptor.isLegalTableName(tableName.to_java_bytes)
# Figure locations under hbase.rootdir
# Move directories into place; be careful not to overwrite.
rootdir = FSUtils.getRootDir(c)
tableDir = fs.makeQualified(Path.new(rootdir, tableName))
# If a directory currently in place, move it aside.
if srcdir.equals(tableDir)
LOG.info("Source directory is in place under hbase.rootdir: " + srcdir.toString());
elsif fs.exists(tableDir)
movedTableName = tableName + "." + java.lang.System.currentTimeMillis().to_s
movedTableDir = Path.new(rootdir, java.lang.String.new(movedTableName))
LOG.warn("Moving " + tableDir.toString() + " aside as " + movedTableDir.toString());
raise IOError.new("Failed move of " + tableDir.toString()) unless fs.rename(tableDir, movedTableDir)
LOG.info("Moving " + srcdir.toString() + " to " + tableDir.toString());
raise IOError.new("Failed move of " + srcdir.toString()) unless fs.rename(srcdir, tableDir)
end
# Clean mentions of table from .META.
# Scan the .META. and remove all lines that begin with tablename
LOG.info("Deleting mention of " + tableName + " from .META.")
metaTable = HTable.new(c, HConstants::META_TABLE_NAME)
tableNameMetaPrefix = tableName + HConstants::META_ROW_DELIMITER.chr
scan = Scan.new((tableNameMetaPrefix + HConstants::META_ROW_DELIMITER.chr).to_java_bytes)
scanner = metaTable.getScanner(scan)
# Use java.lang.String doing compares. Ruby String is a bit odd.
tableNameStr = java.lang.String.new(tableName)
while (result = scanner.next())
rowid = Bytes.toString(result.getRow())
rowidStr = java.lang.String.new(rowid)
if not rowidStr.startsWith(tableNameMetaPrefix)
# Gone too far, break
break
end
LOG.info("Deleting row from catalog: " + rowid);
d = Delete.new(result.getRow())
metaTable.delete(d)
end
scanner.close()
# Now, walk the table and per region, add an entry
LOG.info("Walking " + srcdir.toString() + " adding regions to catalog table")
statuses = fs.listStatus(srcdir)
for status in statuses
next unless status.isDir()
next if status.getPath().getName() == "compaction.dir"
regioninfofile = Path.new(status.getPath(), HRegion::REGIONINFO_FILE)
unless fs.exists(regioninfofile)
LOG.warn("Missing .regioninfo: " + regioninfofile.toString())
next
end
is = fs.open(regioninfofile)
hri = HRegionInfo.new()
hri.readFields(is)
is.close()
# TODO: Need to redo table descriptor with passed table name and then recalculate the region encoded names.
p = Put.new(hri.getRegionName())
p.add(HConstants::CATALOG_FAMILY, HConstants::REGIONINFO_QUALIFIER, Writables.getBytes(hri))
metaTable.put(p)
LOG.info("Added to catalog: " + hri.toString())
end
好了,以上就是我的做法,如何集群键可以通信,那就更好办了,相信你懂得,scp

Hot AI Tools

Undresser.AI Undress
AI-powered app for creating realistic nude photos

AI Clothes Remover
Online AI tool for removing clothes from photos.

Undress AI Tool
Undress images for free

Clothoff.io
AI clothes remover

Video Face Swap
Swap faces in any video effortlessly with our completely free AI face swap tool!

Hot Article
Hot Tools

Notepad++7.3.1
Easy-to-use and free code editor

SublimeText3 Chinese version
Chinese version, very easy to use

Zend Studio 13.0.1
Powerful PHP integrated development environment

Dreamweaver CS6
Visual web development tools

SublimeText3 Mac version
God-level code editing software (SublimeText3)
Hot Topics
 1669
1669
 14
1428
52
1329
25
1273
29
1256
24
14
1428
52
1329
25
1273
29
1256
24

 Use ddrescue to recover data on Linux
Mar 20, 2024 pm 01:37 PM
Use ddrescue to recover data on Linux
Mar 20, 2024 pm 01:37 PM
DDREASE is a tool for recovering data from file or block devices such as hard drives, SSDs, RAM disks, CDs, DVDs and USB storage devices. It copies data from one block device to another, leaving corrupted data blocks behind and moving only good data blocks. ddreasue is a powerful recovery tool that is fully automated as it does not require any interference during recovery operations. Additionally, thanks to the ddasue map file, it can be stopped and resumed at any time. Other key features of DDREASE are as follows: It does not overwrite recovered data but fills the gaps in case of iterative recovery. However, it can be truncated if the tool is instructed to do so explicitly. Recover data from multiple files or blocks to a single
 Open source! Beyond ZoeDepth! DepthFM: Fast and accurate monocular depth estimation!
Apr 03, 2024 pm 12:04 PM
Open source! Beyond ZoeDepth! DepthFM: Fast and accurate monocular depth estimation!
Apr 03, 2024 pm 12:04 PM
0.What does this article do? We propose DepthFM: a versatile and fast state-of-the-art generative monocular depth estimation model. In addition to traditional depth estimation tasks, DepthFM also demonstrates state-of-the-art capabilities in downstream tasks such as depth inpainting. DepthFM is efficient and can synthesize depth maps within a few inference steps. Let’s read about this work together ~ 1. Paper information title: DepthFM: FastMonocularDepthEstimationwithFlowMatching Author: MingGui, JohannesS.Fischer, UlrichPrestel, PingchuanMa, Dmytr
 How to download foobar2000? -How to use foobar2000
Mar 18, 2024 am 10:58 AM
How to download foobar2000? -How to use foobar2000
Mar 18, 2024 am 10:58 AM
foobar2000 is a software that can listen to music resources at any time. It brings you all kinds of music with lossless sound quality. The enhanced version of the music player allows you to get a more comprehensive and comfortable music experience. Its design concept is to play the advanced audio on the computer The device is transplanted to mobile phones to provide a more convenient and efficient music playback experience. The interface design is simple, clear and easy to use. It adopts a minimalist design style without too many decorations and cumbersome operations to get started quickly. It also supports a variety of skins and Theme, personalize settings according to your own preferences, and create an exclusive music player that supports the playback of multiple audio formats. It also supports the audio gain function to adjust the volume according to your own hearing conditions to avoid hearing damage caused by excessive volume. Next, let me help you
 What software is crystaldiskmark? -How to use crystaldiskmark?
Mar 18, 2024 pm 02:58 PM
What software is crystaldiskmark? -How to use crystaldiskmark?
Mar 18, 2024 pm 02:58 PM
CrystalDiskMark is a small HDD benchmark tool for hard drives that quickly measures sequential and random read/write speeds. Next, let the editor introduce CrystalDiskMark to you and how to use crystaldiskmark~ 1. Introduction to CrystalDiskMark CrystalDiskMark is a widely used disk performance testing tool used to evaluate the read and write speed and performance of mechanical hard drives and solid-state drives (SSD). Random I/O performance. It is a free Windows application and provides a user-friendly interface and various test modes to evaluate different aspects of hard drive performance and is widely used in hardware reviews
 Google is ecstatic: JAX performance surpasses Pytorch and TensorFlow! It may become the fastest choice for GPU inference training
Apr 01, 2024 pm 07:46 PM
Google is ecstatic: JAX performance surpasses Pytorch and TensorFlow! It may become the fastest choice for GPU inference training
Apr 01, 2024 pm 07:46 PM
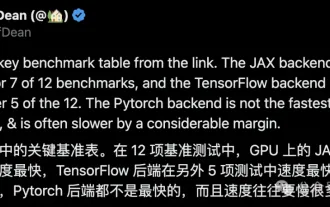
The performance of JAX, promoted by Google, has surpassed that of Pytorch and TensorFlow in recent benchmark tests, ranking first in 7 indicators. And the test was not done on the TPU with the best JAX performance. Although among developers, Pytorch is still more popular than Tensorflow. But in the future, perhaps more large models will be trained and run based on the JAX platform. Models Recently, the Keras team benchmarked three backends (TensorFlow, JAX, PyTorch) with the native PyTorch implementation and Keras2 with TensorFlow. First, they select a set of mainstream
 BTCC tutorial: How to bind and use MetaMask wallet on BTCC exchange?
Apr 26, 2024 am 09:40 AM
BTCC tutorial: How to bind and use MetaMask wallet on BTCC exchange?
Apr 26, 2024 am 09:40 AM
MetaMask (also called Little Fox Wallet in Chinese) is a free and well-received encryption wallet software. Currently, BTCC supports binding to the MetaMask wallet. After binding, you can use the MetaMask wallet to quickly log in, store value, buy coins, etc., and you can also get 20 USDT trial bonus for the first time binding. In the BTCCMetaMask wallet tutorial, we will introduce in detail how to register and use MetaMask, and how to bind and use the Little Fox wallet in BTCC. What is MetaMask wallet? With over 30 million users, MetaMask Little Fox Wallet is one of the most popular cryptocurrency wallets today. It is free to use and can be installed on the network as an extension
 How to migrate WeChat chat history to a new phone
Mar 26, 2024 pm 04:48 PM
How to migrate WeChat chat history to a new phone
Mar 26, 2024 pm 04:48 PM
1. Open the WeChat app on the old device, click [Me] in the lower right corner, select the [Settings] function, and click [Chat]. 2. Select [Chat History Migration and Backup], click [Migrate], and select the platform to which you want to migrate the device. 3. Click [Select chats to be migrated], click [Select all] in the lower left corner, or select chat records yourself. 4. After selecting, click [Start] in the lower right corner to log in to this WeChat account using the new device. 5. Then scan the QR code to start migrating chat records. Users only need to wait for the migration to complete.
 How to use NetEase Mailbox Master
Mar 27, 2024 pm 05:32 PM
How to use NetEase Mailbox Master
Mar 27, 2024 pm 05:32 PM
NetEase Mailbox, as an email address widely used by Chinese netizens, has always won the trust of users with its stable and efficient services. NetEase Mailbox Master is an email software specially created for mobile phone users. It greatly simplifies the process of sending and receiving emails and makes our email processing more convenient. So how to use NetEase Mailbox Master, and what specific functions it has. Below, the editor of this site will give you a detailed introduction, hoping to help you! First, you can search and download the NetEase Mailbox Master app in the mobile app store. Search for "NetEase Mailbox Master" in App Store or Baidu Mobile Assistant, and then follow the prompts to install it. After the download and installation is completed, we open the NetEase email account and log in. The login interface is as shown below
