

linux下通过mysqldump备份mysql数据库成sql文件

linux下通过mysqldump备份mysql数据库成sql文件阶段1:傻瓜式全备份mysqldump-hip地址-uusername-ppassword-A~/name.sql此种情况将整个数据库(结构和数据)导出备
linux下通过mysqldump备份mysql数据库成sql文件
阶段1:傻瓜式全备份
mysqldump -h ip地址 -uusername -ppassword -A >~/name.sql
此种情况将整个数据库(结构和数据)导出备份成一个sql文件
-----------------------------------------------------------------------------------------------------------------------------------------------
阶段2:适当的调整参数达到不同的备份效果
我们先help一下
mysqldump --help
由于help输出过多就不一一列举出来了
通过远程连接备份
-h 需要备份服务器的地址
-u 允许远程连接的账号
-p允许远程连接账号的密码
-A 全备份
常用参数的说明
-A, --all-databases 备份所有数据库
--add-drop-database 在每个create database 语句之前增加一个drop database。
--add-drop-table 在每个create table 语句之前增加一个drop table。
--add-locks 在每个表导出之前增加LOCK TABLES并且之后UNLOCK TABLE。(为了使得更快地插入到MySQL)
--default-character-set=name 设置导出数据的字符集
--opt 同--quick --add-drop-table --add-locks --extended-insert --lock-tables。应该给你为读入一个MySQL服务器的尽可能最快的导出。
-e, --extended-insert 使用全新多行INSERT语法。(给出更紧缩并且更快的插入语句)。生成的文件insert语句中回事批量的,提高导入时的速度
--hex-blob 使用十六进制格式导出二进制字符串字段。如果有二进制数据就必须使用本选项。影响到的字段类型有 BINARY、VARBINARY、BLOB。
--quick,-q 该选项在导出大表时很有用,它强制 mysqldump 从服务器查询取得记录直接输出而不是取得所有记录后将它们缓存到内存中
-t, --no-create-info 只导出数据
-d, --no-data 只导出结构
----------------------------------------------------------------------------------------------------------------------------------------------
阶段3:备份制定定数据库和制定数据库的某个表
mysqldump -h ip地址 -uusername -ppassword databasename >~/name.sql
mysqldump -h ip地址 -uusername -ppassword databasename tablename >~/name.sql
----------------------------------------------------------------------------------------------------------------------------------------------
阶段4.1:
通过读取文本来分库备份数据库成不同的sql文件
例如我们分别有数据库db1 db2 db3 db4 db5。。。。。。db100当我们每个库数据量都不小的时候需要按数据库分别备份,
我们也不可能100个库分别写成100个备份的脚本运行,这样我们就需要结合shell脚本中的循环语句来操作
cat filename.txt |while read i
do
备份脚本,例如:mysqldump -h ip地址 -uusername -ppassword $i >~/name.sql
done
其中filename.txt中保存数据库的库名,每行一个。
通过这样的做法再结合linux的crond服务我们就可以自动备份了
阶段4.2
如果需要分库分表备份那该这么办呢
这时候做法和分库的时候一样,分别按每个库生成相应表的表明文件一行一个分别命名为db1.txt db2.txt db3.txt db4.txt db5.txt。。。。。。。db100.txt
通过两次循环分别进行分库分表的备份
cat filename.txt |while read i
do
mkdir $i
cat $i.txt|while read a
do
备份脚本,例如:mysqldump -h ip地址 -uusername -ppassword $i $a >$i/$a.sql
done
done
当然我们有时候需要记录下备份的时间
fn=$(date +"%Y-%m-%d_%H:%M")
cat filename.txt |while read i
do
mkdir $i
cat $i.txt|while read a
do
备份脚本,美国空间,例如:mysqldump -h ip地址 -uusername -ppassword $i $a >$i/$a$fn.sql
done
done
--------------------------------------------------------------------------------------------------------------------------------------------------
阶段5:
经过第4阶段之后我们的备份更加细致,那部分的数据出问题我们就恢复那部分的(虽然颗粒度还是有些粗)
但是我们是不是觉得第4阶段的备份还是很复杂,例如我们存库名和表明的文件就是一个庞大的工程,美国服务器,新建库我们得在库文件中添加一行
新建表我们得到某个库下面的表的文件中添加一条,这样既繁琐又容易出错,而且容易忘记,维护起来很麻烦。
现在我们有个办法可以让他自动列出库和库下的表
mysql -e
执行
mysql -e "show databases"
得到如下结果
+--------------------+
| Database |
+--------------------+
| information_schema |
| mysql |
| performance_schema |
| test |
+--------------------+
但是这样的结果我们没法用,所需要去掉外围的条条框框的东西
mysql -e "show databases"|sed '1d'
information_schema
mysql
performance_schema
test
for db in `mysql -e "show databases"|sed '1d'`
do
备份脚本,例如:mysqldump -h ip地址 -uusername -ppassword $db >name.sql
done
参照这个我们同样可以分库分表备份
mysql databasename -e "show tables"|sed '1d'
fn=$(date +"%Y-%m-%d_%H:%M")
for db in `mysql -e "show databases"|sed '1d'`
do
mkdir $db
for tables in `mysql $db -e "show tables"|sed '1d'`
do
备份脚本,例如:mysqldump -h ip地址 -uusername -ppassword $db $tables >$db/$tables$fn.sql
done
done
暂且完毕,请多指正,美国服务器,如有其它更好方式请留言,一起进步
本文出自 “天马行空” 博客,请务必保留此出处

Hot AI Tools

Undresser.AI Undress
AI-powered app for creating realistic nude photos

AI Clothes Remover
Online AI tool for removing clothes from photos.

Undress AI Tool
Undress images for free

Clothoff.io
AI clothes remover

Video Face Swap
Swap faces in any video effortlessly with our completely free AI face swap tool!

Hot Article
Hot Tools

Notepad++7.3.1
Easy-to-use and free code editor

SublimeText3 Chinese version
Chinese version, very easy to use

Zend Studio 13.0.1
Powerful PHP integrated development environment

Dreamweaver CS6
Visual web development tools

SublimeText3 Mac version
God-level code editing software (SublimeText3)
Hot Topics


 Using Task Manager in Linux
Aug 15, 2024 am 07:30 AM
Using Task Manager in Linux
Aug 15, 2024 am 07:30 AM
There are many questions that Linux beginners often ask, "Does Linux have a Task Manager?", "How to open the Task Manager on Linux?" Users from Windows know that the Task Manager is very useful. You can open the Task Manager by pressing Ctrl+Alt+Del in Windows. This task manager shows you all the running processes and the memory they consume, and you can select and kill a process from the task manager program. When you first use Linux, you will also look for something that is equivalent to a task manager in Linux. A Linux expert prefers to use the command line to find processes, memory consumption, etc., but you don't have to
 Solve the problem of garbled display of graphs and charts on Zabbix Chinese monitoring server
Jul 31, 2024 pm 02:10 PM
Solve the problem of garbled display of graphs and charts on Zabbix Chinese monitoring server
Jul 31, 2024 pm 02:10 PM
Zabbix's support for Chinese is not very good, but sometimes we still choose Chinese for management purposes. In the web interface monitored by Zabbix, the Chinese under the graphic icon will display small squares. This is incorrect and requires downloading fonts. For example, "Microsoft Yahei", "Microsoft Yahei.ttf" is named "msyh.ttf", upload the downloaded font to /zabbix/fonts/fonts and modify the two characters in the /zabbix/include/defines.inc.php file at define('ZBX_GRAPH_FONT_NAME','DejaVuSans');define('ZBX_FONT_NAME'
 7 ways to help you check the registration date of Linux users
Aug 24, 2024 am 07:31 AM
7 ways to help you check the registration date of Linux users
Aug 24, 2024 am 07:31 AM
Did you know, how to check the creation date of an account on a Linux system? If you know, what can you do? Did you succeed? If yes, how to do it? Basically Linux systems don't track this information, so what are the alternative ways to get this information? You may ask why am I checking this? Yes, there are situations where you may need to review this information and it will be helpful to you at that time. You can use the following 7 methods to verify. Use /var/log/secure Use aureport tool Use .bash_logout Use chage command Use useradd command Use passwd command Use last command Method 1: Use /var/l
 Teach you how to add fonts to Fedora in 5 minutes
Jul 23, 2024 am 09:45 AM
Teach you how to add fonts to Fedora in 5 minutes
Jul 23, 2024 am 09:45 AM
System-wide installation If you install a font system-wide, it will be available to all users. The best way to do this is to use RPM packages from the official software repositories. Before starting, open the "Software" tool in Fedora Workstation, or other tools using the official repository. Select the "Add-ons" category in the selection bar. Then select "Fonts" within the category. You'll see the available fonts similar to the ones in the screenshot below: When you select a font, some details will appear. Depending on several scenarios, you may be able to preview some sample text for the font. Click the "Install" button to add it to your system. Depending on system speed and network bandwidth, this process may take some time to complete
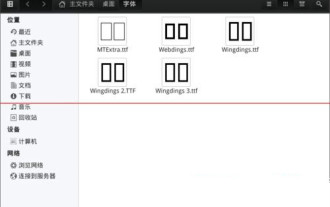 What should I do if the WPS missing fonts under the Linux system causes the file to be garbled?
Jul 31, 2024 am 12:41 AM
What should I do if the WPS missing fonts under the Linux system causes the file to be garbled?
Jul 31, 2024 am 12:41 AM
1. Find the fonts wingdings, wingdings2, wingdings3, Webdings, and MTExtra from the Internet. 2. Enter the main folder, press Ctrl+h (show hidden files), and check if there is a .fonts folder. If not, create one. 3. Copy the downloaded fonts such as wingdings, wingdings2, wingdings3, Webdings, and MTExtra to the .fonts folder in the main folder. Then start wps to see if there is still a "System missing font..." reminder dialog box. If not, just Success! Notes: wingdings, wingdin
 Centos 7 installation and configuration NTP network time synchronization server
Aug 05, 2024 pm 10:35 PM
Centos 7 installation and configuration NTP network time synchronization server
Aug 05, 2024 pm 10:35 PM
Experimental environment: OS: LinuxCentos7.4x86_641. View the current server time zone & list the time zone and set the time zone (if it is already the correct time zone, please skip it): #timedatectl#timedatectllist-timezones#timedatectlset-timezoneAsia/Shanghai2. Understanding of time zone concepts: GMT, UTC, CST, DSTUTC: The entire earth is divided into twenty-four time zones. Each time zone has its own local time. In international radio communication situations, for the sake of unification, a unified time is used, called Universal Coordinated Time (UTC). :UniversalTim
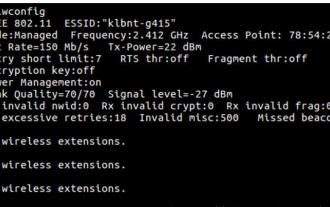 How to connect two Ubuntu hosts to the Internet using one network cable
Aug 07, 2024 pm 01:39 PM
How to connect two Ubuntu hosts to the Internet using one network cable
Aug 07, 2024 pm 01:39 PM
How to use one network cable to connect two ubuntu hosts to the Internet 1. Prepare host A: ubuntu16.04 and host B: ubuntu16.042. Host A has two network cards, one is connected to the external network and the other is connected to host B. Use the iwconfig command to view all network cards on the host. As shown above, the network cards on the author's A host (laptop) are: wlp2s0: This is a wireless network card. enp1s0: Wired network card, the network card connected to host B. The rest has nothing to do with us, no need to care. 3. Configure the static IP of A. Edit the file #vim/etc/network/interfaces to configure a static IP address for interface enp1s0, as shown below (where #==========
 toss! Running DOS on Raspberry Pi
Jul 19, 2024 pm 05:23 PM
toss! Running DOS on Raspberry Pi
Jul 19, 2024 pm 05:23 PM
Different CPU architectures mean that running DOS on the Raspberry Pi is not easy, but it is not much trouble. FreeDOS may be familiar to everyone. It is a complete, free and well-compatible operating system for DOS. It can run some older DOS games or commercial software, and can also develop embedded applications. As long as the program can run on MS-DOS, it can run on FreeDOS. As the initiator and project coordinator of FreeDOS, many users will ask me questions as an insider. The question I get asked most often is: "Can FreeDOS run on a Raspberry Pi?" This question is not surprising. After all, Linux runs very well on the Raspberry Pi
