

squid+iptables建立internet网关

系统环境: RedHat 7.2 squid (http://squid-cache.org/) 1. 系统设置: 运行:setup 选择server 默认情况下iptables 和 ipchains都已经被选择了。请把ipchains去掉,只让iptables运行 2. 安装squid 建议从RedHat的安装光盘上安装 mount /mnt/cdrom cd /mnt/cd
系统环境:RedHat 7.2
squid (http://squid-cache.org/)
1. 系统设置:
运行:setup
选择server
默认情况下iptables 和 ipchains都已经被选择了。请把ipchains去掉,只让iptables运行
2. 安装squid
建议从RedHat的安装光盘上安装
mount /mnt/cdrom
cd /mnt/cdrom/RedHat/RPMS/
rpm -ivh squid-2.4.2.STABLE2-8.i386.rpm
启动squid:/etc/rc.d/init.d/squid start
***一般情况下默认安装的squid不用更改squid.conf文件就可以工作。
3. 为配合iptables做透明网关更改squid.conf文件
vi /etc/squid/squid.conf
更改以下行:
http_port 3128
httpd_accel_host virtual
httpd_accel_port 80
httpd_accel_with_proxy on
httpd_accel_uses_host_header on
4. iptables设置:
建议从这个脚本设置iptables规则。见附件。
./iptables
然后执行:
service iptables save
这样系统就会把刚才执行脚本的命令保存在 /etc/sysconfig/iptables里。下次系统就会
自动加载这些规则
如果你用这个脚本在你的系统上无法执行,可能是文件没有执行权限。
chmod a+x iptables使之可执行。(不要把这个文件拷贝到/etc/rc.d/init.d/下执行。)
#!/bin/sh
INET_IP="222.222.222.1" #代理服务器的internet ip地址
INET_IFACE="eth0" #代理服务的网卡设备
LAN_IP="192.168.100.4" #代理服务器的内部地址
LAN_IP_RANGE="192.168.100.0/16" #局域网的ip网段
LAN_BCAST_ADRESS="192.168.100.255" #局域网的广播地址
LAN_IFACE="eth1" 代理服务器内部网卡设备
LO_IFACE="lo"
LO_IP="127.0.0.1"
#
# IPTables Configuration.
#
IPTABLES="/sbin/iptables"
###########################################################################
#
# 2. Module loading.
#
#
# Needed to initially load modules
#
/sbin/depmod -a
#
# 2.1 Required modules
#加载需要的模块
/sbin/modprobe ip_tables
/sbin/modprobe ip_conntrack
/sbin/modprobe iptable_filter
/sbin/modprobe iptable_mangle
/sbin/modprobe iptable_nat
/sbin/modprobe ipt_LOG
/sbin/modprobe ipt_limit
/sbin/modprobe ipt_state
#
# 2.2 Non-Required modules
#
#/sbin/modprobe ipt_owner
#/sbin/modprobe ipt_REJECT
#/sbin/modprobe ipt_MASQUERADE
#/sbin/modprobe ip_conntrack_ftp
#/sbin/modprobe ip_conntrack_irc
###########################################################################
#
# 3. /proc set up.
#
#
# 3.1 Required proc configuration
#设置ip forward
echo "1" > /proc/sys/net/ipv4/ip_forward
#
# 3.2 Non-Required proc configuration
#
echo "1" > /proc/sys/net/ipv4/conf/all/rp_filter
#echo "1" > /proc/sys/net/ipv4/conf/all/proxy_arp
#echo "1" > /proc/sys/net/ipv4/ip_dynaddr
###########################################################################
#
# 4. rules set up.
#
######
# 4.1 Filter table
#
#
# 4.1.1 Set policies
#
$IPTABLES -P INPUT DROP
$IPTABLES -P OUTPUT DROP
$IPTABLES -P FORWARD DROP
#
# 4.1.2 Create userspecified chains
#
#
# Create chain for bad tcp packets
#
$IPTABLES -N bad_tcp_packets
#
# Create separate chains for ICMP, TCP and UDP to traverse
#
$IPTABLES -N allowed
$IPTABLES -N icmp_packets
$IPTABLES -N tcp_packets
$IPTABLES -N udpincoming_packets
#
# 4.1.3 Create content in userspecified chains
#
#
# bad_tcp_packets chain
#
$IPTABLES -A bad_tcp_packets -p tcp ! --syn -m state --state NEW -j LOG
--log-prefix "New not syn:"
$IPTABLES -A bad_tcp_packets -p tcp ! --syn -m state --state NEW -j DROP
#
# allowed chain
#
$IPTABLES -A allowed -p TCP --syn -j ACCEPT
$IPTABLES -A allowed -p TCP -m state --state ESTABLISHED,RELATED -j ACCEPT
$IPTABLES -A allowed -p TCP -j DROP
#
# ICMP rules
#
# Changed rules totally
$IPTABLES -A icmp_packets -p ICMP -s 0/0 --icmp-type 8 -j ACCEPT
$IPTABLES -A icmp_packets -p ICMP -s 0/0 --icmp-type 11 -j ACCEPT
#
# TCP rules
#
$IPTABLES -A tcp_packets -p TCP -s 0/0 --dport 21 -j allowed
$IPTABLES -A tcp_packets -p TCP -s 0/0 --dport 22 -j allowed
$IPTABLES -A tcp_packets -p TCP -s 0/0 --dport 80 -j allowed
$IPTABLES -A tcp_packets -p TCP -s 0/0 --dport 113 -j allowed
#
# UDP ports
#
# nondocumented commenting out of these rules
$IPTABLES -A udpincoming_packets -p UDP -s 0/0 --source-port 53 -j ACCEPT
#$IPTABLES -A udpincoming_packets -p UDP -s 0/0 --source-port 123 -j ACCEPT
$IPTABLES -A udpincoming_packets -p UDP -s 0/0 --source-port 2074 -j ACCEPT
$IPTABLES -A udpincoming_packets -p UDP -s 0/0 --source-port 4000 -j DROP #禁止客户使用OICQ
#
# 4.1.4 INPUT chain
#
#
# Bad TCP packets we don't want.
#
$IPTABLES -A INPUT -p tcp -j bad_tcp_packets
#
# Rules for incoming packets from the internet.
#
$IPTABLES -A INPUT -p ICMP -i $INET_IFACE -j icmp_packets
$IPTABLES -A INPUT -p TCP -i $INET_IFACE -j tcp_packets
$IPTABLES -A INPUT -p UDP -i $INET_IFACE -j udpincoming_packets
#
# Rules for special networks not part of the Internet
#
$IPTABLES -A INPUT -p ALL -i $LAN_IFACE -d $LAN_BCAST_ADRESS -j ACCEPT
$IPTABLES -A INPUT -p ALL -i $LO_IFACE -s $LO_IP -j ACCEPT
$IPTABLES -A INPUT -p ALL -i $LO_IFACE -s $LAN_IP -j ACCEPT
$IPTABLES -A INPUT -p ALL -i $LO_IFACE -s $INET_IP -j ACCEPT
$IPTABLES -A INPUT -p ALL -i $LAN_IFACE -s $LAN_IP_RANGE -j ACCEPT
$IPTABLES -A INPUT -p ALL -d $INET_IP -m state --state ESTABLISHED,RELATED
-j ACCEPT
#
# Log weird packets that don't match the above.
#
$IPTABLES -A INPUT -m limit --limit 3/minute --limit-burst 3 -j LOG
--log-level DEBUG --log-prefix "IPT INPUT packet died: "
#
# 4.1.5 FORWARD chain
#
#
# Bad TCP packets we don't want
#
$IPTABLES -A FORWARD -p tcp -j bad_tcp_packets
#
# Accept the packets we actually want to forward
#
$IPTABLES -A FORWARD -i $LAN_IFACE -j ACCEPT
$IPTABLES -A FORWARD -m state --state ESTABLISHED,RELATED -j ACCEPT
#
# Log weird packets that don't match the above.
#
$IPTABLES -A FORWARD -m limit --limit 3/minute --limit-burst 3 -j LOG
--log-level DEBUG --log-prefix "IPT FORWARD packet died: "
#
# 4.1.6 OUTPUT chain
#
#
# Bad TCP packets we don't want.
#
$IPTABLES -A OUTPUT -p tcp -j bad_tcp_packets
#
# Special OUTPUT rules to decide which IP's to allow.
#
$IPTABLES -A OUTPUT -p ALL -s $LO_IP -j ACCEPT
$IPTABLES -A OUTPUT -p ALL -s $LAN_IP -j ACCEPT
$IPTABLES -A OUTPUT -p ALL -s $INET_IP -j ACCEPT
#
# Log weird packets that don't match the above.
#
$IPTABLES -A OUTPUT -m limit --limit 3/minute --limit-burst 3 -j LOG
--log-level DEBUG --log-prefix "IPT OUTPUT packet died: "
######
# 4.2 nat table
#
#
# 4.2.1 Set policies
#
#
# 4.2.2 Create user specified chains
#
#
# 4.2.3 Create content in user specified chains
#
#
# 4.2.4 PREROUTING chain
#
$IPTABLES -t nat -I PREROUTING -m mac --mac-source 00:50:4c:3b:e6:fb -j DROP #禁止网卡的MAC为
#00:50:4c:3b:e6:fb访问internet
#
# 4.2.5 POSTROUTING chain
#
#$IPTABLES -t nat -A PREROUTING -i eth1 -p tcp -m tcp --dport 80 -j REDIRECT --to-ports 3128
#
$IPTABLES -t nat -A PREROUTING -s 192.168.100.0/24 -d 0/0 -p tcp --dport 80 -j DNAT --to 192.168.100.4:3128
#把客户的http的请求转发到squid的3128端口上(透明代理)
# Enable simple IP Forwarding and Network Address Translation
#
$IPTABLES -t nat -A POSTROUTING -o $INET_IFACE -j SNAT --to-source $INET_IP
#
# 4.2.6 OUTPUT chain
#
######
# 4.3 mangle table
#
#
# 4.3.1 Set policies
#
#
# 4.3.2 Create user specified chains
#
#
# 4.3.3 Create content in user specified chains
#
#
# 4.3.4 PREROUTING chain
#
$IPTABLES -t nat -A PREROUTING -s 0/0 -d 0/0 -p udp --destination-port 8000 -j DROP
#禁止客户访问OICQ服务器
文章选项: 友善列印 将这篇文章放置于备忘录中,待有空时回覆 通知板主
linux
注册会员
Reged: 11/11/02
篇文章: 17
Re: squid+iptables建立internet网关 [re: linux]
11/12/02 03:28 PM ()
编辑文章 编辑 回应这篇文章 回覆
# NETWORK OPTIONS
# -----------------------------------------------------------------------------
#http_port 3128
#icp_port 3130
#htcp_port 4827
#mcast_groups 239.128.16.128
#
#tcp_outgoing_address 0.0.0.0
#udp_incoming_address 0.0.0.0
#udp_outgoing_address 0.0.0.0
#cache_peer hostname type 3128 3130
#icp_query_timeout 0
#maximum_icp_query_timeout 2000
#mcast_icp_query_timeout 2000
#dead_peer_timeout 10 seconds
#hierarchy_stoplist cgi-bin ?
#acl QUERY urlpath_regex cgi-bin ?
#no_cache deny QUERY
cache_mem 16 MB
#cache_swap_low 90
#cache_swap_high 95
#maximum_object_size 4096 KB
#ipcache_size 1024
#ipcache_low 90
#ipcache_high 95
# TAG: fqdncache_size (number of entries)
# Maximum number of FQDN cache entries.
#fqdncache_size 1024
#
cache_dir ufs /var/spool/squid 100 16 256
cache_access_log /var/log/squid/access.log
#cache_log /var/log/squid/cache.log
#
#cache_store_log /var/log/squid/store.log
#
#cache_swap_log
#emulate_httpd_log off
#mime_table /etc/squid/mime.conf
#log_mime_hdrs off
#useragent_log none
#pid_filename /var/run/squid.pid
#debug_options ALL,1
#log_fqdn off
#client_netmask 255.255.255.255
#ftp_user Squid@
#ftp_list_width 32
#ftp_passive on
#cache_dns_program /usr/lib/squid/dnsserver
#dns_children 5
#dns_defnames off
#dns_nameservers none
#unlinkd_program /usr/lib/squid/unlinkd
#pinger_program /usr/lib/squid/pinger
#redirect_program none
#redirect_children 5
#redirect_rewrites_host_header on
#authenticate_children 5
#authenticate_ttl 3600
#authenticate_ip_ttl 0
#wais_relay_host localhost
#wais_relay_port 8000
#request_header_max_size 10 KB
#
#request_body_max_size 1 MB
#reply_body_max_size 0
#Default:
refresh_pattern ^ftp: 1440 20% 10080
refresh_pattern ^gopher: 1440 0% 1440
refresh_pattern . 0 20% 4320
#replacement_policy LFUDA
#
#reference_age 1 year
#quick_abort_min 16 KB
#quick_abort_max 16 KB
#quick_abort_pct 95
#negative_ttl 5 minutes
#positive_dns_ttl 6 hours
#negative_dns_ttl 5 minutes
#range_offset_limit 0 KB
#connect_timeout 120 seconds
#peer_connect_timeout 30 seconds
#siteselect_timeout 4 seconds
#read_timeout 15 minutes
#request_timeout 30 seconds
#client_lifetime 1 day
#half_closed_clients on
#pconn_timeout 120 seconds
#ident_timeout 10 seconds
#shutdown_lifetime 30 seconds
# ACCESS CONTROLS
# -----------------------------------------------------------------------------
#Examples:
#acl myexample dst_as 1241
#acl password proxy_auth REQUIRED
#
#Defaults:
acl all src 0.0.0.0/0.0.0.0
acl manager proto cache_object
acl localhost src 127.0.0.1/255.255.255.255
acl SSL_ports port 443 563
acl Safe_ports port 80 21 443 563 70 210 1025-65535
acl Safe_ports port 280 # http-mgmt
acl Safe_ports port 488 # gss-http
acl Safe_ports port 591 # filemaker
acl Safe_ports port 777 # multiling http
acl CONNECT method CONNECT
acl chat url_regex -i chat sex oicq
http_access deny chat
#禁止访问url里带chat,sex,oicq词的网站
# TAG: http_access
#Default configuration:
#http_access allow manager localhost
#http_access deny manager
#http_access deny !Safe_ports
#http_access deny CONNECT !SSL_ports
#
# INSERT YOUR OWN RULE(S) HERE TO ALLOW ACCESS FROM YOUR CLIENTS
#
http_access allow lan
# TAG: icp_access
# Reply to all ICP queries we receive
#
icp_access allow all
miss_access allow all
#proxy_auth_realm Squid proxy-caching web server
#ident_lookup_access deny all
#
cache_mgr master@cctk.net
cache_effective_user squid
cache_effective_group squid
#visible_hostname www-cache.foo.org
#unique_hostname www-cache1.foo.org
# TAG: hostname_aliases
# A list of other DNS names that your cache has.
#announce_period 1 day
#announce_host tracker.ircache.net
#announce_port 3131
# HTTPD-ACCELERATOR OPTIONS
# -----------------------------------------------------------------------------
httpd_accel_host 192.168.10.251
httpd_accel_port 80
httpd_accel_with_proxy on
httpd_accel_uses_host_header on
#dns_testnames netscape.com internic.net nlanr.net microsoft.com
#logfile_rotate 0
#append_domain .yourdomain.com
#tcp_recv_bufsize 0 bytes
#err_html_text
#memory_pools on
#forwarded_for on
#log_icp_queries on
#icp_hit_stale off
#minimum_direct_hops 4
#cachemgr_passwd secret shutdown
#cachemgr_passwd lesssssssecret info stats/objects
#cachemgr_passwd disable all
#store_avg_object_size 13 KB
#store_objects_per_bucket 50
#client_db on
#
#netdb_low 900
#netdb_high 1000
#netdb_ping_period 5 minutes
#query_icmp off
#test_reachability off
#buffered_logs off
#reload_into_ims off
#anonymize_headers
#fake_user_agent none
#error_directory /etc/squid/errors
#minimum_retry_timeout 5 seconds
#maximum_single_addr_tries 3
#snmp_port 3401
#Example:
#snmp_access allow snmppublic localhost
#snmp_access deny all
#snmp_incoming_address 0.0.0.0
#snmp_outgoing_address 0.0.0.0
#wccp_router 0.0.0.0
#wccp_version 4
#wccp_incoming_address 0.0.0.0
#wccp_outgoing_address 0.0.0.0
#delay_pools 0
#delay_pools 2 # 2 delay pools
#delay_class 1 2 # pool 1 is a class 2 pool
#delay_class 2 3 # pool 2 is a class 3 pool
#
#
#delay_access 1 allow some_big_clients
#delay_access 1 deny all
#delay_access 2 allow lotsa_little_clients
#delay_access 2 deny all
#delay_parameters 1 -1/-1 8000/8000
#delay_parameters 2 32000/32000 8000/8000 600/64000
#delay_initial_bucket_level 50
#incoming_icp_average 6
#incoming_http_average 4
#min_icp_poll_cnt 8
#min_http_poll_cnt 8
#uri_whitespace strip
#acl buggy_server url_regex ^http://....
#broken_posts allow buggy_server
nderstand what you are doing.
#prefer_direct on
#ignore_unknown_nameservers on
#digest_generation on
#digest_bits_per_entry 5
#digest_rewrite_period 1 hour
#digest_swapout_chunk_size 4096 bytes
#digest_rebuild_chunk_percentage 10
#client_persistent_connections on
#server_persistent_connections on

Hot AI Tools

Undresser.AI Undress
AI-powered app for creating realistic nude photos

AI Clothes Remover
Online AI tool for removing clothes from photos.

Undress AI Tool
Undress images for free

Clothoff.io
AI clothes remover

Video Face Swap
Swap faces in any video effortlessly with our completely free AI face swap tool!

Hot Article
Hot Tools

Notepad++7.3.1
Easy-to-use and free code editor

SublimeText3 Chinese version
Chinese version, very easy to use

Zend Studio 13.0.1
Powerful PHP integrated development environment

Dreamweaver CS6
Visual web development tools

SublimeText3 Mac version
God-level code editing software (SublimeText3)
Hot Topics


 Which one is faster, gateway or router?
Jun 19, 2023 pm 03:06 PM
Which one is faster, gateway or router?
Jun 19, 2023 pm 03:06 PM
The difference between gateway WiFi and router WiFi is mainly reflected in three aspects: function, number of terminals that support Internet access, and WiFi signal coverage. Gateway WiFi is a combination of optical modem and router. It has more functions, but it supports fewer Internet devices and the WiFi signal coverage is not as good as router WiFi.
 What is public IP
Sep 27, 2021 am 10:30 AM
What is public IP
Sep 27, 2021 am 10:30 AM
Public IP refers to a non-reserved address connected to the Internet using the public network, and can be freely accessed by other computers on the Internet. Each computer on the Internet has an independent IP address. This IP address uniquely identifies a computer on the Internet. This IP address refers to the public IP address.
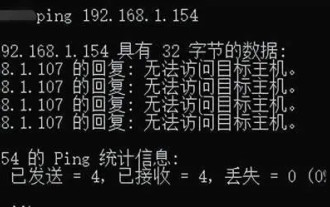 Why can't I ping the gateway? Why can't ping?
Mar 13, 2024 pm 03:40 PM
Why can't I ping the gateway? Why can't ping?
Mar 13, 2024 pm 03:40 PM
The network cannot ping, what's going on? In fact, this is a very common problem. It is mainly divided into two situations: pinging fails on the same network segment and pinging fails on different network segments. Let’s take a look at the details below. There are usually two reasons why the ping command cannot connect to the same network segment: one is an IP address that cannot be pinged in the same network segment, and the other is an IP address that cannot be pinged in a different network segment. These two situations have different solutions. First, let’s discuss the situation where ping fails within the same network segment. 1. Ping fails on the same network segment, and the result is "Unable to access the target host." The destination IP and source IP are on the same network segment, and the ping result is &l
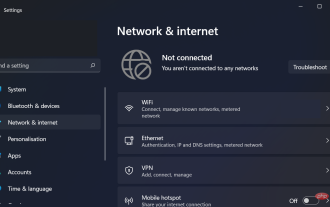 How to set up Windows 11 without an Internet connection
Apr 15, 2023 am 10:46 AM
How to set up Windows 11 without an Internet connection
Apr 15, 2023 am 10:46 AM
Starting with build 22557 and later, Windows 11 requires an Internet connection to complete first-time setup, also known as the Out-of-Box Experience (OOBE) for Home and Pro editions, although there is a way to bypass this requirement entirely. Since Microsoft wants users to connect their computers to their Microsoft accounts, the company is making changes to the initial Windows 11 setup that will make it nearly impossible to proceed with a clean installation without an Internet connection. Alternatively, if Settings detects that the device has no network connection, you will be sent to the Oops, you lost your Internet connection screen. If you click on the retry option you will see Connect to the Internet again
 What is the communication protocol of the internet?
Dec 24, 2020 pm 02:53 PM
What is the communication protocol of the internet?
Dec 24, 2020 pm 02:53 PM
The main communication protocol used by the Internet is "TCP/IP protocol", TCP/IP transmission protocol, namely transmission control/network protocol, also called network communication protocol; it is the most basic communication protocol in the use of the network, TCP/IP The IP transport protocol stipulates the standards and methods for communication between various parts of the Internet.
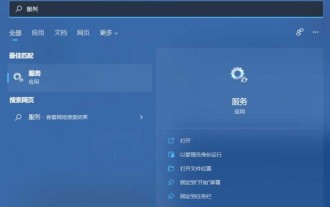 How to solve the problem of unable to access the Internet in win11? Guide to solving the problem of Win11 computer being unable to connect to the internet
Jan 29, 2024 pm 08:57 PM
How to solve the problem of unable to access the Internet in win11? Guide to solving the problem of Win11 computer being unable to connect to the internet
Jan 29, 2024 pm 08:57 PM
When we use computers, we are all connected to the Internet. Only with the Internet can we surf the Internet. Recently, many users have asked me how to solve the problem of Win11 unable to connect to the Internet? Users can directly open the best matching service application provided by the system to set it up. Let this site carefully introduce to users the solution to the problem that Win11 computers cannot access the Internet. Solution 1 for Win11 computers unable to access the internet: You can press the Win+S key combination, or click the search icon next to the bottom taskbar to open the Windows search window. Enter "service" in the search box, and then click to open the best matching service application given by the system. Method Two
 Understand the importance of establishing linked files in Linux
Feb 22, 2024 pm 07:24 PM
Understand the importance of establishing linked files in Linux
Feb 22, 2024 pm 07:24 PM
Title: In-depth discussion of the importance and examples of establishing link files in Linux. In the Linux operating system, link files are a very useful concept. It can help users better organize and manage data in the file system and improve file accessibility. Accessibility and flexibility. Understanding how to create link files in Linux is crucial for system administrators and developers. This article will delve into the importance of establishing link files in Linux and demonstrate its usage and role through specific code examples. 1.What is
 How to create a WeChat group How to create a WeChat group
Feb 22, 2024 pm 03:46 PM
How to create a WeChat group How to create a WeChat group
Feb 22, 2024 pm 03:46 PM
Select the plus button on the homepage, then select Start a group chat, check the contacts you want to create a group, and then complete. Tutorial Applicable Model: iPhone13 System: IOS15.3 Version: WeChat 8.0.20 Analysis 1 First open WeChat and click the plus button in the upper right corner of the homepage. 2 Next, click the option to initiate a group chat in the pop-up window. 3Finally, check the contacts you want to create a group on the page and click Finish. Supplement: What is WeChat group chat? 1 WeChat chat group is a multi-person chat and communication network platform developed by Tencent. We can use the Internet to quickly transmit voice messages, short videos, high-definition pictures and text content. You can also use WeChat to communicate with friends in more colorful forms such as short messages, mobile MMS, etc.
