

RHEL6上课笔记之acl

Passwd,shadow,gshadow,group 这四个文件是 PAM ( portable authentication module )的数据库。 pam 的文件都是 (.so) 结尾的。 cd /lib64/security 目录中有很多 .so 的文件。其中到迄今为止都没有 bug 的是 pam_unix.so , pam_userdb.so 是的 pam_unix.
Passwd,shadow,gshadow,group 这四个文件是PAM(portable authentication module)的数据库。
pam的文件都是(.so)结尾的。
cd /lib64/security目录中有很多.so的文件。其中到迄今为止都没有bug的是pam_unix.so,pam_userdb.so是的pam_unix.so助手。
PAM的配置文件在/etc/pam.d/下。现在我们来看其中的一个配置文件etc/pam.d/login/。
login中有四类
auth:密码正确性。
passwd:密码最多能用的时间。
account:帐号是否合法。
session:性能(如,分配多少cpu)。
其中有一行是:
account required(必要条件) pam_nologin.so
在etc目录下touch 一个名为nologin的文件,那么用除root以外的用户登入就会提示“鉴定错误”(免打扰模式)。 删掉就恢复正常。
单单针对root的tty:
不让root在某个tty窗口登入。可以配置/etc/securetty的白名单配置文件。例如:如果不想让root在tty4登入,那么就在securetty白名单中把tty4注释掉。
也可以阻止其它用户在某个tty登入。需要配置/etc/security/access.conf配置文件。配置方法如下:
#-:ALL EXCEPT (wheel) shutdown sync:LOCAL
- : gg : tty4 # 不让gg用户在tty4上登入,其它tty可以。(也可以在这里配置root)。配置完access.conf文件后还需要配置一个文件,就是在/etc/pam.d/login文件中加上一句:account required pam_nologin.so
acl:对文件设置acl
给文件添加第二属主。
使用root 用户在tmp1 下
[root@station10 tmp1]# echo “helo body” >> file
[root@station10 tmp1]# getfacl file (查看文件属主)
# file: file
# owner: root
# group: root
user::rw-
group::r--
mask::r--
other::r--
[root@station10 tmp1]# su - eg
[eg@station10 ~]$ cd /root/tmp1/
[eg@station10 tmp1]$ echo 111 >> file
-bash: file: 权限不够
[root@station10 tmp1]# setfacl -m u:eg:rw file (-m 修改。用户:用户名:权限)
[root@station10 tmp1]# getfacl file
# file: file
# owner: root
# group: root
user::rw-
user:eg:rw- #eg用户
group::r--
mask::rw-
other::r--
[root@station10 tmp1]# su - eg
[eg@station10 ~]$ echo xxx >> /root/tmp1/file
[eg@station10 ~]$ cat /root/tmp1/file
helo body
xxx
在做以上实验时如果在执行 setfacl -m u:eg:rw file 的时候提示 不支持的操作,那是因为分区不具备acl品质。那么就需要给分区添上acl的品质。如下:
[root@station10 tmp1]# tune2fs -l /dev/sda3
……
Default mount options: user_xattr acl # 具备acl品质
……
如果没有该品质那么就要给它加上。第1种方式:“ tune2fs -o acl /dev/sda3 “ 添上。第二种方式:使用手工mount -o alc /dev/sda3 。第三种方式:开机自动挂载上,配置fstab如下图:使用mount -a 验证。Mount 查看是否具有acl品质。
defaults后面可以有(noexec,nodev)参数。当然这些参数也可以在挂载的时候写上或则fstab都行。
noexec:如果加了此参数那么在该分区就不能够使用( ./ ) 执行任何可执行文件。就会提示权限不够。
nodev:???
[root@station10 tmp1]# mknod egfile b 8 7
[root@station10 tmp1]# mount egfile /mnt1
/tmp1/egfile
/dev/sda7
acl:对目录设置acl
我们新建一个文件夹,然后使用刚刚对文件增加第二属主的方式来做。如下:
[root@station10 /]# mount /dev/sda7 /mnt
[root@station10 mnt]# mkdir dir
[root@station10 mnt]# getfacl dir/
# file: dir/
# owner: root
# group: root
user::rwx
group::r-x
other::r-x
[root@station10 mnt]# setfacl -m u:eg:rwx dir
setfacl: dir: 不支持的操作 #由于刚刚挂载的时候没有添加acl 品质的结果(一定要注意,如果没有acl 品质那么就不能做acl。)
[root@station10 mnt]# tune2fs -o acl /dev/sda7
[root@station10 mnt]# tune2fs -l /dev/sda7
……
Default mount options: acl #有了
……
[root@station10 /]# umount /mnt
[root@station10 /]# mount /dev/sda7 /mnt
[root@station10 mnt]# setfacl -m u:eg:rwx dir
[root@station10 mnt]# getfacl dir/
# file: dir/
# owner: root
# group: root
user::rwx
user:eg:rwx
group::r-x
mask::rwx
other::r-x
[root@station10 mnt]# cd dir/
[root@station10 dir]# mkdir dir1
[root@station10 dir]# getfacl dir1/
# file: dir1/
# owner: root
# group: root
user::rwx
group::r-x
other::r-x
#我们刚刚用root建的第一个文件夹(dir)我给它添加了第二个属主。现在需要再到dir 目录下再建立一个文件夹(dir1)并且也让它属于eg 用户,可是建完之后它并不属于eg,而是单单属于root。那我又得给它增加第二属主太麻烦了。可以使用一种方法让它一直保持第一层的特性。如下所示:
[root@station10 mnt]# ls -ld dir/
drwxrwxr-x+ 3 root root 1024 6月 4 22:27 dir/
[root@station10 dir]# ls -ld dir1/
drwxr-xr-x. 2 root root 1024 6月 4 22:36 dir1/
看到dir 与dir1 的ls -ld 有点不一样,那是因为dir1 没有保持dir 的特性(+)。那接下来我就让它保持dir 的特性。
就是在建立文件夹的时候加上一个d,就可以让它里面建立的第二层第三层等等都保持第一层的特性。如下:
[root@station10 mnt]# mkdir Docu
[root@station10 mnt]# setfacl -m d:u:eg:rwx Docu
[root@station10 mnt]# getfacl Docu/
# file: Docu/
# owner: root
# group: root
user::rwx
group::r-x
other::r-x
default:user::rwx
default:user:eg:rwx
default:group::r-x
default:mask::rwx
default:other::r-x
[root@station10 mnt]# cd Docu/
[root@station10 Docu]# mkdir Docu1
[root@station10 Docu]# getfacl Docu1/
# file: Docu1/
# owner: root
# group: root
user::rwx
user:eg:rwx
group::r-x
mask::rwx
other::r-x
default:user::rwx
default:user:eg:rwx
default:group::r-x
default:mask::rwx
default:other::r-x
#观察到实验的结果了吧。
现在我想把第一层文件恢复原来的样子:
[root@station10 mnt]# setfacl -x d:u:eg Docu/ # (-x:删除)恢复只有一个属主,还留有defaults。
[root@station10 mnt]# setfacl -b Docu/ #恢复正常。可以直接使用-b(-b 级别高于-x)。
s位程序:可执行文件
文件被谁运行就归谁所有:
[root@station10 ~]# /bin/sleep 1000
[root@station10 ~]# ps -eo command,group,user | grep sleep | grep -v grep
/bin/sleep 1000 root root
[eg@station10 ~]$ /bin/sleep 1000
[eg@station10 ~]$ ps -eo command,group,user | grep sleep | grep -v grep
/bin/sleep 1000 eg eg
观察如上实验,就可发现不管是root还是eg 运行sleep ,它的属主都是运行者的。
在工业环境中,有时会要求我们用某个用户来运行某个程序,但是这个程序却不归我们这个用户所有。也就只有S 位程序能够实现。
[root@station10 ~]# ls -l /bin/sleep
-rwxr-xr-x. 1 root root 27880 6月 14 2010 /bin/sleep
[root@station10 ~]# chmod 4755 /bin/sleep
[root@station10 ~]# ls -l /bin/sleep
[eg@station10 ~]$ /bin/sleep 1000
[eg@station10 ~]$ ps -eo command,group,user | grep sleep | grep -v grep
/bin/sleep 1000 eg root
完全和刚刚的相反了,属主是root,而不是eg。(也可以是组)
s位程序:目录
对于目录而言,研究s程序只研究组。
[root@station10 mnt]# mkdir dir
[root@station10 mnt]# chown wang5:eg dir/ #dir属于wang5用户,属于eg组。
[root@station10 mnt]# chmod 2755 dir/
[root@station10 mnt]# ls -ld dir/
drwxr-sr-x. 2 wang5 eg 1024 6月 4 23:40 dir/
[root@station10 mnt]# cd dir
[root@station10 dir]# mkdir d1 #在dir里新建d1
[root@station10 dir]# ls -ld d1/
drwxr-sr-x. 2 root eg 1024 6月 4 23:40 d1/
root 建立的都必须归eg 组。连root都必须尊守。
原理:新建内节点。
[root@station10 dir]# cp -rp /etc/ ./
[root@station10 dir]# ls -ld *
drwxr-sr-x. 2 root eg 1024 6月 5 09:19 d1
drwxr-sr-x. 117 root root 8192 6月 5 09:19 etc
漏洞:移动或拷贝文件,组就会归移动者。
Other t位 (对文件的保护)
t 位 只对777目录,一般是tmp。
[root@station10 mnt]# mkdir tmp
[root@station10 mnt]# chmod 1777 tmp
[root@station10 mnt]# ls -ld tmp/
[root@station10 mnt]# cd tmp/
[root@station10 tmp]# touch 1.txt
[root@station10 tmp]# ls -l 1.txt
-rw-r--r--. 1 root root 0 Jun 6 21:55 1.txt
[root@station10 tmp]# su – wang5
[wang5@station10 ~]$ cd /mnt/tmp/
[wang5@station10 tmp]$ rm -rf 1.txt
rm: 无法删除"1.txt": 不允许的操作
增加了t位,是对777目录的保护,只能是自己本身和root可以删除外其它用户不可删除。
REDHAT6

Hot AI Tools

Undresser.AI Undress
AI-powered app for creating realistic nude photos

AI Clothes Remover
Online AI tool for removing clothes from photos.

Undress AI Tool
Undress images for free

Clothoff.io
AI clothes remover

Video Face Swap
Swap faces in any video effortlessly with our completely free AI face swap tool!

Hot Article
Hot Tools

Notepad++7.3.1
Easy-to-use and free code editor

SublimeText3 Chinese version
Chinese version, very easy to use

Zend Studio 13.0.1
Powerful PHP integrated development environment

Dreamweaver CS6
Visual web development tools

SublimeText3 Mac version
God-level code editing software (SublimeText3)
Hot Topics


 How to delete Xiaohongshu notes
Mar 21, 2024 pm 08:12 PM
How to delete Xiaohongshu notes
Mar 21, 2024 pm 08:12 PM
How to delete Xiaohongshu notes? Notes can be edited in the Xiaohongshu APP. Most users don’t know how to delete Xiaohongshu notes. Next, the editor brings users pictures and texts on how to delete Xiaohongshu notes. Tutorial, interested users come and take a look! Xiaohongshu usage tutorial How to delete Xiaohongshu notes 1. First open the Xiaohongshu APP and enter the main page, select [Me] in the lower right corner to enter the special area; 2. Then in the My area, click on the note page shown in the picture below , select the note you want to delete; 3. Enter the note page, click [three dots] in the upper right corner; 4. Finally, the function bar will expand at the bottom, click [Delete] to complete.
 Can deleted notes on Xiaohongshu be recovered?
Oct 31, 2023 pm 05:36 PM
Can deleted notes on Xiaohongshu be recovered?
Oct 31, 2023 pm 05:36 PM
Notes deleted from Xiaohongshu cannot be recovered. As a knowledge sharing and shopping platform, Xiaohongshu provides users with the function of recording notes and collecting useful information. According to Xiaohongshu’s official statement, deleted notes cannot be recovered. The Xiaohongshu platform does not provide a dedicated note recovery function. This means that once a note is deleted in Xiaohongshu, whether it is accidentally deleted or for other reasons, it is generally impossible to retrieve the deleted content from the platform. If you encounter special circumstances, you can try to contact Xiaohongshu’s customer service team to see if they can help solve the problem.
 What should I do if the notes I posted on Xiaohongshu are missing? What's the reason why the notes it just sent can't be found?
Mar 21, 2024 pm 09:30 PM
What should I do if the notes I posted on Xiaohongshu are missing? What's the reason why the notes it just sent can't be found?
Mar 21, 2024 pm 09:30 PM
As a Xiaohongshu user, we have all encountered the situation where published notes suddenly disappeared, which is undoubtedly confusing and worrying. In this case, what should we do? This article will focus on the topic of "What to do if the notes published by Xiaohongshu are missing" and give you a detailed answer. 1. What should I do if the notes published by Xiaohongshu are missing? First, don't panic. If you find that your notes are missing, staying calm is key and don't panic. This may be caused by platform system failure or operational errors. Checking release records is easy. Just open the Xiaohongshu App and click "Me" → "Publish" → "All Publications" to view your own publishing records. Here you can easily find previously published notes. 3.Repost. If found
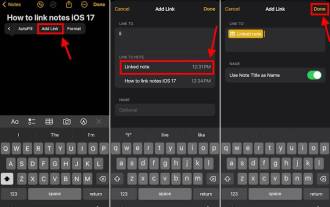 How to connect Apple Notes on iPhone in the latest iOS 17 system
Sep 22, 2023 pm 05:01 PM
How to connect Apple Notes on iPhone in the latest iOS 17 system
Sep 22, 2023 pm 05:01 PM
Link AppleNotes on iPhone using the Add Link feature. Notes: You can only create links between Apple Notes on iPhone if you have iOS17 installed. Open the Notes app on your iPhone. Now, open the note where you want to add the link. You can also choose to create a new note. Click anywhere on the screen. This will show you a menu. Click the arrow on the right to see the "Add link" option. click it. Now you can type the name of the note or the web page URL. Then, click Done in the upper right corner and the added link will appear in the note. If you want to add a link to a word, just double-click the word to select it, select "Add Link" and press
 How to add product links in notes in Xiaohongshu Tutorial on adding product links in notes in Xiaohongshu
Mar 12, 2024 am 10:40 AM
How to add product links in notes in Xiaohongshu Tutorial on adding product links in notes in Xiaohongshu
Mar 12, 2024 am 10:40 AM
How to add product links in notes in Xiaohongshu? In the Xiaohongshu app, users can not only browse various contents but also shop, so there is a lot of content about shopping recommendations and good product sharing in this app. If If you are an expert on this app, you can also share some shopping experiences, find merchants for cooperation, add links in notes, etc. Many people are willing to use this app for shopping, because it is not only convenient, but also has many Experts will make some recommendations. You can browse interesting content and see if there are any clothing products that suit you. Let’s take a look at how to add product links to notes! How to add product links to Xiaohongshu Notes Open the app on the desktop of your mobile phone. Click on the app homepage
 HTTP verb and path based ACL configuration in Nginx reverse proxy
Jun 10, 2023 am 09:22 AM
HTTP verb and path based ACL configuration in Nginx reverse proxy
Jun 10, 2023 am 09:22 AM
Nginx is a high-performance web server and reverse proxy server. Its powerful configuration capabilities enable Nginx to be used in a variety of different scenarios. Among them, ACL configuration based on HTTP verbs and paths is a commonly used method in Nginx reverse proxy. This article will introduce its principle and implementation method. 1. The concept of ACL ACL (AccessControlList) is an access control list, which is a rule-based access control technology. By defining some rules, different access
 How to use ACL (Access Control List) for permission control in Zend Framework
Jul 29, 2023 am 09:24 AM
How to use ACL (Access Control List) for permission control in Zend Framework
Jul 29, 2023 am 09:24 AM
How to use ACL (AccessControlList) for permission control in Zend Framework Introduction: In a web application, permission control is a crucial function. It ensures that users can only access the pages and features they are authorized to access and prevents unauthorized access. The Zend framework provides a convenient way to implement permission control, using the ACL (AccessControlList) component. This article will introduce how to use ACL in Zend Framework
 How to publish notes tutorial on Xiaohongshu? Can it block people by posting notes?
Mar 25, 2024 pm 03:20 PM
How to publish notes tutorial on Xiaohongshu? Can it block people by posting notes?
Mar 25, 2024 pm 03:20 PM
As a lifestyle sharing platform, Xiaohongshu covers notes in various fields such as food, travel, and beauty. Many users want to share their notes on Xiaohongshu but don’t know how to do it. In this article, we will detail the process of posting notes on Xiaohongshu and explore how to block specific users on the platform. 1. How to publish notes tutorial on Xiaohongshu? 1. Register and log in: First, you need to download the Xiaohongshu APP on your mobile phone and complete the registration and login. It is very important to complete your personal information in the personal center. By uploading your avatar, filling in your nickname and personal introduction, you can make it easier for other users to understand your information, and also help them pay better attention to your notes. 3. Select the publishing channel: At the bottom of the homepage, click the "Send Notes" button and select the channel you want to publish.
