
 Web Front-end
HTML Tutorial
Adobe Brackets simple use graphic tutorial_HTML/Xhtml_web page production
Web Front-end
HTML Tutorial
Adobe Brackets simple use graphic tutorial_HTML/Xhtml_web page production
Adobe Brackets simple use graphic tutorial_HTML/Xhtml_web page production

Adobe Brackets is an open source, simple and powerful integrated development environment for HTML, CSS and JavaScript. It supports the addition of plug-ins to provide additional functional extensions. Currently available plug-ins include support for adding debugging, browser-specific CSS prefixes, JSDoc annotations, etc. The editor below briefly introduces the use and settings of Brackets:
1. Project settings
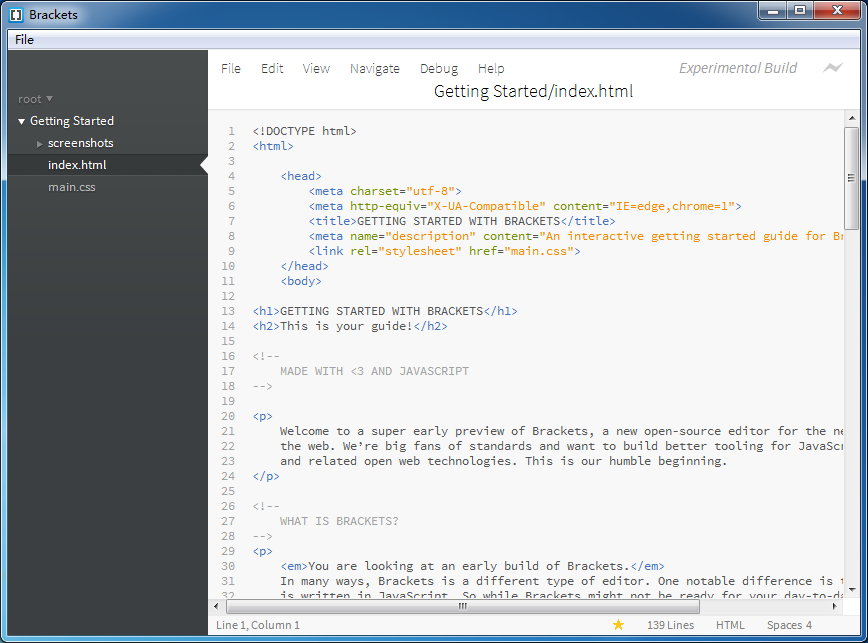
1. Open Brackets. The entire interface is very simple. The top menu bar only provides the file > exit function to exit the editor. On the left is the file tree of the project organization structure. Use Ctrl/Cmd Shift H to call out and close the file tree. The right side is the editing area, the upper part is the toolbar, the middle part is the document area, and the lower part is the prompt area.
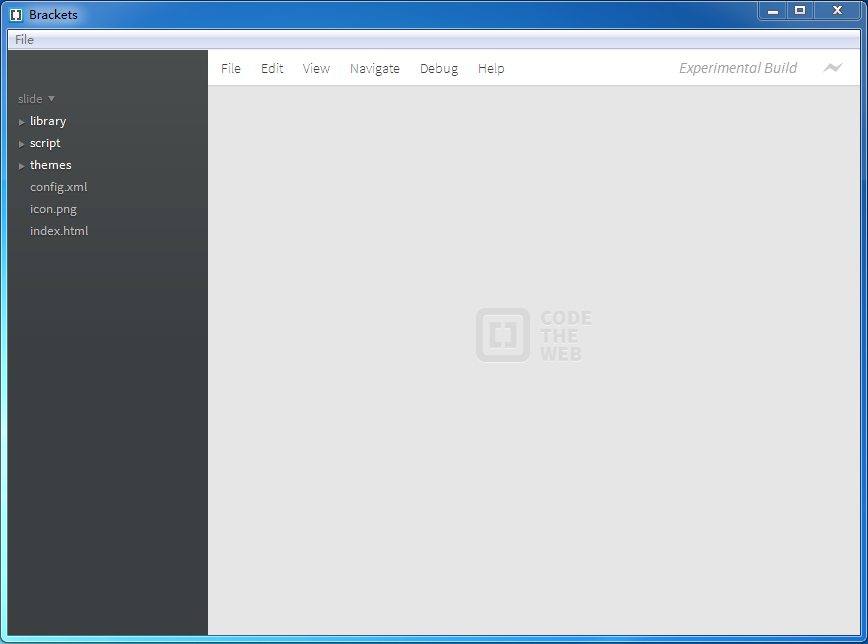
2. Open the project Use the File > Open Folder command to open the project folder. The file tree project name on the left is updated to the project folder name, and the file tree is updated to the file tree of the current project.
Left-click on the project name to pop up the project editing menu. The editing menu will display historical projects and project editing commands.
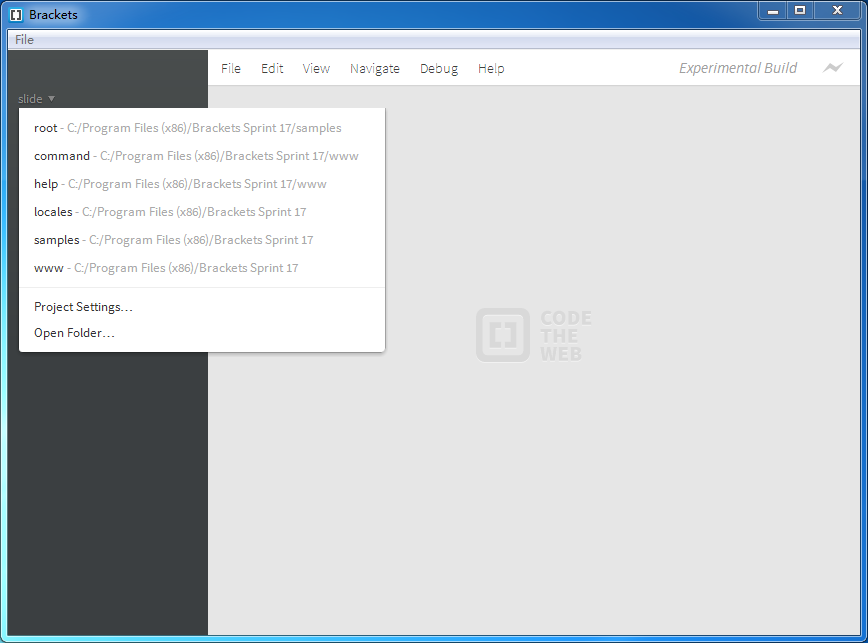
Open Folder command: Open a new project.
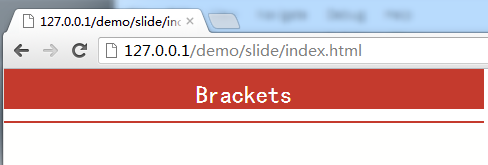
Project Settings command: Set the web address of the current project, which will be used during page debugging and preview.
Setting requirements: It must be a web address starting with http://.
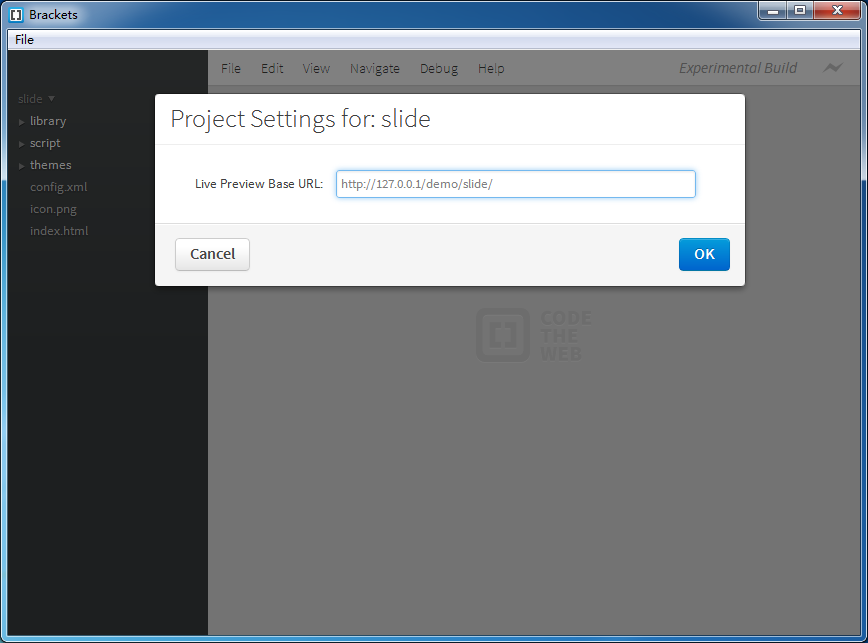
As shown in the picture above, when set to http://127.0.0.1/demo/slide, the corresponding page will be opened through the web address during browser preview.
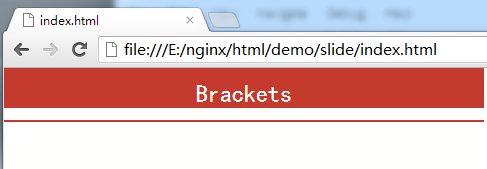
If there is no setting, the page will be opened through the drive letter address of the file.
2. File editing
Click index.html in the file tree to open the index.html document in the main area.
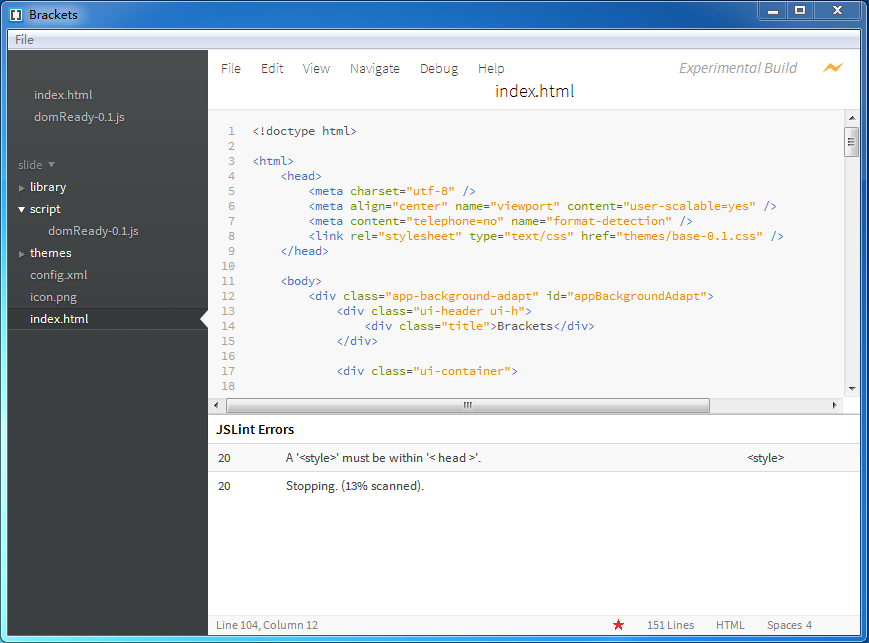
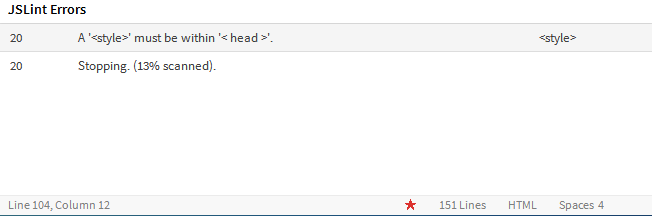
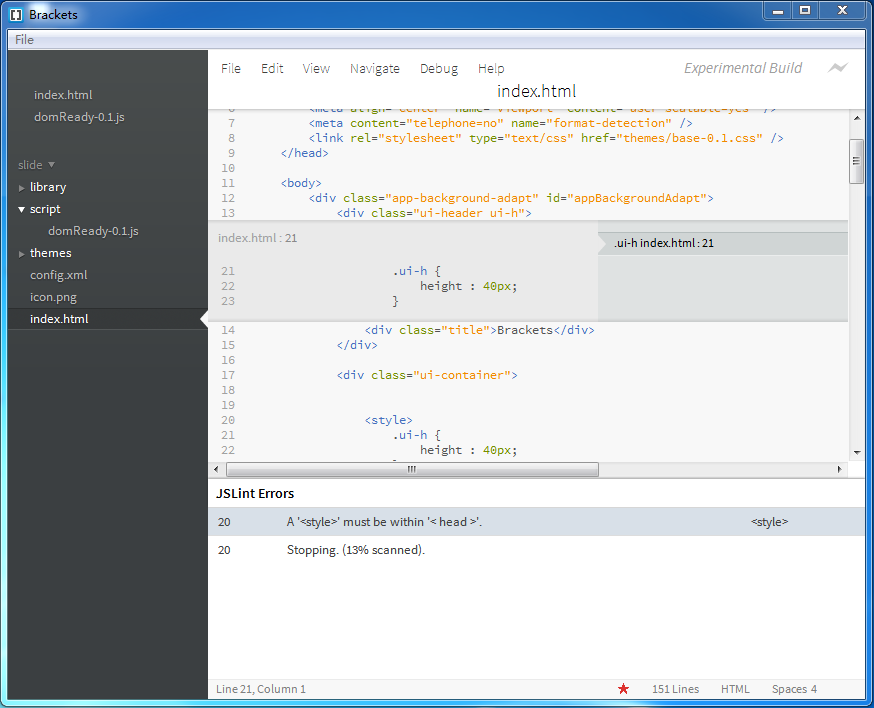
1. Brackest will detect whether the document complies with the HTML specification. As shown in the figure below, there is a style block on line 20 that needs to be placed in the head node.
2. Place the cursor on the label name of a class or id attribute, and press Ctrl/Cmd E ("Edit") or exit editing. Brackets will search all CSS files under the project, and then open an embedded editor embedded in the HTML file, allowing you to quickly modify the CSS code.
When the current class/id tag has multiple style definitions, the editing window provides a switch button to switch the display style. You can also use the Alt Up/Down arrow keys to switch.
It should be noted that Brackets will detect the current HTML document and all CSS files under the project to find class/id styles, even if some CSS files are not referenced in the current HTML document.
3. Brackets also supports quick preview/editing of JS object definitions. Place the cursor on a js function name and press Ctrl/Cmd E ("Edit") or exit editing.

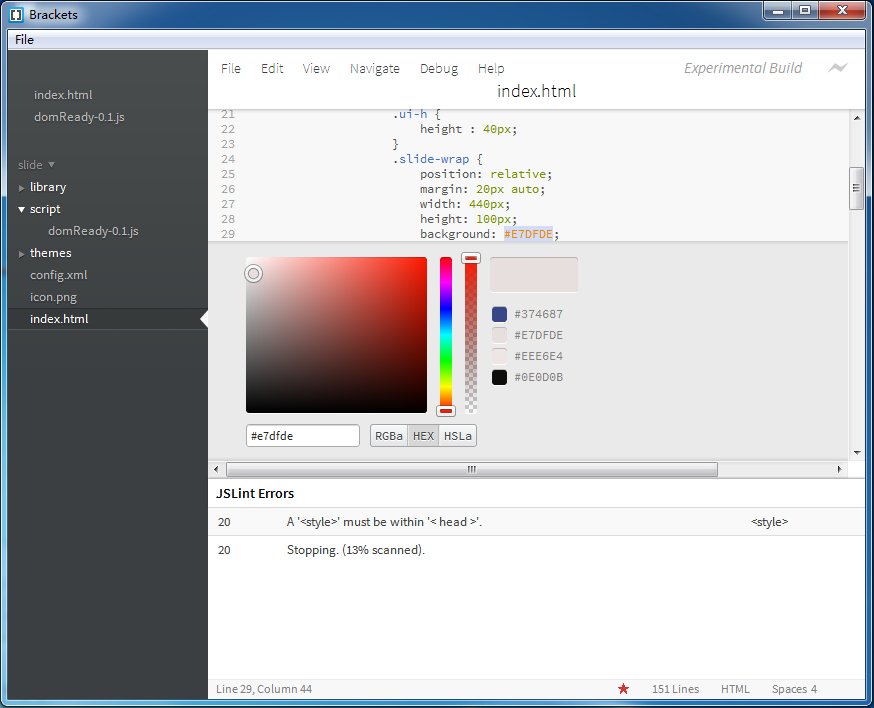
4. Brackets has a built-in color picker, providing color coding forms of RGBa, HEX, and HSLa. Place the cursor on a color code and press Ctrl/Cmd E ("Edit"). To exit the color picker window, use the Esc key.
3. Instant preview
Brackets provides real-time preview of web pages. When using this function, Brackets calls the Chrome browser to open the current page. After that, after modifying the html, css, and javascript and saving them, the modified content will be immediately responded to the page in the browser, without the need to manually refresh the page. This is one of the biggest highlights of Brackets. Coders with two monitors are blessed. Brackets and chrome can be displayed in split-screen mode, allowing for instant preview of modifications without the need to switch editors/browsers and refresh the page.
Some limitations of the current instant preview function:
It only works with Chrome browser as the target browser, you must have Chrome installed.
It relies on the remote debugging feature in Chrome, which is enabled with a command line flag. On a Mac, if you are already using Chrome and launch Instant Preview, Brackets will ask you if you want to restart Chrome to enable remote debugging.
Only one HTML file can be previewed at the same time - if you switch to another HTML file, Brackets will close the original preview.
4. Some shortcut keys
Ctrl/Cmd Shift H can call out and close the file tree
Ctrl/Cmd E Quick preview/edit css style/javascript function
Ctrl/Cmd /- enlarge or reduce the font size of the editing area
Ctrl/Cmd 0 reset the font size of the editing area
Ctrl/Cmd Alt P opens the instant preview function
Ctrl/Cmd / line comment
Ctrl/Cmd Alt / Block comment
Note: Only block comment shortcut keys can be used when commenting on css code and html code

Hot AI Tools

Undresser.AI Undress
AI-powered app for creating realistic nude photos

AI Clothes Remover
Online AI tool for removing clothes from photos.

Undress AI Tool
Undress images for free

Clothoff.io
AI clothes remover

Video Face Swap
Swap faces in any video effortlessly with our completely free AI face swap tool!

Hot Article
Hot Tools

Notepad++7.3.1
Easy-to-use and free code editor

SublimeText3 Chinese version
Chinese version, very easy to use

Zend Studio 13.0.1
Powerful PHP integrated development environment

Dreamweaver CS6
Visual web development tools

SublimeText3 Mac version
God-level code editing software (SublimeText3)
Hot Topics


 How to disable automatic updates in Adobe Acrobat Reader
Mar 14, 2024 pm 08:58 PM
How to disable automatic updates in Adobe Acrobat Reader
Mar 14, 2024 pm 08:58 PM
AdobeAcrobatReader is a powerful tool for viewing and editing PDF files. The software is available in both free and paid versions. If you need to use Adobe Acrobat Reader to edit PDF files, you need to purchase its paid plan. To keep Adobe Acrobat Reader up to date with the latest enhancements and security fixes, the software enables automatic updates by default. However, you can choose to disable automatic updates if you wish. This article will show you how to disable automatic updates in Adobe Acrobat Reader. How to disable automatic updates in Adobe Acrobat Reader us
 How to insert pictures in Adobe Acrobat Pro9-How to insert pictures in Adobe Acrobat Pro9
Mar 04, 2024 pm 11:50 PM
How to insert pictures in Adobe Acrobat Pro9-How to insert pictures in Adobe Acrobat Pro9
Mar 04, 2024 pm 11:50 PM
Are you also using Adobe Acrobat Pro 9 software in your office? But do you know how to insert pictures in Adobe Acrobat Pro 9? Below, the editor will bring you the method of inserting pictures in Adobe Acrobat Pro 9. If you are interested, take a look below. Open the Sample.pdf document in Adobe Acrobat Pro9, click "Tools" - "Content" - select "Edit Object" on the right side of the document, and the mouse cursor changes to a solid arrow + a small box in the lower right corner. Right-click in an empty space of the document and select Insert Image. A dialog box will pop up, then select the ElenaGilbert.JPEG image file in the dialog box (please confirm
 How to set the keyboard increment in Adobe Illustrator CS6 - How to set the keyboard increment in Adobe Illustrator CS6
Mar 04, 2024 pm 06:04 PM
How to set the keyboard increment in Adobe Illustrator CS6 - How to set the keyboard increment in Adobe Illustrator CS6
Mar 04, 2024 pm 06:04 PM
Many users are using the Adobe Illustrator CS6 software in their offices, so do you know how to set the keyboard increment in Adobe Illustrator CS6? Then, the editor will bring you the method of setting the keyboard increment in Adobe Illustrator CS6. Interested users can take a look below. Step 1: Start Adobe Illustrator CS6 software, as shown in the figure below. Step 2: In the menu bar, click the [Edit] → [Preferences] → [General] command in sequence. Step 3: The [Keyboard Increment] dialog box pops up, enter the required number in the [Keyboard Increment] text box, and finally click the [OK] button. Step 4: Use the shortcut key [Ctrl]
 Adobe is shutting down two Android Photoshop apps, recommending users to use Photoshop Express
May 05, 2024 pm 12:43 PM
Adobe is shutting down two Android Photoshop apps, recommending users to use Photoshop Express
May 05, 2024 pm 12:43 PM
According to news on May 5, Adobe recently issued a notice to users indicating that it will officially close the Photoshop Mix and Photoshop Fix applications on the Android platform on June 4, 2024. In recent years, Adobe has shifted its Photoshop product strategy on mobile platforms, from launching independent tools for specific usage scenarios, such as PhotoshopMix and PhotoshopFix, to providing comprehensive Photoshop functions in the form of suites on Android, iOS, and the web. PhotoshopMix once made it possible for users to easily combine two or more pictures, while PhotoshopFix provides
 Sora comes to Adobe video editing software! The new version of Premiere Pro opens the era of AI editing
Apr 16, 2024 pm 03:20 PM
Sora comes to Adobe video editing software! The new version of Premiere Pro opens the era of AI editing
Apr 16, 2024 pm 03:20 PM
Sora is going to be integrated into Adobe video editing software. In the newly released PremierPro concept demonstration, Adobe showed the results of its cooperation with OpenAI: in addition to the main lens, a B-roll auxiliary lens was completely generated by Sora. In addition to Sora, other popular AI video tools Runway and Pika will also be available as options. Runway is used similarly to Sora in the demonstration and can generate a new auxiliary shot. Pika can naturally extend existing lenses for several seconds. It should be emphasized that these features are still in the early preview and research stage, and it has not yet been revealed when they will be released. In comparison, Adobe’s own AI product Firefly
 How to delete recently opened files in Adobe Reader XI - How to delete recently opened files in Adobe Reader XI
Mar 04, 2024 am 11:13 AM
How to delete recently opened files in Adobe Reader XI - How to delete recently opened files in Adobe Reader XI
Mar 04, 2024 am 11:13 AM
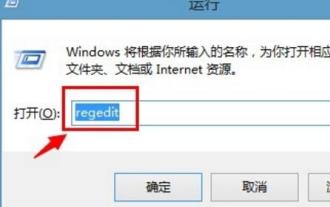
Recently, many friends have asked me how to delete recently opened files in Adobe Reader XI. Next, let us learn how to delete recently opened files in Adobe Reader XI. I hope it can help everyone. Step 1: First, use the "win+R" shortcut key to open the run, enter "regedit", and press Enter to open it, as shown in the picture. Step 2: After entering the new interface, click "HKEY_CURRENT_USERSoftwareAdobeAcrobatReader11.0AVGeneralcRecentFiles" on the left, select "c1", right-click and select the "Delete" option, as shown in the figure. Step 3: Then pop up
 How to set the edge of a picture to fade in Adobe PhotoShop CS6 - Tutorial on how to set the edge of a picture to fade in Adobe PhotoShop CS6
Mar 04, 2024 am 11:07 AM
How to set the edge of a picture to fade in Adobe PhotoShop CS6 - Tutorial on how to set the edge of a picture to fade in Adobe PhotoShop CS6
Mar 04, 2024 am 11:07 AM
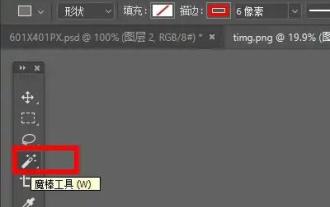
Many friends still don’t know how to set the edge of a picture to fade in Adobe PhotoShop CS6, so the editor below will explain the tutorial on how to set the edge of a picture to fade in Adobe PhotoShop CS6. If you need it, hurry up and take a look. I believe it will be helpful to everyone. oh. Step 1: First, we import the image we want to modify and select the magic wand tool on the left, as shown in the picture. Step 2: Then use the magic wand to select the "outline area of the image", as shown in the picture. Step 3: After selecting it, right-click it and select "Feather", as shown in the picture. Step 4: Then set the feather radius and save it (the radius here represents the size of the fade edge, the larger the setting), as shown in the picture. Step 5: You can find it after the setting is completed
 How to use Macromedia Flash 8 line tool - How to use Macromedia Flash 8 line tool
Mar 04, 2024 pm 05:40 PM
How to use Macromedia Flash 8 line tool - How to use Macromedia Flash 8 line tool
Mar 04, 2024 pm 05:40 PM
The article brought to you in this chapter is about the Macromedia Flash 8 software. Do you know how to use the Macromedia Flash 8 line tool? The following is the method of using the Macromedia Flash 8 line tool brought to you by the editor. Users who are interested in this, please come and take a look below. Bar. Click the flash workstage, then click the "Properties" key drop-down box to open the property control panel. Find the color selection box in the property control panel, click it to select the background color, enter "#99FF66" in the pop-up color selection box, and then type Press "ENTER" on the keyboard to apply color to find the tool selection bar, select the "Line" tool and find the color selection in the property control panel
