Create a form instance using tags in html
This article mainly introduces how to use html tags to create form examples, which is one of the knowledge points that must be mastered in HTML. Interested friends can refer to it, I hope it will be helpful to everyone.
Form label: form
表单标签的主要作用是:在HTML页面中创建一个表单,在用户填写完表单信息后,将数据提交给服务器。需要填写数据的标签必须要放在表单标签体里面。

常用的属性:
    action:请求路径,在该属性中确定表单数据提交的服务器地址。
    method:请求方式。常用的请求方式有:get,post。
        get(默认):1.get的请求的数据有限
                    2.提交的表单数据是追加在请求的路径上,如:regist.action?username=jack&password=1111。
追加是在请求地址的后面加上?连接。之后每一对数据使用&连接。
        post:1.提交的数据不在请求路径上追加,不显示在地址栏上。
            2.理论上,post请求的数据量是无限的。
Input field label: input
输入域标签用于获得用户输入的信息,type属性的值不同,获取的方式也就不一样。
    常用属性:
        type属性
            text:文本框,单行输入字段,用户可以在其中输入文本,
            password:密码框,该输入框中的输入字符将会以黑圆显示。
            radio:单选框,表示一组互斥选项按钮中的一个,当一个按钮被选中,之前的按钮就会变为非选中。
            checkbox:多选按钮。
            file:文件上传组件
            hidden:隐藏字段,数据会发送给服务器,但浏览器不会显示。
            reset:重置按钮,将表单恢复到默认值。
            submit:提交按钮,提交按钮会把表单数据发送到服务器。
    name属性:元素名,必须要提供name属性,表单数据才会提交到服务器中。服务器通过该值来获取数据。
    value属性:设置input标签的默认值,
    size属性:设置输入框的大小
    checked属性:单选框或复选框被选中。
    readonly:是否只读。
    disable:是否可用。
Drop-down list label: select
下拉列表标签,提供一些选项,来选中其中的一项或多项。需要配合子标签<option>来使用。
name属性:设置名称,必写项。
multiple属性:不写默认单选,取值为multiple表示多选。
size属性:多选时,可见的选项数目。

子标签</option><option>:下拉列表中的一个选项
    selected:选中当前的列表项。
    value:发送给服务器的选项值。</option>
Sample code:
<!DOCTYPE html>
<html>
<head>
    <meta charset="UTF-8">
    <title>表单标签</title>
</head>
<body>
    <!--要提交到服务器中的所有信息,必须要用form标签包裹起来-->
    <form>
        <!--文本输入项-->
        用户名:<input type="text" name="usernam"/><br />
        <!--密码项-->
        密  码:<input type="password" name="password" /><br />
        确认密码:<input type="password" name="password2" /><br />
        <!--单选按钮-->
        性别:<input type="radio" name="sex" />男
        <input type="radio" name="sex" />女<br />
        <!--多选按钮-->
        兴趣爱好:<input type="checkbox" name="hobby" />写博客
        <input type="checkbox" name="hobby" />写代码
        <input type="checkbox" name="hobby" />看源码<br />
        <!--文件选项-->
        文件:<input type="file" name="file" /><br />
        <!--下拉列表标签-->
        居住城市:<select name="city">
        <option>--请选择--</option>
        <option>北京</option>
        <option>上海</option>
        <option>广州</option>
        </select><br />
        <!--提交按钮-->
        <input type="submit" value="提交按钮" /><br />
        <!--普通按钮-->
        <input type="button" value="普通按钮" /><br />
        <!--重置按钮-->
        <input type="reset" value="重置" /><br />
    </form>
    </body>
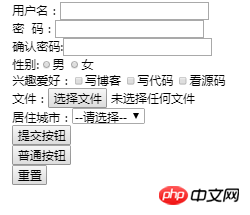
</html>The effect is as follows:

Related recommendations:
How to use in HTML The operation of html form submission
htmlThe event onreset triggered after the form is reset
Detailed explanation of the usage of html form option menu option and optgruop tag
The above is the detailed content of Create a form instance using tags in html. For more information, please follow other related articles on the PHP Chinese website!

Hot AI Tools

Undresser.AI Undress
AI-powered app for creating realistic nude photos

AI Clothes Remover
Online AI tool for removing clothes from photos.

Undress AI Tool
Undress images for free

Clothoff.io
AI clothes remover

Video Face Swap
Swap faces in any video effortlessly with our completely free AI face swap tool!

Hot Article

Hot Tools

Notepad++7.3.1
Easy-to-use and free code editor

SublimeText3 Chinese version
Chinese version, very easy to use

Zend Studio 13.0.1
Powerful PHP integrated development environment

Dreamweaver CS6
Visual web development tools

SublimeText3 Mac version
God-level code editing software (SublimeText3)

Hot Topics
 Table Border in HTML
Sep 04, 2024 pm 04:49 PM
Guide to Table Border in HTML. Here we discuss multiple ways for defining table-border with examples of the Table Border in HTML.
 Nested Table in HTML
Sep 04, 2024 pm 04:49 PM
This is a guide to Nested Table in HTML. Here we discuss how to create a table within the table along with the respective examples.
 HTML margin-left
Sep 04, 2024 pm 04:48 PM
Guide to HTML margin-left. Here we discuss a brief overview on HTML margin-left and its Examples along with its Code Implementation.
 HTML Table Layout
Sep 04, 2024 pm 04:54 PM
Guide to HTML Table Layout. Here we discuss the Values of HTML Table Layout along with the examples and outputs n detail.
 HTML Input Placeholder
Sep 04, 2024 pm 04:54 PM
Guide to HTML Input Placeholder. Here we discuss the Examples of HTML Input Placeholder along with the codes and outputs.
 HTML Ordered List
Sep 04, 2024 pm 04:43 PM
Guide to the HTML Ordered List. Here we also discuss introduction of HTML Ordered list and types along with their example respectively
 Moving Text in HTML
Sep 04, 2024 pm 04:45 PM
Guide to Moving Text in HTML. Here we discuss an introduction, how marquee tag work with syntax and examples to implement.
 HTML onclick Button
Sep 04, 2024 pm 04:49 PM
Guide to HTML onclick Button. Here we discuss their introduction, working, examples and onclick Event in various events respectively.


