Standardized Design Solutions - Markup Language and Style Handbook Web Standards Solutions The Markup and Style Handbook Part 1: Get Down With Markup Starting from Markup Syntax Chapter2 Evil form? Did you know that when did using tables become a sinful act? Indeed, the biggest myth about writing web pages based on web standards is "Don't use tables anymore, ever!" Listen Forms must be avoided like the plague, must be sealed and thrown into dusty cabinets, and preserved as antiques passed down from the early days of the Internet. Where does such disgust come from? Maybe in the beginning. Very simple, at least there is a good reason. Many people will confidently promote the benefits of abandoning the traditional layout of nested tables and fill-in-the-blank GIF images, and switching to the flexible and structured CSS layout. We may start to peel off the cocoon. Get rid of all the tables, and even start to stubbornly insist on expelling all the tables - regardless of the occasion. We will see the CSS layout method and all the benefits of doing so later in the book. But for now we still Let’s first look at how to use tables in the right context—that is, when labeling data lists. We’ll look at a few simple ways to make our data lists easier to use and more beautiful. That’s it Table There is absolutely no reason not to use the table tag when labeling list data. But wait, what is list data? Here are some examples:
calendar
spreadsheet
Chart
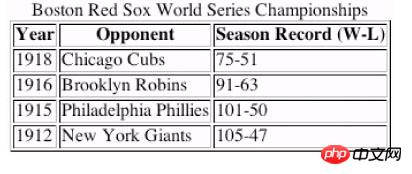
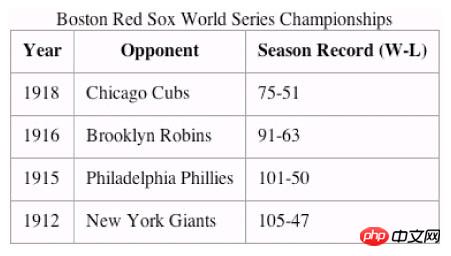
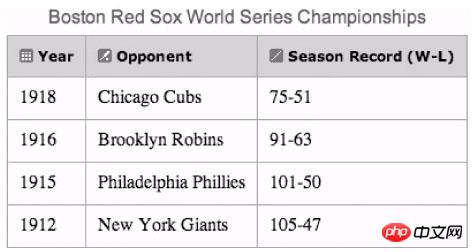
Time Schedule For these examples and many other cases, very complex and strict CSS effects must be used to make the data look like a table. Perhaps you can imagine what you get after using clever CSS floats and positioning all the items. The incompatible and contradictory results, not to mention that without CSS, accurately reading every piece of information would probably become an impossible task. In fact, we don’t have to be afraid of tables—we should use them for the purpose for which they were designed. Forms for everyone One of the reasons forms are reviled is because they have usability flaws if not used with care. For example: screen readers have trouble reading the content correctly, and Small screen devices are often disrupted by tables used for layout, but we have some simple ways to increase the usability of list data tables. At the same time, create a flexible structure for future styling with CSS. Let’s take a look at Figure 3- A simple example from 1, this is the league record of the American League: Figure 3-1: Typical data table example Perhaps this is very depressing for Red Sox fans Statistical data, but Figure 3-1 is a perfect example of list data. It has three table headers (year, opponent, season record (w-l)), followed by four years of data. Above the table is the table title, description The content of the table. The way to mark this data table is very intuitive. We may complete the work with code like this:
Boston Red Sox World Series Championships< ;/p>
Year
< td align="center">Opponent
Season Record (W-L)< ;/td>
1918
Chicago Cubs
1916
Brooklyn Robins
91-63
1915
Philadelphia Phillies
101-50
1912
New York Giants
105-47
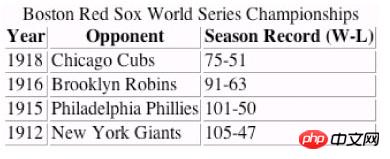
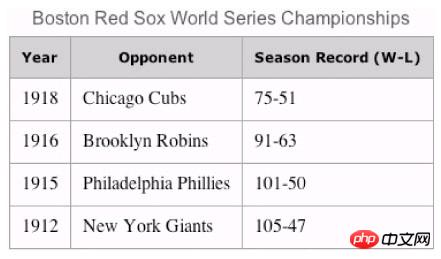
The results displayed in this way should be the same as the picture 3-1 is very similar, but we can add some improvements on this basis. First, we can use a more semantic
tag to store "Boston Red Sox World Series Championships". start tag, which is usually used to store the title of the table or the description of the table data. It seems that it makes it easier for users to see the theme of the table, and it can also help Someone who knows the content of the page in some other way. Let’s take out the paragraph at the beginning and add the correct
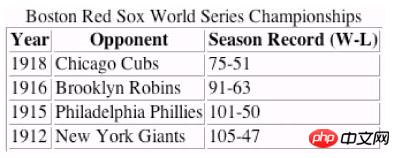
tag to mark the header cell has the same effect as in Figure 3-1. Let’s take a look at why this method is better: We don’t have to use additional display effect tags to highlight the header outside the data content.
According to the default settings, most visual browsers will display the content in the
tag in bold and centered effect, allowing users to easily distinguish the difference between the header and the table content.
Since it is relatively independent from the
tag, we can add a different style to the table header than the data content. We will continue to discuss other benefits of using the table header tag in the following chapters. .
#p#
The relationship between header and data We can use the headers attribute to associate the header with the data in the corresponding
so that screen readers can It is easier to organize the table content for people who need it. After using this attribute, the screen reader will be able to read the table content more logically, instead of rigidly reading from the left to the right of each column as usual. We continue to use the Red Sox record table as an example to demonstrate how to use it. First, we need to add a unique id to each
in the It is very simple to add an id to each header, just like this:
Boston Red Sox World Series Championships
Year
Opponent
Season Record (W-L)
< ;tr>
1918
Chicago Cubs
75-51
< ;/tr>
1915
Philadelphia Phillies
101-50
1912
New York Giants
105- 47
We choose a short and descriptive name for each header id, and then we give each data Add appropriate headers attributes to the cell so that the content matches the correct header id:
Boston Red Sox World Series Championships
Year
Opponent
Season Record (W-L)
< td headers="year">1918
Chicago Cubs
75-51
1916
Brooklyn Robins< ;/td>
91-63
1915
Philadelphia Phillies
101-50
1912
New York Giants
105-47
After establishing the correspondence between the table header and the content, the screen reader It is possible to read out each row of the table in this way: "Year: 1918, Opponent: Chicago Cubs, Season Record (W-L): 75-51". Compared with reading out the contents of each cell from left to right, This makes a lot more sense. Letting each
have a unique id has other benefits. We can use this identification basis to set special css rules, which will be discussed in the extension of the technique at the end of this chapter. This method.
#p#
Use the abbr attribute In the previous example, you may feel that the "Season Record (W-L)" in the header is too long to pronounce using a speech synthesizer. At this time, as long as we add the abbr attribute, we can shorten the pronunciation content while retaining the original text in the
cell for the visual browser.
Boston Red Sox World Series Championships
Year
Opponent
Season Record ( W-L)
1918
Chicago Cubs
75-51
1916
Brooklyn Robins
91-63
1915
Philadelphia Phillies
101-50
1912
< ;td>New York Giants
105-47
We added abbr="Record", the screen reader will read "Record" using the short version of the header. >Here I would also like to mention three table-related tags. They not only provide more precise semantics for the table structure, but also provide additional tags for css, so that you do not need to use < when styling table rows. tr>There are so many classes in tag design. Quote from a W3C description of these tags in the HTML4.01 specification (http://www.php.cn/):Quote:
Table rows can be divided into table headers, table footers and an unlimited number of table bodies using thead, tfoot and tbody tags. This classification method allows the browser to support the function of independently scrolling the table body. When printing long tables , the header and footer can also be repeated on every page containing table data. Therefore, using this classification method can also make it easier for browser users who support independent table bodies to read the table Content, especially long tables. and
must appear before so that browsers and other devices can load the content first and mark the table in this way of table row classification. It looks like this:
...table header content...
...table footer content...
...table data row...
...table data row ...
...table data row...
< ;/table>
You will find that the header and footer data are surrounded by and tags and placed before the table data rows. As I said before, these tags not only provide more information for the table Precise semantics, and can also provide style anchors for css, allowing you to set css rules for these specific contents without having to design so many classes for each
. For example, if we only want to give data Block (marked with
) sets a different background color from other blocks. Then we only need to write this piece of css to achieve the goal: tbody { background-color: gray ; } If there is no tbody tag, we need to add a class attribute to each
tag that we want to add a gray background. Meaningful marking methods can often be used later with css settings The work of setting styles becomes very easy. This is a good example.
#p#
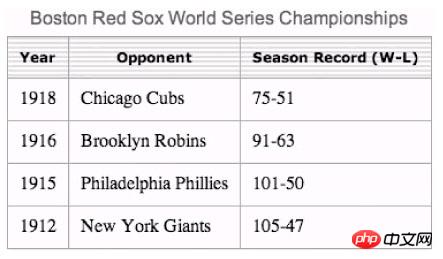
Are tables evil? I think if we use table tags according to their original purpose, then the answer is definitely "no!". Abuse Tables are rightly condemned for creating complex, nested layouts, but tables do give blocks of data the good structure they need. We can't spend the entire book describing everything needed to create the perfect table. techniques, so I’ll stop here and hopefully you’ve started to figure out how to create simple tables that are both simple and usable and can be easily modified with CSS. Speaking of styles, let’s modify the previous example using a few different CSS techniques. Extension of skills As in the previous chapter, we use flexible semantic structured markup as the basis, and then use CSS to add some styles to it First of all, let’s take a look Look at the simple border technique, create a single-line border on the example, and then we add a unique style to the table title and header Create a border Already have a 3D effect on the border default attribute Are you tired of it? Me too. Generally speaking, adding border="1" to the table tag will have a similar effect to Figure 3-1. Of course, you can also change the method. Here is a beautiful and neat way to use CSS The trick to borders. First, we add a one-pixel border to both sides (right and bottom) of each
cell: th, td { border- right: 1px solid #999; border-bottom: 1px solid #999; } Only adding borders on both sides is to create borders with the same width everywhere while making most of them pop. The key is that the browser can display it correctly. If I add a border on all sides, the top and left sides of the border will cause overlap when the cells are arranged. In a later example, I will give a way to use only one The border rule is a way to achieve the childlike effect. You will find that the entire table in Figure 3-2 is only missing the top and left borders. In order to complete the border, we add styles to the
element Same border-top and border-left properties , td { border-right: 1px solid #999; border-bottom: 1px solid #999; }
Figure 3-2: for th Table example with and td plus side lines on both sides
Figure 3-3 Table example after filling in the side lines
#p#
Remove the gap Now we have a complete table, but what about the spacing between the borders? Unfortunately, since most browsers The editor will set a little outer patch by default, so these annoying gaps will be exposed. What we can do is add the border-collapse attribute to the table element to remove these gaps and get the style we want.
After adding the collapse attribute to border-collapse, we can see The precise single-line border style is achieved, as shown in Figure 3-4
Figure 3-4: Table example after using the border-collapse attribute Does not support the version of IE for Mac
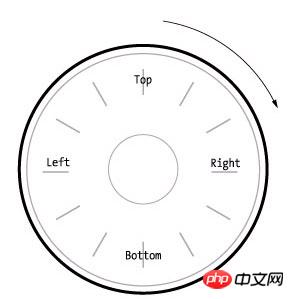
Except Internet Explorer for Mac, other browsers support abbreviating css like this: table { border-collapse: collapse; } th, td { border: 1px solid #999; } Which method to use is of course up to you, there are still some people who still use IE for Mac, and using this alternative method will cause them to see some duplication of edges, if you don't care about this thing, then use a simplified approach. Strictly speaking, this is just a display issue, and the table functionality is not affected at all. Since I can’t abandon the Mac fanatic (any web designer worth his salt should (like this), so in future examples, I will still use the version that can be displayed correctly in IE for Mac. Expand the space Now we have a perfect table in our hands, It looks a bit cramped though... Let's add a little inlining to the th, td rules at hand to give them room to breathe (Figure 3-5) table { border-top: 1px solid #999; border-left: 1px solid #999; border-collapse: collapse; } th, td { padding: 10px; border-right : 1px solid #999; border-bottom: 1px solid #999; } Figure 3-5: Table example with 10 pixel inner patch Did you know? If you use a single value to set the inner patch (such as 10px in the previous example), you need to add the same setting value to all four sides of the element. You can also follow the clockwise order (top, right, bottom, left ) specify the settings for each side separately. If you set the inner patch to 10px 5px 2px 10px, it will add a 10px inner patch to the top, a 5px inner patch to the right, and a 2px inner patch to the bottom. Patch, add an inner patch of 10px on the left side. Another shortcut: If the setting values for the top and bottom are the same, and the setting values for the left and right are also the same, you only need to set them once respectively. If you set If padding: 10px 5px is set, 10px inner patches will be added to the upper and lower parts, and 5px inner patches will be added to the left and right sides. Figure 3-6: Set the inner patches clockwise and Order of outer boundaries
#p#
Adjust the display effect of the meter header We can easily add a background color to the meter header and choose different fonts to make the meter header more obvious, because we The
tag is used instead of directly setting the content in bold in the line, so we can directly set the style for the header content without adding any other tags. We also add below the title In the previous point, we also use different fonts and colors (red, of course) to highlight the title content (Figure 3-7) table { border-top: 1px solid #999; border-left: 1px solid #999; } caption { font-family: Arial, sans-serif; color: #993333; padding-bottom: 6px; } th, td { padding: 10px; border-right: 1px solid #999; border-bottom: 1px solid #999; } th { font-family: Verdana, sans-serif; background: #ccc; } Figure 3-7: Styled title and < th> Add a background image to the table header Just now we added a gray background to the
element in the table, but we can actually go one step further and use a tiled background image To create beautiful effects in the grid, for example, we can use detailed gray stripes to simulate many window styles in Mac OS (Other drawing tools you are familiar with) Create a small picture. In this example, we are going to create an effect of alternating 2 pixels gray and 2 pixels white, so the picture only needs to be 4 pixels high. It doesn’t matter if the width is different, because it will Flatten it in
to create the striped effect we want. In order to save bandwidth, we only make it 1 pixel wide (Figure 3-8) Figure 3-8: 1X4 pixel stripe image (enlarged)
CSS Follow the code in the example just now. The only thing we need to modify is to change the background color to the path of the small image we just created, unless otherwise Specify, otherwise according to the default settings, the background image will automatically tile in each direction. table { border-top: 1px solid #999; border-left: 1px solid #999; }caption { font-family: Arial, sans-serif; color: #993333; padding-bottom: 6px; } th, td { padding: 10px; border-right: 1px solid #999; border-bottom: 1px solid #999; } th { font-family: Verdana, sans -serif; background: url(th_stripe.gif); }
Figure 3-9 is the table after applying this style. The header part has a stripe background. You need to experiment with other ones. Tile background images are also very convenient. You can try how to create the best-looking effect for headers or information. Enjoy the process of this experiment. Figure 3-9: Example of using a tiled background in the table header
#p#
Specify icons for IDs Remember at the beginning of this chapter when we added a unique ID to each
in the table? At that time we added these The id matches the headers attribute in the data list to help users of non-visual browsers understand the contents of the table. Now we can use the function of this id in another place, that is, specify a different value for each
Icon. The icon path will be completely recorded in the css file, allowing you to easily replace it during website reconstruction and update without having to modify the label part. Icon I use Photoshop made three unique icons, which are used on each table header in the example: Year, Opponent and Season Record (W-L). Figure 3-10 shows these three icons: picture 3-10 It is not difficult to add css to the three header icons CSS produced by hotoshop, because we have formulated a unique id for each
, so we can directly Use the background attribute to specify the correct icon. table { border-top: 1px solid #999; border-left: 1px solid #999; } caption { font-family: Arial, sans-serif; color: #993333; padding-bottom: 6px; } th, td { padding: 10px; border-right: 1px solid #999; border-bottom: 1px solid #999; } th { font-family: Verdana, sans-serif; } #year { padding-left: 26px; background: #ccc url(icon_year.gif) no-repeat 10px 50%; } #opponent { padding-left: 26px; background: #ccc url(icon_opp.gif) no-repeat 10px 50%; } #record { padding-left: 26px; background: #ccc url( icon_rec.gif) no-repeat 10px 50%; } You should notice that we use abbreviation to define the background style. We take out the background:#ccc rule from the definition of th, and Put it next to the icon name of each header. This will make our icon "sit" on the gray background we specified. We also leave enough space for the icon on the left side of each header content so that the text does not cover it. Go up, Figure 3-11 is the effect we want: Figure 3-11: The effect of formulating a unique icon for each
Using abbreviated syntax has obvious advantages, However, if we only define the image with the background attribute and do not define the background color, we should first cancel the background color previously defined with background in
. Combining rules and simplifying the content Another way of writing that can achieve the same function is to take out the rules that appear repeatedly in each table header (in this case, the background image, inner patch and position) and write them in
and define them once (because their settings are indeed the same in each
), and then only retain their different setting values (that is, the image path) within the #year, #opponent, #record definitions table { border-top: 1px solid #999; border-left: 1px solid #999; } caption { font-family: Arial, sans-serif; color: #993333; padding-bottom: 6px; } th, td { padding: 10px; border-right: 1px solid #999; border-bottom: 1px solid #999; } th { font-family: Verdana, sans-serif; padding-left: 26px; background-color: #ccc; background-repeat: no-repeat; background-position: 10px 50%; } #year { background-image: url(icon_year.gif); } #opponent { background-image: url(icon_opp.gif); } #record { background: url(icon_rec.gif); } Isn’t this a little more concise? By integrating the same rules, we can save the time and energy of repeatedly defining and modifying each time. In this example, it seems that there are only six, half a dozen, but for larger For style sheets, the savings are considerable. Summary In this chapter, we not only discovered that tables are not evil, but also after understanding the tables in depth, we found that they It is very suitable for labeling table data, and is still easy to use We also found that by adding some styles, we can control the display of list data, making them very attractive. Don't worry about using tables anymore. Feeling scared.
Statement of this Website
The content of this article is voluntarily contributed by netizens, and the copyright belongs to the original author. This site does not assume corresponding legal responsibility. If you find any content suspected of plagiarism or infringement, please contact admin@php.cn
1. Create a new PPT file and name it [PPT Tips] as an example. 2. Double-click [PPT Tips] to open the PPT file. 3. Insert a table with two rows and two columns as an example. 4. Double-click on the border of the table, and the [Design] option will appear on the upper toolbar. 5. Click the [Shading] option and click [Picture]. 6. Click [Picture] to pop up the fill options dialog box with the picture as the background. 7. Find the tray you want to insert in the directory and click OK to insert the picture. 8. Right-click on the table box to bring up the settings dialog box. 9. Click [Format Cells] and check [Tile images as shading]. 10. Set [Center], [Mirror] and other functions you need, and click OK. Note: The default is for pictures to be filled in the table
Being able to skillfully make forms is not only a necessary skill for accounting, human resources, and finance. For many sales staff, learning to make forms is also very important. Because the data related to sales is very large and complex, and it cannot be simply recorded in a document to explain the problem. In order to enable more sales staff to be proficient in using Excel to make tables, the editor will introduce the table making issues about sales forecasting. Friends in need should not miss it! 1. Open [Sales Forecast and Target Setting], xlsm, to analyze the data stored in each table. 2. Create a new [Blank Worksheet], select [Cell], and enter [Label Information]. [Drag] downward and [Fill] the month. Enter [Other] data and click [
1. Open the worksheet and find the [Start]-[Conditional Formatting] button. 2. Click Column Selection and select the column to which conditional formatting will be added. 3. Click the [Conditional Formatting] button to bring up the option menu. 4. Select [Highlight conditional rules]-[Between]. 5. Fill in the rules: 20, 24, dark green text with dark fill color. 6. After confirmation, the data in the selected column will be colored with corresponding numbers, text, and cell boxes according to the settings. 7. Conditional rules without conflicts can be added repeatedly, but for conflicting rules WPS will replace the previously established conditional rules with the last added rule. 8. Repeatedly add the cell columns after [Between] rules 20-24 and [Less than] 20. 9. If you need to change the rules, you can just clear the rules and then reset the rules.
It's no secret that the iPhone is one of the most user-friendly electronic gadgets, and one of the reasons why is that it can be easily personalized to your liking. In Personalization, you can change the language to a different language than the one you selected when setting up your iPhone. If you're familiar with multiple languages, or your iPhone's language setting is wrong, you can change it as we explain below. How to Change the Language of iPhone [3 Methods] iOS allows users to freely switch the preferred language on iPhone to adapt to different needs. You can change the language of interaction with Siri to facilitate communication with the voice assistant. At the same time, when using the local keyboard, you can easily switch between multiple languages to improve input efficiency.
How to mark minesweeper? First, we need to familiarize ourselves with the marking method in Minesweeper. Normally, there are two common marking methods in Minesweeper games: flag marking and question mark marking. The flag mark is used to indicate that there are mines in the block and is a deterministic mark; while the question mark mark indicates that there may be mines in the block, but it is not deterministic. These two marking methods play an important role in the game, helping players to infer which blocks may contain mines, so as to effectively proceed to the next step. Proficient use of these marking methods can improve the player's success rate in the minesweeper game and reduce the risk of stepping on mines. Therefore, when playing the minesweeper game, if the player has mastered the flag mark and question mark mark, when the player is not sure whether there is a mine in a certain square, he can use the question mark mark to mark it.
There are many functions above, especially for maps that can mark multiple places. When we know some places, we will definitely use some punctuation functions, so that we can bring you a variety of different aspects. Some of the functions you mark will produce distance differences, that is, you can know how far away they are. Of course, some names and detailed information of the above places will also be displayed. However, many netizens may not be familiar with some of the above. The content information is not very clear, so in order to allow everyone to make better choices in various aspects, today the editor will bring you some choices in various aspects, so friends who are interested in ideas, If you are also interested, come and give it a try. Standard
Sometimes, we often encounter counting problems in Word tables. Generally, when encountering such problems, most students will copy the Word table to Excel for calculation; some students will silently pick up the calculator. Calculate. Is there a quick way to calculate it? Of course there is, in fact the sum can also be calculated in Word. So, do you know how to do it? Today, let’s take a look together! Without further ado, friends in need should quickly collect it! Step details: 1. First, we open the Word software on the computer and open the document that needs to be processed. (As shown in the picture) 2. Next, we position the cursor on the cell where the summed value is located (as shown in the picture); then, we click [Menu Bar
Sometimes we just install the computer system and find that the system is in English. In this case, we need to change the computer language to Chinese. So how to change the computer language to Chinese in the win10 system? Now Give you specific operation methods. How to change the computer language in win10 to Chinese 1. Turn on the computer and click the start button in the lower left corner. 2. Click the settings option on the left. 3. Select "Time and Language" on the page that opens. 4. After opening, click "Language" on the left. 5. Here you can set the computer language you want.